
上传文件
一、send_keys实现上传
定位上传按钮,通 send_keys 添加本地文件路径就可以了。绝对路径和相对路径都可以,关键是上传的文件存在。
upload_file.html
 1 <html>
 2 <head>
 3 <meta http-equiv="content-type" content="text/html;charset=utf-8" />
 4 <title>upload_file</title>
 5 <script type="text/javascript" async=""
 6 src="http://ajax.googleapis.com/ajax/libs/jquery/1.9.1/jquery.min.js"></script>
 7 <link href="http://netdna.bootstrapcdn.com/twitter-bootstrap/2.3.2/css/bootstrap-combined.min.css"
 8 rel="stylesheet" />
 9 <script type="text/javascript">
10 </script>
11 </head>
12 <body>
13     <div class="row-fluid">
14     <div class="span6 well">
15     <h3>upload_file</h3>
16     <input type="file" name="file" />
17     </div>
18     </div>
19 </body>
20 <script src="http://netdna.bootstrapcdn.com/twitter-bootstrap/2.3.2/js/bootstrap.min.js"></script>
21 </html>
通过浏览器打开,得到下列页面

脚本实现上传
 1 #coding=utf-8
 2 from selenium import webdriver
 3 import time
 4 import os
 5
 6 driver = webdriver.Firefox()
 7 file_path = 'file:///'+os.path.abspath('upload_file.html')
 8 driver.get(file_path)
 9
10 driver.find_element_by_name("file").send_keys("D:\\demo\maizi\geckodriver.log")
11 time.sleep(2)
12
13 driver.quit()
二、AutoIt实现上传
1、首先打开AutoIt Windows Info 工具,鼠标点击Finder Tool,鼠标将变成一个小风扇形状的图标,按住鼠标左键拖动到需要识别的控件上。
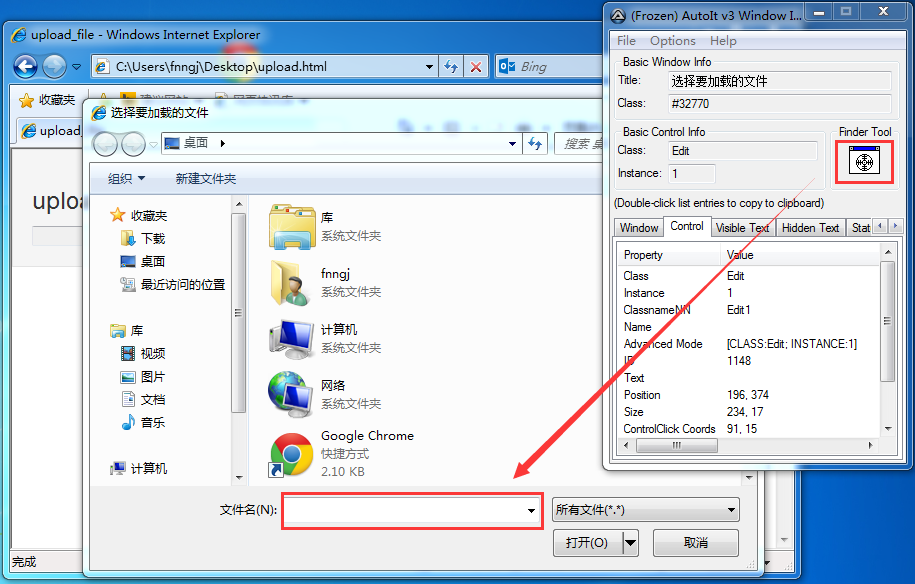
图4.14 AutoIt Windows Info识别“文件名”输入框控件
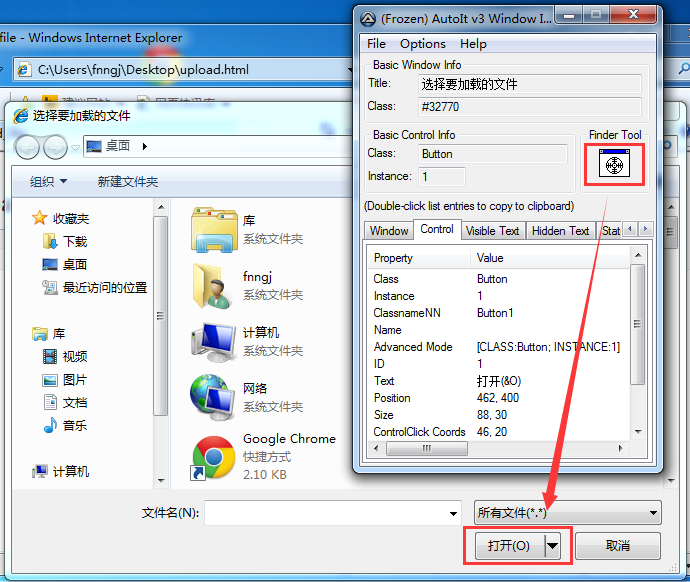
图4.15 AutoIt Windows Info识别“打开”按钮控件
如图4.14、4.15,通过AutoIt Windows Info 获得以下信息。
窗口的title为“选择要加载的文件”,标题的Class为“#32770”。
文件名输入框的class 为“Edit”,Instance为“1” ,所以ClassnameNN为“Edit1”。
打开按钮的class 为“Button”,Instance为“1” ,所以ClassnameNN为“Button1”。
2、根据AutoIt Windows Info 所识别到的控件信息打开SciTE Script Editor编辑器,编写脚本。

;ControlFocus("title","text",controlID) Edit1=Edit instance 1
ControlFocus("文件上传", "","Edit1")


; Wait 10 seconds for the Upload window to appear
  WinWait("[CLASS:#32770]","",10)


; Set the File name text on the Edit field

  ControlSetText("文件上传", "", "Edit1", "F:\python\checkbox.html")

  Sleep(2000)

; Click on the Open button

  ControlClick("文件上传", "","Button1");
- ControlFocus()方法用于识别Window窗口。
- WinWait()设置10秒钟用于等待窗口的显示,其用法与WebDriver 所提供的implicitly_wait()类似。
- ControlSetText()用于向“文件名”输入框内输入本地文件的路径。
- Sleep()方法与Python中time模块提供的Sleep()方法用法一样,不过它是以毫秒为单位,Sleep(2000)表示固定休眠2000毫秒。
- ControlClick()用于点击上传窗口中的“打开”按钮。
AutoIt的脚本已经写好了,可以通过菜单栏“Tools”-->“Go” (或按键盘F5)来运行一个脚本吧!注意在运行时上传窗口当前处于打开状态。
3、脚本运行正常,将其保存为upfile.au3,这里保存的脚本可以通过Run Script 工具将其打开运行,但我们的目的是希望这个脚本被Python程序调用,那么就需要将其生成exe程序。打开Compile Script to.exe工具,将其生成为exe可执行文件。如图4.16,
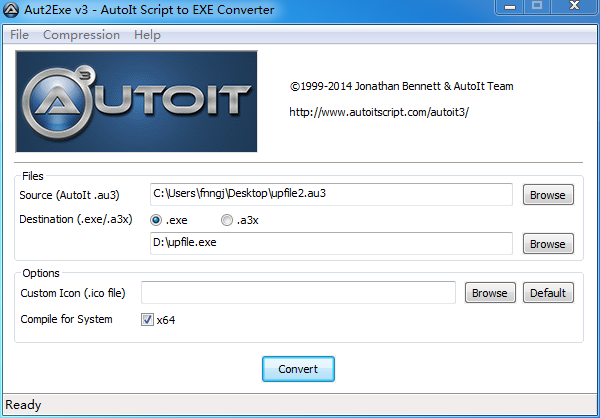
图4.16 Compile Script to.exe生成exe程序
点击“Browse”选择upfile.au3文件,点击“Convert”按钮将其生成为upfile.exe程序。
4、下面就是通过自动化测试脚本调用upfile.exe程序实现上传了。
#coding=utf-8
from selenium import webdriver
import time
import os

driver = webdriver.Firefox()
#打开上传功能界面
file_path = 'file:///'+os.path.abspath("upload_file.html")
driver.get(file_path)
#点击打开上传窗口
driver.find_element_by_name("file").click()
#调用exe上传程序
os.system("upfile.exe")


driver.quit()
通过Python 的os模块的system()方法可以调用exe程序并执行。
了解了上传的实现过程,那么下载也是一样的。

 浙公网安备 33010602011771号