OSPFv3与OSPF的配置
1、拓扑图如下(个人的学号后三位是047)
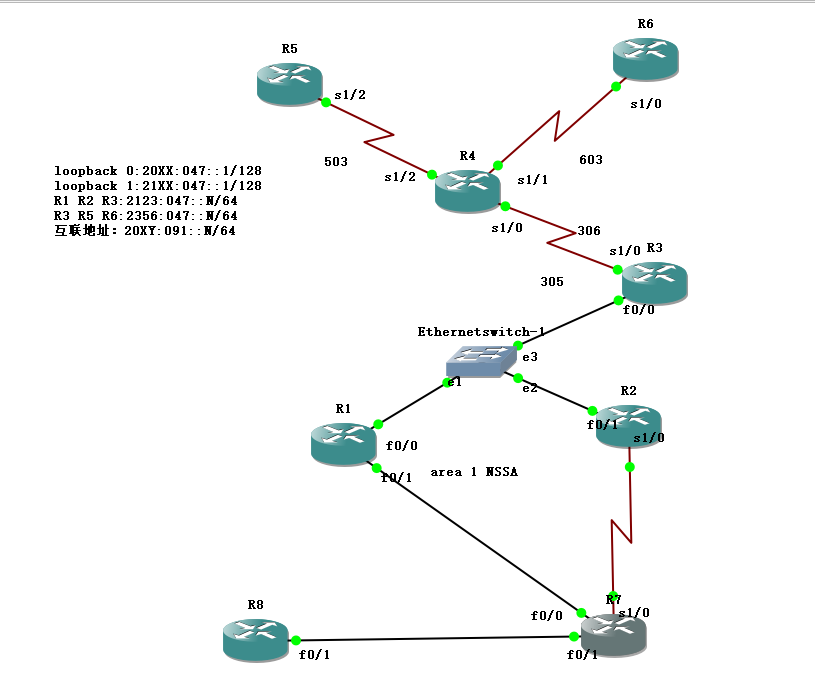
2、IPV6和IPV4的地址规划
|
设备名称 |
接口 |
地址 |
|
R1 |
Loopback 0 |
2011:047::1/128 |
|
Loopback 1 |
2111:047::1/128 |
|
|
FastEthernet 0/0 |
2123:047::1/64 |
|
|
192.47.123.1/24(ipv4) |
||
|
FastEthernet 0/1 |
2019:047::1/64 |
|
|
192.47.17.1/24(ipv4) |
||
|
R2 |
Loopback 0 |
2022:047::1/128 |
|
FastEthernet 1/0 |
2123:047::2/64 |
|
|
192.47.123.2/24(ipv4) |
||
|
Serial 1/0 |
2048:047::2/64 |
|
|
192.47.27.2/24(ipv4) |
||
|
R3 |
Loopback 0 |
2033:047::1/128 |
|
Serial 0/0.1 |
2356:047::3/64 |
|
|
192.47.4.3/24(ipv4) |
||
|
FastEthernet 0/0 |
2123:047::3/64 |
|
|
2188:047::3/64 |
||
|
192.47.123.3/24(ipv4) |
||
|
R5 |
Loopback 0 |
2055:047::1/128 |
|
Serial 1/2.1 |
2356:047::5/64 |
|
|
192.47.4.5/24(ipv4) |
||
|
R6 |
Loopback 0 |
2066:047::1/128 |
|
Serial 1/0.1 |
2356:047::6/64 |
|
|
192.47.4.6/24(ipv4) |
||
|
R7 |
Loopback 0 |
2077:047::1/128 |
|
Serial 1/0 |
2048:047::7/64 |
|
|
192.47.27.7/24(ipv4) |
||
|
FastEthernet 0/1 |
2027:047::7/64 |
|
|
192.47.78.7/24(ipv4) |
||
|
FastEthernet 0/0 |
2019:047::7/64 |
|
|
192.47.17.7/24(ipv4) |
||
|
R8 |
Loopback 0 |
2088:047::1/128 |
|
FastEthernet 0/1 |
2027:047::8/64 |
|
|
192.47.78.8/24(ipv4) |
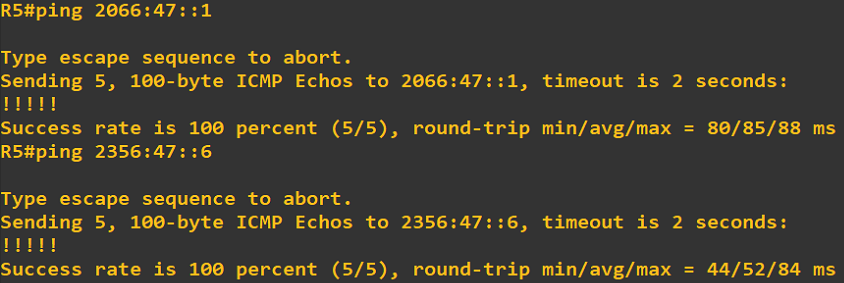
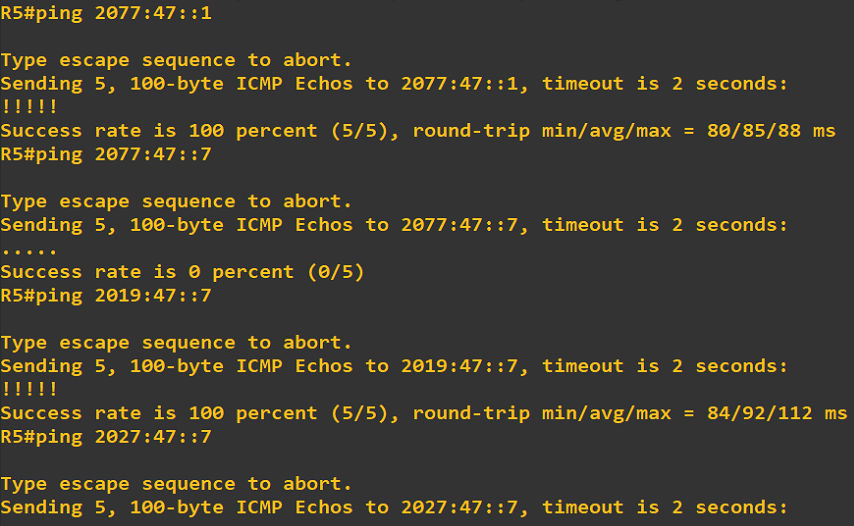
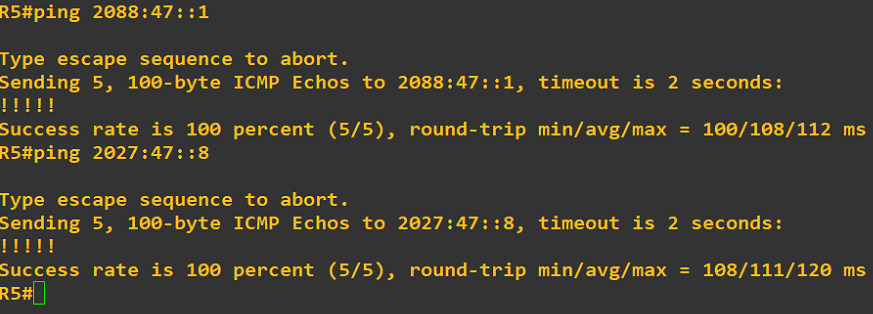
2、连通性测试 使用R5 ping所有路由器
IPV4:
R5 ping R3、R6(帧中继)

R5 ping R1

R5 ping R2

R5 ping R7

R5 ping R8

IPV6:
R5 ping R1
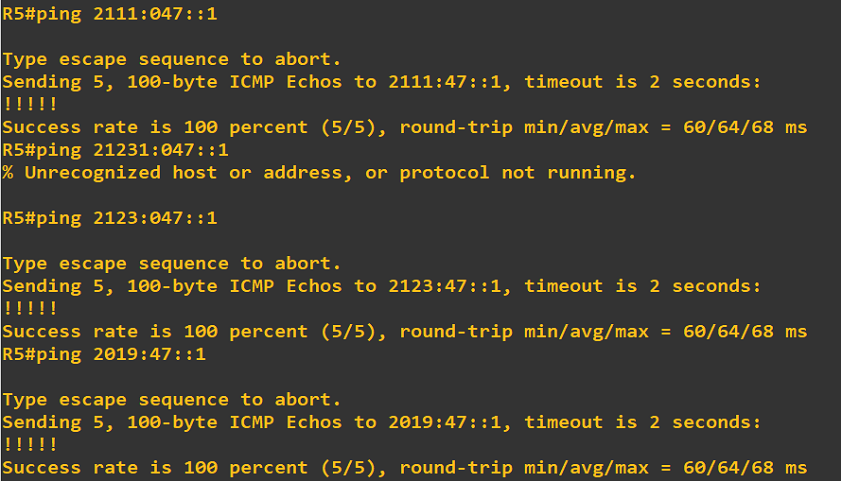
R5 ping R2
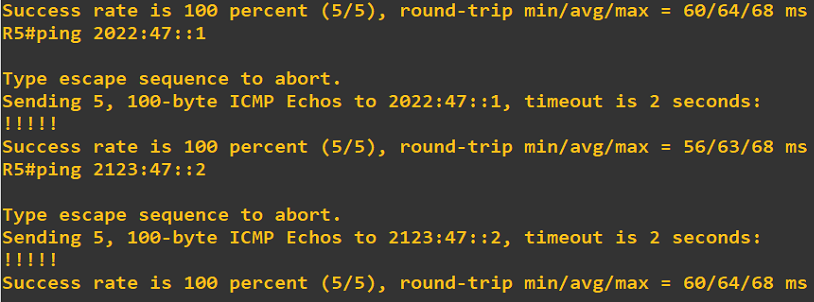

R5 ping R3
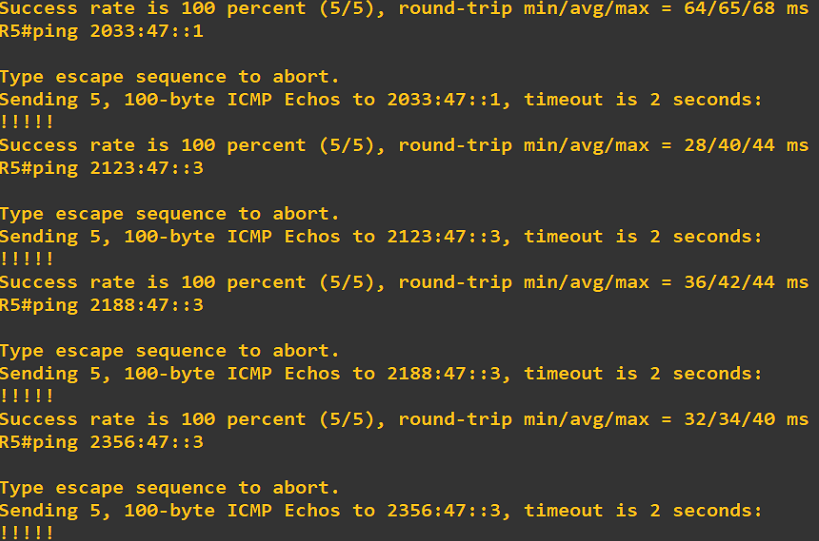
R5 ping R6
R5 ping R7
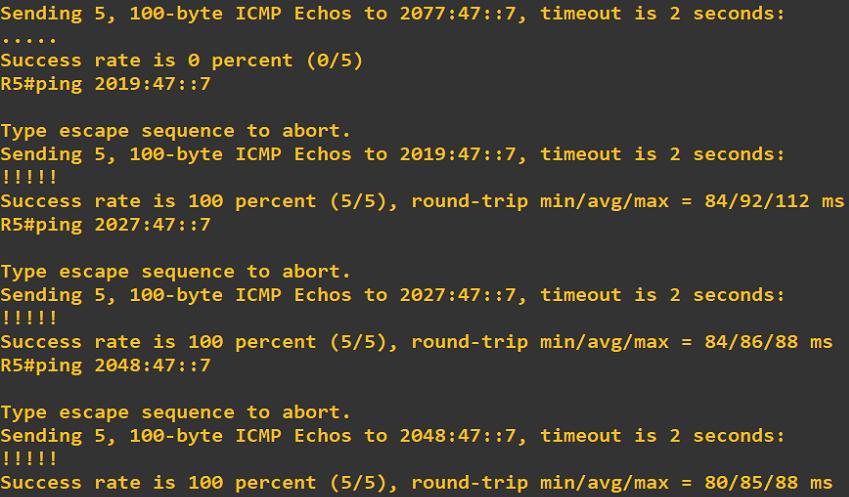
R5 ping R8
4、
ipv4帧中继配置如下
R5的ipv4配置
R5(config)#int s1/2.1 multipoint
R5(config-subif)#frame-relay map ip 192.47.4.3 503 broadcast
R5(config-subif)#frame-relay map ip 192.47.4.6 503 broadcast
R5(config-subif)#frame-relay map ip 192.47.4.5 503 broadcast
R6的ipv4配置
R6(config)#int s1/0.1 multipoint
R6(config-subif)#frame-relay map ip 192.47.4.3 603 broadcast
R6(config-subif)#frame-relay map ip 192.47.4.5 603 broadcast
R6(config-subif)#frame-relay map ip 192.47.4.6 603 broadcast
R3的ipv4配置
R3(config)#int s1/0.1 multipoint
R3(config-subif)#frame-relay map ip 192.47.4.6 306 broadcast
R3(config-subif)#frame-relay map ip 192.47.4.5 305 broadcast
R3(config-subif)#frame-relay map ip 192.47.4.3 305 broadcast
R4的ipv4配置已经在ipv6的配置中配完,故无需再配置
ipv6帧中继的配置
将R4当成帧中继交换机
R4的配置如下:
R4(config)#frame-relay switching
R4(config)#int s1/0
R4(config-if)#no shu
R4(config-if)#clock rate 128000
R4(config-if)#encapsulation frame-relay
R4(config-if)#frame-relay lmi-type cisco
R4(config-if)#frame-relay intf-type dce
R4(config-if)#frame-relay route 305 interface s1/2 503
R4(config-if)#frame-relay route 306 interface s1/1 603
R4(config)#int s1/2
R4(config-if)#no shu
R4(config-if)#clock rate 128000
R4(config-if)#encapsulation frame-relay
R4(config-if)#frame-relay lmi-type cisco
R4(config-if)#frame-relay intf-type dce
R4(config-if)#frame-relay route 503 interface s1/0 305
R4(config)#int s1/1
R4(config-if)#encapsulation frame-relay
R4(config-if)#no shu
R4(config-if)#clock rate 128000
R4(config-if)#encapsulation frame-relay
R4(config-if)#frame-relay lmi-type cisco
R4(config-if)#frame-relay intf-type dce
R4(config-if)#frame-relay route 603 interface s1/0 306
R5的配置内容如下:
R5(config)#ipv6 unicast-routing
R5(config)#int s1/2
R5(config-if)#encapsulation frame-relay
R5(config-if)#no shu
R5(config)#int s1/2.1 multipoint
R5(config-subif)#no shu
R5(config-subif)#frame-relay map ipv6 2356:047::3 503 broadcast
R5(config-subif)#frame-relay map ipv6 2356:047::6 503 broadcast
R5(config-subif)#frame-relay map ipv6 FE80::CE03:25FF:FE3C:0 503 broadcast
R5(config-subif)#frame-relay map ipv6 FE80::CE06:2CFF:FE2C:0 503 broadcast
R6的配置如下:
R6(config)#int s1/0
R6(config-if)#encap frame-relay
R6(config-if)#no shu
R6(config)#int s1/0.1 multipoint
R6(config-subif)#no shu
R6(config-subif)#frame-relay map ipv6 2356:047::3 603 broadcast
R6(config-subif)#frame-relay map ipv6 2356:047::5 603 broadcast
R6(config-subif)#frame-relay map ipv6 2356:047::6 603 broadcast
R6(config-subif)#frame-relay map ipv6 FE80::CE05:2FF:FEA0:0 603 broadcast
R6(config-subif)#frame-relay map ipv6 FE80::CE03:25FF:FE3C:0 603 broadcast
R6(config-subif)#exit
至此ipv6和ipv4的帧中继配置完成
5、OSPF和NSSA的配置
R1的配置如下:
R1(config)#ipv6 router ospf 1
R1(config-rtr)#router-id
R1(config-rtr)#router-id 1.1.1.1
R1(config-rtr)#area 1 nssa 将R1的OSPF 1中的area 1划为NSSA
R1(config)#int f0/0
R1(config-if)#ipv6 ospf 1 area 0
R1(config)#int f0/1
R1(config-if)#ipv6 ospf 1 area 1
R2的配置如下:
R2(config)#ipv6 router ospf 1
R2(config-rtr)#router-id
R2(config-rtr)#router-id 2.2.2.2
R2(config-rtr)#area 1 nssa 将R1的OSPF 1中的area 1划为NSSA
R2(config)#int f0/1
R2(config-if)#ipv6 ospf 1 area 0
R2(config)#int s1/0
R2(config-if)#ipv6 ospf 1 area 1
R3、R5、R6、R7同理
因为R3、R5、R7是有帧中继的,要将帧中继配置进OSPF,要手动配置邻居local地址
R3(config)#int s0/0.1 mul
R3(config-subif)#ipv6 ospf neighbor FE80::CE06:2FF:FE98:0
R3(config-subif)#ipv6 ospf neighbor FE80::CE05:2FF:FEA0:0
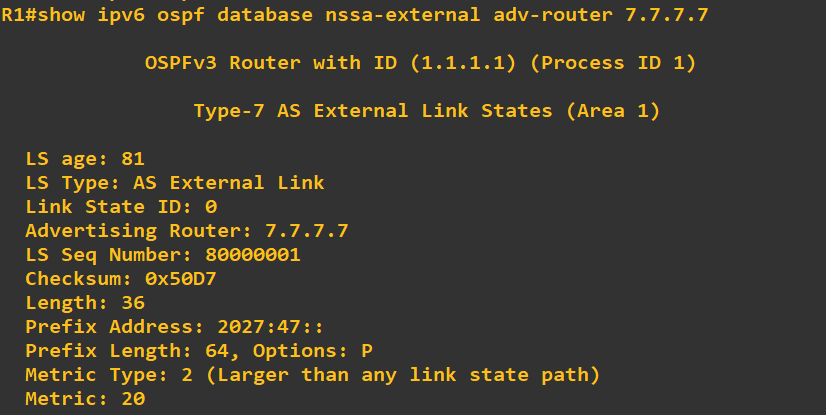
在 R1上查看 R7生成的这类 LSA:
ipv4用的OSPF2中的area 1划为NSSA
R1(config)router ospf 2
R1(config-rtr)#router-id
R1(config-rtr)#router-id 1.1.1.11
R1(config-rtr)#network 192.47.17.0 0.0.0.255 area1 宣告网段
R1(config-rtr)#network 192.47.123.0 0.0.0.255 area1 宣告网段
R1(config-rtr)#area 1 nssa
R2、R3、R5、R6、R7同理
6、路由汇总
R1的配置如下:
R1(config)#int f0/0
R1(config-if)#ipv6 ospf 1 area 0
R1(config)#int f0/1
R1(config-if)#ipv6 ospf 1 area 1
R2、R3、R5、R6、R7同理
外部路由汇总
R1(config)#ipv6 router ospf 1
R1(config-rtr)#summary-prefix 2111:047::0/64
R2、R3、R5、R6、R7同理
区域间路由汇总
R3(config)#ipv6 router ospf 1
R3(config-rtr)#area 0 range 2011:047::0/64
R1、R2、R5、R6、R7同理
7、
ipv4的RIP的配置
R8的配置如下:
R8(config)#router rip
R8(config-router)#network 192.47.78.0
R8(config-router)#no auto-summary
R7的配置如下:
R7(config)#router rip
R7(config-router)#network 192.47.78.0
R7(config-router)#no auto-summary
R7(config-router)#redistribute ospf 2 metric 3
R7(config-router)#redistribute connected
查看ipv4的R8 rip路由表

ipv6的RIPng和RIP的配置
R8的配置如下:
R8(config)#ipv6 router rip yeslab
R8(config)#int f0/1
R8(config-if)#ipv6 rip yeslab enable
R8(config)#int loopback 0
R8(config-if)#ipv6 rip yeslab enable
R7的配置如下:
R7(config)#ipv6 router ospf 1
R7(config)#int f0/1
R7(config-if)#ipv6 rip yeslab enable
R7(config-rtr)#redistribute rip yeslab metric 1
R7(config)#ipv6 router rip yeslab
R7(config-rtr)#redistribute ospf 1 metric 8
R7(config-rtr)#redistribute connected
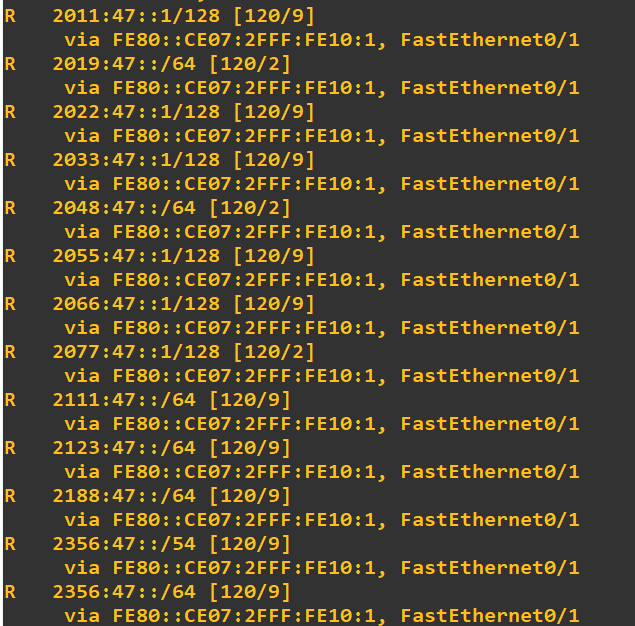
查看R8 rip路由表
8、路由注入
R7(config-router)#area 1 nssa default-information-originate
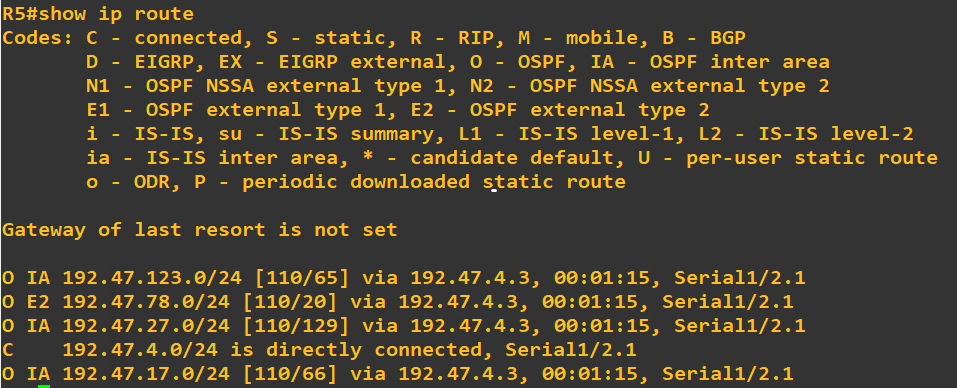
通过路由汇总、RIPng的配置和路由注入后,查看R3的OSPF邻居和R5路由表、R3的OSPF 邻居


R5的ipv4路由表
R5的ipv6路由表
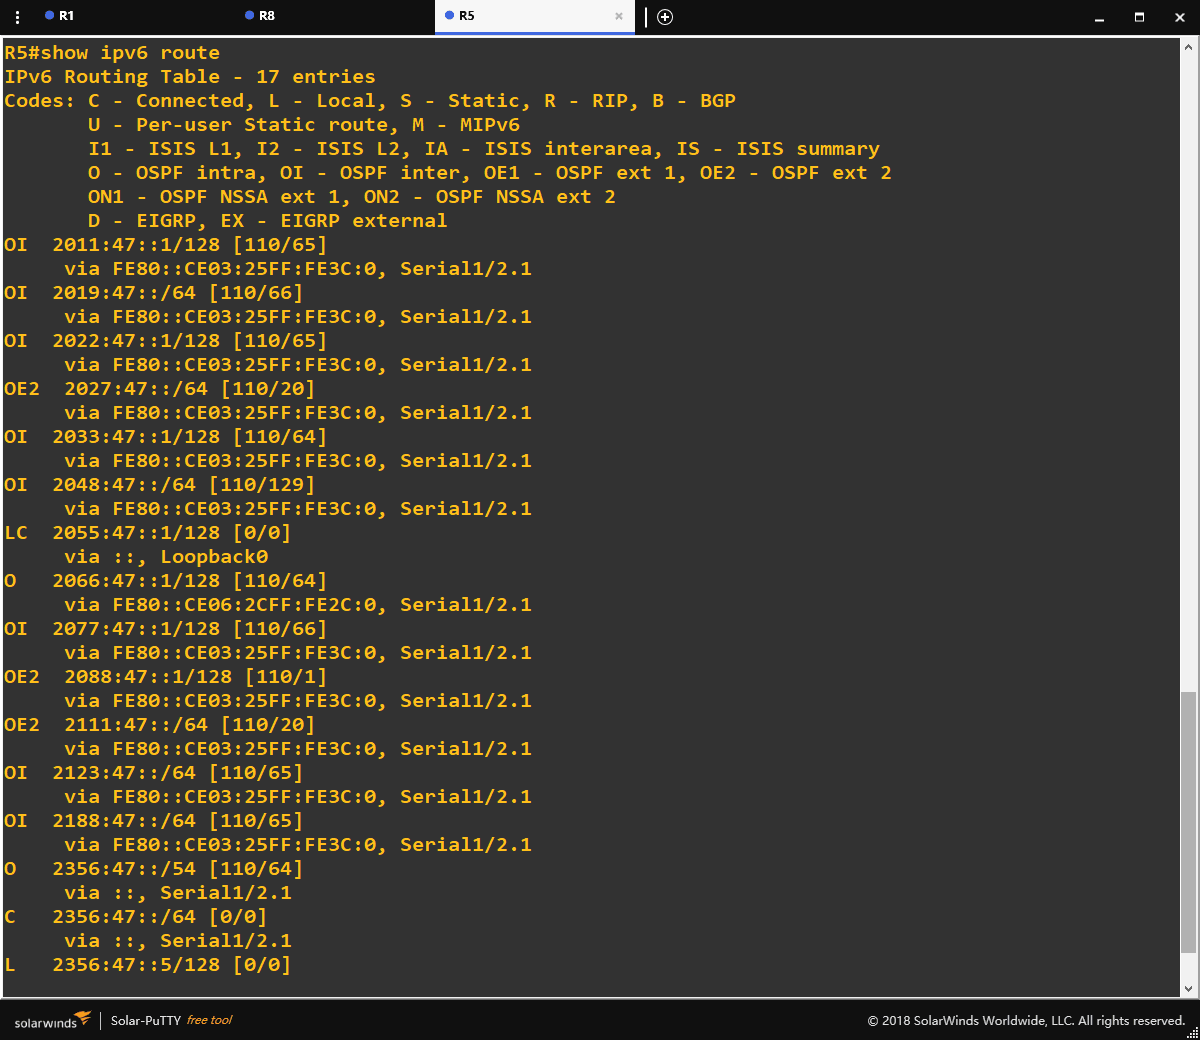
可以发现R5学习到了R1、R2、R3、R6、R7、R8 的ipv6和ipv4地址
实现了全网互通。
9、总结
本次ospf和ospfv3的实验我们在课堂上已经做过不少类似的配置了,起初不清楚怎么配,先配了ipv6的地址,后来发现不好理解,便先用ipv4做了一遍,逐渐找到了感觉。而且这一次作业第一次遇到帧中继配置,之前没有太多的了解导致遇到了困难,经过上网查阅资料,与小组成员讨论,最终完成了实验。基本考察了我们上半学期的学习情况和之前大二ipv4的学习,对rip动态路由,ospf动态路由,帧中继有更深层次的理解。


