
Use Rsync Backup Service on Redhat
一、Use Rsync Backup Service on Redhat
1 地址
二、Rsync 概述
rsync英文称为 remote synchronizetion,rsync具有可使本地和远程两台主机之间的数据快速复制同步镜像、远程备份的功能,功能类似于ssh带的scp命令,优于scp命令的功能,scp每次都是全量拷贝,而rsync可以增量拷贝。
1 rsync 常用的传输工具,多台服务器之间传输数据,具备全量同步和增量同步
- 备份服务:rsync + 定时任务 实现定时备份
- 默认端口号:873
- rsync 运行模式:c/s [clent/server] rsync守护进程模式
假设客户端上有xyz1,xyz2,xyz3 文件,服务端上有xyz1文件,现在将客户端上的数据备份 之服务端
- 完全备份:将客户端所有的数据内容xyz1,xyz2,xyz3 全部备份之服务端(效率低下,占用空间)
- 增量备份:将客户端的xyz2,xyz3 增量备份之服务端(提高备份效率,节省空间,适合异地备份)
2 rsync 的传输方式
- push 推:客户端将数据从本地推送至服务端
- pull 拉:客户端将数据从服务端拉取到本地
3 rsync 传输模式
- 本地方式(类似于cp,不支持推送和拉取,只是单纯的复制)
- 远程方式(类似于scp,又不同于scp),scp只支持全量备份,rsync支持增量备份和差异备份
- 守护进程方式(客户端和服务端)
4 下载 & 安装
## 检查是否安装
rpm -qa |grep rsync
## 查找rsync包
dnf search rsync
## dnf安装
dnf install -y rsync
5 本地模式
## /tmp/ 表示目录及目录下面的内容
mkdir /opt/logs
rsync -a /tmp/ /opt/logs && ll /opt/logs
rm -rf /opt/logs/*

## /tmp 目录下面的内容
rsync -a /tmp /opt/logs && ll /opt/logs
rm -rf /opt/logs
6 环境准备
| 主机 | 外网 | 内网 |
| base(服务端) | 192.168.18.11 | 10.0.1.11 |
| web01(客户端) | 192.168.18.71 | 10.0.1.71 |
7 免密码准备
###
ssh-keygen
ssh-copy-id -i  /root/.ssh/id_rsa.pub  10.0.1.71
8 远程模式(ssh隧道模式)
### push 推
[root@base ~]# echo " iyuyi.xyz@aliyun.com " > /tmp/tom.txt
[root@base ~]# rsync -a /tmp/tom.txt 10.0.1.71:/tmp/
[root@base ~]# ssh 10.0.1.71 cat /tmp/tom.txt
 iyuyi.xyz@aliyun.com

### pull 拉
[root@base ~]# ssh 10.0.1.71 'echo " huaxiayuyi@aliyun.com " > /tmp/email.txt'
[root@base ~]# rsync -av 10.0.1.71:/tmp/email.txt /tmp/
receiving incremental file list
email.txt
sent 43 bytes  received 119 bytes  324.00 bytes/sec
total size is 24  speedup is 0.15
[root@base ~]# cat /tmp/email.txt
 huaxiayuyi@aliyun.com

###
[root@base ~]# cat /etc/redhat-release
Red Hat Enterprise Linux release 8.4 (Ootpa)

###
rm -rf /tmp/tom.txt /tmp/email.txt
ssh 10.0.1.71 rm -rf /tmp/tom.txt /tmp/email.txt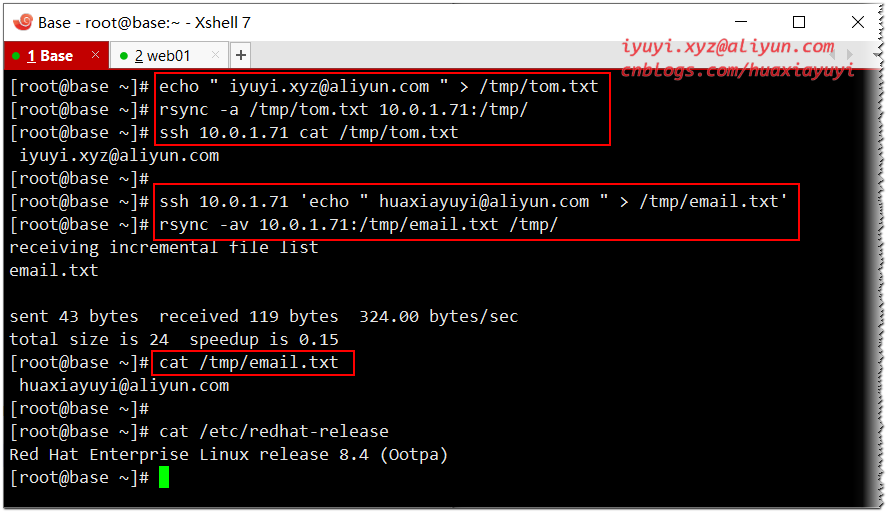
三、Rsync 配置文件
1 常用配置参数说明
[root@backup01 ~]# ll /etc/rsyncd.conf
-rw-r--r--. 1 root root 458 Aug 26 08:00 /etc/rsyncd.conf

## 启动服务的用户id和用户的组id
uid = rsync
gid = rsync
## 服务默认监听端口
port = 873
## 无需使用root用户启动,解决故障
fake super = yes
## 安全机制选项,关闭
use chroot = no
## 最大连接数
max connections = 200
## 客户端连接超时时间 [为秒 查看帮助文档 man rsyncd.conf]
timeout = 600
## 进程信息文件
pid file = /var/run/rsyncd.pid
## 忽略错误
ignore errors
## 只读权限
read only = false
## 查看模块列表
list = false
## 定义虚拟用户(rsync传输过程使用的用户)
auth users = rsync_backup
## 定义虚拟用户的密码
secrets file = /etc/rsync.passwd

## 获取进程号停止进程
## 判断服务是否启动 避免反复启动
## 锁文件
lock file = /var/run/rsync.lock
## 服务运行时日志文件
log file = /var/log/rsyncd.log
## 指定备份目录的权限为可读可写,false关闭[可读写]
read only = false
## 安全策略配置 设置一个白名单
hosts allow = 10.0.1.51/24
## 安全策略配置 设置一个黑名单
hosts deny = 10.0.1.51/32
## 定义认证用户
auth users = rsync_backup
## 密码文件 用户密码信息 格式为:user:passwd
secrets file = /etc/rsync.password
## 自定模块名称,可以写多个
[backup]
## 模块的备注
comment = welcome to backup!
## 模块对于的位置[路径]
path = /opt/backupxyz

[iyuyixyz]
comment = welcome to iyuyixyz!
path=/tmp/xyz
2 服务端 rsyncd 配置文件
### 服务端执行 Base主机
cat > /etc/rsyncd.conf << EOF
uid = rsyncxyz
gid = rsyncxyz
port = 873
fake super = yes
use chroot = no
max connections = 200
timeout = 600
ignore errors
read only = false
list = false
auth users = xyz
secrets file = /etc/rsync.passwd
log file = /var/log/rsyncd.log
[backup]
comment = welcome to backup!
path = /backup
EOF
3 服务端相关配置
### 增加用户
useradd -s /sbin/nologin -M rsyncxyz
id rsyncxyz

###
mkdir /backup
chown rsyncxyz.rsyncxyz -R /backup

## 配置用户名和密码
cat > /etc/rsync.passwd << EOF
xyz:123
EOF

chmod 600 /etc/rsync.passwd

### 启动 rsync
[root@base ~]# /usr/bin/rsync --daemon --config=/etc/rsyncd.conf
[root@base ~]# netstat -tupln |grep 873
tcp        0      0 0.0.0.0:873             0.0.0.0:*               LISTEN      3195/rsync
tcp6       0      0 :::873                  :::*                    LISTEN      3195/rsync

### 停止
[root@base ~]# pkill rsync
四、Rsync 参数选项
- -v 表示 | 显示详细信息
- -z 表示 | 传输是进行压缩提高传输效率
- -a 表示 | 递归传输数据,保持文件属性和权限
- -r 表示 | 表递归传输
- -p 表示 | 保持权限不变
- -t 表示 | 保持时间信息
- -P 表示 | 显示同步过程及传输进度信息
- -e 表示 | 信道协议
1 客户端执行 web01
###
echo " huaxiayuyi " > /opt/demo.txt
rsync -avz -e "ssh -p22" /opt/demo.txt root@10.0.1.11:/backup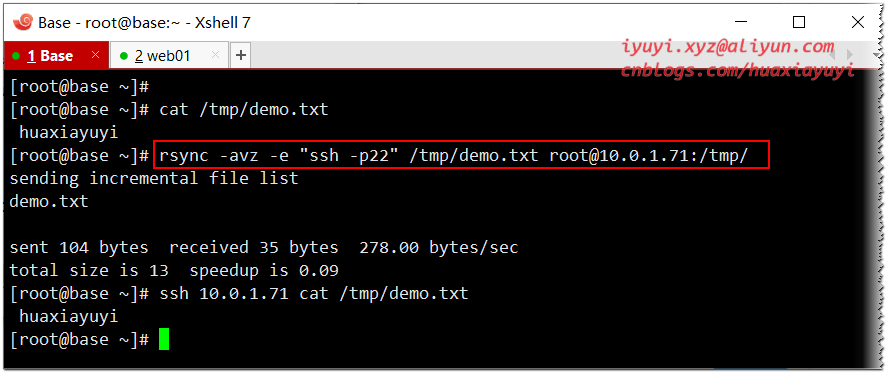
2 无需输入密码
## --delete 表示:目标和源目录数据保持一致 /home/xyz/ 后面得有斜线
[root@web01 ~]# rsync -avz --delete  /opt/demo.txt xyz@10.0.1.11::backup
Password:
sending incremental file list
sent 57 bytes  received 23 bytes  53.33 bytes/sec
total size is 13  speedup is 0.16

###
echo " huaxiayuyi " > /opt/iyuyi.xyz

### 无需输入密码
echo "123" > /etc/rsync.passwd
cat > /etc/rsync.passwd << EOF
123
EOF

###
rsync -avz --delete  /opt/iyuyi.xyz xyz@10.0.1.11::backup --password-file=/etc/rsync.passwd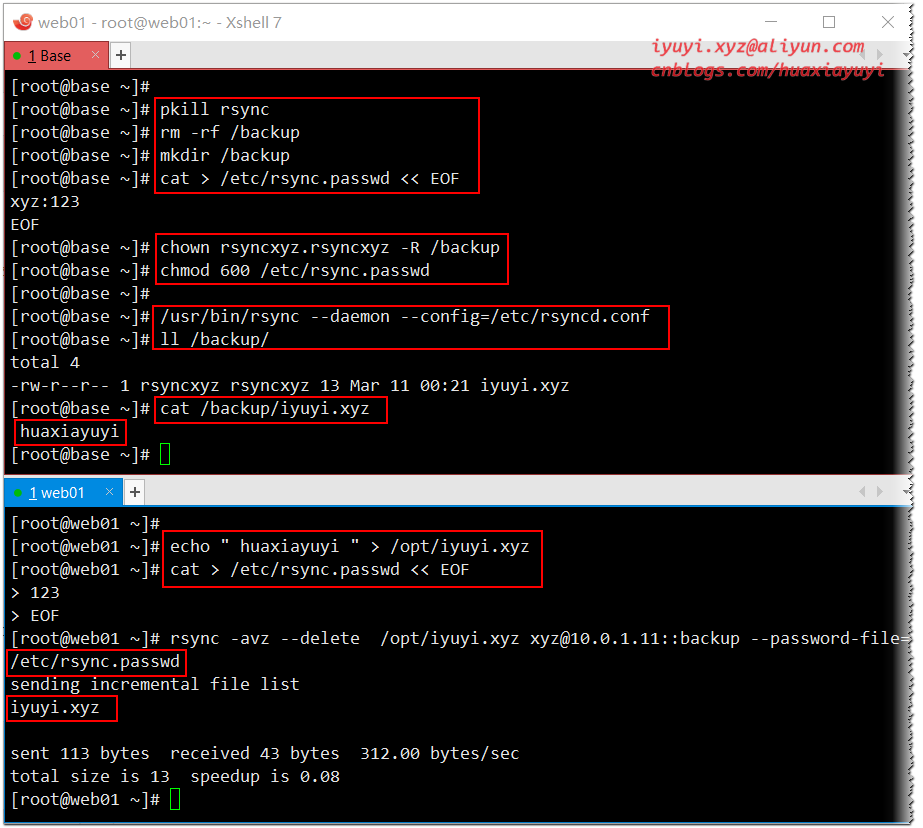
3 排除
## --exclude 参数指定排除的文件或目录信息
mkdir /opt/iyuyixyz
touch /opt/iyuyixyz/{1..10}.txt
rsync -avz /opt/iyuyixyz/ --exclude=10.txt --exclude=9.txt xyz@10.0.1.11::backup --password-file=/etc/rsync.passwd

## --exclude-from 参数指定排除多个数据信息文件
rsync -avz /home/xyz/ --exclude-from=  rsync_backup_xyz@10.0.1.51::backup–password-file=/etc/rsync.passwd

## bwlimite = 1000 表示:限速传输
## partial    表示:断点续传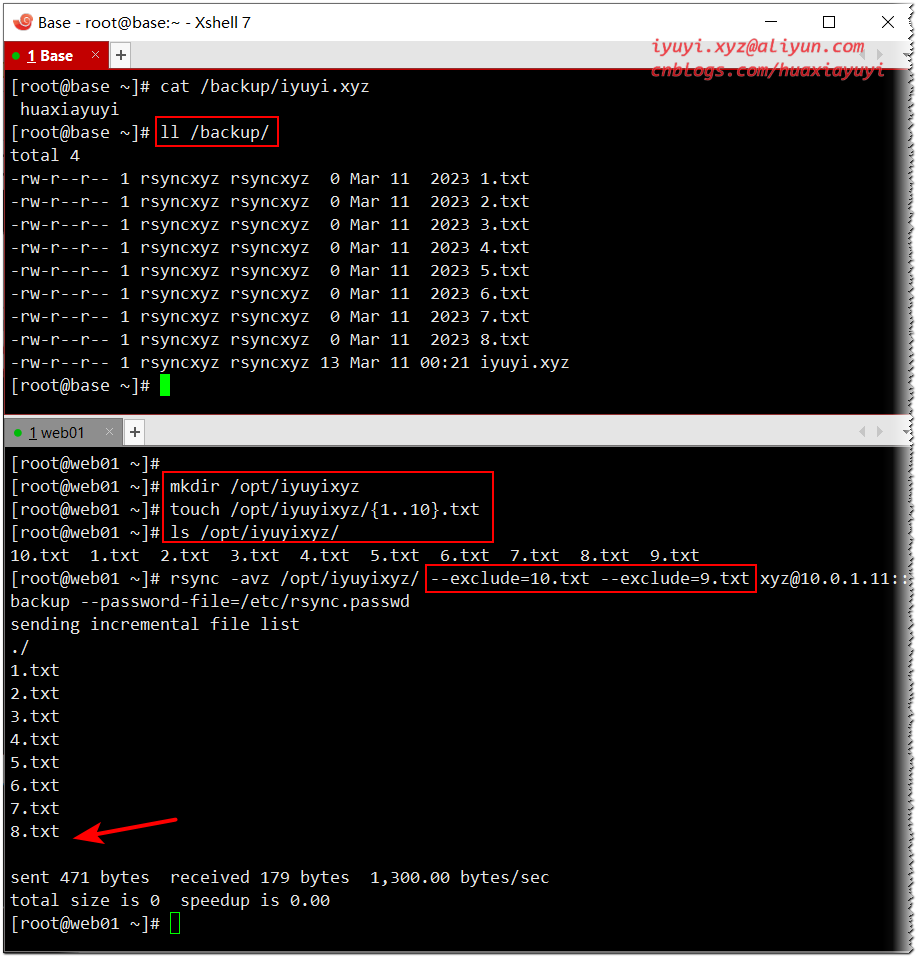
五、防火墙 & Selinux
## 关闭防火墙
systemctl stop firewalld
systemctl disable --now firewalld

firewall-cmd --zone=public --add-port=873/tcp --permanent
## 配置立即生效
firewall-cmd --reload

## 关闭Selinux
## 永久关闭
sed -i 's#SELINUX=enforcing#SELINUX=disabled#g' /etc/selinux/config
## 临时关闭
setenforce 0
X、One Step Success
rsync 帮助命令
###
[root@base ~]# man rsync
[root@base ~]# rsync --help
[root@base ~]# rsync --version
rsync  version 3.1.3  protocol version 31
Copyright (C) 1996-2018 by Andrew Tridgell, Wayne Davison, and others.
Web site: http://rsync.samba.org/
Capabilities:
    64-bit files, 64-bit inums, 64-bit timestamps, 64-bit long ints,
    socketpairs, hardlinks, symlinks, IPv6, batchfiles, inplace,
    append, ACLs, xattrs, iconv, symtimes, prealloc

rsync comes with ABSOLUTELY NO WARRANTY.  This is free software, and you
are welcome to redistribute it under certain conditions.  See the GNU
General Public Licence for details.
Y、 Error message
1 报错详情 | 未启动rsync服务
###
[root@web01 ~]# rsync -avz --delete  /opt/demo.txt xyz@10.0.1.11::backup
rsync: failed to connect to 10.0.1.11 (10.0.1.11): Connection refused (111)
rsync error: error in socket IO (code 10) at clientserver.c(128) [sender=3.1.3]
解决方法
### 服务端启动
/usr/bin/rsync --daemon --config=/etc/rsyncd.conf
netstat -anp|grep 873
2 报错详情 | 服务端指定模块没有对应目录
###
[root@web01 ~]# rsync -avz --delete  /opt/demo.txt xyz@10.0.1.11::backup --password-file=/etc/rsync.passwd
@ERROR: chdir failed
rsync error: error starting client-server protocol (code 5) at main.c(1668) [sender=3.1.3]
解决方法
### 服务端创建
[root@base ~]# mkdir /backup
3 报错详情 | 服务端指定模块没有对应目录
###
[root@web01 ~]# rsync -avz --delete  /opt/demo.txt xyz@10.0.1.11::backup --password-file=/etc/rsync.passwd
sending incremental file list
demo.txt
rsync: mkstemp ".demo.txt.g435hR" (in backup) failed: Permission denied (13)

sent 112 bytes  received 124 bytes  472.00 bytes/sec
total size is 13  speedup is 0.06
rsync error: some files/attrs were not transferred (see previous errors) (code 23) at main.c(1189) [sender=3.1.3]
解决
- 共享目录的属主和属组不正确,不是 rsyncxyz
chown -R rsyncxyz:rsyncxyz /backup/ - 共享目录的权限不正确,不是755
chmod 755 /backup/ - 关闭 selinux
setenforce 0
Z、Related Links
Use Rsync Backup Service on openEuler - 娇小赤雅 - 博客园 (cnblogs.com)

