
Use nfs Storage Service on openEuler
一、Use nfs Storage Service on openEuler
nfs 是网络文件系统,用于Linux与Linux之间文件共享的解决方案
1 nfs 服务安装配置
## 查看是否安装NFS
rpm -qa nfs-utils rpcbind

## 安装 nfs
yum install -y nfs-utils rpcbind
dnf install -y nfs-utils rpcbind
2 启动服务
## 启动服务
systemctl start rpcbind
systemctl start nfs-server

## 开机启动服务
systemctl enable rpcbind
systemctl enable nfs-server

## 查看服务状态
systemctl status rpcbind
systemctl status nfs-server

## 停止服务
systemctl stop rpcbind
systemctl stop nfs-server
3 查看端口进程
##
dnf install -y net-tools lsof
## 查看 rpc
lsof -i :111
netstat -lntup |grep rpcbind

## nfs 常见进程
ps -ef  |egrep "rpc|nfs"
4 查看 nfs 服务向rpc注册的端口信息
## rpc 信息
[root@nfs01 opt]# rpcinfo -p
   program vers proto   port  service
    100000    4   tcp    111  portmapper
    100000    3   tcp    111  portmapper
    100000    2   tcp    111  portmapper
    100000    4   udp    111  portmapper
    100000    3   udp    111  portmapper
    100000    2   udp    111  portmapper
    100005    1   udp  20048  mountd
    100005    1   tcp  20048  mountd
    100024    1   udp  59413  status
    100005    2   udp  20048  mountd
    100024    1   tcp  39245  status
    100005    2   tcp  20048  mountd
    100005    3   udp  20048  mountd
    100005    3   tcp  20048  mountd
    100003    3   tcp   2049  nfs
    100003    4   tcp   2049  nfs
    100227    3   tcp   2049  nfs_acl
    100021    1   udp  57731  nlockmgr
    100021    3   udp  57731  nlockmgr
    100021    4   udp  57731  nlockmgr
    100021    1   tcp  38233  nlockmgr
    100021    3   tcp  38233  nlockmgr
    100021    4   tcp  38233  nlockmgr
5 nfs 服务器端配置
配置文件路径 /etc/exports 按照共享目录的路径 允许访问 nfs客户端,定义共享得目录和相应得权限。
## 默认用户:nfsnobody
## id nfsnobody
## chown nfsnobody.nfsnobody /opt/nfs/data

## 服务端和客户端节点都执行 自定义用户
userdel iyuyixyz
groupadd iyuyixyz --gid=1000
useradd iyuyixyz --uid=1000 --gid=1000
id iyuyixyz

## 以下在服务端执行
## 创建共享目录
mkdir -p /opt/nfs/data

## 修改目录所有者
chown iyuyixyz.iyuyixyz /opt/nfs/data

## nfs 共享的目录 nfs客户端地址1(参数1,参数2,...)
## IP,网段,* 所有IP
cat > /etc/exports << EOF
/opt/nfs/data 10.0.1.0/24(rw,no_subtree_check,all_squash,anonuid=1000,anongid=1000)
EOF

## 不用重启 nfs服务,配置文件直接生效
## -a 全部挂载或者全部卸载
## -r 重新加载配置
## -v 显示共享目录
## -u 卸载某个目录
[root@nfs01 ~]# exportfs -arv
exporting 10.0.1.0/24:/opt/nfs/data

## 查看nfs服务器挂载情况
[root@nfs01 nfs]# showmount -e
Export list for nfs01:
/opt/nfs/data 10.0.1.0/24

## 查看nfs配置详细信息
cat /var/lib/nfs/etab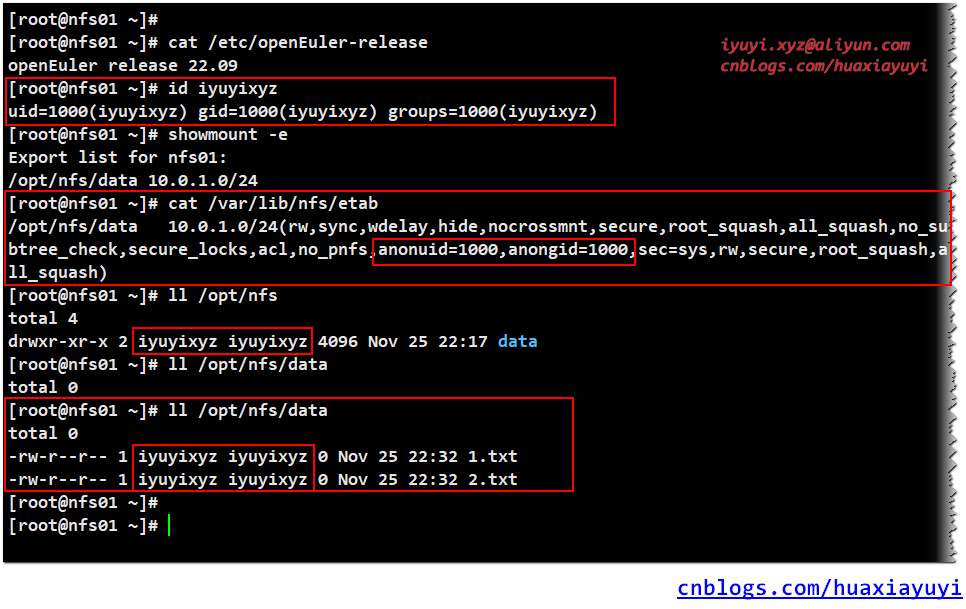
6 客服端挂载测试
## 测试前建议重启下
systemctl restart nfs-server

## 优雅重启
systemctl reload nfs

## 客户端执行测试与检查
## -t 指定类型
mkdir -p /opt/nfs/tmp
mount -t nfs 10.0.1.55:/opt/nfs/data /opt/tmp

## 查看挂载
df -Th
## 10.0.1.55:/opt/nfs/data    nfs4       96G  1.5G   89G   2% /opt/tmp

## 在 /opt/nfs/data 下创建文件
touch /opt/nfs/tmp/{1..2}.txt

## 查看 /opt/tmp 是否有文件
ll /opt/nfs/data

## 正常卸载
umount -lf /opt/nfs/tmp

## 卸载挂载
## -l 不退出挂载点目录进行卸载
## -f 强制进行卸载操作
umount -lf 卸载路径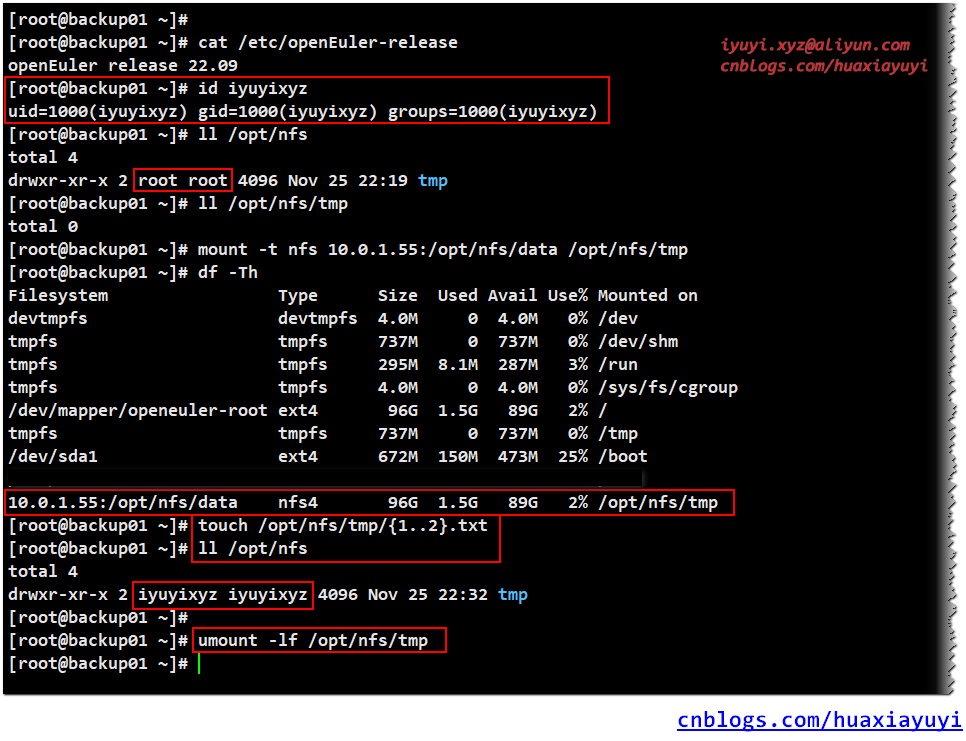
7 帮助命名
mount --help
man rpc.mountd
8 nfs 服务端配置参数权限
- rw:读写权限
- ro:只读权限
- sync:同步方式存储数据,数据保存到磁盘 [数据存储安全]
- async:同步方式存储数据,数据保存内存 [提高数据存储效率]
- no_root_squash:root用户不进行转换
- root_squash:root用户进行转换
- all_squash:所有用户都进行转换,客户端上所有用户在使用 nfs共享目录的时候,都被限制成为一个普通用户
- no_all_squash:非root用户不进行转换
- anonuid/anongid:和上面几个选项搭配使用,定义被限定用户的 uid 和 gid
9 nfs 客户端挂载选项
- -t:文件系统类型 xfs,ext3,nfs
- -o:挂载详细参数
10 开机自动挂载[永久挂载]
vim /etc/fstab
## 添加如下信息
10.0.1.55:/opt/nfs/data                  /opt/nfs/tmp   nfs   defaults   0 0
二、防火墙 & Selinux
## 关闭防火墙
systemctl stop firewalld
systemctl disable --now firewalld

## 不确定
## firewall-cmd --zone=public --add-port=111/tcp --permanent
## firewall-cmd --zone=public --add-port=2049/tcp --permanent
## firewall-cmd --zone=public --add-port=20048/tcp --permanent
## firewall-cmd --zone=public --add-port=42711/tcp --permanent

## 配置立即生效
## firewall-cmd --reload

## 关闭Selinux
## 永久关闭
sed -i 's#SELINUX=enforcing#SELINUX=disabled#g' /etc/selinux/config
## 临时关闭
setenforce 0
X、One Step Success
dnf install -y nfs-utils rpcbind

systemctl start rpcbind
systemctl start nfs-server

ps -ef  |egrep "rpc|nfs"
rpcinfo -p

mkdir -p /opt/nfs/data
id nfsnobody
chown nfsnobody.nfsnobody /opt/nfs/data
cat > /etc/exports << EOF
/opt/nfs/data 10.0.1.0/24(rw)
EOF

exportfs -rv
showmount -e
systemctl restart nfs-server

mkdir /opt/tmp
mount -t nfs 10.0.1.55:/opt/nfs/data /opt/tmp
df -Th
touch /opt/tmp/{1..10}.txt
ll /opt/nfs/data

## 卸载挂载
## umount /opt/tmp
Y、Error message
Neither 'subtree_check' or 'no_subtree_check' specified for export xxx
[root@nfs01 ~]# exportfs -rv
exportfs: /etc/exports [1]: Neither 'subtree_check' or 'no_subtree_check' specified for export "10.0.1.0/24:/opt/nfs/data".
  Assuming default behaviour ('no_subtree_check').
  NOTE: this default has changed since nfs-utils version 1.0.x

exporting 10.0.1.0/24:/opt/nfs/data

## 解决 增加no_subtree_check
cat > /etc/exports << EOF
/opt/nfs/data 10.0.1.0/24(rw,no_subtree_check,all_squash,anonuid=65500,anongid=65500)
EOF
Z、Related Links
Use Rsync Backup Service on openEuler:https://www.cnblogs.com/huaxiayuyi/p/16913716.html

