SpringBoot 请求复制
为什么要做请求复制?
业务场景:微信公众号限制申请个数,现在一个公众号要是 dev、int、uat、prod 环境公用的,因为微信公众号只能配置一个回调地址,当有微信公众号回调场景时,只能在让微信公众号回调到 prod 环境,再由prod 环境把请求复制后转到其他环境。
1 获取运行环境
1.1 测试代码
编写一个类,从Spring 上下文中,读取ActiveProfiles
@Component
public class SpringContextHolder implements ApplicationContextAware, DisposableBean {

    private static ApplicationContext applicationContext = null;

    public static ApplicationContext getApplicationContext() {
        return applicationContext;
    }

    @Override
    public void destroy() throws Exception {
        applicationContext = null;
    }

    @Override
    public void setApplicationContext(ApplicationContext applicationContext) throws BeansException {
        SpringContextHolder.applicationContext = applicationContext;
    }

    /**
     * 获取当前环境
     */
    public static String getActiveProfile() {
        return applicationContext.getEnvironment().getActiveProfiles()[0];
    }

}
启动类
@SpringBootApplication
public class RunApplication {

    public static void main(String[] args) {
        SpringApplication.run(RunApplication.class, args);
    }
}
1.2 设置Active Profiles
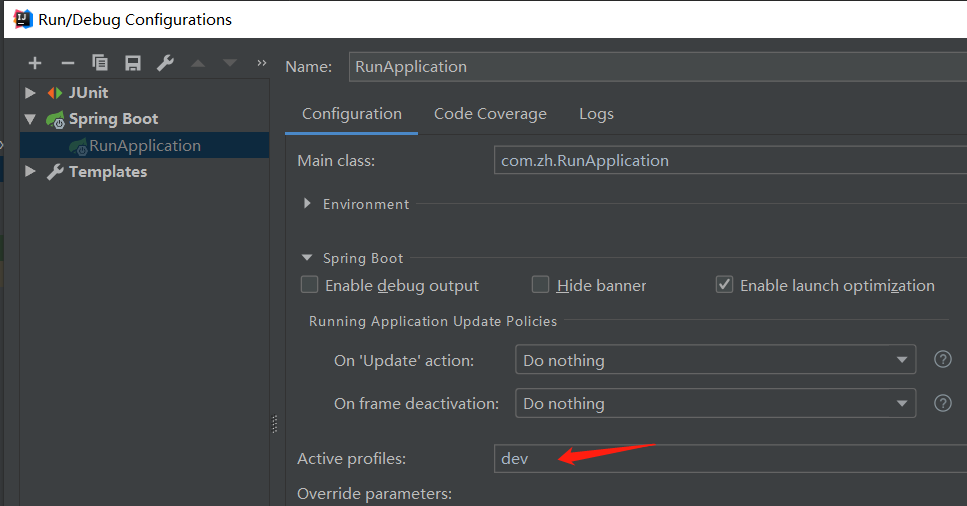
要完成上面的业务需求,我们首先要知道当前的运行环境。提前是我们要设置 Active Profiles 参数,这样才能在 SpringContextHolder 类中的 getActiveProfile() 方法来获取到。
1.2.1 Idea 设置 Active Profiles 方式

启动 RunApplication 时,运行日志如下:
2022-05-20 12:19:33.261 INFO 7204 --- [ main] com.**.RunApplication : The following profiles are active: dev
1.2.2 JVM启动命令行方式
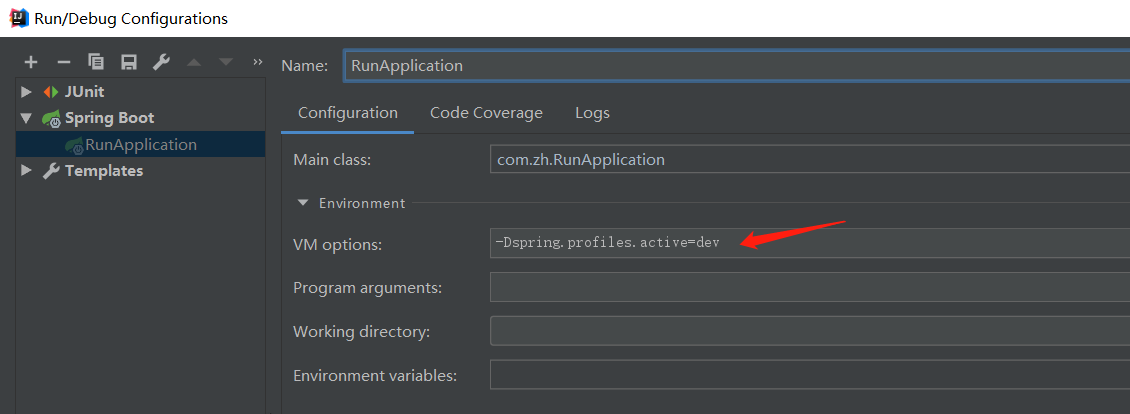
在使用JVM命令启动时候,可以添加如下命令来设置Active Profiles:-Dspring.profiles.active=dev
如果还是在Idea启动是测试,可以在 Environment 设置下里添加JVM命令。

启动 RunApplication 时,运行日志如下:
2022-05-20 12:19:33.261 INFO 7204 --- [ main] com.**.RunApplication : The following profiles are active: dev
1.2.3 测试用例设置 Active Profiles
如果使用SpringBootTest方式测试我们的代码,需要设置Active Profiles,可以使用 @ActiveProfiles 注解进行设置。
@SpringBootTest
@ActiveProfiles(value = "dev")
@RunWith(SpringRunner.class)
public class SpringServiceTest {

    @Test
    public void test() {
        String activeProfile = SpringContextHolder.getActiveProfile();
        System.out.println("activeProfile == " + activeProfile);
    }

}
测试用例运行日志如下:
2022-05-20 17:26:14.773  INFO 936 --- [           main] com.**.test.SpringServiceTest            : The following profiles are active: dev
......
activeProfile == dev
2 请求转发的拦截器
2.1 定义拦截器
我们使用AOP的方式,定义一个Intercepter,需要实现 HandlerInterceptor 接口。用来复制请求的参数,并且转发请求到其他环境的地址去。
@Component
public class WeChatRequestInterceptor implements HandlerInterceptor {

    public static ThreadLocal<Map<String, Object>> threadLocal = new ThreadLocal<Map<String, Object>>();

    private final static String ACTIVE_PROFILE_PROD = "prod";
    private final static String REQUEST_STR = "requestStr";

    private final static String DEV_URL = "http:192.168.1.1:8080/dev/";
    private final static String INT_URL = "http:192.168.1.1:8080/int/";
    private final static String UAT_URL = "http:192.168.1.1:8080/uat/";

    @Override
    public boolean preHandle(HttpServletRequest request, HttpServletResponse response, Object handler) throws Exception {
        // 只需要带线上环境生效
        if (!ACTIVE_PROFILE_PROD.equals(SpringContextHolder.getActiveProfile())) {
            return true;
        }
        String uri = request.getRequestURI();
        // GET请求
        if(request.getMethod().equalsIgnoreCase("GET")){
            String parameters = getParameter(request);
            String path = DEV_URL + uri + "?" + parameters;
            // TODO 使用http的方式,转发GET请求,建议单独封装一个Service方法
            return true;
        }

        // POST请求
        if(request.getMethod().equalsIgnoreCase("POST")){
            // 获取inputStream,解析成字符串,保存到ThreadLocal
            String requestStr = IoUtils.toString(request.getInputStream(), request.getCharacterEncoding());
            // 这里的TheadLocal需要自己写包装类,我这里只是简单写法
            // 因为 POST请求中的inputStream只要读取一次,在Request里就被清除了,所有要存到TheadLocal,让prod环境的请求可以正常处理。
            Map<String, Object> localMap = threadLocal.get();
            localMap.put(REQUEST_STR, requestStr);
            try {
                // 复制HttpServletRequest
                HttpServletRequest requestWrapper = new ContentCachingRequestWrapper(request);
                String path = DEV_URL + uri;
                // TODO 使用http的方式,转发POST请求, 建议单独封装一个Service方法
          // 类似方法:HttpRequestBase httpRequest = new HttpPost(url);
          //         ((HttpPost) httpRequest).setEntity(new ByteArrayEntity(requestStr.getBytes()));
            } catch (Exception e) {
                log.error("CopyHttpServletRequestInterceptor Exception, ", e);
            }
            return true;
        }
        return true;
    }

    @Override
    public void postHandle(HttpServletRequest request, HttpServletResponse response, Object handler, ModelAndView modelAndView) throws Exception {

    }

    @Override
    public void afterCompletion(HttpServletRequest request, HttpServletResponse response, Object handler, Exception ex) throws Exception {

    }

    /**
     * 从HttpServletRequest获取所有Parameter
     */
    public static String getParameter(HttpServletRequest request){
        List<String> params = new ArrayList<>();
        Enumeration parameterNames = request.getParameterNames();
        while (parameterNames.hasMoreElements()) {
            String key = (String) parameterNames.nextElement();
            String value = request.getParameter(key);
            params.add(key + "=" + value);
        }
        if (!CollectionUtils.isEmpty(params)){
            return String.join("&", params);
        }
        return "";
    }

}
2.2 转换工具类
因为 InputStream 读取一次后就会被清除,所以我们要把InputStream 转换成 String 保存起来,用来下次使用。
String 转换成 InputStream 可以使用这行代码:InputStream inputStream = new ByteArrayInputStream(requestStr.getBytes());
public class IoUtils {

    /**
     * InputStream 转换成 String
     */
    static public String toString(InputStream input, String encoding) {
        try {
            return (null == encoding) ? toString(new InputStreamReader(input, "UTF-8"))
                : toString(new InputStreamReader(input, encoding));
        } catch (Exception e) {
            return StringUtils.EMPTY;
        }
    }

    static public String toString(Reader reader) throws IOException {
        CharArrayWriter sw = new CharArrayWriter();
        copy(reader, sw);
        return sw.toString();
    }

    static public long copy(Reader input, Writer output) throws IOException {
        char[] buffer = new char[1 << 12];
        long count = 0;
        for (int n = 0; (n = input.read(buffer)) >= 0; ) {
            output.write(buffer, 0, n);
            count += n;
        }
        return count;
    }

    static public long copy(InputStream input, OutputStream output) throws IOException {
        byte[] buffer = new byte[1024];
        int bytesRead;
        int totalBytes = 0;
        while ((bytesRead = input.read(buffer)) != -1) {
            output.write(buffer, 0, bytesRead);

            totalBytes += bytesRead;
        }
        return totalBytes;
    }

}
2.3 配置拦截器
我们需要一个 SpringMVC 配置类,配置起来这个拦截器,声明要拦截的请求地址。
测试代码如下:
@Configuration
public class WebMvcConfiguration implements WebMvcConfigurer {

    @Autowired
    private WeChatRequestInterceptor weChatRequestInterceptor;

    /**
     * 自定义拦截器
     */
    public void addInterceptors(InterceptorRegistry registry) {
        registry.addInterceptor(weChatRequestInterceptor).addPathPatterns("/wechat/callback");
    }

}


【推荐】国内首个AI IDE,深度理解中文开发场景,立即下载体验Trae
【推荐】编程新体验,更懂你的AI,立即体验豆包MarsCode编程助手
【推荐】抖音旗下AI助手豆包,你的智能百科全书,全免费不限次数
【推荐】轻量又高性能的 SSH 工具 IShell:AI 加持,快人一步
· 无需6万激活码!GitHub神秘组织3小时极速复刻Manus,手把手教你使用OpenManus搭建本
· Manus爆火,是硬核还是营销?
· 终于写完轮子一部分:tcp代理 了,记录一下
· 别再用vector<bool>了!Google高级工程师:这可能是STL最大的设计失误
· 单元测试从入门到精通
2021-05-20 Spring Cloud Alibaba Nacos 在Windows10下启动
2020-05-20 Linux服务器配置SSH免密登录
2020-05-20 CentOS安装Maven