


对Android的应用开发,如果熟悉Java,那么Android studio或Eclipse将是不错的选择。而对熟悉.net平台开发人员,在强大的Visual Studio帮助下,开发Android应用不再是难题。本文基于Visual Studio 2017及以上的版本讨论,如果低于2017的版本,因为xamarin并未集成,需要单独安装,所以在搭建开发环境上会有些麻烦。
本文假设你有一定的开发经验,对Android的有基础的了解。假如你还不熟悉,建议先从MSDN上的Hello, Android开始,将是不错的入门。
1. 开发环境搭建
在Windows 10,仅需要做下面两个就足够了:
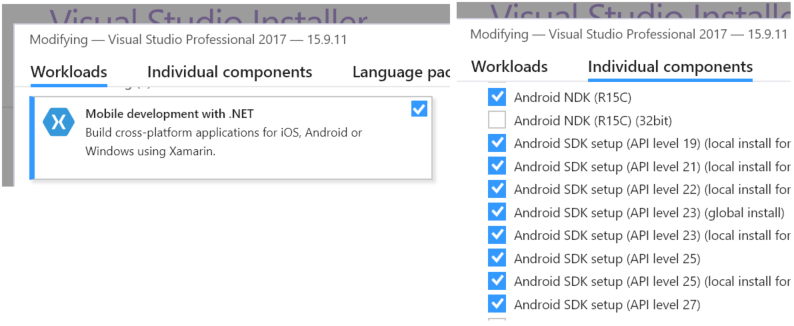
a. 在Visual studio上开发,需要Mobile development with .NET组件,详细的过程可参考Installing Xamarin in Visual Studio。也可以通过Visual studio installer,修改已有的安装。在最小安装的情况下,对components的选择,需要注意开发不同Android版本的应用,其API Level也不一样,Android API levels详见MSDN。如果需要原生支持,那么NDK也需要一并安装。
b. Android Emulator:在模拟器的选择上,这里推荐Genymotion,对个人是免费的,资源占用下,启动迅速,对调试、可操作性都非常便利。虽然在visual studio的Mobile development with .NET默认安装情况下,会有一个hardware accelerated emulator,但,这里非常不推荐。MSDN上Android Emulator Setup这篇文章提到的模拟器,在硬件不是特别强大的情况下,都不建议去尝试。
Notes:如果硬件不够强大,vs自带的hardware accelerated emulator启动会非常慢,每次编译调试会很费时。在T480笔记本上(i5-7300U+16G+SSD),默认的模拟器j仅成功了几次,后来修改了程序,旋转了一次模拟器,再启动就卡在应用加载上,模拟器无法响应或者无法加载应用。因为这个,曾一度怀疑是不是程序那里修改错了或者开发环境哪里少了步骤而没有搭建完成,折腾了近一下午的时间。第二天,安装了Genymotion模拟器,一切都清爽了。
Gemymotion模拟器的安装步骤:
- 从官网下载后(对首次下载,建议选择带有Virtualbox的版本),注册账号。因为在安装完成,启动该软件,仍然需要登录账号,才可以创建模拟器。在安装完成后,可以看到:

- 启动Genymotion, 创建模拟器。如下图所示,可根据需要创建不同Android版本的模拟器:

上面两步完成后,开发环境就搭建成功了。
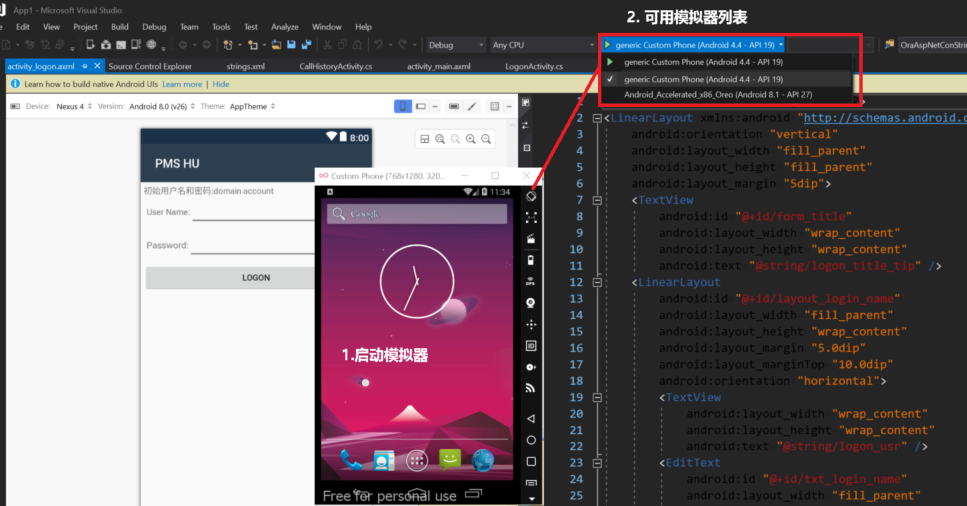
启动新建的Genymotion虚拟设备,打开Android project后,在visual studio的调试设备列表中,默认就是该模拟器,否则将是hardware accelerated emulator。
2. 应用程序
这里会有些不同于MSDN上的Hello, Android,稍微有些复杂,将从Activity,View(axml),Intent相关点介绍。
2.1 程序开发 - 应用程序结构及代码结构:
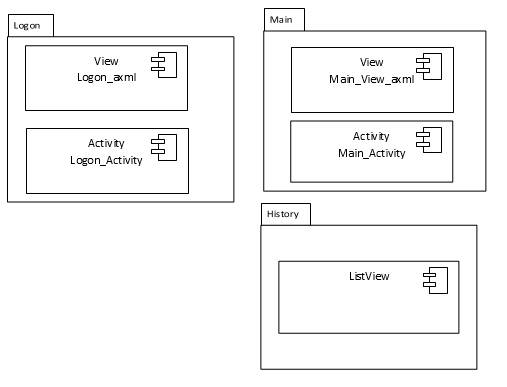

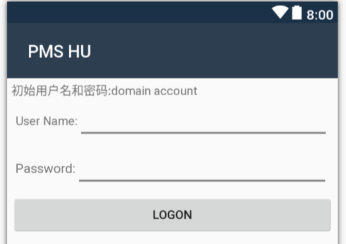
- Logon activity & logon view:登录相关,应用程序启动后,此为主activity启动 一个main activity。其对应的view放在axml文件中
- Main activity & view:登录后的相关操作,此处呈现简单的click计数器,并提供导航到history activity和返回logon的操作。其对应的view放在axml文件中
- History list activity:此activity继承自Built-in Control ListView, 不单独创建xml结构的view
初步介绍程序结构后,接下来从创建该程序开始:
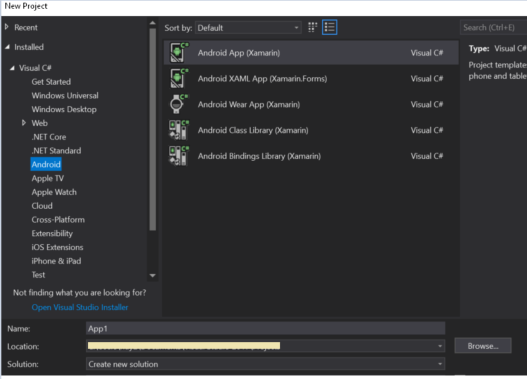
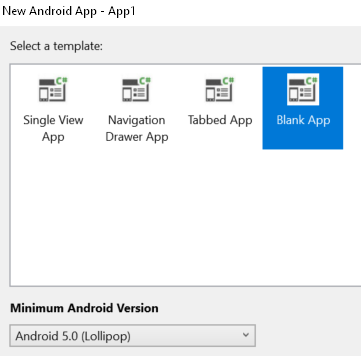
A. 在visual studio中,新建一个Xamarin project
B. 在接下来的向导中,选择空白模板。对最小Android版本,其字面直译,表示该应用程序运行所需的最低版本。根据开发环境搭建步骤a中所选择安装的API Level不同,该列表呈现的可选版本也不同。
C. 完成后,可见到程序默认结构。在Resource/Layout目录下,Activity_main.axml为默认的启动的activity设图。这里,将其作为main activity的视图(非程序启动后的第一个页面)。为了保持一致,可将其重命名为其它试图的activity。为了简化,这里不做改名。
默认的布局结构为RelativeLayout, 这里将其修改为LinearLayout,并设置属性android:orientation="vertical"纵向线性布局结构。本axml使用嵌套LinearLayout布局,
完整的代码如下:


<?xml version="1.0" encoding="utf-8"?>
<LinearLayout xmlns:android="http://schemas.android.com/apk/res/android"
    android:orientation="vertical"
    android:layout_width="fill_parent"
    android:layout_height="fill_parent"
    android:layout_margin="5dip">
    <TextView
        android:id="@+id/form_title"
        android:layout_width="wrap_content"
        android:layout_height="wrap_content"
        android:text="@string/logon_title_tip" />
    <LinearLayout
        android:id="@+id/layout_login_name"
        android:layout_width="fill_parent"
        android:layout_height="wrap_content"
        android:layout_margin="5.0dip"
        android:layout_marginTop="10.0dip"
        android:orientation="horizontal">
        <TextView
            android:layout_width="wrap_content"
            android:layout_height="wrap_content"
            android:text="@string/logon_usr" />
        <EditText
            android:id="@+id/txt_login_name"
            android:layout_width="fill_parent"
            android:layout_height="wrap_content"
            android:textSize="15.0sp" />
    </LinearLayout>
    <LinearLayout
        android:id="@+id/login_pwd_layout"
        android:layout_width="fill_parent"
        android:layout_height="wrap_content"
        android:layout_below="@id/layout_login_name"
        android:layout_centerHorizontal="true"
        android:layout_margin="5.0dip"
        android:orientation="horizontal">
        <TextView
            android:id="@+id/login_pass_edit"
            android:layout_width="wrap_content"
            android:layout_height="wrap_content"
            android:text="@string/logon_pwd"
            android:textSize="15.0sp" />
        <EditText
            android:id="@+id/txt_login_pwd"
            android:layout_width="fill_parent"
            android:layout_height="wrap_content"
            android:password="true"
            android:textSize="15.0sp" />
    </LinearLayout>
    <Button
        android:id="@+id/btn_login"
        android:layout_width="fill_parent"
        android:layout_height="wrap_content"
        android:layout_gravity="center"
        android:gravity="center"
        android:text="@string/logon_logonBtnText" />
</LinearLayout>
D. Logon对应的Activity, 其默认继承自AppCompatActivity,且其被ActivityAttribute修饰为MainLauncher = true。在Android程序中,并没有主程序的入口点,理论上,任何一个activity都可以被作为主入口。在xaml开发中,做了更为易于理解的标注( AppCompatActivity, MainLauncher = true)。完整的代码:
   [Activity(Label = "LogonActivity", MainLauncher = true)]
    public class LogonActivity : AppCompatActivity
    {
        protected override void OnCreate(Bundle savedInstanceState)
        {
            base.OnCreate(savedInstanceState);

            // Create your application here
            SetContentView(Resource.Layout.activity_logon);

            EditText usr = FindViewById<EditText>(Resource.Id.txt_login_name);
            usr.KeyPress += Usr_KeyPress;

            var logonBtn = FindViewById<Button>(Resource.Id.btn_login);
            logonBtn.Click += LogonBtn_Click;

            CreateNotificationChannel();
        }

        private void Usr_KeyPress(object sender, View.KeyEventArgs e)
        {
            e.Handled = false;
            if (e.Event.Action == KeyEventActions.Down && e.KeyCode == Keycode.Enter)
            {
                var msg = FindViewById<EditText>(Resource.Id.txt_login_name).Text;
                Toast.MakeText(this, msg, ToastLength.Short).Show();

                EditText pwdTxt = FindViewById<EditText>(Resource.Id.txt_login_pwd);
                pwdTxt.Text = msg;
                e.Handled = true;

                #region notification

                var builder = new NotificationCompat.Builder(this, "location_notification")
                  .SetAutoCancel(true) // Dismiss the notification from the notification area when the user clicks on it
                  //.SetContentIntent(resultPendingIntent) // Start up this activity when the user clicks the intent.
                  .SetContentTitle("Button Clicked") // Set the title
                  //.SetNumber(count) // Display the count in the Content Info
                  .SetSmallIcon(Resource.Drawable.abc_tab_indicator_mtrl_alpha) // This is the icon to display
                  .SetContentText("只有图标、标题、内容:" + FindViewById<EditText>(Resource.Id.txt_login_name).Text); // the message to display.

                // Finally, publish the notification:
                var notificationManager = NotificationManagerCompat.From(this);
                notificationManager.Notify(1000, builder.Build());
                #endregion
            }

        }

        private void LogonBtn_Click(object sender, EventArgs e)
        {
            var intent = new Intent(this, typeof(MainActivity));
            intent.PutExtra("username", FindViewById<EditText>(Resource.Id.txt_login_name).Text);
            StartActivity(intent);
        }

        void CreateNotificationChannel()
        {
            //in case API 26 or above
            if (Build.VERSION.SdkInt < BuildVersionCodes.O) return;

            var channel = new NotificationChannel("location_notification", "Noti_name", NotificationImportance.Default)
            {
                Description = "Hello description"
            };

            var notificationManager = (NotificationManager)GetSystemService(NotificationService);
            notificationManager.CreateNotificationChannel(channel);
        }
    }
这里,User name的输入框中,增加了按键press down事件,用回车键按下后,触发Toast及通知栏展示(此处仅为演示用)。对通知栏,在API 26以后,需要首先注册Channel。
var channel = new NotificationChannel("location_notification", "Noti_name", NotificationImportance.Default)
            {
                Description = "Hello description"
            };

var notificationManager =(NotificationManager)GetSystemService(NotificationService);
            notificationManager.CreateNotificationChannel(channel);
E. 输入user name后,点击Logon,跳转到Main activity页面。此页面,Enter code默认呈现user name。在Click me按钮点击后,内部计数器增加,消息呈现在Enter code并记录到Intent中。

axml完整代码:
<?xml version="1.0" encoding="utf-8"?>
<LinearLayout xmlns:android="http://schemas.android.com/apk/res/android"
    xmlns:app="http://schemas.android.com/apk/res-auto"
    xmlns:tools="http://schemas.android.com/tools"
    android:layout_width="match_parent"
    android:layout_height="match_parent"
    android:orientation="vertical" >
    <TextView
        android:text="Enter code"
        android:textAppearance="?android:attr/textAppearanceLarge"
        android:layout_width="wrap_content"
        android:layout_height="wrap_content"
        android:minWidth="25px"
        android:minHeight="25px"
        android:id="@+id/textView1" />
    <EditText
        android:layout_width="match_parent"
        android:layout_height="wrap_content"
        android:id="@+id/editText1" />
    <Button
        android:text="Click ME"
        android:layout_width="match_parent"
        android:layout_height="wrap_content"
        android:id="@+id/button1" />
    <Button
        android:text="@string/callhistory"
        android:layout_width="match_parent"
        android:layout_height="wrap_content"
        android:id="@+id/callhistoryBtn"
        android:enabled="false"
    />
    <Button
        android:text="Logout"
        android:layout_width="match_parent"
        android:layout_height="wrap_content"
        android:id="@+id/switchBtn" />
</LinearLayout>
F. Main Activity, 视图对应的代码实现
   [Activity(Label = "@string/app_name", Theme = "@style/AppTheme")]
    public class MainActivity:Activity
    {
        static readonly List<string> phoneNumbers = new List<string>();
        protected override void OnCreate(Bundle savedInstanceState)
        {
            base.OnCreate(savedInstanceState);
            // Set our view from the "main" layout resource
            SetContentView(Resource.Layout.activity_main);

            Button btn = FindViewById<Button>(Resource.Id.button1);
            btn.Click += Btn_Click;

            Button callhis = FindViewById<Button>(Resource.Id.callhistoryBtn);
            callhis.Click += Callhis_Click;

            FindViewById<Button>(Resource.Id.switchBtn).Click+= (obj, e)=> {
                //SetContentView(Resource.Layout.activity_logon);
                StartActivity(typeof(LogonActivity));
            };

            //set user name
            EditText usr = FindViewById<EditText>(Resource.Id.editText1);
            usr.Text = Intent.Extras?.Get("username")?.ToString();
        }

        private void Callhis_Click(object sender, System.EventArgs e)
        {
            var intent = new Intent(this, typeof(CallHistoryActivity));
            intent.PutStringArrayListExtra("phone_numbers", phoneNumbers);
            StartActivity(intent);
        }

        private int counter = 1;
        private void Btn_Click(object sender, System.EventArgs e)
        {
          var cl =  FindViewById<EditText>(Resource.Id.editText1);
          cl.Text = $"your counter is {counter++}";

           phoneNumbers.Add(cl.Text);
           FindViewById<Button>(Resource.Id.callhistoryBtn).Enabled = true;

        }
    }
对该页面,当点击"Click ME"按钮后,计数器自增,Call History的按钮可用。当点击Call History,页面跳转到view list页面,呈现计数器Counter的变化历史。

G. 在Call History,该activity继承自ListView,数据源为计数器Counter的变化历史记录。详细的代码为:
   [Activity(Label = "@string/callhistory")]
    public class CallHistoryActivity : ListActivity
    {
        protected override void OnCreate(Bundle savedInstanceState)
        {
            base.OnCreate(savedInstanceState);

            // Create your application here
            var phoneNumbers = Intent.Extras.GetStringArrayList("phone_numbers") ?? new string[0];
            this.ListAdapter = new ArrayAdapter<string>(this, Android.Resource.Layout.SimpleListItem1, phoneNumbers);
        }
    }
除了这里演示的ListView, 还有LinearLayout,RelativeLayout , TableLayout , RecyclerView, GridView, GridLayout, Tabbed Layouts多种布局构建页面。
2.2 程序部署
和传统的windows程序有些不太一样(DEBUG/RELEASE模式下,直接编译后得到的为dll而非.apk文件),在程序需要发布的时候,在project右键或者Tools -> Arhive Manager,可以看到已经创建的Archive或者新的Archive。
NOTE:右键菜单中的Deploy按钮,对没有多少经验的开发者有些不太友好,在模拟器环境中,通常会报不支持CPU型号的错误。这是由于deploy会依赖Simulation列表设备的选择。如果是Gemymotion模拟器,基本会失败。如果连接的硬件(usb调试模式下的硬件),会直接部署到对应的设备上。

在Archive Manger中,选择相应的Archive,将其分发到本地或者应用市场:


对Ad Hoc选项,可以创建/选择已有的签名,对所要发布的程序进行签名。
3. 所涉及的要点
3.1 Activity & axml
这里更多的是从设计的角度考虑,Activity和axml以一对一的形式构建。单从程序实现角度,一个activity可使用多个axml文件以构建不同业务场景的试图(同一个时刻,content view只会有一个),这种情况下多个axml的事件或业务,将只能在对应的那个Activity中实现(调用SetContentView的地方)。在设计上,这种很难理解维护,即使以partial这种投机的方式达到可维护性,对OO的设计模式也是一种破坏(或美其名曰反设计模式)。
3.2 Activity lifecycle
在Android应用程序中(不像传统的桌面/web程序,有指定的程序入口点Main),任何activity都可以成为入口点。在vs中,Xamarin.Android很好的照顾了刚入门的开发人员,将activity及对应的axml文件直接以main关键字命名。借用MSDN上的这幅图,形象生动说明整个actity的生命周期。

对各个关键点,提供了相应的重写方法。如默认的OnCreate, 执行activity启动以初始化。需要注意,该方法是在OnStart之后执行。
3.3 Activity之间的数据传递
对于不同Activity之间的数据传递,Intent类提供了多种方式。对简单数据类型,调用内置的PutExtra不会有任何问题。对实例对象或复杂对象,需要将其序列化,在取的时候,反序列化即可。
而对于同一个Activity不同的活动期间,则无需这么复杂,通过Bundle即可。如OnCreate, OnPause等可重写的方法,通过参数Bundle即可完成生命周期内的数据传递。在实际应用中,OnSaveInstanceState在activity被销毁时保存相应数据或试图状态,在恢复的时候,OnRestoreInstanceState是一种选择,但更多的时候, 通过OnCreate已经足够。
protected override void OnSaveInstanceState (Bundle outState)
{
  outState.PutString("UsrCfg", MyStringData);
  base.OnSaveInstanceState (outState);
}
3.4 Localization
如演示程序所示,如果应用需要多语言支持,对本地化策略:
android:text="@string/callhistory"
以@string或者类似值,将以字面直译的方式处理,涉及的resource在Resources/Values/xx.axml文件中。比如上述代码所演示的,具体的resource资源在Resources/Values/string.axml中。
对熟悉.NET平台开发,又想开发Android应用的朋友,希望这篇文章对你有所帮助。
另外,在写这篇文章2天前,我也没有相关的Android开发经验。因为基于项目要求,需要在PDA设备开发相应的程序,于是便有了此文。对于想要了解更详细的知识点,可详见Application Fundamentals。

