jquery easyUi简单介绍
jquery easyui 下称(ui)适合一个网站后台的快速搭建,给我们开发人员节约了很多的时间,下面,对于操作,下面进行详细的介绍下:
首先下载ui包,下载地址http://www.jeasyui.com/download/index.php选择一个版本下载,当然不同版本存在差异,建议使用最新版本
然后可以开始我们的项目开发了
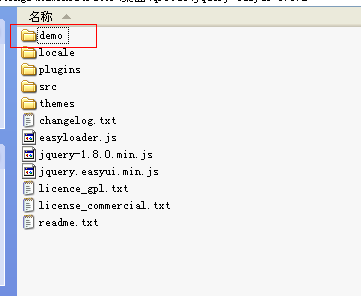
我们新建一个html页面,将ui包解压到本地硬盘,打开目录,找到demo文件夹

找到demo下面的layout文件夹
打开full.html
这个是一个简单的网页布局,我们可以使用这个布局来对项目进行开发
将body的标签替换成full.html内的body内容,然后引入项目jqury.js和jquery.easyui.min.js和locale/easyui-lang-zh_CN.js这些js文件
引入样式,拷贝整个theme文件夹放入到网站项目目录下面这时候,浏览网页,就可以看到你所需要的效果了.
接着我们把logo图片替换到north 区域
然后west区域我们用一个菜单样式替换,找到demo文件夹下面的accordion/tools.html文件,查看其源代码
<div class="easyui-accordion" style="width:500px;height:300px;">
        <div title="About" data-options="iconCls:'icon-ok'" style="overflow:auto;padding:10px;">
            <h3 style="color:#0099FF;">Accordion for jQuery</h3>
            <p>Accordion is a part of easyui framework for jQuery. It lets you define your accordion component on web page more easily.</p>
        </div>
        <div title="Help" data-options="iconCls:'icon-help'" style="padding:10px;">
            <p>The accordion allows you to provide multiple panels and display one at a time. Each panel has built-in support for expanding and collapsing. Clicking on a panel header to expand or collapse that panel body. The panel content can be loaded via ajax by specifying a 'href' property. Users can define a panel to be selected. If it is not specified, then the first panel is taken by default.</p>
        </div>
        <div title="DataGrid" style="padding:10px" data-options="
                selected:true,
                tools:[{
                    iconCls:'icon-reload',
                    handler:function(){
                        $('#dg').datagrid('reload');
                    }
                }]">
            <table id="dg" class="easyui-datagrid"
                    data-options="url:'../accordion/datagrid_data1.json',fit:true,fitColumns:true,singleSelect:true">
                <thead>
                    <tr>
                        <th data-options="field:'itemid',width:80">Item ID</th>
                        <th data-options="field:'productid',width:100">Product ID</th>
                        <th data-options="field:'listprice',width:80,align:'right'">List Price</th>
                        <th data-options="field:'unitcost',width:80,align:'right'">Unit Cost</th>
                        <th data-options="field:'attr1',width:150">Attribute</th>
                        <th data-options="field:'status',width:50,align:'center'">Status</th>
                    </tr>
                </thead>
            </table>
        </div>
    </div>
这个是起类似的代码,我们在里面添加菜单选项:
将其替换成这些代码,当然我没有实现样式,需要的话可以自己实现
<div data-options="region:'west',split:true,title:'菜单导航'"
            style="width: 150px;">
            <div class="easyui-accordion" data-options="border:false" style="width: 150px;">
                <div title="系统设置" data-options="iconCls:'icon-ok'"
                    style="overflow: auto;" >
                    <ul>
                    <li><a href="#" class="meunlink" url="userinfo.jsp">用户管理</a></li>
                    <li><a href="#" class="meunlink" url="temp.jsp">菜单管理</a></li>
                    <li><a href="#" class="meunlink" url="temp.jsp">权限管理</a></li>
                    </ul>
                </div>
                <div title="系统设置" data-options="iconCls:'icon-ok'"
                    style="overflow: auto;" >
                    <ul>
                    <li><a href="#" class="meunlink" url="temp.jsp">用户管理</a></li>
                    <li><a href="#" class="meunlink" url="temp.jsp">菜单管理</a></li>
                    <li><a href="#" class="meunlink" url="temp.jsp">权限管理</a></li>
                    </ul>
                </div>
            </div>

        </div>
主区域我们实现的是一个类似tab标签的效果
在demo文件夹上我们找到/tabs/tabposition.html
复制其代码
 View Code
然后除了div id=tt这个div标签,删除全部标签,在js内初始化
$("#tt").tabs({ border:false});
接着我们在要实现的是点击菜单选项弹出一个tab标签到主区域:
这个时候我们查看api文档,具体的api文档纯英文的,看不懂,推荐
http://www.cnblogs.com/Philoo/archive/2011/09/28/jeasyui_api_documentation.html
这边就很详细了.
这样我就直接贴上我的代码,如果看不懂,可以回帖,我会回复的
实现点击内弹出tab的代码
function bindMeunClick(){
                $(".meunlink").click(function(){
                    var title=$(this).text();
                    var isExist=$("#tt").tabs('exists',title);
                    var href=$(this).attr("url");
                    if(isExist){
                        $("#tt").tabs('select',title);
                    }else{
                        $('#tt').tabs('add',{
                               title:title,
                              content:getContentUrl(href),
                             closable:true
                          });
                      }
                      return false;
                });
            }
            function getContentUrl(url){
                return '<iframe src="' + url + '" scrolling="no" frameborder="0" width="100%" height="100%"></iframe>';
            }
这样一个简单demo就实现了


