Redis实现的分布式锁和分布式限流
随着现在分布式越来越普遍,分布式锁也十分常用,我的上一篇文章解释了使用zookeeper实现分布式锁(传送门),本次咱们说一下如何用Redis实现分布式锁和分布限流。
Redis有个事务锁,就是如下的命令,这个命令的含义是将一个value设置到一个key中,如果不存在将会赋值并且设置超时时间为30秒,如何这个key已经存在了,则不进行设置。
SET key value NX PX 30000
这个事务锁很好的解决了两个单独的命令,一个设置set key value nx,即该key不存在的话将对其进行设置,另一个是expire key seconds,设置该key的超时时间。我们可以想一下,如果这两个命令用程序单独使用会存在什么问题:
1. 如果一个set key的命令设置了key,然后程序异常了,expire时间没有设置,那么这个key会一直锁住。
2. 如果一个set key时出现了异常,但是直接执行了expire,过了一会儿之后另一个进行set key,还没怎么执行代码,结果key过期了,别的线程也进入了锁。
还有很多出问题的可能点,这里我们就不讨论了,下面咱们来看看如何实现吧。本文使用的Spring Boot 2.x + Spring data redis + Swagger +lombok + AOP + lua脚本。在实现的过程中遇到了很多问题,都一一解决实现了。依赖的POM文件如下:
<?xml version="1.0" encoding="UTF-8"?>
<project xmlns="http://maven.apache.org/POM/4.0.0" xmlns:xsi="http://www.w3.org/2001/XMLSchema-instance"
         xsi:schemaLocation="http://maven.apache.org/POM/4.0.0 http://maven.apache.org/xsd/maven-4.0.0.xsd">
    <modelVersion>4.0.0</modelVersion>
    <parent>
        <groupId>org.springframework.boot</groupId>
        <artifactId>spring-boot-starter-parent</artifactId>
        <version>2.1.2.RELEASE</version>
        <relativePath/> <!-- lookup parent from repository -->
    </parent>
    <groupId>com.hqs</groupId>
    <artifactId>distributedlock</artifactId>
    <version>0.0.1-SNAPSHOT</version>
    <name>distributedlock</name>
    <description>Demo project for Spring Boot</description>

    <properties>
        <java.version>1.8</java.version>
    </properties>

    <dependencies>
        <dependency>
            <groupId>org.springframework.boot</groupId>
            <artifactId>spring-boot-starter-aop</artifactId>
        </dependency>
        <dependency>
            <groupId>org.springframework.boot</groupId>
            <artifactId>spring-boot-starter-web</artifactId>
        </dependency>
        <dependency>
            <groupId>org.springframework.boot</groupId>
            <artifactId>spring-boot-starter-data-redis</artifactId>
        </dependency>
        <dependency>
            <groupId>org.springframework.boot</groupId>
            <artifactId>spring-boot-devtools</artifactId>
            <scope>runtime</scope>
        </dependency>
        <dependency>
            <groupId>org.projectlombok</groupId>
            <artifactId>lombok</artifactId>
            <optional>true</optional>
        </dependency>
        <dependency>
            <groupId>org.springframework.boot</groupId>
            <artifactId>spring-boot-starter-test</artifactId>
            <scope>test</scope>
        </dependency>
        <dependency>
            <groupId>io.springfox</groupId>
            <artifactId>springfox-swagger-ui</artifactId>
            <version>2.9.2</version>
        </dependency>
        <dependency>
            <groupId>io.springfox</groupId>
            <artifactId>springfox-swagger2</artifactId>
            <version>2.9.2</version>
            <scope>compile</scope>
        </dependency>
        <dependency>
            <groupId>redis.clients</groupId>
            <artifactId>jedis</artifactId>
            <version>2.9.0</version>
        </dependency>
    </dependencies>

    <build>
        <plugins>
            <plugin>
                <groupId>org.springframework.boot</groupId>
                <artifactId>spring-boot-maven-plugin</artifactId>
            </plugin>
        </plugins>
    </build>

</project>
使用了两个lua脚本,一个用于执行lock,另一个执行unlock。咱们简单看一下,lock脚本就是采用Redis事务执行的set nx px命令,其实还有set nx ex命令,这个ex命令是采用秒的方式进行设置过期时间,这个px是采用毫秒的方式设置过期时间。value需要使用一个唯一的值,这个值在解锁的时候需要判断是否一致,如果一致的话就进行解锁。这个也是官方推荐的方法。另外在lock的地方我设置了一个result,用于输出测试时的结果,这样就可以结合程序去进行debug了。
local expire = tonumber(ARGV[2])
local ret = redis.call('set', KEYS[1], ARGV[1], 'NX', 'PX', expire)
local strret = tostring(ret)
--用于查看结果,我本机获取锁成功后程序返回随机结果"table: 0x7fb4b3700fe0",否则返回"false"
redis.call('set', 'result', strret)
if strret == 'false' then
    return false
else
    return true
end
redis.call('del', 'result')
if redis.call('get', KEYS[1]) == ARGV[1] then
    return redis.call('del', KEYS[1])
else
    return 0
end
来看下代码,主要写了两个方法,一个是用与锁另外一个是用于结解锁。这块需要注意的是使用RedisTemplate<String, String>,这块意味着key和value一定都是String的,我在使用的过程中就出现了一些错误。首先初始化两个脚本到程序中,然后调用执行脚本。
package com.hqs.distributedlock.lock;


import lombok.extern.slf4j.Slf4j;
import org.springframework.beans.factory.annotation.Autowired;
import org.springframework.data.redis.core.RedisTemplate;
import org.springframework.data.redis.core.script.RedisScript;
import org.springframework.stereotype.Component;

import java.util.Collections;

@Slf4j
@Component
public class DistributedLock {

    //注意RedisTemplate用的String,String,后续所有用到的key和value都是String的
    @Autowired
    private RedisTemplate<String, String> redisTemplate;

    @Autowired
    RedisScript<Boolean> lockScript;

    @Autowired
    RedisScript<Long> unlockScript;

    public Boolean distributedLock(String key, String uuid, String secondsToLock) {
        Boolean locked = false;
        try {
            String millSeconds = String.valueOf(Integer.parseInt(secondsToLock) * 1000);
            locked =redisTemplate.execute(lockScript, Collections.singletonList(key), uuid, millSeconds);
            log.info("distributedLock.key{}: - uuid:{}: - timeToLock:{} - locked:{} - millSeconds:{}",
                    key, uuid, secondsToLock, locked, millSeconds);
        } catch (Exception e) {
            log.error("error", e);
        }
        return locked;
    }

    public void distributedUnlock(String key, String uuid) {
        Long unlocked = redisTemplate.execute(unlockScript, Collections.singletonList(key),
                uuid);
        log.info("distributedLock.key{}: - uuid:{}: - unlocked:{}", key, uuid, unlocked);

    }

}
还有一个就是脚本定义的地方需要注意,返回的结果集一定是Long, Boolean,List, 一个反序列化的值。这块要注意。
package com.hqs.distributedlock.config;


import com.sun.org.apache.xpath.internal.operations.Bool;
import lombok.extern.slf4j.Slf4j;
import org.springframework.beans.factory.annotation.Qualifier;
import org.springframework.context.annotation.Bean;
import org.springframework.context.annotation.Configuration;
import org.springframework.core.io.ClassPathResource;
import org.springframework.data.redis.core.script.DefaultRedisScript;
import org.springframework.data.redis.core.script.RedisScript;
import org.springframework.scripting.ScriptSource;
import org.springframework.scripting.support.ResourceScriptSource;


@Configuration
@Slf4j
public class BeanConfiguration {

    /**
     * The script resultType should be one of
     * Long, Boolean, List, or a deserialized value type. It can also be null if the script returns
     * a throw-away status (specifically, OK).
     * @return
     */
    @Bean
    public RedisScript<Long> limitScript() {
        RedisScript redisScript = null;
        try {
            ScriptSource scriptSource = new ResourceScriptSource(new ClassPathResource("/scripts/limit.lua"));
//            log.info("script:{}", scriptSource.getScriptAsString());
            redisScript = RedisScript.of(scriptSource.getScriptAsString(), Long.class);
        } catch (Exception e) {
            log.error("error", e);
        }
        return redisScript;

    }

    @Bean
    public RedisScript<Boolean> lockScript() {
        RedisScript<Boolean> redisScript = null;
        try {
            ScriptSource scriptSource = new ResourceScriptSource(new ClassPathResource("/scripts/lock.lua"));
            redisScript = RedisScript.of(scriptSource.getScriptAsString(), Boolean.class);
        } catch (Exception e) {
            log.error("error" , e);
        }
        return redisScript;
    }

    @Bean
    public RedisScript<Long> unlockScript() {
        RedisScript<Long> redisScript = null;
        try {
            ScriptSource scriptSource = new ResourceScriptSource(new ClassPathResource("/scripts/unlock.lua"));
            redisScript = RedisScript.of(scriptSource.getScriptAsString(), Long.class);
        } catch (Exception e) {
            log.error("error" , e);
        }
        return redisScript;
    }


    @Bean
    public RedisScript<Long> limitAnother() {
        DefaultRedisScript<Long> redisScript = new DefaultRedisScript<>();
        redisScript.setScriptSource(new ResourceScriptSource(new ClassPathResource("/scripts/limit.lua")));
        redisScript.setResultType(Long.class);
        return redisScript;
    }

}
好了,这块就写好了,然后写好controller类准备测试。
   @PostMapping("/distributedLock")
    @ResponseBody
    public String distributedLock(String key, String uuid, String secondsToLock, String userId) throws Exception{
//        String uuid = UUID.randomUUID().toString();
        Boolean locked = false;
        try {
            locked = lock.distributedLock(key, uuid, secondsToLock);
            if(locked) {
                log.info("userId:{} is locked - uuid:{}", userId, uuid);
                log.info("do business logic");
                TimeUnit.MICROSECONDS.sleep(3000);
            } else {
                log.info("userId:{} is not locked - uuid:{}", userId, uuid);
            }
        } catch (Exception e) {
            log.error("error", e);
        } finally {
            if(locked) {
                lock.distributedUnlock(key, uuid);
            }
        }

        return "ok";
    }
我也写了一个测试类,用于测试和输出结果, 使用100个线程,然后锁的时间设置10秒,controller里边需要休眠3秒模拟业务执行。
    @Test
    public void distrubtedLock() {
        String url = "http://localhost:8080/distributedLock";
        String uuid = "abcdefg";
//        log.info("uuid:{}", uuid);
        String key = "redisLock";
        String secondsToLive = "10";

        for(int i = 0; i < 100; i++) {
            final int userId = i;
            new Thread(() -> {
                MultiValueMap<String, String> params = new LinkedMultiValueMap<>();
                params.add("uuid", uuid);
                params.add("key", key);
                params.add("secondsToLock", secondsToLive);
                params.add("userId", String.valueOf(userId));
                String result = testRestTemplate.postForObject(url, params, String.class);
                System.out.println("-------------" + result);
            }
            ).start();
        }

    }
获取锁的地方就会执行do business logic, 然后会有部分线程获取到锁并执行业务,执行完业务的就会释放锁。

分布式锁就实现好了,接下来实现分布式限流。先看一下limit的lua脚本,需要给脚本传两个值,一个值是限流的key,一个值是限流的数量。获取当前key,然后判断其值是否为nil,如果为nil的话需要赋值为0,然后进行加1并且和limit进行比对,如果大于limt即返回0,说明限流了,如果小于limit则需要使用Redis的INCRBY key 1,就是将key进行加1命令。并且设置超时时间,超时时间是秒,并且如果有需要的话这个秒也是可以用参数进行设置。
--lua 下标从 1 开始
-- 限流 key
local key = KEYS[1]
-- 限流大小
local limit = tonumber(ARGV[1])

-- 获取当前流量大小
local curentLimit = tonumber(redis.call('get', key) or "0")

if curentLimit + 1 > limit then
    -- 达到限流大小 返回
    return 0;
else
    -- 没有达到阈值 value + 1
    redis.call("INCRBY", key, 1)
    -- EXPIRE后边的单位是秒
    redis.call("EXPIRE", key, 10)
    return curentLimit + 1
end
执行limit的脚本和执行lock的脚本类似。
package com.hqs.distributedlock.limit;

import lombok.extern.slf4j.Slf4j;
import org.springframework.beans.factory.annotation.Autowired;
import org.springframework.data.redis.core.RedisTemplate;
import org.springframework.data.redis.core.script.RedisScript;
import org.springframework.stereotype.Component;

import java.util.Collections;

/**
 * @author huangqingshi
 * @Date 2019-01-17
 */
@Slf4j
@Component
public class DistributedLimit {

    //注意RedisTemplate用的String,String,后续所有用到的key和value都是String的
    @Autowired
    private RedisTemplate<String, String> redisTemplate;


    @Autowired
    RedisScript<Long> limitScript;

    public Boolean distributedLimit(String key, String limit) {
        Long id = 0L;

        try {
            id = redisTemplate.execute(limitScript, Collections.singletonList(key),
                    limit);
            log.info("id:{}", id);
        } catch (Exception e) {
            log.error("error", e);
        }

        if(id == 0L) {
            return false;
        } else {
            return true;
        }
    }

}
接下来咱们写一个限流注解,并且设置注解的key和限流的大小:
package com.hqs.distributedlock.annotation;

import java.lang.annotation.ElementType;
import java.lang.annotation.Retention;
import java.lang.annotation.RetentionPolicy;
import java.lang.annotation.Target;

/**
 * 自定义limit注解
 * @author huangqingshi
 * @Date 2019-01-17
 */
@Target(ElementType.METHOD)
@Retention(RetentionPolicy.RUNTIME)
public @interface DistriLimitAnno {
    public String limitKey() default "limit";
    public int limit() default 1;
}
然后对注解进行切面,在切面中判断是否超过limit,如果超过limit的时候就需要抛出异常exceeded limit,否则正常执行。
package com.hqs.distributedlock.aspect;

import com.hqs.distributedlock.annotation.DistriLimitAnno;
import com.hqs.distributedlock.limit.DistributedLimit;
import lombok.extern.slf4j.Slf4j;
import org.aspectj.lang.JoinPoint;
import org.aspectj.lang.annotation.Aspect;
import org.aspectj.lang.annotation.Before;
import org.aspectj.lang.annotation.Pointcut;
import org.aspectj.lang.reflect.MethodSignature;
import org.springframework.beans.factory.annotation.Autowired;
import org.springframework.context.annotation.EnableAspectJAutoProxy;
import org.springframework.stereotype.Component;

import java.lang.reflect.Method;

/**
 * @author huangqingshi
 * @Date 2019-01-17
 */
@Slf4j
@Aspect
@Component
@EnableAspectJAutoProxy(proxyTargetClass = true)
public class LimitAspect {

    @Autowired
    DistributedLimit distributedLimit;

    @Pointcut("@annotation(com.hqs.distributedlock.annotation.DistriLimitAnno)")
    public void limit() {};

    @Before("limit()")
    public void beforeLimit(JoinPoint joinPoint) throws Exception {
        MethodSignature signature = (MethodSignature) joinPoint.getSignature();
        Method method = signature.getMethod();
        DistriLimitAnno distriLimitAnno = method.getAnnotation(DistriLimitAnno.class);
        String key = distriLimitAnno.limitKey();
        int limit = distriLimitAnno.limit();
        Boolean exceededLimit = distributedLimit.distributedLimit(key, String.valueOf(limit));
        if(!exceededLimit) {
            throw new RuntimeException("exceeded limit");
        }
    }

}
因为有抛出异常,这里我弄了一个统一的controller错误处理,如果controller出现Exception的时候都需要走这块异常。如果是正常的RunTimeException的时候获取一下,否则将异常获取一下并且输出。
package com.hqs.distributedlock.util;

import lombok.extern.slf4j.Slf4j;
import org.springframework.http.HttpStatus;
import org.springframework.web.bind.annotation.ControllerAdvice;
import org.springframework.web.bind.annotation.ExceptionHandler;
import org.springframework.web.bind.annotation.ResponseBody;
import org.springframework.web.bind.annotation.ResponseStatus;
import org.springframework.web.context.request.NativeWebRequest;

import javax.servlet.http.HttpServletRequest;
import java.util.HashMap;
import java.util.Map;

/**
 * @author huangqingshi
 * @Date 2019-01-17
 * 统一的controller错误处理
 */
@Slf4j
@ControllerAdvice
public class UnifiedErrorHandler {
    private static Map<String, String> res = new HashMap<>(2);

    @ExceptionHandler(value = Exception.class)
    @ResponseStatus(HttpStatus.OK)
    @ResponseBody
    public Object processException(HttpServletRequest req, Exception e) {
        res.put("url", req.getRequestURL().toString());

        if(e instanceof RuntimeException) {
            res.put("mess", e.getMessage());
        } else {
            res.put("mess", "sorry error happens");
        }
        return res;
    }

}
好了,接下来将注解写到自定义的controller上,limit的大小为10,也就是10秒钟内限制10次访问。
@PostMapping("/distributedLimit")
    @ResponseBody
    @DistriLimitAnno(limitKey="limit", limit = 10)
    public String distributedLimit(String userId) {
        log.info(userId);
        return "ok";
    }
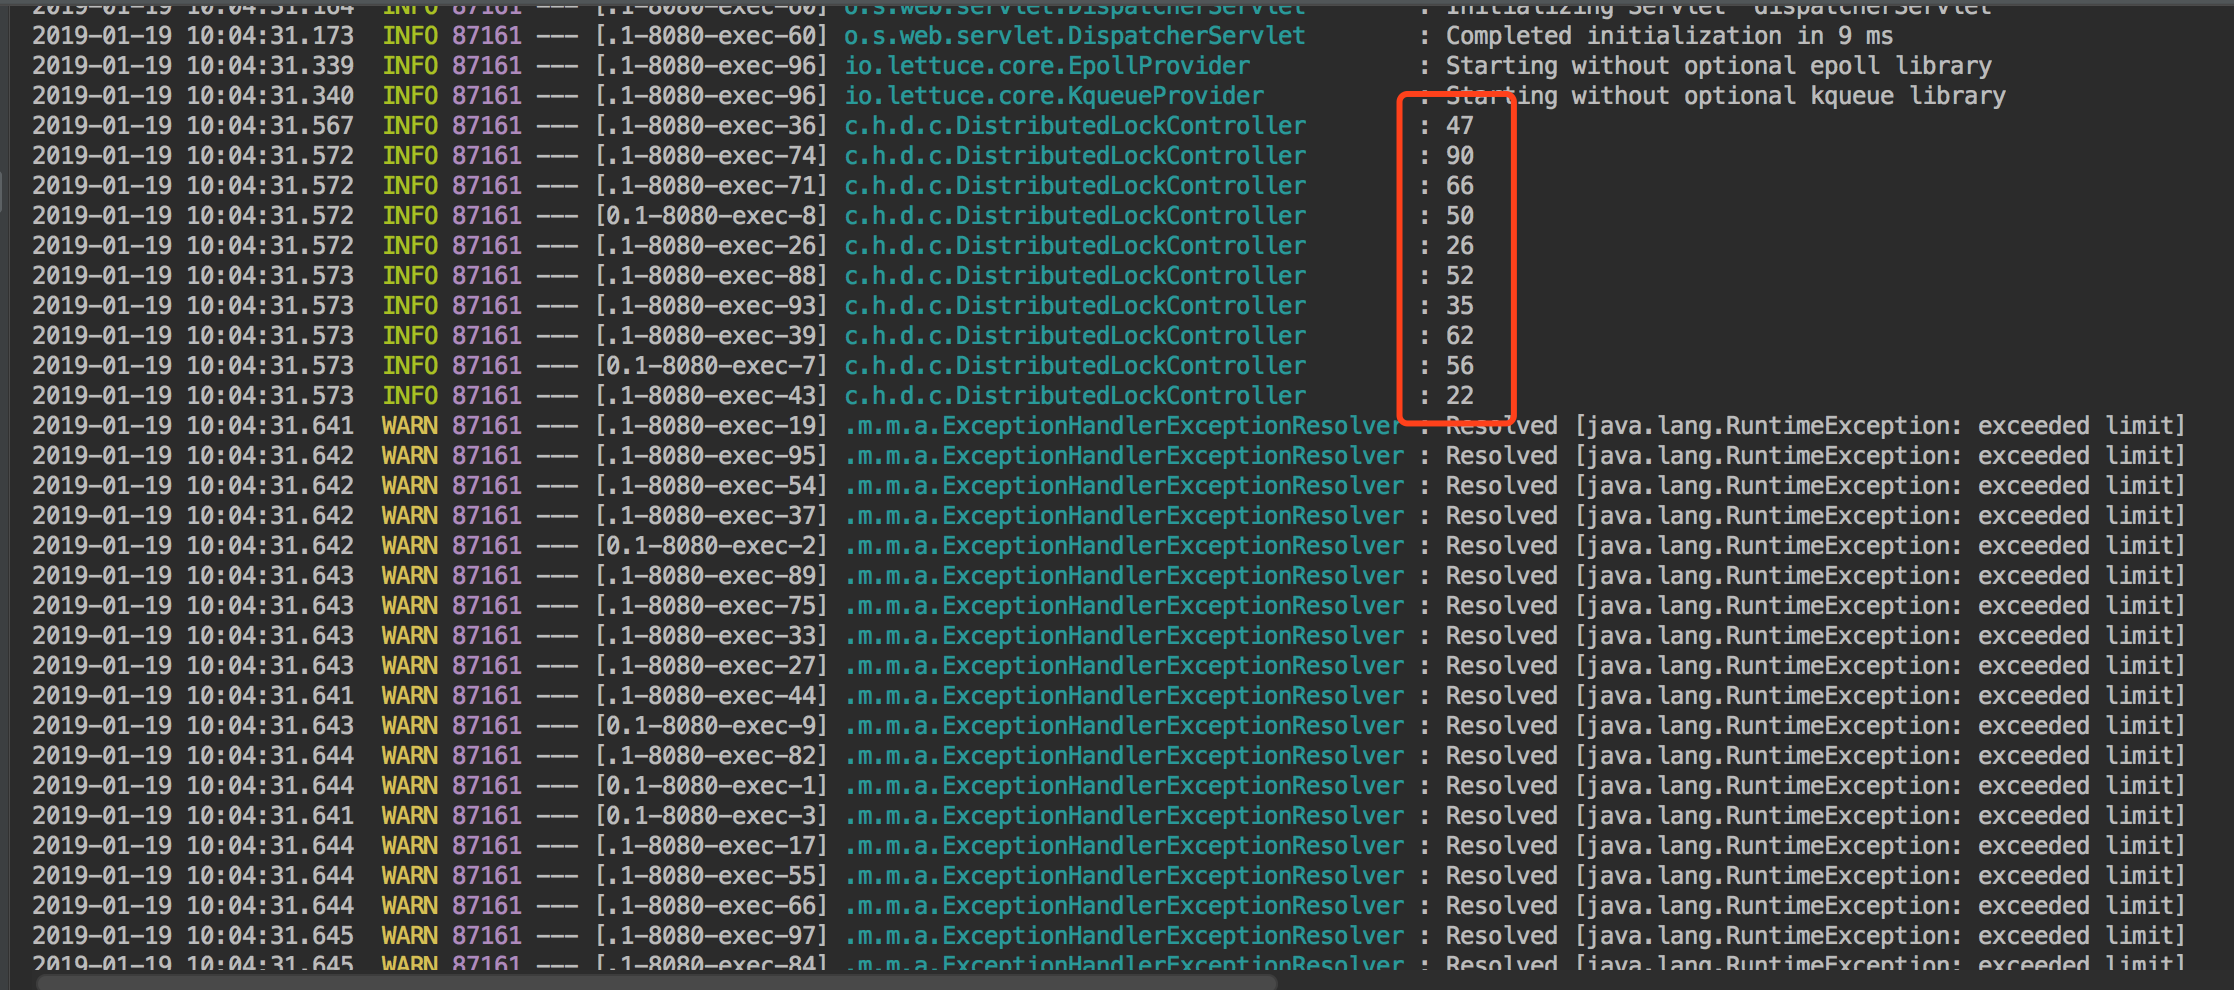
也是来一段Test方法来跑,老方式100个线程开始跑,只有10次,其他的都是limit。没有问题。

总结一下,这次实现采用了使用lua脚本和Redis实现了锁和限流,但是真实使用的时候还需要多测试,另外如果此次Redis也是采用的单机实现方法,使用集群的时候可能需要改造一下。关于锁这块其实Reids他们自己也实现了RedLock, java实现的版本Redission。也有很多公司使用了,功能非常强大。各种场景下都用到了。
如有问题,欢迎拍砖~


