6.1 为什么要分层

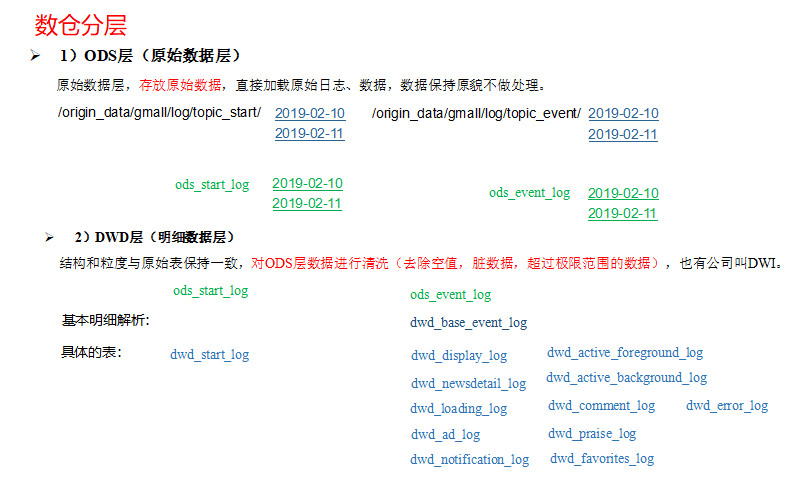
6.2 数仓分层

6.3 数据集市与数据仓库概念

6.4 数仓命名规范
-
ODS层命名为ods
-
DWD层命名为dwd
-
DWS层命名为dws
-
ADS层命名为ads
-
临时表数据库命名为xxx_tmp
-
备份数据数据库命名为xxx_bak
第7章 数仓搭建环境准备
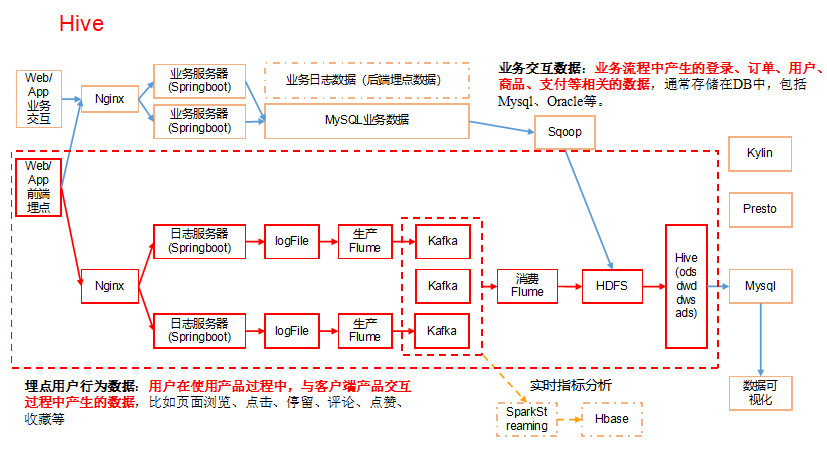

7.1 Hive&MySQL安装
7.1.1 Hive&MySQL安装
7.1.2 修改hive-site.xml
1)关闭元数据检查
[kgg@hadoop102 conf]$ pwd
/opt/module/hive/conf
[kgg@hadoop102 conf]$ vim hive-site.xml
增加如下配置:
<property>
    <name>hive.metastore.schema.verification</name>
    <value>false</value>
</property>
7.2 项目经验之元数据备份
元数据备份(重点,如数据损坏,可能整个集群无法运行,至少要保证每日零点之后备份到其它服务器两个复本) 参看文档:大数据技术之MySQL_HA
7.3 Hive运行引擎Tez
Tez是一个Hive的运行引擎,性能优于MR。为什么优于MR呢?看下图。
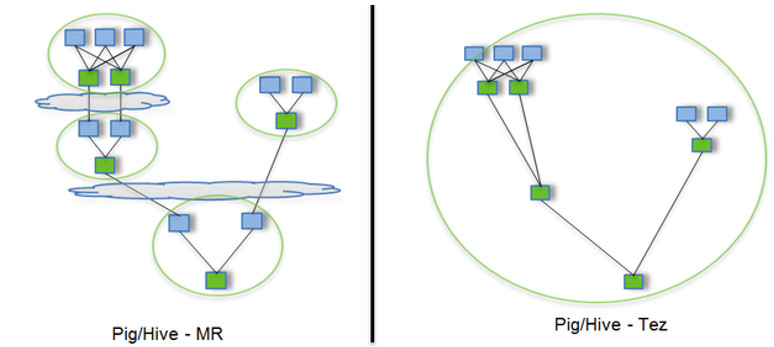 用Hive直接编写MR程序,假设有四个有依赖关系的MR作业,上图中,绿色是Reduce Task,云状表示写屏蔽,需要将中间结果持久化写到HDFS。 Tez可以将多个有依赖的作业转换为一个作业,这样只需写一次HDFS,且中间节点较少,从而大大提升作业的计算性能。
7.3.1 安装包准备
1)下载tez的依赖包:http://tez.apache.org 2)拷贝apache-tez-0.9.1-bin.tar.gz到hadoop102的/opt/software目录
[kgg@hadoop102 software]$ ls
apache-tez-0.9.1-bin.tar.gz
3)将apache-tez-0.9.1-bin.tar.gz上传到HDFS的/tez目录下。
[kgg@hadoop102 conf]$ hadoop fs -mkdir /tez
[kgg@hadoop102 conf]$ hadoop fs -put /opt/software/apache-tez-0.9.1-bin.tar.gz/ /tez
4)解压缩apache-tez-0.9.1-bin.tar.gz
[kgg@hadoop102 software]$ tar -zxvf apache-tez-0.9.1-bin.tar.gz -C /opt/module
5)修改名称
[kgg@hadoop102 module]$ mv apache-tez-0.9.1-bin/ tez-0.9.1
7.3.2 在Hive中配置Tez
1)进入到Hive的配置目录:/opt/module/hive/conf
[kgg@hadoop102 conf]$ pwd
/opt/module/hive/conf
2)在Hive的/opt/module/hive/conf下面创建一个tez-site.xml文件
[kgg@hadoop102 conf]$ pwd
/opt/module/hive/conf
[kgg@hadoop102 conf]$ vim tez-site.xml
添加如下内容
<?xml version="1.0" encoding="UTF-8"?>
<?xml-stylesheet type="text/xsl" href="configuration.xsl"?>
<configuration>
<property>
    <name>tez.lib.uris</name>
    <value>${fs.defaultFS}/tez/apache-tez-0.9.1-bin.tar.gz</value>
</property>
<property>
     <name>tez.use.cluster.hadoop-libs</name>
     <value>true</value>
</property>
<property>
     <name>tez.history.logging.service.class</name>        <value>org.apache.tez.dag.history.logging.ats.ATSHistoryLoggingService</value>
</property>
</configuration>
3)在hive-env.sh文件中添加tez环境变量配置和依赖包环境变量配置
[kgg@hadoop102 conf]$ vim hive-env.sh
添加如下配置
# Set HADOOP_HOME to point to a specific hadoop install directory
export HADOOP_HOME=/opt/module/hadoop-2.7.2
# Hive Configuration Directory can be controlled by:
export HIVE_CONF_DIR=/opt/module/hive/conf
# Folder containing extra libraries required for hive compilation/execution can be controlled by:
export TEZ_HOME=/opt/module/tez-0.9.1 #是你的tez的解压目录
export TEZ_JARS=""
for jar in `ls $TEZ_HOME |grep jar`; do
export TEZ_JARS=$TEZ_JARS:$TEZ_HOME/$jar
done
for jar in `ls $TEZ_HOME/lib`; do
export TEZ_JARS=$TEZ_JARS:$TEZ_HOME/lib/$jar
done
export HIVE_AUX_JARS_PATH=/opt/module/hadoop-2.7.2/share/hadoop/common/hadoop-lzo-0.4.20.jar$TEZ_JARS
4)在hive-site.xml文件中添加如下配置,更改hive计算引擎
<property>
    <name>hive.execution.engine</name>
    <value>tez</value>
</property>
7.3.3 测试
1)启动Hive
[kgg@hadoop102 hive]$ bin/hive
2)创建表
hive (default)> create table student(
id int,
name string);
3)向表中插入数据
hive (default)> insert into student values(1,"zhangsan");
4)如果没有报错就表示成功了
hive (default)> select * from student;
1       zhangsan
7.3.4 小结
1)运行Tez时检查到用过多内存而被NodeManager杀死进程问题:
Caused by: org.apache.tez.dag.api.SessionNotRunning: TezSession has already shutdown. Application application_1546781144082_0005 failed 2 times due to AM Container for appattempt_1546781144082_0005_000002 exited with  exitCode: -103
For more detailed output, check application tracking page:http://hadoop103:8088/cluster/app/application_1546781144082_0005Then, click on links to logs of each attempt.
Diagnostics: Container [pid=11116,containerID=container_1546781144082_0005_02_000001] is running beyond virtual memory limits. Current usage: 216.3 MB of 1 GB physical memory used; 2.6 GB of 2.1 GB virtual memory used. Killing container.
这种问题是从机上运行的Container试图使用过多的内存,而被NodeManager kill掉了。
[摘录] The NodeManager is killing your container. It sounds like you are trying to use hadoop streaming which is running as a child process of the map-reduce task. The NodeManager monitors the entire process tree of the task and if it eats up more memory than the maximum set in mapreduce.map.memory.mb or mapreduce.reduce.memory.mb respectively, we would expect the Nodemanager to kill the task, otherwise your task is stealing memory belonging to other containers, which you don't want.
解决方法: 关掉虚拟内存检查,修改yarn-site.xml,修改后一定要分发,并重新启动hadoop集群。
<div><property>
<name>yarn.nodemanager.vmem-check-enabled</name>
<value>false</value>
</property>
</div>

8.1 创建数据库
1)创建gmall数据库 hive (default)> create database gmall; 说明:如果数据库存在且有数据,需要强制删除时执行:drop database gmall cascade; 2)使用gmall数据库 hive (default)> use gmall;
8.2 ODS层
原始数据层,存放原始数据,直接加载原始日志、数据,数据保持原貌不做处理。
8.2.1 项目经验之支持LZO压缩配置
1)hadoop本身并不支持lzo压缩,故需要使用twitter提供的hadoop-lzo开源组件。hadoop-lzo需依赖hadoop和lzo进行编译,编译步骤如下。
Hadoop支持LZO
0.环境准备
maven(下载安装,配置环境变量,修改sitting.xml加阿里云镜像)
gcc-c++
zlib-devel
autoconf
automake
libtool
通过yum安装即可,yum -y install gcc-c++ lzo-devel zlib-devel autoconf automake libtool
1. 下载、安装并编译LZO
wget http://www.oberhumer.com/opensource/lzo/download/lzo-2.10.tar.gz
tar -zxvf lzo-2.10.tar.gz
cd lzo-2.10
./configure -prefix=/usr/local/hadoop/lzo/
make
make install
2. 编译hadoop-lzo源码
2.1 下载hadoop-lzo的源码
下载地址:https://github.com/twitter/hadoop-lzo/archive/master.zip
2.2 解压之后,修改pom.xml
<hadoop.current.version>2.7.2</hadoop.current.version>
2.3 声明两个临时环境变量
     export C_INCLUDE_PATH=/usr/local/hadoop/lzo/include
     export LIBRARY_PATH=/usr/local/hadoop/lzo/lib
2.4 编译
    进入hadoop-lzo-master,执行maven编译命令
    mvn package -Dmaven.test.skip=true
2.5 编译hadoop
进入target,hadoop-lzo-0.4.21-SNAPSHOT.jar 即编译成功的hadoop-lzo组件
1)将编译好后的hadoop-lzo-0.4.20.jar 放入hadoop-2.7.2/share/hadoop/common/
[kgg@hadoop102 common]$ pwd
/opt/module/hadoop-2.7.2/share/hadoop/common
[kgg@hadoop102 common]$ ls
hadoop-lzo-0.4.20.jar
2)同步hadoop-lzo-0.4.20.jar到hadoop103、hadoop104
[kgg@hadoop102 common]$ xsync hadoop-lzo-0.4.20.jar
3)core-site.xml增加配置支持LZO压缩
4)同步core-site.xml到hadoop103、hadoop104
[kgg@hadoop102 hadoop]$ xsync core-site.xml
5)启动及查看集群
[kgg@hadoop102 hadoop-2.7.2]$ sbin/start-dfs.sh
[kgg@hadoop103 hadoop-2.7.2]$ sbin/start-yarn.sh
6)创建lzo文件的索引,lzo压缩文件的可切片特性依赖于其索引,故我们需要手动为lzo压缩文件创建索引。若无索引,则lzo文件的切片只有一个。
hadoop jar /path/to/your/hadoop-lzo.jar com.hadoop.compression.lzo.DistributedLzoIndexer big_file.lzo
7)测试
    (1)hive建表语句
create table bigtable(id bigint, time bigint, uid string, keyword string, url_rank int, click_num int, click_url string) row format delimited fields terminated by '\t' STORED AS
  INPUTFORMAT 'com.hadoop.mapred.DeprecatedLzoTextInputFormat'
  OUTPUTFORMAT 'org.apache.hadoop.hive.ql.io.HiveIgnoreKeyTextOutputFormat';
    (2)向表中导入数据,bigtable.lzo大小为140M
load data local inpath '/opt/module/data/bigtable.lzo' into table bigtable;
    (3)测试(建索引之前),观察map个数(1个)
select id,count(*) from bigtable group by id limit 10;
    (4)建索引
hadoop jar /opt/module/hadoop-2.7.2/share/hadoop/common/hadoop-lzo-0.4.20.jar com.hadoop.compression.lzo.DistributedLzoIndexer /user/hive/warehouse/bigtable
    (5)测试(建索引之后),观察map个数(2个)
select id,count(*) from bigtable group by id limit 10;
8.2.2 创建启动日志表ods_start_log
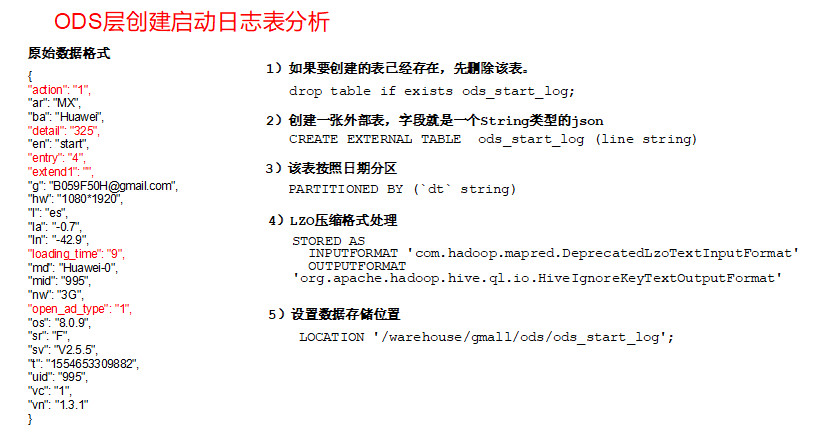
1)创建输入数据是lzo输出是text,支持json解析的分区表
hive (gmall)>
drop table if exists ods_start_log;
CREATE EXTERNAL TABLE ods_start_log (`line` string)
PARTITIONED BY (`dt` string)
STORED AS
  INPUTFORMAT 'com.hadoop.mapred.DeprecatedLzoTextInputFormat'
  OUTPUTFORMAT 'org.apache.hadoop.hive.ql.io.HiveIgnoreKeyTextOutputFormat'
LOCATION '/warehouse/gmall/ods/ods_start_log';
说明Hive的LZO压缩:https://cwiki.apache.org/confluence/display/Hive/LanguageManual+LZO
2)加载数据
hive (gmall)>
load data inpath '/origin_data/gmall/log/topic_start/2020-10-14' into table gmall.ods_start_log partition(dt='2019-12-14');
注意:时间格式都配置成YYYY-MM-DD格式,这是Hive默认支持的时间格式
3)查看是否加载成功
hive (gmall)> select * from ods_start_log limit 2;
4)为lzo压缩文件创建索引
hadoop jar /opt/module/hadoop/share/hadoop/common/hadoop-lzo-0.4.20.jar com.hadoop.compression.lzo.DistributedLzoIndexer /warehouse/gmall/ods/ods_start_log/dt=2020-10-14
8.2.3 创建事件日志表ods_event_log
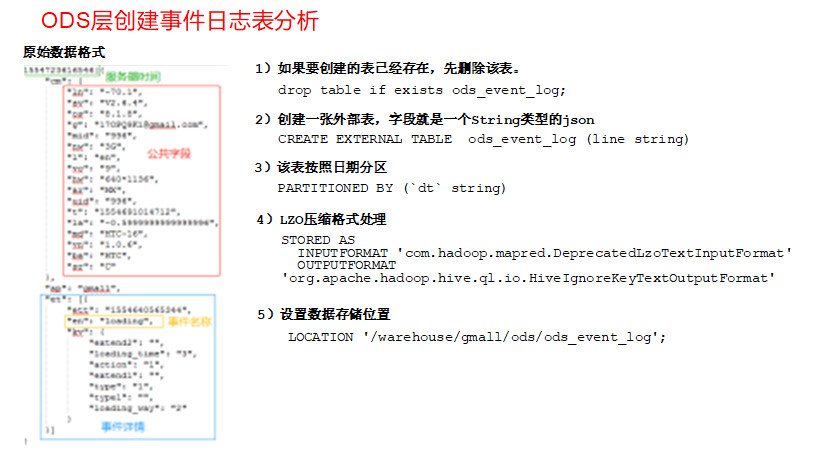 1)创建输入数据是lzo输出是text,支持json解析的分区表
hive (gmall)>
drop table if exists ods_event_log;
CREATE EXTERNAL TABLE ods_event_log(`line` string)
PARTITIONED BY (`dt` string)
STORED AS
  INPUTFORMAT 'com.hadoop.mapred.DeprecatedLzoTextInputFormat'
  OUTPUTFORMAT 'org.apache.hadoop.hive.ql.io.HiveIgnoreKeyTextOutputFormat'
LOCATION '/warehouse/gmall/ods/ods_event_log';
2)加载数据
hive (gmall)>
load data inpath '/origin_data/gmall/log/topic_event/2020-10-14' into table gmall.ods_event_log partition(dt='2020-10-14');
注意:时间格式都配置成YYYY-MM-DD格式,这是Hive默认支持的时间格式
3)查看是否加载成功
hive (gmall)> select * from ods_event_log limit 2;
4)为lzo压缩文件创建索引
hadoop jar /opt/module/hadoop/share/hadoop/common/hadoop-lzo-0.4.20.jar com.hadoop.compression.lzo.DistributedLzoIndexer /warehouse/gmall/ods/ods_event_log/dt=2020-10-14
8.2.4 Shell中单引号和双引号区别
1)在/home/kgg/bin创建一个test.sh文件
[kgg@hadoop102 bin]$ vim test.sh
在文件中添加如下内容
2)查看执行结果
[kgg@hadoop102 bin]$ test.sh 2019-12-14
$do_date
2019-12-14
'2019-12-14'
"$do_date"
2019年 05月 02日 星期四 21:02:08 CST
3)总结: (1)单引号不取变量值 (2)双引号取变量值 (3)反引号,执行引号中命令 (4)双引号内部嵌套单引号,取出变量值 (5)单引号内部嵌套双引号,不取出变量值
8.2.5 ODS层加载数据脚本
1)在hadoop102的/home/kgg/bin目录下创建脚本
[kgg@hadoop102 bin]$ vim ods_log.sh
在脚本中编写如下内容
2)增加脚本执行权限
[kgg@hadoop102 bin]$ chmod 777 ods_log.sh
3)脚本使用
[kgg@hadoop102 module]$ ods_log.sh 2019-02-11
4)查看导入数据
hive (gmall)>
select * from ods_start_log where dt='2019-02-11' limit 2;
select * from ods_event_log where dt='2019-02-11' limit 2;
5)脚本执行时间
本文来自博客园,作者:大码王,转载请注明原文链接:https://www.cnblogs.com/huanghanyu/


 posted on


【推荐】国内首个AI IDE,深度理解中文开发场景,立即下载体验Trae
【推荐】编程新体验,更懂你的AI,立即体验豆包MarsCode编程助手
【推荐】抖音旗下AI助手豆包,你的智能百科全书,全免费不限次数
【推荐】轻量又高性能的 SSH 工具 IShell:AI 加持,快人一步
· 开发者必知的日志记录最佳实践
· SQL Server 2025 AI相关能力初探
· Linux系列:如何用 C#调用 C方法造成内存泄露
· AI与.NET技术实操系列(二):开始使用ML.NET
· 记一次.NET内存居高不下排查解决与启示
· 阿里最新开源QwQ-32B,效果媲美deepseek-r1满血版,部署成本又又又降低了!
· 开源Multi-agent AI智能体框架aevatar.ai,欢迎大家贡献代码
· Manus重磅发布:全球首款通用AI代理技术深度解析与实战指南
· 被坑几百块钱后,我竟然真的恢复了删除的微信聊天记录!
· AI技术革命,工作效率10个最佳AI工具