Spring AOP学习
什么是AOP
Spring AOP 面向切面编程,采取横向抽取机制,取代了传统纵向继承体系重复性代码(性能监视、事务管理、安全检查、缓存)
使用纯Java实现,不需要专门的编译过程和类加载器,在运行期通过JDK动态代理或者CGLIB动态代理的方式向目标类织入增强代码
AspectJ [ˈæspekt] 是一个基于Java语言的AOP框架,扩展了Java语言,提供了一个专门的编译器,在编译时提供横向代码的织入。
在决定使用哪种框架实现你的项目之前,有几个要点(同样适用于其他框架)。https://www.oschina.net/translate/comparative_analysis_between_spring_aop_and_aspectj
明确你在应用横切关注点(cross-cutting concern)时(例如事物管理、日志或性能评估),需要处理的是Spring beans还是POJO。
如果正在开发新的应用,则选择Spring AOP就没有什么阻力。但是如果你正在维护一个现有的应用(该应用并没有使用Spring框架),AspectJ就将是一个自然的选择了。
为了详细说明这一点,假如你正在使用Spring AOP,当你想将日志功能作为一个通知(advice)加入到你的应用中,用于追踪程序流程,那么该通知(Advice)就只能应用在Spring beans的连接点(Joinpoint)之上。
另一个需要考虑的因素是,你是希望在编译期间进行织入(weaving),还是编译后(post-compile)或是运行时(run-time)。Spring只支持运行时织入。如果你有多个团队分别开发多个使用Spring编写的模块(导致生成多个jar文件,例如每个模块一个jar文件),并且其中一个团队想要在整个项目中的所有Spring bean(例如,包括已经被其他团队打包了的jar文件)上应用日志通知(在这里日志只是用于加入横切关注点的举例),那么通过配置该团队自己的Spring配置文件就可以轻松做到这一点。之所以可以这样做,就是因为Spring使用的是运行时织入。如果你使用AspectJ想要做到同样的事情,你也许就需要使用acj(AspectJ编译器)重新编译所有的代码并且进行重新打包。否则,你也可以选择使用AspectJ编译后(post-compile)或载入时(load-time)织入。
Advisor和Aspect的区别:
Advisor:Spring传统意义上的切面,支持一个切点和一个通知的组合
Aspect:支持多个切点和多个通知的组合,真实开发中常用。
为什么要用AOP
在传统的面向对象编程时,难免有很多重复的代码。我们可以把重复的代码提出来,放到一个类中,然后统一使用,这样将来修改起来也会很是方便。
AOP底层原理
就是代理机制:
* 动态代理:(JDK中使用)
* JDK的动态代理,对实现了接口的类生成代理.
Spring的AOP代理
JDK动态代理:对实现了接口的类生成代理。没有实现接口的类,就无法生成代理对象了。
CGLib代理机制:对类生成代理
代理实例:
一个接口:
package com.js.demo10;

public interface Greeting {

    void sayHello(String name);
}
一个实现类:
package com.js.demo10;

public class GreetingImpl implements Greeting {

    @Override
    public void sayHello(String name) {
        before();
        System.out.println("Hello! " + name);
        after();
    }

    private void before() {
        System.out.println("Before");
    }

    private void after() {
        System.out.println("After");
    }
}
静态代理实现实例:
由程序员创建或由特定工具自动生成源代码,再对其编译。在程序运行前,代理类的.class文件就已经存在了。
package com.js.demo10;

public class GreetingProxy implements Greeting {

    private GreetingImpl greetingImpl;

    public GreetingProxy(GreetingImpl greetingImpl) {
        this.greetingImpl = greetingImpl;
    }

    @Override
    public void sayHello(String name) {
        before();
        greetingImpl.sayHello(name);
        after();
    }

    private void before() {
        System.out.println("Before");
    }

    private void after() {
        System.out.println("After");
    }
}
客户端来调用:
public class GreetingProxyClient {

    public static void main(String[] args) {
        Greeting greetingProxy = new GreetingProxy(new GreetingImpl());
        greetingProxy.sayHello("Jack");
    }
}
问题:XxxProxy 这样的类会越来越多,如何才能将这些代理类尽可能减少呢?最好只有一个代理类。
如果项目中有多个类,则需要编写多个代理类,工作量大,不好修改,不好维护,不能应对变化。
JDK动态代理实现实例:
JDK内置的Proxy动态代理可以在运行时动态生成字节码,而没必要针对每个类编写代理类。
package com.js.demo10;

import java.lang.reflect.Method;

import org.springframework.cglib.proxy.InvocationHandler;
import org.springframework.cglib.proxy.Proxy;

public class JDKDynamicProxy implements InvocationHandler {

    private Object target;

    public JDKDynamicProxy(Object target) {
        this.target = target;
    }

    @SuppressWarnings("unchecked")
    public <T> T getProxy() {
        return (T) Proxy.newProxyInstance(
            target.getClass().getClassLoader(),
            target.getClass().getInterfaces(),
            this
        );
    }

    @Override
    public Object invoke(Object proxy, Method method, Object[] args) throws Throwable {
        before();
        Object result = method.invoke(target, args);
        after();
        return result;
    }

    private void before() {
        System.out.println("Before");
    }

    private void after() {
        System.out.println("After");
    }
}
客户端来调用:
public class JDKDynamicProxyClient {

    public static void main(String[] args) {
        Greeting greeting = new JDKDynamicProxy(new GreetingImpl()).getProxy();
        greeting.sayHello("Jack");
    }
}
问题:JDK 给我们提供的动态代理只能代理接口,而不能代理没有接口的类。
CGLIB动态代理实现实例:
CGLIB(Code Generation Library)是一个开源项目,是一个强大的,高性能,高质量的Code生成类库,它可以在运行期扩展Java类与实现Java接口,通俗说cglib可以在运行时动态生成字节码。
大概的原理是:使用cglib可以实现动态代理,即使被代理的类没有实现接口,但被代理的类必须不是final类。cglib继承被代理的类,重写方法,织入通知,动态生成字节码并运行,因为是继承所以final类是没有办法动态代理的。
package com.js.demo10;

import java.lang.reflect.Method;

import org.springframework.cglib.proxy.Enhancer;
import org.springframework.cglib.proxy.MethodInterceptor;
import org.springframework.cglib.proxy.MethodProxy;

public class CGLibDynamicProxy implements MethodInterceptor {

    private static CGLibDynamicProxy instance = new CGLibDynamicProxy();

    private CGLibDynamicProxy() {
    }

    public static CGLibDynamicProxy getInstance() {
        return instance;
    }

    @SuppressWarnings("unchecked")
    public <T> T getProxy(Class<T> cls) {
        return (T) Enhancer.create(cls, this);
    }

    @Override
    public Object intercept(Object target, Method method, Object[] args, MethodProxy proxy) throws Throwable {
        before();
        Object result = proxy.invokeSuper(target, args);
        after();
        return result;
    }

    private void before() {
        System.out.println("Before");
    }

    private void after() {
        System.out.println("After");
    }
}
客户端来调用:
public class CGLibDynamicProxyClient {

    public static void main(String[] args) {
        Greeting greeting = CGLibDynamicProxy.getInstance().getProxy(GreetingImpl.class);// Singleton 模式
        greeting.sayHello("Jack");
    }
}
结论:Spring框架,如果类实现了接口,就使用JDK的动态代理生成代理对象,如果这个类没有实现任何接口,使用CGLIB生成代理对象.
如果项目中有些类没有实现接口,则不应该为了实现动态代理而刻意去抽出一些没有实例意义的接口,通过cglib可以解决该问题。
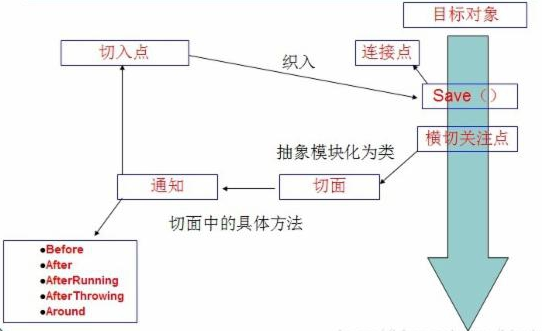
AOP的术语
Aspect(切面):是切入点和通知(引介)的结合,横切关注点被模块化的特殊对象。即,它是一个类。
Advice(通知/增强):所谓通知是指拦截到Joinpoint之后所要做的事情,即拦截逻辑.切面必须要完成的工作。即,它是类中的一个方法。
通知分为前置通知,后置通知,异常通知,最终通知,环绕通知
Target(目标对象):代理的目标对象
Proxy(代理):一个类被AOP织入增强后,就产生一个结果代理类
Joinpoint(连接点):所谓连接点是指那些被拦截到的点。在spring中,这些点指的是方法,因为spring只支持方法类型的连接点.
Pointcut(切入点):所谓切入点是指我们要对哪些Joinpoint连接点进行拦截的定义,简单理解如正则表达式.
Weaving(织入):是指把增强应用到目标对象来创建新的代理对象的过程.
Introduction(引介):引介是一种特殊的通知在不修改类代码的前提下, Introduction可以在运行期为类动态地添加一些属性或方法.
spring采用动态代理织入,而AspectJ采用编译期织入和类装在期织入

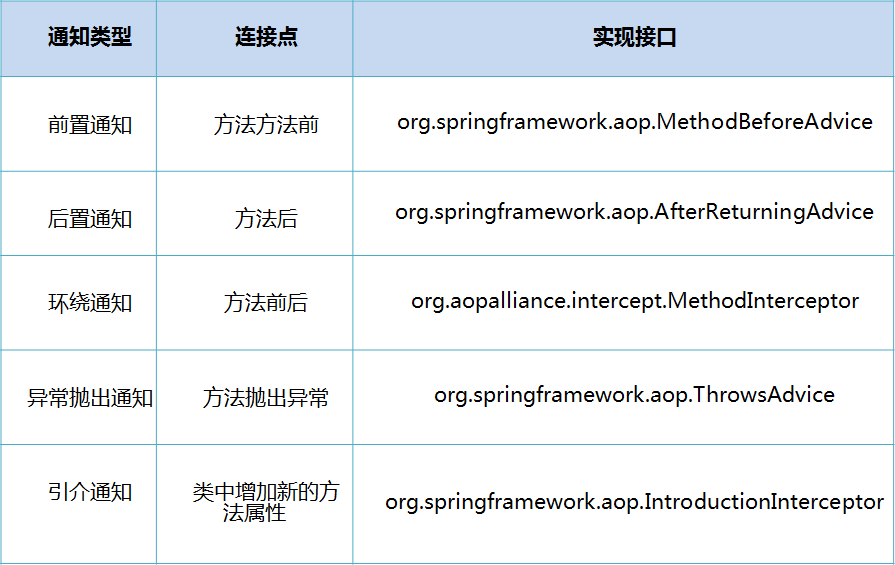
Spring按照通知Advice在目标方法的连接点位置,通知Advice可分为五类(可以分编程式和声明式实现)
前置通知:org.springframework.aop.MethodBeforeAdvice,在目标方法执行之前实施增强
后置通知:org.springframework.aop.AfterReturningAdvice,在目标方法执行之后实施增强
环绕通知:org.aopalliance.intercept.MethodInterceptor,在目标方法执行前后实施增强
异常抛出通知:org.springframework.aop.ThrowsAdvice,在方法抛出异常之后实施增强
引介通知:org.springframework.aop.IntroductionInterceptor,在目标类中添加一些新的方法和属性
Spring中切面的类型:
Advisor:Spring中的传统切面。
Aspect:都是有一个切点和一个通知的组合
Advisor:多个切点和多个通知的组合
Advisor : 代表一般切面,Advice本身就是一个切面,对目标类所有方法进行拦截(*不带有切点的切面)
PointcutAdvisor : 代表具有切点的切面,可以指定拦截目标类哪些方法带有切点的切面,针对某个方法进行拦截
IntroductionAdvisor : 代表引介切面,针对引介通知而使用切面(不要求掌握)
不带有切点的切面
不带切点的切面实例
导入相应的jar包:Spring开发基础包、spring-aop-4.3.7.RELEASE.jar、aopalliance-1.0.jar(AOP联盟包)
编写一个接口Customer:
package com.js.aopStu;

public interface CustomerDao {
    public void add();
    public void delete();
    public void update();
    public void find();
}
编写实现类CustomerImpl:
package com.js.aopStu;

public class CustomerImpl implements CustomerDao {

    @Override
    public void add() {
        System.out.println("添加客户...");
    }

    @Override
    public void delete() {
        System.out.println("删除客户...");
    }

    @Override
    public void update() {
        System.out.println("修改客户...");
    }

    @Override
    public void find() {
        System.out.println("查询客户...");
    }

}
编写增强的代码。新建一个类MyBeforeAdvice,以前置增强为例
package com.js.aopStu;

import java.lang.reflect.Method;

import org.springframework.aop.MethodBeforeAdvice;

/**
 * 前置增强
 * 实现指定接口
 * @author hdb
 *
 */
public class MyBeforeAdvice implements MethodBeforeAdvice{
    /**
     * method:执行的方法
     * args:参数
     * target:目标对象
     */
    @Override
    public void before(Method method, Object[] args, Object target) throws Throwable {
        System.out.println("前置增强...");
    }

}
配置代理生成代理类,基于ProxyFactoryBean类,底层自动选择使用JDK的动态代理还是CGLIB的代理。
配置applicationContext.xml:
<?xml version="1.0" encoding="UTF-8"?>
<beans xmlns="http://www.springframework.org/schema/beans"
xmlns:xsi="http://www.w3.org/2001/XMLSchema-instance"
xmlns:context="http://www.springframework.org/schema/context"
xmlns:util="http://www.springframework.org/schema/util"
xsi:schemaLocation="
http://www.springframework.org/schema/beans http://www.springframework.org/schema/beans/spring-beans.xsd
http://www.springframework.org/schema/context http://www.springframework.org/schema/context/spring-context.xsd
http://www.springframework.org/schema/util http://www.springframework.org/schema/util/spring-util.xsd">

<!-- 定义目标对象 -->
<bean id="customerDao" class="com.js.aopStu.CustomerImpl"></bean>
<!-- 定义增强 -->
<bean id="beforeAdice" class="com.js.aopStu.MyBeforeAdvice"></bean>
 <!-- Spring支持配置来生成代理,基于ProxyFactoryBean类,底层自动选择使用JDK的动态代理还是CGLIB的代理 -->
 <bean id="customerDaoProxy" class="org.springframework.aop.framework.ProxyFactoryBean">
 <!-- 设置目标对象 -->
     <property name="target" ref="customerDao"></property>
     <!-- 设置实现的接口,value中写接口的全路径 -->
     <property name="proxyInterfaces" value="com.js.aopStu.CustomerDao"></property>
     <!-- 配置需要拦截的,一定是value,此处对customerDao中的所有方法拦截 -->
     <property name="interceptorNames" value="beforeAdice"></property>
 </bean>

</beans>
我们需要配置一些属性,不需要都设置。
<list>
<value></value>
....
</list>
编写测试类:
package com.js.aopStu;

import org.junit.Test;
import org.junit.runner.RunWith;
import org.springframework.beans.factory.annotation.Autowired;
import org.springframework.beans.factory.annotation.Qualifier;
import org.springframework.test.context.ContextConfiguration;
import org.springframework.test.context.junit4.SpringJUnit4ClassRunner;

@RunWith(SpringJUnit4ClassRunner.class)
@ContextConfiguration("classpath:applicationContext.xml")
public class TestAOPDemo1 {

    @Autowired
    @Qualifier("customerDaoProxy")
    private CustomerDao customerDao;

    //不使用增强的情况下
    @Test
    public void Demo1(){
        customerDao.add();
        customerDao.delete();
        customerDao.find();
        customerDao.update();
    }
}
带有切点的切面(常用)
带有切点的切面实例
新建一个DAO,创建被代理对象:
package com.js.demo3;
/**
 * 目标对象
 * @author  hdb
 *
 */
public class OrderDao {
    public void add() {
        System.out.println("添加订单...");
    }
    public void delete() {
        System.out.println("删除订单...");
    }
    public void update() {
        System.out.println("修改订单...");
    }
    public void find() {
        System.out.println("查询订单...");
    }
}
编写增强类,这次使用环绕增强:
package com.js.demo3;

import org.aopalliance.intercept.MethodInterceptor;
import org.aopalliance.intercept.MethodInvocation;

/**
 * 增强的类
 * 使用的是环绕增强
 * @author hbd
 *
 */
public class MyAroundAdvice implements MethodInterceptor{

    @Override
    public Object invoke(MethodInvocation methodInvocation) throws Throwable {
        System.out.println("环绕前增强===");
        Object object=methodInvocation.proceed();//执行目标对象的方法
        System.out.println("环绕后增强===");
        return object;
    }

}
生成代理:通过配置的方式:
<?xml version="1.0" encoding="UTF-8"?>
<beans xmlns="http://www.springframework.org/schema/beans"
       xmlns:xsi="http://www.w3.org/2001/XMLSchema-instance"
       xmlns:context="http://www.springframework.org/schema/context"
       xmlns:util="http://www.springframework.org/schema/util"
       xsi:schemaLocation="
http://www.springframework.org/schema/beans http://www.springframework.org/schema/beans/spring-beans.xsd
http://www.springframework.org/schema/context http://www.springframework.org/schema/context/spring-context.xsd
http://www.springframework.org/schema/util http://www.springframework.org/schema/util/spring-util.xsd">

<!-- 带有切点的切面 -->
<!-- 定义目标对象 -->
<bean id="orderDao1" class="com.js.demo3.OrderDao"></bean>

<!-- 定义增强 -->
<bean id="aroundAdvice" class="com.js.demo3.MyAroundAdvice"></bean>

<!-- 定义切点切面: -->
<bean id="myPointcutAdvisor" class="org.springframework.aop.support.RegexpMethodPointcutAdvisor">
    <!-- 定义表达式,规定哪些方法执行拦截 -->
    <!-- . 任意字符  * 任意个 -->
    <!-- <property name="pattern" value=".*"/> -->
    <!-- <property name="pattern" value="cn\.itcast\.spring3\.demo4\.OrderDao\.add.*"/> -->
    <!-- <property name="pattern" value=".*add.*"></property> -->
    <property name="patterns" value=".*add.*,.*find.*"></property>
    <!-- 应用增强 -->
    <property name="advice" ref="aroundAdvice"/>
</bean>

<!-- 定义生成代理对象 -->
<bean id="orderDaoProxy" class="org.springframework.aop.framework.ProxyFactoryBean">
    <!-- 配置目标 -->
    <property name="target" ref="orderDao1"></property>
    <!-- 针对类的代理 -->
    <property name="proxyTargetClass" value="true"></property>
    <!-- 在目标上应用增强 -->
    <property name="interceptorNames" value="myPointcutAdvisor"></property>
</bean>

</beans>
编写测试类:
package com.js.demo3;

import org.junit.Test;
import org.junit.runner.RunWith;
import org.springframework.beans.factory.annotation.Autowired;
import org.springframework.beans.factory.annotation.Qualifier;
import org.springframework.test.context.ContextConfiguration;
import org.springframework.test.context.junit4.SpringJUnit4ClassRunner;

@RunWith(SpringJUnit4ClassRunner.class)
@ContextConfiguration("classpath:applicationContext.xml")
public class TestAOPDemo1 {

    @Autowired
    @Qualifier("orderDaoProxy")
    private OrderDao orderDao;

    @Test
    public void demo1(){
        orderDao.add();
        orderDao.delete();
        orderDao.find();
        orderDao.update();
    }
}
自动代理
前面的案例中,每个代理都是通过ProxyFactoryBean织入切面代理,在实际开发中,非常多的Bean每个都配置ProxyFactoryBean开发维护量巨大。
自动创建代理(*****基于后处理Bean.在Bean创建的过程中完成的增强.生成Bean就是代理。)
(1)BeanNameAutoProxyCreator根据Bean名称创建代理
(2)DefaultAdvisorAutoProxyCreator根据Advisor本身包含信息创建代理
*AnnotationAwareAspectJAutoProxyCreator 基于Bean中的AspectJ 注解进行自动代理
之前我们手动创建代理的时候,注意到一点,都是先创建被代理对象,然后在创建代理的时候,传入该被代理对象。
而下面要学习的两种自动代理,是基于后处理bean,在类创建的过程中完成增强,生成的bean,就是代理!
基于Bean名称的自动代理
先清理配置文件中其他部分,留下最简洁的四个bean配置:
<?xml version="1.0" encoding="UTF-8"?>
<beans xmlns="http://www.springframework.org/schema/beans"
       xmlns:xsi="http://www.w3.org/2001/XMLSchema-instance"
       xmlns:context="http://www.springframework.org/schema/context"
       xmlns:util="http://www.springframework.org/schema/util"
       xsi:schemaLocation="
http://www.springframework.org/schema/beans http://www.springframework.org/schema/beans/spring-beans.xsd
http://www.springframework.org/schema/context http://www.springframework.org/schema/context/spring-context.xsd
http://www.springframework.org/schema/util http://www.springframework.org/schema/util/spring-util.xsd">

<!-- 定义目标对象 -->
<bean id="orderDao2" class="com.helloAOP.autoProxy.OrderDao"></bean>
<bean id="customerDao2" class="com.helloAOP.autoProxy.CustomerImpl"></bean>
<!-- 定义增强 -->
<bean id="aroundAdvice2" class="com.helloAOP.autoProxy.MyAroundAdvice"></bean>
<bean id="beforeAdvice2" class="com.helloAOP.autoProxy.MyBeforeAdvice"></bean>

<!-- 自动代理:按名称代理 基于后处理bean,后处理bean不需要配置ID-->
<bean class="org.springframework.aop.framework.autoproxy.BeanNameAutoProxyCreator">
    <property name="beanNames" value="*Dao2"/>
    <property name="interceptorNames" value="beforeAdvice2"/>
</beans>
编写测试类:
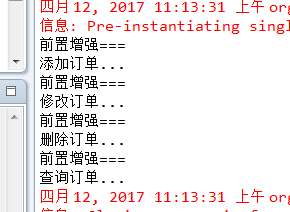
package com.helloAOP.autoProxy;

import org.junit.Test;
import org.springframework.context.support.ClassPathXmlApplicationContext;

public class TestAutoProxyByName {

    @Test
    public void testDemo(){

        ClassPathXmlApplicationContext applicationContext = new ClassPathXmlApplicationContext("applicationContext.xml");
        OrderDao orderDao = (OrderDao)applicationContext.getBean("orderDao2");
        orderDao.add();
        orderDao.update();
        orderDao.delete();
        orderDao.find();
        applicationContext.close();
    }
}
运行测试:
基于AspectJ注解信息的自动代理
先清理配置文件中其他部分,留下最简洁的四个bean配置:
<?xml version="1.0" encoding="UTF-8"?>
<beans xmlns="http://www.springframework.org/schema/beans"
       xmlns:xsi="http://www.w3.org/2001/XMLSchema-instance"
       xmlns:context="http://www.springframework.org/schema/context"
       xmlns:util="http://www.springframework.org/schema/util"
       xsi:schemaLocation="
http://www.springframework.org/schema/beans http://www.springframework.org/schema/beans/spring-beans.xsd
http://www.springframework.org/schema/context http://www.springframework.org/schema/context/spring-context.xsd
http://www.springframework.org/schema/util http://www.springframework.org/schema/util/spring-util.xsd">

<!-- 定义目标对象 -->
<bean id="orderDao3" class="com.helloAOP.autoProxy.OrderDao"></bean>
<bean id="customerDao3" class="com.helloAOP.autoProxy.CustomerImpl"></bean>
<!-- 定义增强 -->
<bean id="aroundAdvice3" class="com.helloAOP.autoProxy.MyAroundAdvice"></bean>
<bean id="beforeAdvice3" class="com.helloAOP.autoProxy.MyBeforeAdvice"></bean>
<!-- 定义一个带有切点的切面 -->
<bean id="myPointcutAdvisor" class="org.springframework.aop.support.RegexpMethodPointcutAdvisor">
    <property name="pattern" value=".*add.*"></property>
    <property name="advice" ref="aroundAdvice3"></property>
    </bean>
<!-- 自动代理:-->
<bean class="org.springframework.aop.framework.autoproxy.DefaultAdvisorAutoProxyCreator"></bean>

</beans>
编写测试类:
package com.helloAOP.autoProxy;

import org.junit.Test;
import org.springframework.context.support.ClassPathXmlApplicationContext;

public class TestAutoProxyByAspectJ {

    @Test
    public void testDemo(){

        ClassPathXmlApplicationContext applicationContext = new ClassPathXmlApplicationContext("applicationContext.xml");
        OrderDao orderDao = (OrderDao)applicationContext.getBean("orderDao3");
        orderDao.add();
        orderDao.delete();
        applicationContext.close();
    }

}
运行测试:

AspectJ方面
<?xml version="1.0" encoding="UTF-8"?>
<beans xmlns="http://www.springframework.org/schema/beans"
       xmlns:xsi="http://www.w3.org/2001/XMLSchema-instance"
       xmlns:context="http://www.springframework.org/schema/context"
       xmlns:util="http://www.springframework.org/schema/util"
       xmlns:aop="http://www.springframework.org/schema/aop"
       xsi:schemaLocation="
http://www.springframework.org/schema/beans http://www.springframework.org/schema/beans/spring-beans.xsd
http://www.springframework.org/schema/context http://www.springframework.org/schema/context/spring-context.xsd
http://www.springframework.org/schema/util http://www.springframework.org/schema/util/spring-util.xsd
http://www.springframework.org/schema/aop  http://www.springframework.org/schema/aop/spring-aop.xsd">
<!-- 开启AspectJ自动代理-->
<aop:aspectj-autoproxy/>
AspectJ表达式:
语法:execution(表达式)
execution(<访问修饰符>?<返回类型><方法名>(<参数>)<异常>)
execution(“* cn.itcast.spring3.demo1.dao.*(..)”) ---只检索当前包
execution(“* cn.itcast.spring3.demo1.dao..*(..)”) ---检索包及当前包的子包.
execution(* cn.itcast.dao.GenericDAO+.*(..)) ---检索GenericDAO及子类
AspectJ增强:
@Before 前置通知,相当于BeforeAdvice
@AfterReturning 后置通知,相当于AfterReturningAdvice
@Around 环绕通知,相当于MethodInterceptor
@AfterThrowing 抛出通知,相当于ThrowAdvice
@After 最终final通知,不管是否异常,该通知都会执行
@DeclareParents 引介通知,相当于IntroductionInterceptor (不要求掌握)
下面详细介绍详细的使用方法(基于注解、基于XML),并做举例说明。
基于AspectJ的注解开发
第一步:引入相应jar包
使用AspectJ需要导入SpringAOP和AspectJ相关jar包:
1、spring-aop-3.2.7.RELEASE.jar
2、aopalliance-1.0.jar
3、spring-aspects-3.2.7.RELEASE.jar
4、aspectj.weaver-1.6.8.jar
第二步:编写被增强的类,即目标类
package com.js.demo8;
/**
 * 目标类
 * @author hdb
 *
 */
public class UserDao {
    public void add(){
        System.out.println("add...");
    }
    public int update(){
        System.out.println("update...");
        return 1;
    }
    public void delete(){
        System.out.println("delete...");
    }
    public void find(){
        System.out.println("find...");
        int d=1/0;
    }
}
第三步:编写切面类,即切点和增强的结合
package com.js.demo8;

import org.aspectj.lang.ProceedingJoinPoint;
import org.aspectj.lang.annotation.After;
import org.aspectj.lang.annotation.AfterReturning;
import org.aspectj.lang.annotation.AfterThrowing;
import org.aspectj.lang.annotation.Around;
import org.aspectj.lang.annotation.Aspect;
import org.aspectj.lang.annotation.Before;
import org.aspectj.lang.annotation.Pointcut;

/**
 * 切面类:就是切点与增强的结合
 * @Aspect:用于定义切面
 * @Before:用于定义xx增强,只使用其value属性时,value可以省略,其值为表达式
 * 表示你想对哪些类进行增强,可精确到某包、某类、某方法,控制灵活
 * @author hdb
 *
 */

@Aspect
public class MyAspect {

    @Before(value="execution(* com.js.demo8.UserDao.add(..))")
    public void before(){
        System.out.println("前置增强===");
    }

    @AfterReturning(value="execution(* com.js.demo8.UserDao.update(..))")
    public void afterReturnin(){
        System.out.println("后置增强===");
    }

    @Around(value="execution(* com.js.demo8.UserDao.update(..))")
    public Object around(ProceedingJoinPoint proceedingJoinPoint) throws Throwable{
        System.out.println("环绕前增强===");
        Object object=proceedingJoinPoint.proceed(); //调用目标方法
        System.out.println("环绕后增强===");
        return object;
    }

    @AfterThrowing(value="MyAspect.myPointcut()",throwing="e")
    public void afterThrowing(Throwable e){
        System.out.println("不好了,出异常了==="+e.getMessage());
    }

    @After(value="MyAspect.myPointcut()")
    public void after(){
        System.out.println("最终通知===");
    }

    @Pointcut("execution(* com.js.demo1.UserDao.find(..))")
    private void myPointcut(){}

}
关于切点的注解,切点是我们的增强最重要应用的方法。为什么要定义一个切点呢?因为我们上述开发中,很多通知的value表达式都是重复的,在实际开发中,每写一个通知,就要去写一个表达式,很繁琐。所以我们可以采用定义切点的方式来解决。例如上面的定义一个myPointcut切点,可以重复调用:
@Pointcut("execution(* com.js.demo1.UserDao.find(..))")
 private void myPointcut(){}
第四步:在applicationContext.xml中引入约束,配置bean,并开启自动代理
<?xml version="1.0" encoding="UTF-8"?>
<beans xmlns="http://www.springframework.org/schema/beans"
       xmlns:xsi="http://www.w3.org/2001/XMLSchema-instance"
       xmlns:context="http://www.springframework.org/schema/context"
       xmlns:util="http://www.springframework.org/schema/util"
    xmlns:aop="http://www.springframework.org/schema/aop"
       xsi:schemaLocation="
http://www.springframework.org/schema/beans http://www.springframework.org/schema/beans/spring-beans.xsd
http://www.springframework.org/schema/context http://www.springframework.org/schema/context/spring-context.xsd
http://www.springframework.org/schema/util http://www.springframework.org/schema/util/spring-util.xsd
http://www.springframework.org/schema/aop  http://www.springframework.org/schema/aop/spring-aop.xsd">
<!-- 开启AspectJ自动生成代理,底层就是AnnotationAwareAspectJAutoProxyCreator-->
<aop:aspectj-autoproxy/>
<bean id="userDao" class="com.js.demo8.UserDao"></bean>
<bean id="myAspect" class="com.js.demo8.MyAspect"></bean>
</beans>
第五步:编写测试类
package com.js.demo8;

/**
 * 测试类
 */
import org.junit.Test;
import org.junit.runner.RunWith;
import org.springframework.beans.factory.annotation.Autowired;
import org.springframework.beans.factory.annotation.Qualifier;
import org.springframework.test.context.ContextConfiguration;
import org.springframework.test.context.junit4.SpringJUnit4ClassRunner;

@RunWith(SpringJUnit4ClassRunner.class)
@ContextConfiguration("classpath:applicationContext.xml")
public class TestAspectDemo {

    @Autowired
    @Qualifier("userDao")
    private UserDao userDao;
    @Test
    public void demo1(){
        userDao.add();
        userDao.delete();
        userDao.find();
        userDao.update();
    }
}
第六步:运行测试,查看结果。

基于AspectJ的XML配置方式开发
第一步:引入相应jar包
使用AspectJ需要导入SpringAOP和AspectJ相关jar包:
1、spring-aop-3.2.7.RELEASE.jar
2、aopalliance-1.0.jar
3、spring-aspects-3.2.7.RELEASE.jar
4、aspectj.weaver-1.6.8.jar
第二步:编写被增强的类,即目标类
package com.js.demo9;

public class ProductDao {

    public void add(){
        System.out.println("add...");
    }
    public void update(){
        System.out.println("update...");
    }
    public void delete(){
        System.out.println("delete...");
     int a = 1/0;
    }
    public String find(){
        System.out.println("find...");return "find Success!";
    }
}
第三步:编写切面类,即切点和增强的结合
package com.js.demo9;

import org.aspectj.lang.ProceedingJoinPoint;

/**
 * 切面类
 * @author hdb
 *
 */
public class MyAspectXML {

    public void before(){
        System.out.println("前置通知===");
    }
    public void after(Object returnVal){
        System.out.println("后置通知===返回值:"+returnVal);
    }
    public Object around(ProceedingJoinPoint point) throws Throwable{
        System.out.println("环绕前通知===");
        Object object = point.proceed();
        System.out.println("环绕后通知===");
        return object;
    }
    public void afterthrowing(Throwable e){
        System.out.println("糟糕,出错了===错误信息:"+e.getMessage());
    }
    public void afterFinal(){
        System.out.println("最终通知===");
    }
}
第四步:在applicationContext.xml中引入约束,配置bean,并开启自动代理
<?xml version="1.0" encoding="UTF-8"?>
<beans xmlns="http://www.springframework.org/schema/beans"
       xmlns:xsi="http://www.w3.org/2001/XMLSchema-instance"
       xmlns:context="http://www.springframework.org/schema/context"
       xmlns:util="http://www.springframework.org/schema/util"
       xmlns:aop="http://www.springframework.org/schema/aop"
       xsi:schemaLocation="
http://www.springframework.org/schema/beans http://www.springframework.org/schema/beans/spring-beans.xsd
http://www.springframework.org/schema/context http://www.springframework.org/schema/context/spring-context.xsd
http://www.springframework.org/schema/util http://www.springframework.org/schema/util/spring-util.xsd
http://www.springframework.org/schema/aop  http://www.springframework.org/schema/aop/spring-aop.xsd">

<!-- 定义被增强的类 -->
<bean id="productDao" class="com.js.demo9.ProductDao"> </bean>
<!-- 定义切面类 -->
<bean id="myAspectXML" class="com.js.demo9.MyAspectXML"></bean>
<!-- 定义aop的配置 -->
<aop:config>
<!-- 定义切点 -->
<aop:pointcut expression="execution(* com.js.demo9.ProductDao.add(..))" id="myPointcut"/>
<aop:pointcut expression="execution(* com.js.demo9.ProductDao.find(..))" id="myAfter"/>
<aop:pointcut expression="execution(* com.js.demo9.ProductDao.update(..))" id="myAround"/>
<aop:pointcut expression="execution(* com.js.demo9.ProductDao.delete(..))" id="myafterthrowing"/>
<aop:aspect ref="myAspectXML">
<!-- 前置通知 -->
<aop:before method="before" pointcut-ref="myPointcut"/>
<!-- 后置通知 -->
<aop:after-returning method="after" pointcut-ref="myAfter" returning="returnVal"/>
<!-- 环绕通知 -->
<aop:around method="around" pointcut-ref="myAround"/>
  <!-- 异常通知 -->
  <aop:after-throwing method="afterthrowing" pointcut-ref="myAfter" throwing="e"/>
  <!-- 最终通知 -->
  <aop:after method="afterFinal" pointcut-ref="myAfter"/>
</aop:aspect>
</aop:config>

</beans>
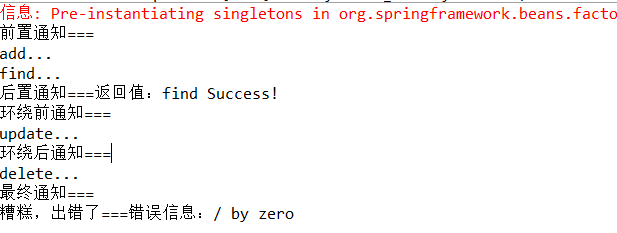
第五步:编写测试类
package com.js.demo9;

import org.junit.Test;
import org.junit.runner.RunWith;
import org.springframework.beans.factory.annotation.Autowired;
import org.springframework.beans.factory.annotation.Qualifier;
import org.springframework.test.context.ContextConfiguration;
import org.springframework.test.context.junit4.SpringJUnit4ClassRunner;

@RunWith(SpringJUnit4ClassRunner.class)
@ContextConfiguration("classpath:applicationContext.xml")
public class TestAspectXML {

    @Autowired
    @Qualifier("productDao")
    private ProductDao productDao;
    @Test
    public void demo(){
        productDao.add();
        productDao.find();
        productDao.update();
        productDao.delete();
    }
}
第六步:运行测试,查看结果。
参考链接:https://blog.csdn.net/dove_knowledge/article/category/6818451
https://my.oschina.net/pingpangkuangmo/blog/517340

 浙公网安备 33010602011771号