MySQL数据库基础与安装
Mysql数据库分类和版本
MySQL数据库版本采用双授权政策,分为社区般和商业版
MySQL数据库商业版和社区版区别
商业版有MySQL内部人维护同时会吸收社区人员编写的优秀代码和算法;需要付费才能提供服务,稳定性和可靠性都是最好的
社区版由分散在世界各地MySQL开发者参与开发,完成测试,相比商业版,社区版的开发以及测试没有那么严格
1、 商业版组织与测试环节控制更严格,稳定性方面更稳定
2、 MySQL是成熟产品,商业版和社区版性能方面相差不大
3、 商业版不遵守GPL协议,社区遵守GPL协议可以免费使用
4、 使用商业版可以购买相关服务
5、 社区版的维护服务只能靠社区提供;
四种版本:
Alpha版:
一般只在开发的公司内部运行,不对外公开
Beta版
一般完成功能的开发和所有测试工作之后的产品,不会存在较大的功能或者性能bug,并邀请或提供给用户体验(内部测试后,没有大的功能和bug的)
RC版
属于生产环境发布前的一个小版本或称为候选版
GA版
是软件产品正式发布的版本,也称为生产版本的产品
Mysql数据库软件命名
MySQL-5.0.56.tar
第一个数字是主版本号
第二个数字就是发行级别,主版本号和发行级别构成了发行序列号
第三个数字是在此发行系列的版本号,随着新分发版递增,通常你需要已经选择的发型(rslease)的最新把呢不能
Mysql选择建议
1、 稳定版:选择开源的社区版的稳定版GA版本
2、 产品线:可以选择5.1或5.5。互联网主流5.5
3、 选择MySQL数据库GA版发布后6个月以上的GA版本
4、 要选择前后几个月没多大的bug修复的版本,而不是大量修复bug的集中版本
5、 最好向后较长时间没有更新发布的版本
6、 要考虑开发人员开发程序使用的版本是否兼容你选择的版本
7、 作为内部开发测试数据库环境,跑大概3-6个月的时间
8、 优先企业非核心业务采用新版本的数据库GA版本软件
9、 向DBA高手请教,或者在技术氛围好的群里和大家交流,使用真正高手们使用过的好的GA版本
10、 经过上述工序之后,若是没有重要功能bug或性能瓶颈,则可以开始考虑作为任何业务数据服务的后端数据库软件;
MySQL多种安装方法
yum/rpm方式安装MySQL
yum方式安装MySQL
只要执行yum install -y mysql-server即可
这种安装方式一般适合对数据库要求不太高的场合,例如并发不大,公司内部,企业内部的一些应用场景
常规方式编译安装MySQL
所谓常规方式编译安装MySQL就是延续早期MySQL安装三部曲
即./configure,make;make install
采用cmake方式编译安装MySQL
由于MySQL5.5-5.6产品的特殊性,所以编译方式也和早期不同,采用cmake或gmake方式编译安装。即./cmake;make;make install,
采用二进制方式免编译安装MySQL
采用二进制方式面编译安装MySQL,这种方法和yum/rpm包安装方法类似,适合各种MySQL版本
如何选择安装方式
yum/rpm安装适合对数据库要求不高的场合
二进制比较简单,普通使用编译方式5.0-5.1,cmake适合5.5-5.6
安装方式机器数量少,推荐cmake,数量多的话,就用二进制免安装
安装系统补装工具命令
Yum install tree nmap sysstat lrzsz dos2unix
如果需要更新,
Yum update
删除软件时,不要使用yum的删除功能删除软件,会删c除相关依赖,导致意外问题
cmake安装
tar -xvf cmake-2.8.8.tar.gz
cd cmake-2.8.8
./configure
Gmake
gmake install
mysql安装
安装依赖包
[root@root cmake-2.8.8]# yum install -y ncurses-devel
[root@root cmake-2.8.8]# tar xvf mysql-5.5.32.tar.gz
创建用户和组
[root@root ~]# groupadd mysql
[root@root ~]# useradd mysql -s /sbin/mologin -M -g mysql
编译安装mysql
cmake . -DCMAKE_INSTALL_PREFIX=/application/mysql-5.5.32 \
-DMYSQL_DATADIR=/application/mysql-5.5.32/data \
-DMYSQL_UNIX_ADDR=/application/mysql-5.5.32/tmp/mysql.sock \
-DEXTRA_CHARSETS=gbk,gb2312,utf8,ascii \
-DENABLED_LOCAL_INFILE=ON \
-DWITH_INNOBASE_STORAGE_ENGINE=1 \
-DWITH_FEDERATED_STORAGE_ENGINE=1 \
-DWITH_BLACKHOLE_STORAGE_ENGINE=1 \
-DWITHOUT_EXAMPLE_STORAGE_ENGINE=1 \
-DWITHOUT_PARTITION_STORAGE_ENGINE=1 \
-DWITH_FAST_MUTEXES=1 \
-DWITH_ZLIB=bundled \
-DENABLED_LOCAL_INFILE=1 \
-DWITH_READLINE=1 \
-DWITH_EMBEDDED_SERVER=1 \
-DWITH_DEBUG=0
make && make install
创建软链接
[root@root mysql-5.5.32]# ln -s /application/mysql-5.5.32/ /application/mysql
[root@root mysql]# cp mysql-5.5.32/support-files/my-small.cnf /etc/my.cnf
cp: overwrite `/etc/my.cnf'? y
修改环境变量
[root@root mysql]# echo `export PATH=/application/mysql/bin:$PATH` >> /etc/profile
[root@root ~]# source /etc/profile
[root@root ~]# echo $PATH
查看库是否存在并授权
[root@root mysql]# ll /application/mysql/data/
total 4
drwxr-xr-x. 2 root root 4096 Oct 22 17:49 test
[root@root mysql]# chown -R mysql.mysql /application/mysql/data/
[root@root mysql]# chown -R 1777 /tmp/
初始化数据库
[root@root ~]# cd /application/mysql/scripts/
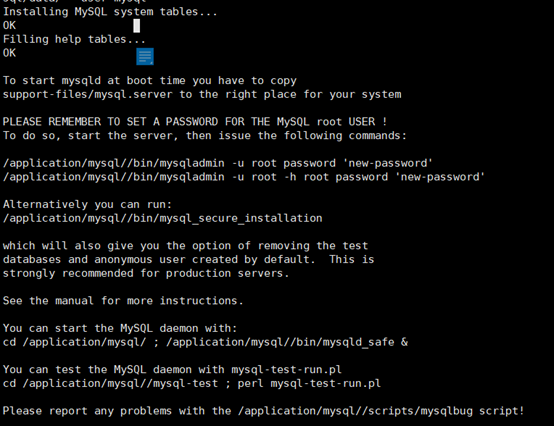
[root@root scripts]# ./mysql_install_db --basedir=/application/mysql/ --datadir=/application/mysql/data/ --user=mysql

如图所示初始化成功
启动MySQL
[root@root mysql-5.5.32]# /bin/cp support-files/mysql.server /etc/init.d/mysqld
[root@root mysql-5.5.32]# chmod +x /etc/init.d/mysqld
[root@root mysql-5.5.32]# /etc/init.d/mysqld start
Starting MySQL..                                           [  OK  ]

至此,MySQL安装成功,此时便可以进入MySQL
[root@root mysql-5.5.32]# mysql
Welcome to the MySQL monitor.  Commands end with ; or \g.
Your MySQL connection id is 5
Server version: 5.5.32 Source distribution

Copyright (c) 2000, 2013, Oracle and/or its affiliates. All rights reserved.

Oracle is a registered trademark of Oracle Corporation and/or its
affiliates. Other names may be trademarks of their respective
owners.

Type 'help;' or '\h' for help. Type '\c' to clear the current input statement.

mysql>
数据库优化
清除并修改管理员用户
mysql> select user,host from mysql.user
    -> ;
+------+-----------+
| user | host      |
+------+-----------+
| root | 127.0.0.1 |
| root | ::1       |
|      | localhost |
| root | localhost |
|      | root      |
| root | root      |
+------+-----------+
6 rows in set (0.00 sec)

mysql> delete from mysql.user where user='';
Query OK, 2 rows affected (0.00 sec)

mysql> select user,host from mysql.user;
+------+-----------+
| user | host      |
+------+-----------+
| root | 127.0.0.1 |
| root | ::1       |
| root | localhost |
| root | root      |
+------+-----------+
4 rows in set (0.00 sec)

mysql> delete from mysql.user where host='root';
Query OK, 1 row affected (0.02 sec)

mysql> select user,host from mysql.user;
+------+-----------+
| user | host      |
+------+-----------+
| root | 127.0.0.1 |
| root | ::1       |
| root | localhost |
+------+-----------+
3 rows in set (0.00 sec)

mysql> delete from mysql.user where host='::1';
Query OK, 1 row affected (0.00 sec)

mysql> select user,host from mysql.user;
+------+-----------+
| user | host      |
+------+-----------+
| root | 127.0.0.1 |
| root | localhost |
+------+-----------+
2 rows in set (0.00 sec)

简单的优化,删除test库
mysql> drop database test;
Query OK, 0 rows affected (0.02 sec)

mysql> show databases;
+--------------------+
| Database           |
+--------------------+
| information_schema |
| mysql              |
| performance_schema |
+--------------------+
3 rows in set (0.00 sec)
关于管理员,可以直接全部删除,添加额外管理员
delete from mysql.user;
grant all privileges on *.* to system@’localhost’ identified by ‘oldboy123’ with grant option;
flush privileges;
select user,host from mysql.user;
此时退出MySQL为MySQL添加密码
[root@root mysql-5.5.32]# /application/mysql//bin/mysqladmin -u root password '123456'
[root@root mysql-5.5.32]# mysql -uroot -p123456
Welcome to the MySQL monitor.  Commands end with ; or \g.
Your MySQL connection id is 5
Server version: 5.5.32 Source distribution

Copyright (c) 2000, 2013, Oracle and/or its affiliates. All rights reserved.

Oracle is a registered trademark of Oracle Corporation and/or its
affiliates. Other names may be trademarks of their respective
owners.

Type 'help;' or '\h' for help. Type '\c' to clear the current input statement.

mysql>
[root@root mysql-5.5.32]# chkconfig mysqld on
[root@root mysql-5.5.32]# chkconfig --list mysqld
mysqld             0:off    1:off    2:on    3:on    4:on    5:on    6:off
至此,MySQL安装完成


