


Novice学Pytest(4)-fixture的详细使用
一、前言
setup()和teardown()等方法可以在执行用例前或结束后加入一些操作,但都是针对整个脚本全局生效的。我们项目组在写直播间自动化脚本时,可能会遇到一些场景:比如进入直播间,发言和送礼等都需要用户先登录,分享直播间和清晰度切换等不需要用户登录。这些场景就无法用setup和teardown来实现了。。。但fixture可以完美解决这个问题,因为支持自定义测试用例的前置条件
二、fixture的优势
- 命名方式灵活,不局限于 setup 和teardown 这几个命名
- conftest.py 配置里可以实现数据共享,不需要 import 就能自动找到fixture
- scope="module" :每一个.py文件调用一次,该文件内又有多个function和class
- scope="session" :多个.py文件调用一次,可以 跨文件调用,每个.py文件就是一个module
三、fixture参数列表
@pytest.fixture(scope="function", params=None, autouse=False, ids=None, name=None)
def test():
    print("fixture初始化的参数列表")
1、参数列表
- scope:可以理解成fixture的作用域,默认:function,还有class、module、package、session四个【常用】
- autouse:默认:False,需要用例手动调用该fixture;如果是True,所有作用域内的测试用例都会自动调用该fixture
- name:默认:装饰器的名称,同一模块的fixture相互调用建议写个不同的name
2、Notes:session的作用域是整个测试会话,即开始执行pytest到结束测试
四、测试用例如何调用fixture
- 将fixture名称作为测试用例函数的输入参数
- 测试用例加上装饰器:@pytest.mark.usefixtures(fixture_name)
- fixture设置autouse=True
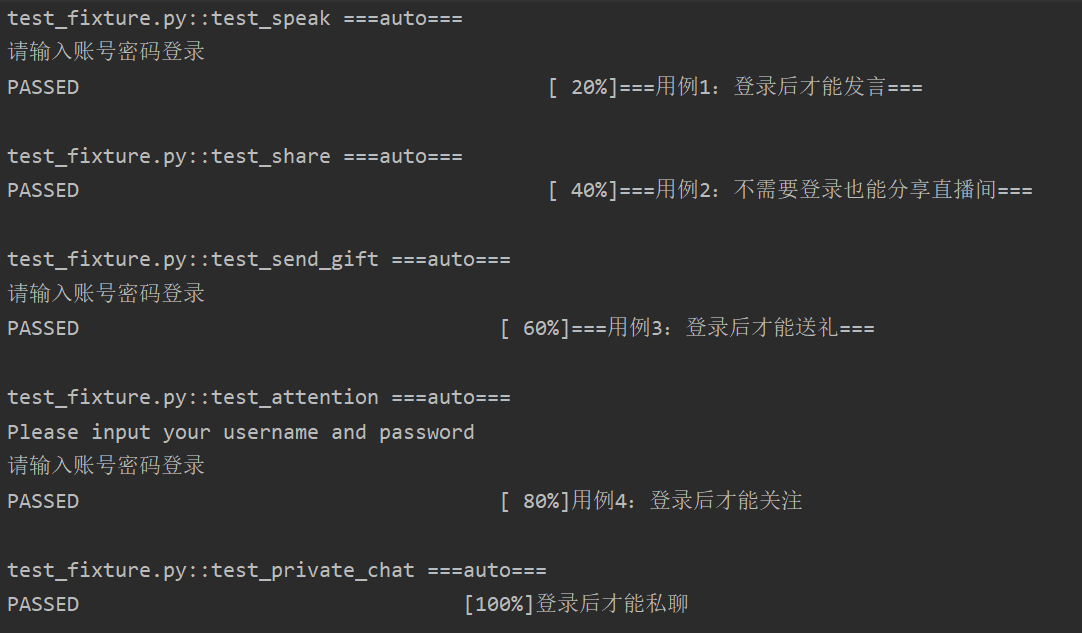
#!/usr/bin/env python
# -*- coding: utf-8 -*-

"""
__Title__   =
__Time__    =  2021/8/7 21:46
__Author__  =  Isaymore
__Blog__    =  https://www.cnblogs.com/huainanhai/
"""

import pytest

# 调用方式一
@pytest.fixture()
def login():
    print("请输入账号密码登录")


def test_speak(login):
    print("===用例1:登录后才能发言===")

def test_share():
    print("===用例2:不需要登录也能分享直播间===")

def test_send_gift(login):
    print("===用例3:登录后才能送礼===")

# 调用方式二
@pytest.fixture()
def login2():
    print("Please input your username and password")

@pytest.mark.usefixtures("login2","login")
def test_attention():
    print("用例4:登录后才能关注")

@pytest.fixture(autouse = True)
def login3():
    print("===auto===")

def test_private_chat():
    print("登录后才能私聊")

# 不是test开头的函数,加了装饰器也不会执行fixture
@pytest.mark.usefixtures("login3")
def manage():
    print("===频道管理===")
执行结果:
知识点
- 在类声明上面加 @pytest.mark.usefixtures() ,代表这个类里面所有测试用例都会调用该fixture
- 可以叠加多个 @pytest.mark.usefixtures() ,先执行的放底层,后执行的放上层
- 可以传多个fixture参数,先执行的放前面,后执行的放后面
- 如果fixture有返回值,用 @pytest.mark.usefixtures() 是无法获取到返回值的,必须用传参的方式(方式一)
五、fixture的实例化顺序
- 较高 scope 范围的fixture(session)在较低 scope 范围的fixture( function 、 class )之前实例化【session > package > module > class > function】
- 具有相同作用域的fixture遵循测试函数中声明的顺序,并遵循fixture之间的依赖关系【在fixture_A里面依赖的fixture_B优先实例化,然后到fixture_A实例化】
- 自动使用(autouse=True)的fixture将在显式使用(传参或装饰器)的fixture之前实例化
#!/usr/bin/env python
# -*- coding: utf-8 -*-

"""
__Title__   =
__Time__    =  2021/8/14 15:07
__Author__  =  Isaymore
__Blog__    =  https://www.cnblogs.com/huainanhai/
"""

import pytest

order = []
@pytest.fixture(scope = "session")
def s1():
    order.append("s1")

@pytest.fixture(scope="module")
def m1():
    order.append("m1")

@pytest.fixture()
def f1(f3,a1):
    # 先实例化f3,再实例化a1,最后实例化f1
    order.append("f1")
    assert f3 == 123

@pytest.fixture()
def f3():
    order.append("f3")
    a = 123
    yield a

@pytest.fixture()
def a1():
    order.append("a1")

@pytest.fixture()
def f2():
    order.append("f2")

def test_fixture_order(f1,m1,f2,s1):
    # m1、s1在f1后,但因为scope范围大,所以会优先实例化
    assert order == ["s1","m1","f3","a1","f1","f2"]
执行结果:断言成功
六、关于fixture的注意点
添加了 @pytest.fixture ,如果fixture还想依赖其他fixture,需要用函数传参的方式,不能用 @pytest.mark.usefixtures() 的方式,否则会不生效
@pytest.fixture(scope="session")
def open():
    print("===打开手Y===")

@pytest.fixture()
# @pytest.mark.usefixtures("open") 不可取!不生效!
def login(open):
    # 方法级别前置操作setup
    print(f"Please input your username and password")

def test_grab_mic(login):
    print("登录后才能抢麦克风")
七、实现teardown
前面都是setup的操作,接下来是如何实现teardown
1.fixture之yield实现teardown
用fixture实现teardown并不是一个独立的函数,而是用yield关键字来实现teardown操作
@pytest.fixture(scope="session")
def open():
    # 会话前置操作setup
    print("===打开手Y===")
    test = "测试变量是否返回"
    yield test
    # 会话后置操作teardown
    print("===关闭手Y===")

@pytest.fixture()
def login(open):
    # 方法级别前置操作setup
    print(f"Please input your username and password{open}")
    name = "===我是账号==="
    pwd = "===我是密码==="
    age = "===我是年龄==="
    # 返回变量
    yield name,pwd,age
    # 方法级别后置操作teardown
    print("===登录成功===")

def test_s1(login):
    print("===用例1===")
    # 返回的是一个元组
    print(login)
    # 分别赋值给不同变量
    name,pwd,age = login
    print(name,pwd,age)
    assert "账号" in name
    assert "密码" in pwd
    assert "年龄" in age

def test_s2(login):
    print("===用例2===")
    print(login)
执行结果:

2.yield注意事项
- 如果yield前面的代码,即setup部分已经抛出异常了,则不会执行yield后面的teardown内容
- 如果测试用例抛出异常,yield后面的teardown内容还是会正常执行
3.addfinalizer 终结函数
@pytest.fixture(scope="module")
def test_addfinalizer(request):
    # 前置操作setup
    print("===再次打开手Y===")
    test = "test_addfinalizer"

    def fin():
        # 后置操作teardown
        print("===再次关闭手Y===")

    request.addfinalizer(fin)
    # 返回前置操作的变量
    return test

def test_author(test_addfinalizer):
    print("===最新用例===",test_addfinalizer)
执行结果:

Notes:
- 如果 request.addfinalizer() 前面的代码,即setup部分已经抛出异常了,则不会执行 request.addfinalizer() 的teardown内容(和yield相似,应该是最近新版本改成一致了)
- 可以声明多个终结函数并调用
参考链接:https://www.cnblogs.com/poloyy/p/12642602.html
一行代码一行诗

