ASP.NET Core MVC 从入门到精通之鉴权授权基础
随着技术的发展,ASP.NET Core MVC也推出了好长时间,经过不断的版本更新迭代,已经越来越完善,本系列文章主要讲解ASP.NET Core MVC开发B/S系统过程中所涉及到的相关内容,适用于初学者,在校毕业生,或其他想从事ASP.NET Core MVC 系统开发的人员。
经过前几篇文章的讲解,初步了解ASP.NET Core MVC项目创建,启动运行,以及命名约定,创建控制器,视图,模型,接收参数,传递数据ViewData,ViewBag,路由,页面布局,wwwroot和客户端库,Razor语法,EnityFrameworkCore与数据库,HttpContext,Request,Response,Session,序列化,文件上传,自动映射,Html辅助标签,模型校验等内容,今天继续讲解ASP.NET Core MVC 中鉴权、授权基础等相关内容,仅供学习分享使用。

概述
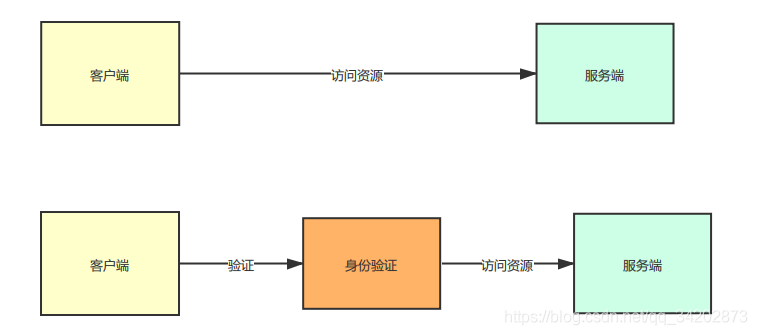
在实际开发中,大部分的程序都是要进行身份验证,才能进行访问,没有身份验证的访问,那么安全性就得不到保证,很容易被加以利用和攻击。身份验证就等于在应用程序中,增加了一层防护网。示意图如下所示:

什么是鉴权,授权?
鉴权,又叫身份验证,确定用户身份的过程。
授权,确定用户是否有权访问资源的过程。
在 ASP.NET Core 中,身份验证由身份验证服务 IAuthenticationService 负责,而它供身份验证中间件使用。 身份验证服务会使用已注册的身份验证处理程序来完成与身份验证相关的操作。 与身份验证相关的操作示例包括:
- 对用户进行身份验证。
- 在未经身份验证的用户试图访问受限资源时作出响应。
已注册的身份验证处理程序及其配置选项被称为“方案”。身份验证负责提供 ClaimsPrincipal 进行授权,以针对其进行权限决策。
关于鉴权,授权,可以通过以下示例说明:

鉴权是一个承上启下的一个环节,上游它接受授权的输出,校验其真实性后,然后获取权限(permission),这个将会为下一步的权限控制做好准备。

鉴权授权基本步骤
在ASP.NET Core MVC程序中,要使用鉴权,授权功能,可参考以下步骤。
1. 添加鉴权服务
首先鉴权服务,本示例采用cookie的方式进行身份验证,Program.cs启动类中,添加鉴权服务,如下所示:
 1 //添加鉴权服务
 2 builder.Services.AddAuthentication(options =>
 3 {
 4     options.DefaultScheme = CookieAuthenticationDefaults.AuthenticationScheme;
 5
 6 }).AddCookie(CookieAuthenticationDefaults.AuthenticationScheme, options =>
 7 {
 8     options.LoginPath = "/Login/Index";
 9     options.LogoutPath = "/Login/Logout";
10 });
注意,添加服务时,指定了默认的schema。以及在在没有授权时,需要跳转的登录的页面。
2. 添加鉴权,授权中间件
在Program.cs启动类中,添加身份验证和授权中间件,以便在客户端访问时进行验证。
1 //使用鉴权
2 app.UseAuthentication();
3 //使用授权
4 app.UseAuthorization();
3. 添加Authorize权限控制
在需要进行权限控制的地方【如:Cotroller,Action ,Razor页面】,添加Authorize特性,如Home控制器,如下所示:
 1 namespace DemoCoreMVC.Controllers
 2 {
 3     [Authorize]
 4     public class HomeController : Controller
 5     {
 6         private readonly ILogger<HomeController> _logger;
 7
 8         public HomeController(ILogger<HomeController> logger)
 9         {
10             _logger = logger;
11         }
12
13         public IActionResult Index()
14         {
15             var username = HttpContext.Session.GetString("username");
16             ViewBag.Username = username;
17             return View();
18         }
19
20         public IActionResult Privacy()
21         {
22             return View();
23         }
24
25     }
26 }
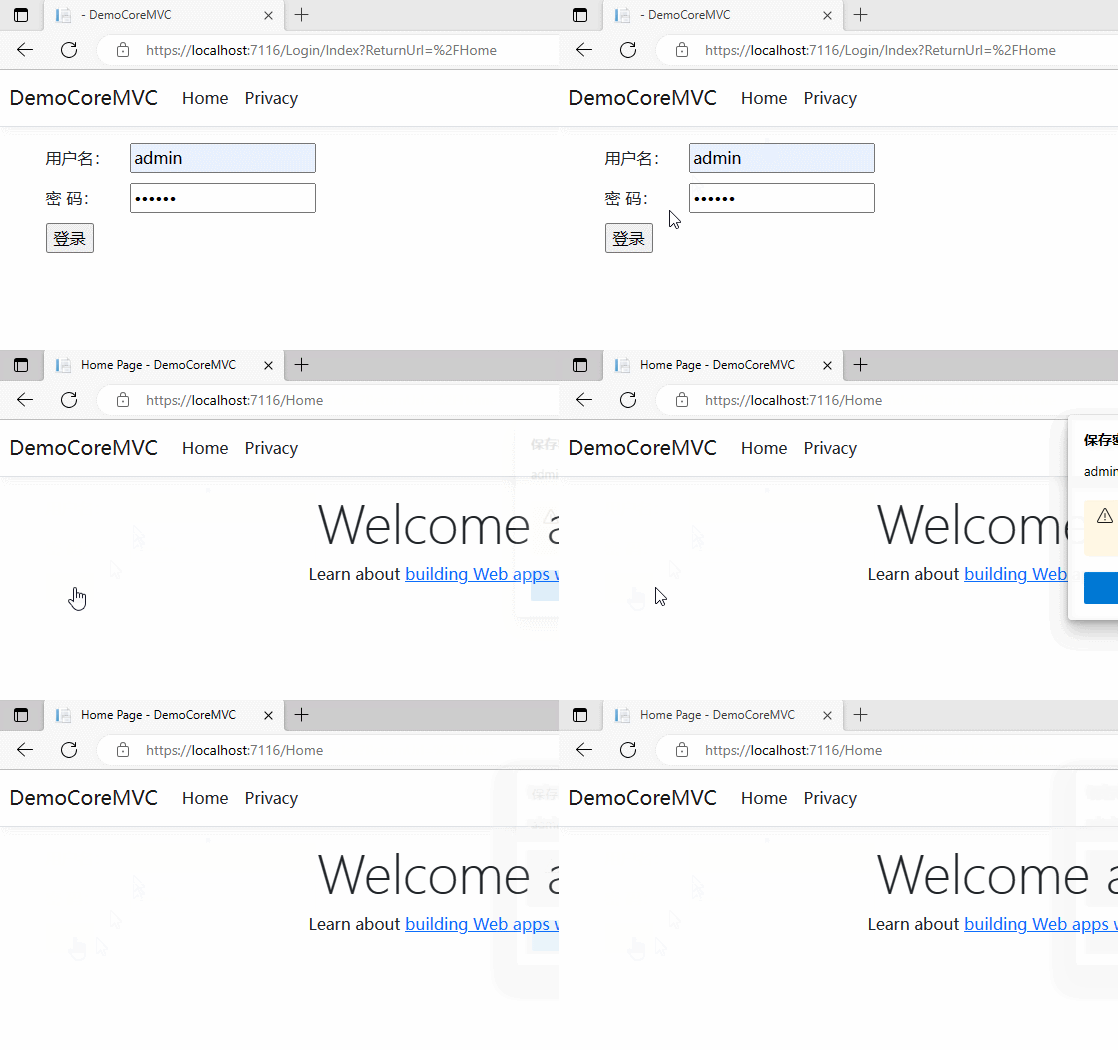
如此,添加Authorize特性后,在访问Home/Index首页时,如下没有鉴权,则会跳转到登录页面。
4. 鉴权
在用户登录后,通过HttpContext.SignInAsync进行鉴权,并设置ClaimsPrincipal。如下所示:
 1 namespace DemoCoreMVC.Controllers
 2 {
 3     public class LoginController : Controller
 4     {
 5         public IActionResult Index()
 6         {
 7             return View();
 8         }
 9
10         public async  Task<IActionResult> Login()
11         {
12             var username = Request.Form["username"];
13             var password = Request.Form["password"];
14             if(username=="admin" && password == "abc123")
15             {
16                 HttpContext.Session.SetString("username", username);
17             }
18             var claimsIdentity = new ClaimsIdentity(CookieAuthenticationDefaults.AuthenticationScheme);
19             claimsIdentity.AddClaim(new Claim(ClaimTypes.Name,username));
20             claimsIdentity.AddClaim(new Claim(ClaimTypes.Role,"Admin"));
21             var claimPrincipal = new ClaimsPrincipal(claimsIdentity);
22             await HttpContext.SignInAsync(claimPrincipal);
23             return Redirect("/Home");
24         }
25
26         public async Task<IActionResult> Logout()
27         {
28             await HttpContext.SignOutAsync();
29             return Redirect("/Login");
30         }
31     }
32 }
在示例中,设置了ClaimTypes为Name和Role两个内容,可以为后续授权使用。
5. 测试
在启动时,由于没有进行身份验证,所以默认Home/Index跳转到了Login页面,当输入密码登录后,即可进行正常跳转,如下所示:

且通过F12查看开发者工具,发现多了一个Cookie信息,这就是在后续访问的时候,都会带上作为凭证的验证信息。如下所示:

授权区分
在实际应用中,经常遇到有些功能是管理员权限才有,有些权限普通角色也可以查看。
则可以在Authorize特性中加以区分,[Authorize(Roles ="Admin,SuperAdmin")]。Authorize特性共有以几个属性可以设置:
 1 namespace Microsoft.AspNetCore.Authorization
 2 {
 3     //
 4     // 摘要:
 5     //     Specifies that the class or method that this attribute is applied to requires
 6     //     the specified authorization.
 7     [AttributeUsage(AttributeTargets.Class | AttributeTargets.Method, AllowMultiple = true, Inherited = true)]
 8     public class AuthorizeAttribute : Attribute, IAuthorizeData
 9     {
10         //
11         // 摘要:
12         //     Initializes a new instance of the Microsoft.AspNetCore.Authorization.AuthorizeAttribute
13         //     class.
14         public AuthorizeAttribute();
15         //
16         // 摘要:
17         //     Initializes a new instance of the Microsoft.AspNetCore.Authorization.AuthorizeAttribute
18         //     class with the specified policy.
19         //
20         // 参数:
21         //   policy:
22         //     The name of the policy to require for authorization.
23         public AuthorizeAttribute(string policy);
24
25         //
26         // 摘要:
27         //     Gets or sets the policy name that determines access to the resource.
28         public string? Policy { get; set; }
29         //
30         // 摘要:
31         //     Gets or sets a comma delimited list of roles that are allowed to access the resource.
32         public string? Roles { get; set; }
33         //
34         // 摘要:
35         //     Gets or sets a comma delimited list of schemes from which user information is
36         //     constructed.
37         public string? AuthenticationSchemes { get; set; }
38     }
39 }
以上就是ASP.NET Core MVC 从入门到精通之鉴权授权基础的全部内容。
 作者:老码识途
出处:http://www.cnblogs.com/hsiang/
本文版权归作者和博客园共有,写文不易,支持原创,欢迎转载【点赞】,转载请保留此段声明,且在文章页面明显位置给出原文连接,谢谢。
关注个人公众号,定时同步更新技术及职场文章


