vue2PC端和移动端适配
之前ui 给pc端的设计稿是 1920* 1080 ,并没有提过要写移动端网站,所以之前一直做的是pc端。
1,安装 flexible和 postcss-px2rem(命令行安装)
npm install lib-flexible --save
npm install postcss-px2rem --save
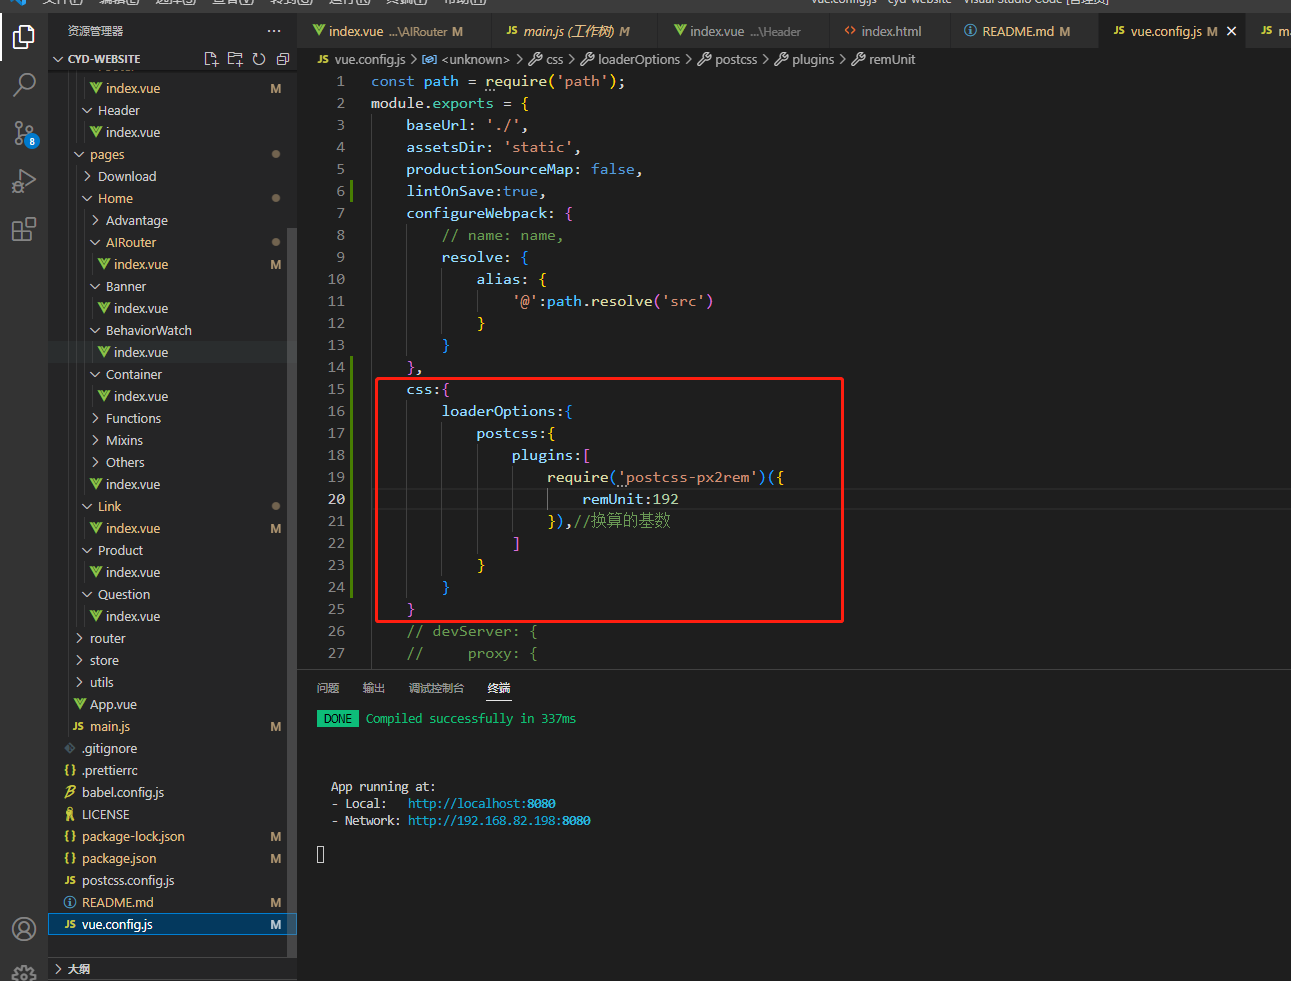
vue.confit.js的文件中:

在main.js里引入 import 'lib-flexible' ,如果是多人开发需将 lib-flexible文件下的flexible.js复制出来放在utils文件夹下再改动里面的配置,在main.js里引入 import './utils/flexible' //移动端PC端适配
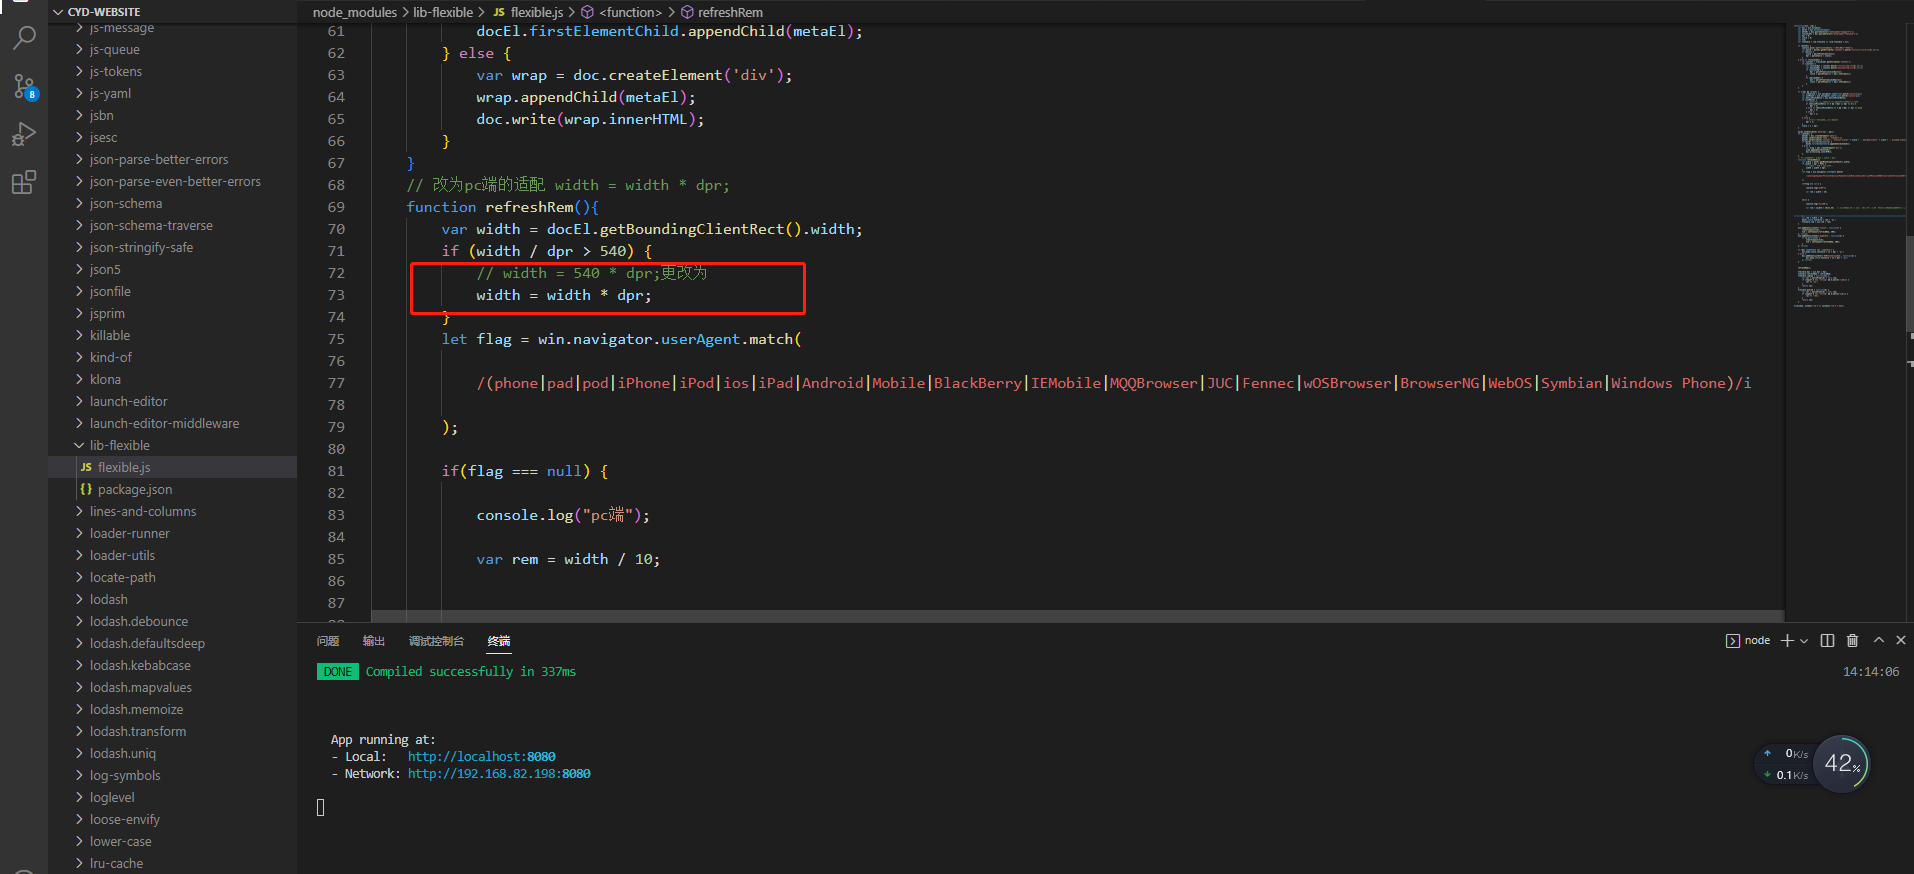
在node_modules 找到 lib-flexible文件下的flexible.js,然后找到refreshRem函数,将其改为:

那么pc端的适配就好了
后来又在这的基础上要加入移动端的适配,并且UI给的移动端设计图是750,额鹅鹅鹅,而pc端的是1920,在网上查了,好像没找到 怎么同事解决给1920的设计稿和750的设计稿,最终自己摸索了会,将lib-flexible文件下的flexible.js,然后找到refreshRem函数改为:
function refreshRem(){
console.log('将根据已有的meta标签来设置缩放比例',win)
var width = docEl.getBoundingClientRect().width;
if (width / dpr > 540) {
width = width * dpr;
}
let flag = win.navigator.userAgent.match(
/(phone|pad|pod|iPhone|iPod|ios|iPad|Android|Mobile|BlackBerry|IEMobile|MQQBrowser|JUC|Fennec|wOSBrowser|BrowserNG|WebOS|Symbian|Windows Phone)/i
);
if(flag === null) {
console.log("pc端");
var rem = width / 10;
}else {
console.log("移动端");
var rem = (width / 10)*2.56; // 移动端的2.56 是 我用 192 /75 = 2.56 然后移动端的尺寸就可以1:1 进行
}
docEl.style.fontSize = rem + 'px';
flexible.rem = win.rem = rem;
}
《----------------------------------------------------------》
然后 首页:
<template>
<div class="home" >
<div v-if="type" class="homePC">
<div class="headerNav" v-if="type">
<div class="logo">
<img src="@/assets/images/home/logo.png" alt="">
</div>
<ul class="titleNav">
<router-link :to=item.routerName tag="li" v-for="(item,index) in navList" :key="index" class="title">{{item.name}}</router-link>
</ul>
</div>
<div>
<router-view></router-view>
</div>
<div :class="$route.path==='/developmentCenter' || $route.path==='/developmentCloud'?'footer footDevelopment':$route.path==='/index'?'footer footIndex':'footer'" >
<div><a href="#" target="_blank" class="beian">陕ICP备*****号-1</a></div>
<div class="titleFoot">陕西****科技有限公司</div>
</div>
</div>
<div v-if="!type" class="homeMobile">
<div class="mobileHeaderNav">
<div class="mobileNav">
<img src="@/assets/mobileImages/home/icoNav.png" alt="" @click="mobileNavClick">
</div>
<div class="mobileLogo">
<img src="@/assets/mobileImages/home/logo.png" alt="">
</div>
<div class="mobileNavContent" v-show="navHalfMobile" @click="navLiClick">
<ul class="mobileUl" >
<router-link tag="li" v-for="(item,i) in navListMobile" :key="i" :to=item.routerName @click="navLiClick">
<div class="mobileIclPadding">
<img :src="item.ico" alt="" :class="'mobileImg'+i">
</div>
<div class="mobileTitle">{{item.title}}</div>
</router-link>
</ul>
</div>
</div>
<div>
<router-view></router-view>
</div>
<!-- class="mbileFooter" -->
<div :class="$route.path==='/index' || $route.path==='/mobileDevelopment' || $route.path==='/mobileDevelopmentCloud'?'mbileFooter mbileFooterBack':'mbileFooter'">
<a href="#" target="_blank" class="beianMobile">陕ICP备*****号-1</a>
<div class="companyMobile">陕西****科技有限公司</div>
</div>
</div>
</div>
</template>
<script>
export default {
name: 'Home',
data () {
return {
// value1: 0,
navList:[
{
name:'首页',
routerName:'index'
},
{
name:'研发中心',
routerName:'developmentCenter'
},
{
name:'国科学院',
routerName:'academySciences'
},
{
name:'产品中心',
routerName:'productCenter'
},
{
name:'开发云',
routerName:'developmentCloud'
},
{
name:'专家团队',
routerName:'expertTeam'
},
{
name:'联系我们',
routerName:'contactUs'
}
],
navListMobileRouter:[
{
name:'首页',
routerName:'index'
},
{
name:'研发中心',
routerName:'mobileDevelopment'
},
{
name:'国科学院',
routerName:'academySciences'
},
{
name:'产品中心',
routerName:'productCenter'
},
{
name:'开发云',
routerName:'developmentCloud'
},
{
name:'专家团队',
routerName:'expertTeam'
},
{
name:'联系我们',
routerName:'contactUs'
}
],
navListMobile:[
{
ico:require('@/assets/mobileImages/home/homeIco.png'),
title:'首页',
routerName:'index'
},{
ico:require('@/assets/mobileImages/home/developmentIco.png'),
title:'研发中心',
routerName:'mobileDevelopment'
}, {
ico:require('@/assets/mobileImages/home/academyIco.png'),
title:'国科学院',
routerName:'mobileAcademySciencest'
}, {
ico:require('@/assets/mobileImages/home/developmentIco.png'),
title:'产品中心',
routerName:'mobileProductCenter'
}, {
ico:require('@/assets/mobileImages/home/cloudIco.png'),
title:'开发云',
routerName:'mobileDevelopmentCloud'
}, {
ico:require('@/assets/mobileImages/home/experIco.png'),
title:'专家团队',
routerName:'mobileexpertTeam'
}, {
ico:require('@/assets/mobileImages/home/contactIco.png'),
title:'联系我们',
routerName:'contactUs'
}
],
type:true,
navHalfMobile:false
}
},
created() {
console.log(navigator.userAgent)
let flag = navigator.userAgent.match(
/(phone|pad|pod|iPhone|iPod|ios|iPad|Android|Mobile|BlackBerry|IEMobile|MQQBrowser|JUC|Fennec|wOSBrowser|BrowserNG|WebOS|Symbian|Windows Phone)/i
);
console.log('66666666666666666',flag);
if(flag === null) {
console.log("pc端");
this.type = true
}else {
console.log("移动端");
this.type = false
}
},
methods:{
mobileNavClick() {
this.navHalfMobile = true
},
navLiClick() {
setTimeout(() => {
this.navHalfMobile = false
},500)
}
}
}
</script>
由于首页路面涉及到重定向,所以首页的pc端和移动端我写在了一个页面,剩下的页面可以和pc端分开写
### px转换为rem
、、、
px后面添加/*no*/,就不会转化为rem。一般border需要。

px后面添加/*px*/,会根据dpr的不同生成三套代码。一般字体需要。

.box {
  font-size:14px;/*px*/
  border: 1px;/*no*/
}
、、、


