TPM及TSS协议栈的安装使用
TPM及TSS协议栈的安装
标签: 可信计算。
目录
安装环境介绍
TPM及TSS安装
交互过程
- 编写代码测试TPM是否可用
- 编写代码测试TSS是否可用
- [对编译指令的一点说明](#10)
测试代码
环境
ubuntu 16.04ubuntu 14.04ubuntu 12.04都可以,本人使用的是Ubuntu16.04
TPM 及TSS安装
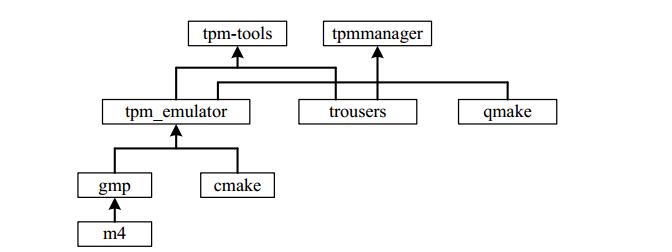
- 直接上干货吧
- 下面是仿真环境软件包依赖关系图
- 安装环境应该是由下至上按部就班的安装。
![]()
软件包下载百度网盘 提取码1tug
安装步骤
安装libgmp
- step one:使用
sudo apt-get install m4安装m4 - 在百度网盘上下载
gmp6.1.2
- (1)./configure
- (2)make
- (3)make check
- (4)sudo make install
安装TPM_emulator
- 进入之前百度网盘下载的
tpm-emulator-master文件夹下
- (1)mkdir build
- (2)cd build
- (3)cmake ../
- (4)sudo make
- (5)sudo make install//需要权限复制文件 - 初始化TPM
- (1)tpmd deactivated
- (2)killall tpmd
- (3)tpmd clear - 启动TPM
- (1)depmod -a
- (2)modprobe tpmd_dev
- (3)tpmd -f -d
安装TSS协议栈
- 养成好习惯,安装使用别人的东西之前,先看README文档,可以减少很多麻烦
安装依赖:
 Packages needed to build:
  automake > 1.4
  autoconf > 1.4
  pkgconfig
  libtool
  gtk2-devel
  openssl-devel >= 0.9.7
  pthreads library (glibc-devel)
      - 使用````sudo apt-get install 软件包名````挨个安装这些依赖的安装包
      - 使用````sudo apt-get install libssl-dev````安装openssl_dev
-
进入之前下载的
trousers0.3.14- (1)
./configure - (2)
make - (3)
sudo make install
- (1)
-
启动TSS 使用
sudo tcsd -e -f启动tss
安装tpm-tools
- 使用指令
sudo apt-get install tpm-tools这里需要等几分钟。
-如果出现fail可能是tcsd没有跑起来,最简单的解决办法就是重启,然后重新启动TPM TSS,重新使用指令sudo apt-get install tpm-tools
- 查看是否安装成功
在/usr/sbin目录下有3个关于tpm的命令运行如下
cd /usr/sbin
./tpm_version      #查看版本号
./tpm_getpubek   #查看ek公钥
./tpm_takeownership   #获取owner
TPM交互
- 安装完
TPM以及TSS还有tpm tools后。 Step one:启动TPM:- 使用指令
sudo depmod -a//分析可载入模块的相依性 - 使用指令
sudo modprobe tpmd_dev//加载模块 - 使用指令
sudo tpmd -f -d//启动模块
![]()
- 使用指令
- 启动成功后的信息记录如下

aaronhoo@aaronhoo:~/tpm/tpm-emulator-master$ sudo tpmd -f -d
tpmd.c:523: Info: starting TPM Emulator daemon (1.2.0.7-475)
tpmd.c:102: Info: parsing options
tpmd.c:109: Debug: debug mode enabled
tpmd.c:228: Info: installing signal handlers
tpmd.c:387: Info: staring main loop
tpmd.c:302: Info: initializing socket /var/run/tpm/tpmd_socket:0
tpmd.c:401: Debug: initializing TPM emulator
tpm_emulator_extern.c:101: Info: _tpm_extern_init()
tpm_emulator_extern.c:104: Debug: openening random device /dev/urandom
tpm_cmd_handler.c:4113: Debug: tpm_emulator_init(2, 0x00000000)
tpm_startup.c:29: Info: TPM_Init()
tpm_testing.c:243: Info: TPM_SelfTestFull()
tpm_testing.c:39: Debug: tpm_test_prng()
tpm_testing.c:69: Debug: Monobit: 9948
tpm_testing.c:70: Debug: Poker:   11.3
tpm_testing.c:71: Debug: run_1:   2487, 2525
tpm_testing.c:72: Debug: run_2:   1280, 1299
tpm_testing.c:73: Debug: run_3:   672, 617
tpm_testing.c:74: Debug: run_4:   302, 295
tpm_testing.c:75: Debug: run_5:   139, 145
tpm_testing.c:76: Debug: run_6+:  156, 155
tpm_testing.c:77: Debug: run_34:  0
tpm_testing.c:111: Debug: tpm_test_sha1()
tpm_testing.c:157: Debug: tpm_test_hmac()
tpm_testing.c:184: Debug: tpm_test_rsa_EK()
tpm_testing.c:186: Debug: tpm_rsa_generate_key()
tpm_testing.c:191: Debug: testing endorsement key
tpm_testing.c:197: Debug: tpm_rsa_sign(RSA_SSA_PKCS1_SHA1)
tpm_testing.c:200: Debug: tpm_rsa_verify(RSA_SSA_PKCS1_SHA1)
tpm_testing.c:203: Debug: tpm_rsa_sign(RSA_SSA_PKCS1_DER)
tpm_testing.c:206: Debug: tpm_rsa_verify(RSA_SSA_PKCS1_DER)
tpm_testing.c:210: Debug: tpm_rsa_encrypt(RSA_ES_PKCSV15)
tpm_testing.c:214: Debug: tpm_rsa_decrypt(RSA_ES_PKCSV15)
tpm_testing.c:218: Debug: verify plain text
tpm_testing.c:221: Debug: tpm_rsa_encrypt(RSA_ES_OAEP_SHA1)
tpm_testing.c:225: Debug: tpm_rsa_decrypt(RSA_ES_OAEP_SHA1)
tpm_testing.c:229: Debug: verify plain text
tpm_testing.c:261: Info: Self-Test succeeded
tpm_startup.c:43: Info: TPM_Startup(2)
tpmd.c:412: Debug: waiting for connections...
编写一个测试程序,测试TPM是否正常使用


tpm_takeownership setup an owner on the system's TPM (via the TPM_TakeOwnership API). This operation requires the TPM to be enabled and can be restricted by tpm_setownable. The command will prompt for owner and SRK passwords and confirmations of these if executed without either of the -well-known options, otherwise, a secret of all zeros is set for the requested password. After the second confirmation, be patient as the command may take awhile.

-h, --help
    Display command usage info.
-v, --version
    Display command version info.
-l, --log [none|error|info|debug]
    Set logging level.
-u, --unicode
    Use TSS UNICODE encoding for passwords to comply with applications using TSS popup boxes
-y, --owner-well-known
    Set a secret of all zeros (20 bytes of zeros) as the owner's secret.
-z, --srk-well-known
    Set a secret of all zeros (20 bytes of zeros) as the SRK secret.
启动成功后,编写一个测试程序,测试TSS是否正常使用

- 使用
gcc指令进行编译,-l去链接需要使用到的库,生成可执行文件。- 例如:我有一个
test.c文件需要编译。可以使用gcc test.c -o exp -ltspi - 大概的意思就是链接
tspi编译test.c生成 一个可执行文件exp
- 例如:我有一个
- 注意不同的代码,需要链接的库可能不一样所以
-l后面跟的库名根据代码而定。
关于测试代码:
- TPM的测试代码老师会给
- TSS 测试代码看这里

 浙公网安备 33010602011771号