CSS装饰页面
CSS称为层叠样式表,是Cascading Style Sheets的缩写。CSS不仅可以静态地修饰网页,还可以配合各种脚本语言动态地对网页各元素进行格式化。
CSS引入方式:
- 行内式:对标签元素添加style属性,在style属性中设置CSS样式;
- 嵌入式:将CSS样式写入网页<head>标签的<style>子标签中;
- 导入式:将CSS样式写入单独的css文件中,然后在网页<head>标签的<style>子标签中引入,@import "URL"(css文件路径);
- 链接式:将CSS样式写入单独的css文件中,通过<link>方式引入HTML中;
元素嵌套规则:
- 块级元素可以包含内联元素或某些块级元素,但内联元素不能包含块级元素,它只能包含其它内联元素。
- 块级元素不能放在p里面。
- 有几个特殊的块级元素只能包含内联元素,不能包含块级元素。如h1,h2,h3,h4,h5,h6,p,dt
- li内可以包含div
- 块级元素与块级元素并列、内联元素与内联元素并列。
CSS选择器
CSS选择器用于选择你想要的元素的样式的模式。
1、基础选择器
| * | * | 选择所有的元素,包括body元素 |
| class | .outer | 选择所有class='outer'的元素 |
| id | #inner | 选择id='inner'的元素 |
| Element | p | 选择所有的<p>元素 |


<!DOCTYPE html>
<html lang="en">
<head>
    <meta charset="UTF-8">
    <title>CSS</title>
    <style>
        *{
            color: white;
        }
        .outer{
            background-color: purple;
        }
        #inner{
            background-color: blue;
        }
        h1{
            background-color: red;
        }

    </style>
</head>
<body>
    <h1>标题</h1>
    <div class="outer">上</div>
    <div id="inner">中</div>
    <div class="outer">下</div>
</body>
2、组合选择器
| Element, Element | h1, h4 | 选择所有的<h1>元素和<h4>元素 |
| Element Element | div p | 选择<div>元素内的所有<p>元素,递归 |
| Element>Element | div>h3 | 选择所有父级是<div>元素的<h3>元素,一层 |
| Element+Element | div+p | 选择所有紧接着<div>元素之后的<p>元素 |
| [attribute] | [say] | 选择所有带有say属性元素 |
| [attribute=value] | [say='ahhh'] | 选择所有属性say="ahhh"的元素 |
| ~=v,^=,$=,*= | [say~=,^=,$=*="ahh"] | 包含单词,开头,结尾,包含字符串 |
<!DOCTYPE html>
<html lang="en">
<head>
    <meta charset="UTF-8">
    <title>CSS</title>
    <style>
        h1, h4{
            background-color: antiquewhite;
        }
        div p{
            background-color: aquamarine;
        }
        div>h3{
            background-color: coral;
        }
        div+p{
            background-color: gray;
        }
        [say]{
            background-color: darkcyan;
        }
        div[say$="la"]{
            background-color: darkorange;
        }
    </style>
</head>
<body>
    <h1>标题1</h1>
    <h4>标题4</h4>
    <div>
        <p>First Element Element</p>
        <div>
            <p>Second Element Element</p>
        </div>
    </div>
    <div>
        <h3>Element>Element</h3>
    </div>
    <div>DIV Element+Element</div>
    <p>First Element+Element</p>
    <p>Second Element+Element</p>
    <div say="ahhh">attribute1</div>
    <div say="blabla">attribute2</div>
</body>
</html>
3、伪类选择器
伪类选择器用于控制链接的显示效果。
| :link | a:link | 所有未访问链接 |
| :visited | a:visited | 所有访问过的链接 |
| :active | a:active | 鼠标点击下的链接 |
| :hover | a:hover | 鼠标悬浮在上面时 |
| :focus | input:focus | 具有焦点(鼠标点击)的输入元素 |
| :before | p:before | 在每个<p>元素之前插入内容,不换行 |
| :after | p:after | 在每个<p>元素之后插入内容,不换行 |
<!DOCTYPE html>
<html lang="en">
<head>
    <meta charset="UTF-8">
    <title>CSS</title>
    <style>
        a:link{
            background: blue;
        }
        a:visited{
            background: red;
        }
        a:active{
            background-color: yellow;
        }
        a:hover{
            background: aqua;
        }
        input:focus{
            background-color: aquamarine;
        }
        p:before{
            content: "段前";
        }
        p:after{
            content: "段后";
        }
    </style>
</head>
<body>
    <a href="http://www.baidu.com">转至百度</a>
    <div>
        <input type="text">
    </div>
    <p>这是一段话。</p>
</body>
</html>
背景
background:简写属性,作用是将背景属性设置在一个声明中;
background-color:设置元素的背景颜色;
background-image:把图像设置为背景;
background-position:设置背景图像的起始位置;
background-repeat:设置背景图像是否及如何重复;
background-attachment:背景图像是否固定或者随着页面的其余部分滚动;
建议使用background属性,而不是分别使用单个属性,因为这个属性在较老的浏览器中能够得到更好的支持,而且需要键入的字母也更少。
p{
    background: #ccc top right fixed no-repeat url("HTML5.jpg");
}

p{
    background-color: #fff;
    background-image: url("HTML5.jpg");
    background-position: bottom center;
    background-repeat: no-repeat;
    background-attachment: fixed;
}
文本
color:定义文本颜色;
text-indent:用于定义块级元素中第一个内容行的缩进,可以继承父元素的值;
text-align:规定元素中的文本的水平对齐方式;
line-height:设置行间的距离(行高),一行文字高度加上文字上下的空白区域的高度;
letter-spacing:设置字符间距;
word-spacing:设置字间距;
text-decoration:向文本添加修饰,如加下划线,修饰的颜色由 "color" 属性设置;
text-transform:控制文本的大小写;
text-shadow:设置文本阴影,规定水平阴影、垂直阴影、模糊距离,以及阴影的颜色;
direction:设置文本方向,ltr(left to right),rtl(right to left)。
p{
    color: #eeeeee;
    text-indent: 2em;
    text-align: left;
    line-height: 50px;
    letter-spacing: 2px;
    word-spacing: 10px;
    text-decoration: underline;
    text-transform: capitalize;
    text-shadow: 5px 5px 3px #000 ;
    direction: rtl;
}
文字
font:简写属性在一个声明中设置所有字体属性;
font-family:设置字体系列;可以设置多个字体,如果浏览器不支持第一个,则会尝试下一个;
font-size:设置字体的尺寸;
font-weight:设置字体的粗细,100-900,400等同于normal,而700等同于bold;
font-style:设置字体风格,italic斜体;
font-variant:以小型大写字体或者正常字体显示文本,small-caps小型大写字母的字体。
p{
    font-family: Verdana,Arial,sans-serif;
    font-size: 20px;
    font-weight: bold;
    font-style: italic;
    font-variant: small-caps;
}
盒子模型
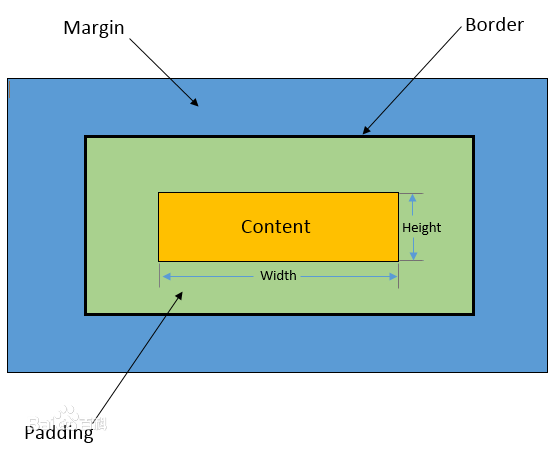
- Margin(外边距) - 清除边框外的区域,外边距是透明的;
- Border(边框) - 围绕在内边距和内容外的边框;
- Padding(内边距) - 清除内容周围的区域,内边距是透明的;
- Content(内容) - 盒子的内容,显示文本和图像。
margin:简写属性。在一个声明中设置所有外边距属性;
border:简写属性把四个边的属性设置在一个声明;
border-style:用于设置元素所有边框的样式,或者单独地为各边设置边框样式;
border-width:简写属性为元素的所有边框设置宽度,或者单独地为各边边框设置宽度;
border-color:简写属性设置元素的所有边框中可见部分的颜色,或者单独地为各边边框设置颜色。
padding:简写属性在一个声明中设置元素的所内边距属性;
当调整padding大小时,会把整个盒子撑大,可以利用box-sizing属性解决。
div.inner{
    height: 100px;
    width: 150px;
    background-color: #FFA000;
    margin: 50px 50px ;
    padding-top: 30px;
    padding-left: 30px;
    box-sizing: border-box;
}
列表
list-style:简写属性把所有用于列表的属性设置于一个声明中;
list-style-type:设置列表项标志的类型;
list-style-position:设置列表中列表项标志的位置。
list-style-image:指定作为一个有序或无序列表项标志的图像,图像相对于列表项内容的放置位置通常使用 list-style-position 属性控制。
none:无标记。
disc:默认。标记是实心圆。
circle:标记是空心圆。
square:标记是实心方块。
decimal:标记是数字。
decimal-leading-zero:0开头的数字标记。(01, 02, 03, 等。)
lower-roman:小写罗马数字(i, ii, iii, iv, v, 等。)
upper-roman:大写罗马数字(I, II, III, IV, V, 等。)
lower-alpha:小写英文字母The marker is lower-alpha (a, b, c, d, e, 等。)
upper-alpha:大写英文字母The marker is upper-alpha (A, B, C, D, E, 等。)
lower-greek:小写希腊字母(alpha, beta, gamma, 等。)
lower-latin:小写拉丁字母(a, b, c, d, e, 等。)
upper-latin:大写拉丁字母(A, B, C, D, E, 等。)
hebrew:传统的希伯来编号方式
armenian:传统的亚美尼亚编号方式
georgian:传统的乔治亚编号方式(an, ban, gan, 等。)
cjk-ideographic:简单的表意数字
hiragana:标记是:a, i, u, e, o, ka, ki, 等。(日文片假名)
katakana:标记是:A, I, U, E, O, KA, KI, 等。(日文片假名)
hiragana-iroha:标记是:i, ro, ha, ni, ho, he, to, 等。(日文片假名)
katakana-iroha:标记是:I, RO, HA, NI, HO, HE, TO, 等。(日文片假名)
ul{
    list-style: square inside url("HTML5.jpg");
}

ul{
    list-style-type: square;
    list-style-position: inside;
    list-style-image: url("HTML5.jpg");
}
display
规定元素应该生成的框的类型。
none:此元素不会被显示;
block:显示为块级元素,可以设置width,height属性,可以设置margin和padding属性,前后会带有换行符;
inline:显示为内联元素,设置width,height属性无效,margin和padding属性水平有效、上下无效,元素前后没有换行符;
inline-block:将对象呈现为inline对象,但是对象的内容作为block对象呈现,使其既具有block的宽度高度特性又具有inline的同行特性。
<div style="display: none;">aaaa</div>
<div style="display: block; height: 50px">bbbb</div>
<div style="display: inline; height: 50px">cccc</div>  <!--height无效-->
<div style="display: inline-block; height: 50px">dddd</div>
float
float 属性定义元素在哪个方向浮动。以往这个属性总应用于图像,使文本围绕在图像周围,不过在 CSS 中,任何元素都可以浮动。浮动元素会生成一个块级框,而不论它本身是何种元素。
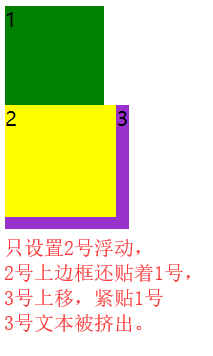
float浮动未完全脱离文档流,当元素浮动时,紧贴上一个未浮动元素的下边框;
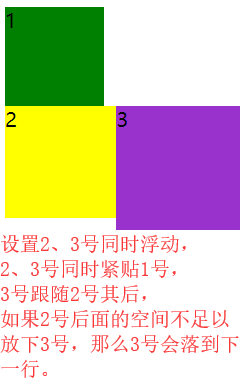
一个浮动元素下面的未浮动元素会取代浮动元素的位置,但文本内容会围绕在浮动元素周围;
假如在一行之上只有极少的空间可供浮动元素,那么这个元素会跳至下一行。
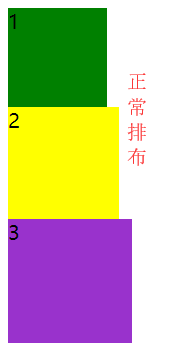
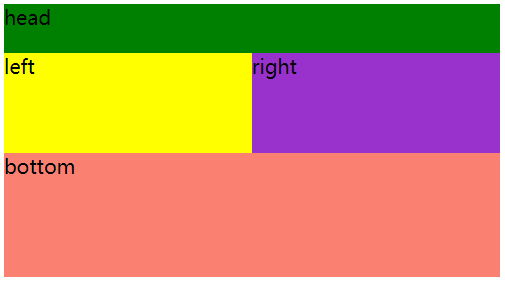
清除浮动
如果想使用float来做左侧这样的布局,如果直接使用float,就会出现右侧这种现象。
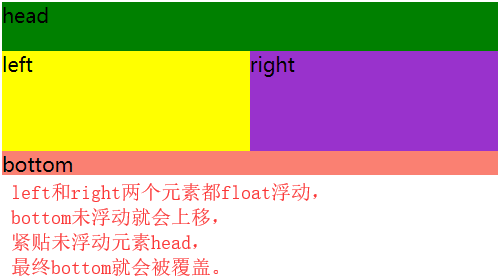
出现上述现象,根本原因是因为float元素脱离文档流,在文档流里就没有这个元素,即宽高不会在文档流体现出来;那么bottom是未浮动元素,根据文档流特性依此从上到下排列,bottom就会上移,紧贴上一个未浮动元素head;但上面又存在浮动元素left、right,最终就会把bottom覆盖,但文本不会被覆盖。
想要解决这种浮动带来的问题,那就需要在文档流中体现出浮动元素的存在,就需要清除浮动。
1、添加空标签
在最后一个浮动标签后,新加一个标签,给其设置clear:both;
缺点:添加无意义标签,语义化差。
<!doctype html>
<html lang="en">
<head>
    <meta charset="UTF-8">
    <title>float</title>
    <style>
        .head{
            height: 40px;
            width: 400px;
            background-color: green;
        }
        .left{
            height: 80px;
            width: 200px;
            background-color: yellow;
            float: left;
        }
        .right{
            height: 80px;
            width: 200px;
            background-color: darkorchid;
            float: left;
        }
        .bottom{
            height: 100px;
            width: 400px;
            background-color: salmon;
        }
        .clear{
            clear: both;  /*给空标签设置clear属性*/
        }
    </style>
</head>
<body>
    <div class="head">head</div>
    <div>
        <div class="left">left</div>
        <div class="right">right</div>
        <div class="clear"></div>  <!--在最后一个浮动元素后,添加一个空标签-->
    </div>
    <div class="clear"></div>  <!--或者父级后面也可以-->
    <div class="bottom">bottom</div>
</body>
</html>
2、父级元设置overflow属性
为浮动元素的父元素,添加overflow:hidden属性。
缺点:内容增多的时候容易造成不会自动换行导致内容被隐藏掉,无法显示要溢出的元素。
<!doctype html>
<html lang="en">
<head>
    <meta charset="UTF-8">
    <title>float</title>
    <style>
        .head{
            height: 40px;
            width: 400px;
            background-color: green;
        }
        .left{
            height: 80px;
            width: 200px;
            background-color: yellow;
            float: left;
        }
        .right{
            height: 80px;
            width: 200px;
            background-color: darkorchid;
            float: left;
        }
        .bottom{
            height: 100px;
            width: 400px;
            background-color: salmon;
        }
    </style>
</head>
<body>
    <div class="head">head</div>
    <div style="overflow: hidden">  <!--为下面两个浮动元素的父级元素,添加overflow:hidden属性-->
        <div class="left">left</div>
        <div class="right">right</div>
    </div>
    <div class="bottom">bottom</div>
</body>
</html>
3、添加after伪元素
对浮动元素的父级元素添加伪元素::after。
优点:符合闭合浮动思想,结构语义化正确。
<!doctype html>
<html lang="en">
<head>
    <meta charset="UTF-8">
    <title>float</title>
    <style>
        .head{
            height: 40px;
            width: 400px;
            background-color: green;
        }
        .left{
            height: 80px;
            width: 200px;
            background-color: yellow;
            float: left;
        }
        .right{
            height: 80px;
            width: 200px;
            background-color: darkorchid;
            float: left;
        }
        .bottom{
            height: 100px;
            width: 400px;
            background-color: salmon;
        }
        .content::after{  /*父级元素添加after伪元素*/
            display: block;
            content: '';
            height: 0;
            clear: both;
            visibility: hidden;  /*设置元素不可见*/
        }
    </style>
</head>
<body>
    <div class="head">head</div>
    <div class="content">  <!--浮动元素的父级元素-->
        <div class="left">left</div>
        <div class="right">right</div>
    </div>
    <div class="bottom">bottom</div>
</body>
</html>
position
static:默认值,无特殊定位,元素遵循正常文档流。top,right,bottom,left等属性不会被应用
relative:元素遵循正常文档流,相对正常位置进行偏移,而其层叠通过z-index属性定义。
absolute:元素脱离正常文档流,根据父级元素属性进行绝对定位。而其层叠通过z-index属性定义。
如果所有祖级元素position属性值都为static,那么就以浏览器边界为依据,进行top,right,bottom,left偏移;
如果父级元素有position属性值为非static,那么就以这个父元素边界为依据,进行top,right,bottom,left偏移。
fixed:元素脱离正常文档流,定位于浏览器窗口的一个指定坐标,不论窗口是否滚动,它都会固定在这个位置。
如果一个元素设置了 position:absolute | fixed,那么该元素就不能设置float。因为这是两个不同的流,一个是浮动流,另一个是“定位流”。但是 relative 却可以,因为它未脱离正常文档流。

 浙公网安备 33010602011771号