
1.问题描述
有209张图片作为训练集,50张图片作为测试集,图片中有的是猫的图片,有的不是。每张图片的像素大小为64*64
吴恩达并没有把原始的图片提供给我们
而是把这两个图片集转换成两个.h5文件:train_catvnoncat.h5(训练集),test_catvnoncat.h5(测试集)。
这三这个文件的下载地址:https://pan.baidu.com/s/1bL8SC3gNxbzL9Xo4C6ybow 提取码: iaq7
这个h5文件是一种数据文件格式,关于它的写入和读取详见: https://blog.csdn.net/csdn15698845876/article/details/73278120
这里并不需要我们自己来写读取方法,吴恩达已经给出了一个文件lr_utils.py来读取这两个.h5文件。
问题总结一下,我们的已知条件是这下图的这两个.h5文件和一个lr_utils.py文件,两个.h5文件分别是训练集和测试集,lr_utils.py用来解析两个.h5文件的内容。
我们可以打开看看这个lr_utils.py文件看看:
import numpy as np
import h5py

def load_dataset():
    train_dataset = h5py.File('datasets/train_catvnoncat.h5', "r")
    train_set_x_orig = np.array(train_dataset["train_set_x"][:]) # your train set features
    train_set_y_orig = np.array(train_dataset["train_set_y"][:]) # your train set labels

    test_dataset = h5py.File('datasets/test_catvnoncat.h5', "r")
    test_set_x_orig = np.array(test_dataset["test_set_x"][:]) # your test set features
    test_set_y_orig = np.array(test_dataset["test_set_y"][:]) # your test set labels

    classes = np.array(test_dataset["list_classes"][:]) # the list of classes

    train_set_y_orig = train_set_y_orig.reshape((1, train_set_y_orig.shape[0]))
    test_set_y_orig = test_set_y_orig.reshape((1, test_set_y_orig.shape[0]))

    return train_set_x_orig, train_set_y_orig, test_set_x_orig, test_set_y_orig, classes
可以看到它里面就一个函数 load_dataset(),
它的返回值有5个,分别对应
train_set_x_orig:训练集的特征值(像素集合)
train_set_y_orig:训练集的标签(是不是猫)
test_set_x_orig:测试集的特征值(像素集合)
test_set_y_orig:测试集的标签(0表示不是猫,1表示是猫),
classes:bytes:保存的两个字符串数据。
我们可以把他们打印出来,看看里面的结构:
train_set_x_orig,train_set_y,test_set_x_orig,test_set_y,classes=lr_utils.load_dataset()

print("===========train_set_x_orig========")
print(train_set_x_orig.shape)
print(train_set_x_orig)

print("===========train_set_y========")
print(train_set_y.shape)
print(train_set_y)

print("===========test_set_x_orig========")
print(test_set_x_orig.shape)
print(test_set_x_orig)

print("===========test_set_y========")
print(test_set_y.shape)
print(test_set_y)

print("===========classes========")
print(classes.shape)
print(classes)
得到的部分结果如下(太长就不全贴出来了):
===========train_set_x_orig========
(209, 64, 64, 3)
[[[[ 17  31  56]
   [ 22  33  59]
   [ 25  35  62]
   ...
   [  0   0   0]
   [  0   0   0]
   [  0   0   0]]]]
===========train_set_y========
(1, 209)
[[0 0 1 0 0 0 0 1 0 0 0 1 0 1 1 0 0 0 0 1 0 0 0 0 1 1 0 1 0 1 0 0 0 0 0 0 0
  0 1 0 0 1 1 0 0 0 0 1 0 0 1 0 0 0 1 0 1 1 0 1 1 1 0 0 0 0 0 0 1 0 0 1 0 0
  0 0 0 0 0 0 0 0 0 1 1 0 0 0 1 0 0 0 1 1 1 0 0 1 0 0 0 0 1 0 1 0 1 1 1 1 1
  1 0 0 0 0 0 1 0 0 0 1 0 0 1 0 1 0 1 1 0 0 0 1 1 1 1 1 0 0 0 0 1 0 1 1 1 0
  1 1 0 0 0 1 0 0 1 0 0 0 0 0 1 0 1 0 1 0 0 1 1 1 0 0 1 1 0 1 0 1 0 0 0 0 0
  1 0 0 1 0 0 0 1 0 0 0 0 1 0 0 1 0 0 0 0 0 0 0 0]]
===========test_set_x_orig========
(50, 64, 64, 3)
[[[[158 104  83]
   [161 106  85]
   [162 107  84]
   ...
   [  8  33  12]
   [ 13  35  18]
   [  5  22   5]]]]
===========test_set_y========
(1, 50)
[[1 1 1 1 1 0 1 1 1 1 1 1 1 0 0 1 0 1 1 1 1 0 0 1 1 1 1 0 1 0 1 1 1 1 0 0 0
  1 0 0 1 1 1 0 0 0 1 1 1 0]]
===========classes========
(2,)
[b'non-cat' b'cat']
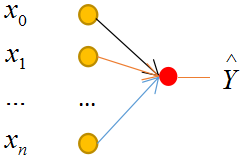
2.模型
本文采用简单的单层神经网络模型:
![]()
![]()
3.问题分析
3.1 单个样本的情况
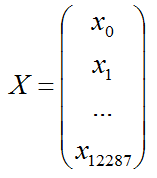
(1)特征矩阵X
每个样本是一张64*64像素的图,买个像素由(R,G,B)三原色构成的,所以每个样本的特征数为 64*64*3=12288
把它们列起来写,单个样本的特征记做一个矩阵X:
(2)系数W矩阵
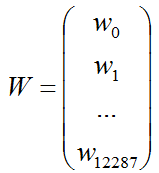
(3)系数B
![]()
3.2 m个样本的情况
以上的z和x加上一个上标即可,注意W和b不要加,系数只有一组,与样本的数量无关!
![]() 它表示第i个样本
它表示第i个样本
m=209个样本写成矩阵就是:

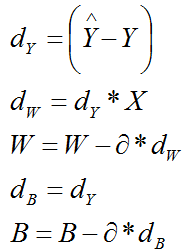
4.写代码
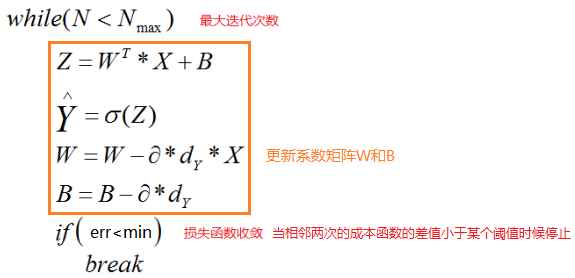
4.1伪代码
使用这m个样本进行训练N次,不断更新参数w和b,迭代结束的条件是当两次相邻迭代的损失函数的变化值小于某个阈值,
为了防止死循环,还要设置一个最大迭代次数。
4.2写代码
(1)矩阵变换
还记得 我们的已知条件是这5个矩阵:
train_set_x_orig:训练集的特征值(像素集合)
train_set_y_orig:训练集的标签(是不是猫)
test_set_x_orig:测试集的特征值(像素集合)
test_set_y_orig:测试集的标签(0表示不是猫,1表示是猫),
classes:bytes类型保存的两个字符串数据
训练集_图片的维数 : (209, 64, 64, 3)
训练集_标签的维数 : (1, 209)
测试集_图片的维数: (50, 64, 64, 3)
测试集_标签的维数: (1, 50)
首先我们将train_set_x_orig转成如下的格式:
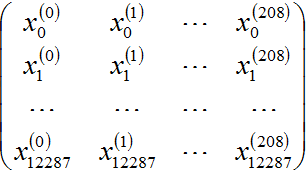
每一列是一个样本,一共209个样本,我们使用的是reshape函数:
train_x_tmp=train_set_x_orig.reshape(train_set_x_orig.shape(1),-1).T
注意它并不等价于 train_set_x_orig.reshape(-1,train_set_x_orig.shape(1)),不信你可以自己写个小例子测试下。
使用同样的方法,我们将test_set_x_orig做变换,使得他们满足公式中的形式:
test_x_tmp=test_set_x_orig.reshape(test_set_x_orig.shape(1),-1).T
(2)标准化数据集:
为了收敛速度,我们还要将每个像素值除以255,这个技巧在吴恩达的视频里面讲到。
train_set_x = train_x_tmp / 255
test_set_x = test_x_tmp/ 255
(3)开始写吧
以下是需要你写的代码,除了这个文件,还需要前面说的两个.h5文件和一个lr_utils.py文件,文章一开头已经给出了下载地址。
# -*- coding: utf-8 -*-
import io
import sys
sys.stdout=io.TextIOWrapper(sys.stdout.buffer,encoding='utf8')
import pylab

import lr_utils
import matplotlib.pyplot as plt
import numpy as np
import h5py
train_set_x_orig,train_set_y,test_set_x_orig,test_set_y,classes=lr_utils.load_dataset()

#转换成12288*209的矩阵
train_x_tmp  = train_set_x_orig.reshape(train_set_x_orig.shape[0],-1).T

#标准化特征值
X = train_x_tmp / 255
Y = train_set_y

#初始化W,B,Z,A,cost,Dy
#W是一个12288*1的矩阵
#B是一个1*1的矩阵,使用广播
#Z是一个1*209的矩阵
#A是一个1*209的矩阵
#Dy=A-Y
costCur=0
cost=0
W = np.zeros(shape = (12288,1))
B = 0
Z = np.zeros(shape = (1,209))
A = np.zeros(shape = (1,209))
Dy= 0
#err是相邻两次迭代的成本函数的差值
err=0
#costTmp是成本损失矩阵
costTmp = np.zeros(shape = (1,209))
#学习率
learning=0.01
#最大迭代次数
Nmax=5000
#定义收敛阈值
min=0.01

#写循环
N=0
while N<Nmax :
    Z=np.dot((W.T),X)+B
    A=1/(1 + np.exp(-Z))
    #成本矩阵
    costTmp = np.dot(Y,np.log(A).T)+np.dot((1-Y),np.log(1-A).T)
    #计算成本
    cost=(-1/209)*np.squeeze(np.sum(costTmp))
    err = abs(costCur-cost)
    if err < min :
       break
    cost=costCur

    #W是一个12288*1的矩阵
    #A是一个1*209的矩阵
    Dy=(1/209)*(A-Y)
    W=W-learning*np.dot(X,(Dy.T))  #更新W 一个12288*1的矩阵,这里容易出错,注意是X与Dy的转置相乘,可以根据矩阵的维数来判断。
    B=B-learning*np.sum(Dy)    #更新B

    N += 1

print("iteration is over")
print("iteration count: "+str(N))
print("w:"+str(W))
print("B:"+str(B))

#使用训练集合测试准确率
Y_prediction_train = np.zeros((1,209))
for i in range(A.shape[1]):
        #将概率a [0,i]转换为实际预测p [0,i]
        Y_prediction_train[0,i] = 1 if A[0,i] > 0.5 else 0

#使用测试集合测试准确率
#转换成12288*50的矩阵
TEST_Y = test_set_y
test_x_tmp  = test_set_x_orig.reshape(test_set_x_orig.shape[0],-1).T
#标准化特征值
TEST_X = test_x_tmp/ 255
TEST_Z=np.dot((W.T),TEST_X)+B
TEST_A=1/(1 + np.exp(-TEST_Z))
Y_prediction_test = np.zeros((1,50))
for i in range(TEST_A.shape[1]):
        #将概率a [0,i]转换为实际预测p [0,i]
        Y_prediction_test[0,i] = 1 if TEST_A[0,i] > 0.5 else 0

#打印结果
print("test accuracy: "  , format(100 - np.mean(np.abs(Y_prediction_test - TEST_Y)) * 100) ,"%")
print("train accuracy: "  , format(100 - np.mean(np.abs(Y_prediction_train - Y)) * 100) ,"%")
打印结果中的迭代数目和准确率如下:
iteration count: 5000
test accuracy:  68.0 %
train accuracy:  100.0 %
可以看到,迭代次数达到了5000,训练集的准确率是100%,但测试集的准确率不高。
如何提高呢?本文的线性模型不行了,
继续学习后面的课程,使用多层神经网络,隐藏层不要使用线性激活函数,选择合理的初始参数值等等,这就是后面的内容了。

 浙公网安备 33010602011771号