ubuntu18 网卡配置 永久静态路由 server和desktop 版-更新
一、ubuntu18 网卡配置 永久静态路由 server版
ubuntu系统用的比较少,从ubuntu 18 server开始使用netplan管理卡; 纪录一下网卡配置,和静态路由配置;
netpan 命令帮助
root@fjgdwl_ubuntu_template:~# netplan help
usage: /usr/sbin/netplan  [-h] [--debug]  ...

Network configuration in YAML

optional arguments:
  -h, --help  show this help message and exit
  --debug     Enable debug messages    使用debug方式运行,前台显示运行日志;例  netplan --debug apply

Available commands:

    help      Show this help message
    apply     Apply current netplan config to running system     运行新的配置到服务器;似重启网卡
    generate  Generate backend specific configuration files from  生成配置文件 (/etc/netplan/ 可能没有yaml 文件)
              /etc/netplan/*.yaml
    info      Show current netplan version and available features  显示版本
    ip        Retrieve IP information from the system
    try       Try to apply a new netplan config to running system, with  尝试验证配置文件
              automatic rollback
配置:
root@ubuntu_18:~# vim /etc/netplan/tools-netcfgv4.yaml
# This file generated by castools, describes the ipv4 network interfaces available on your system
network:
  version: 2
  renderer: networkd
  ethernets:
    #hwaddr: 0c:da:41:1d:bf:44
    ens3:
      addresses:
        - 192.168.136.6/28
      routes:
        - to: 10.166.0.0/15
          via: 192.168.136.1
        - to: 10.168.0.0/13
          via: 192.168.136.1
    #gateway4: 192.168.136.1
    #hwaddr: 0c:da:41:1d:d0:65
    ens10:
      addresses:
        - 192.168.137.6/28
      gateway4: 192.168.137.1
root@fjgdwl_ubuntu_template:~# netplan apply 重启网卡
=============================================================================================
二、ubuntu18 网卡配置 永久静态路由 desktop版
碰到服务器第三方装的系统。

网卡配置是这样的,通过查看系统版本发现装成了ubuntu desktop版本,是用图形界面配置的网络 默认使用了NetworkManager由于远程访问不能断网通过 grep -r "10.110.5.2" * 找到了网卡配置文件在</etc/NetworkManager/system-connections/有线连接 2>。
看配置文件毫无头脑;试了下centos配置网卡的命令<nmtui>居然可以;
#nmtui 按步骤点击 可以添加路由,保存之后会同步到配置文件中,并且不需要重启网卡;
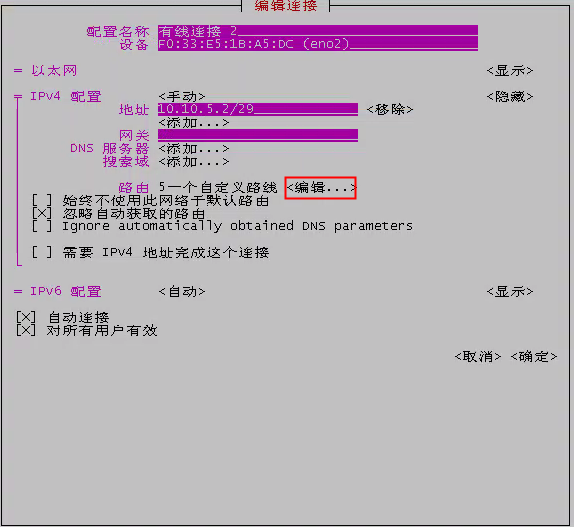
黄色部分是新添加的路由
root@huawei-2488-V5:/etc# cat NetworkManager/system-connections/有线连接\ 2
[connection]
id=有线连接 2
uuid=c49242d8-3043-39bd-a0bc-32fd645767db
type=ethernet
autoconnect-priority=-999
permissions=
timestamp=1627875689

[ethernet]
mac-address=F0:33:E5:1B:A5:DC
mac-address-blacklist=

[ipv4]
address1=10.10.5.2/29
dns-search=
ignore-auto-routes=true
method=manual
route1=10.172.0.0/14,10.10.5.1
route2=10.180.0.0/15,10.10.5.1
route3=10.218.0.0/15,10.10.5.1
route4=10.220.0.0/14,10.10.5.1
route5=10.224.0.0/14,10.10.5.1

[ipv6]
addr-gen-mode=stable-privacy
dns-search=
method=auto
本文来自博客园,作者:拆服务器的运维,转载请注明原文链接:https://www.cnblogs.com/hoshiblog/p/15070221.html

