ShadowGun Demo学习
1.GodRays

MADFINGER/Transparent/GodRays
传统的上帝之光效果,有顶点变形,适用范围非常广。
另外维京村落demo中,还有一个粒子用的近处消隐效果:http://www.cnblogs.com/hont/p/5705240.html
补充:
float3 viewPos = mul(UNITY_MATRIX_MV,v.vertex);
直接对顶点做MV变换,得到相机空间内的距离
然后计算FadeIn,FadeOut。并根据顶点色和FadeOut值往法线方向做一个推进的处理
即视角离近后面片会被推开,其他表现和常规的面片消隐差不多
2.Blinking GodRays

MADFINGER/Transparent/Blinking GodRays
非顶点变形的近处消隐shader,并且支持过远隐藏
3.Blinking GodRays Billboarded

MADFINGER/Transparent/Blinking GodRays Billboarded
注意培培养皿周围的发光,就是使用带有Billboarded效果的god ray shader制作的
不错的移动平台自发光做法
而培养皿中的气泡流动是双层的uv流动Shader,用的是Scroll 2 Layers Multiplicative No Lightmap Sine
补充:
此处的shader广告牌的思路主要是记录当前顶点到锚点的相对位置,记录到顶点色上或者uv2上。
cheap版本代码少一段,补充测试后主要是这样:
float3    centerOffs        = float3(float(0.5).xx - v.color.rg,0) * v.texcoord1.xyy;
float3    BBCenter        = v.vertex + centerOffs;
float3    viewPos            = mul(UNITY_MATRIX_MV,float4(BBCenter,1)) - centerOffs;
o.pos    = mul(UNITY_MATRIX_P, float4(viewPos,1));
先减去相对位置,变为锚点位置做变换MV,变化后加回相对位置。然后做P变换。
因为是在V空间相机空间做的偏移,Z始终是相机前后,XY始终是相机的左右方向,因此直接加偏移值可行。
非cheap版会从相机到目标物体方向得到forward向量,然后求得right、up另外两个方向向量,
好处是在MVP变换之前做了相对当前观察位置的偏移,后面正常走MVP变换,所以支持旋转缩放。
并且可以对y轴旋转进行再次的调节,Y方向可以不跟着广告牌走。
wiki上的billboards就是先做mv,再加偏移然后做p变换,shadowgun cheap版本的做法:
https://en.wikibooks.org/wiki/Cg_Programming/Unity/Billboards
4.Wind

MADFINGER/Environment/Lightmap + Wind
旗帜飘扬的效果,也是使用范围非常广,很多shadowGun学习的文章都有介绍过,运行效率也很高
核心部分:
inline float4 AnimateVertex2(float4 pos, float3 normal, float4 animParams,float4 wind,float2 time)
{
    // animParams stored in color
    // animParams.x = branch phase
    // animParams.y = edge flutter factor
    // animParams.z = primary factor
    // animParams.w = secondary factor

    float fDetailAmp = 0.1f;
    float fBranchAmp = 0.3f;

    // Phases (object, vertex, branch)
    float fObjPhase = dot(_Object2World[3].xyz, 1);
    float fBranchPhase = fObjPhase + animParams.x;

    float fVtxPhase = dot(pos.xyz, animParams.y + fBranchPhase);

    // x is used for edges; y is used for branches
    float2 vWavesIn = time  + float2(fVtxPhase, fBranchPhase );

    // 1.975, 0.793, 0.375, 0.193 are good frequencies
    float4 vWaves = (frac( vWavesIn.xxyy * float4(1.975, 0.793, 0.375, 0.193) ) * 2.0 - 1.0);

    vWaves = SmoothTriangleWave( vWaves );
    float2 vWavesSum = vWaves.xz + vWaves.yw;

    // Edge (xz) and branch bending (y)
    float3 bend = animParams.y * fDetailAmp * normal.xyz;
    bend.y = animParams.w * fBranchAmp;
    pos.xyz += ((vWavesSum.xyx * bend) + (wind.xyz * vWavesSum.y * animParams.w)) * wind.w;

    // Primary bending
    // Displace position
    pos.xyz += animParams.z * wind.xyz;

    return pos;
}
补充1:
此处技术出自GPUGems3,但后续blend部分有所差异。并且并未用到顶点色的rgb通道,只是用顶点色的a通道作为
强度标记。
补充2:
最近正好在做树,又重新看了下GPU GEMS3 Chapter 16. Vegetation Procedural Animation and Shading in Crysis
书中给的源码不全,无法定位具体顶点色通道对应哪个参数,书中光盘给的是视频文件。。
于是我直接去下载了crysis,豁然开朗。。
-主弯曲部分:
和书中代码已经不一样了
GPUGems3:
// Bend factor - Wind variation is done on the CPU.
float fBF = vPos.z * fBendScale; // Smooth bending factor and increase its nearby height limit.
fBF += 1.0;
fBF *= fBF;
fBF = fBF * fBF - fBF; // Displace position
float3 vNewPos = vPos;
vNewPos.xy += vWind.xy * fBF; // Rescale
vPos.xyz = normalize(vNewPos.xyz)* fLength;
Crysis:
// vBendParams.x = windir x
// vBendParams.y = windir y
// vBendParams.z = bending strength

// Main vegetation bending animation (applied on entire vegetation)
void _MainBending(inout float3 vPos, half3 vBendParams)
{
#if %_VT_TYPE_MODIF || %_VT_TYPE
    #if %_VT_BEND
        // Bend factor
        half fBF = vPos.z * vBendParams.z;                                                                // 1 alu
        fBF *= fBF;                                                                                       // 1 alu

        #if %_VT_GRASS
            vPos.xy += vBendParams.xy * fBF;                                                                // 1 alu
        #else
            half fLength = length(vPos.xyz);                                                                // 2 alu

            half3 vNewPos = vPos;
            vNewPos.xy += vBendParams.xy * fBF;                                                             // 1 alu

            vPos = normalize(vNewPos) * fLength;                                                            // 4 alu
        #endif
    #endif
#endif
}
fLength的获取也被省略掉:
half fLength = length(vPos.xyz);
-细节弯曲部分:
和GPUGems3差别不大,不同贴图通道代表的变量如下:
fEdgeAtten - 红色通道,对已经计算好的位移信息再做一次Mask
fBranchPhase - 绿色通道,作为不同叶子的相位偏移
fBranchAtten -蓝色通道,表示了上下浮动,也会被乘上fBranchPhase系数
GPUGems3:
// Phases (object, vertex, branch)
float fObjPhase = dot(worldPos.xyz, 1);
fBranchPhase += fObjPhase;
float fVtxPhase = dot(vPos.xyz, fDetailPhase + fBranchPhase); // x is used for edges; y is used for branches
float2 vWavesIn = fTime + float2(fVtxPhase, fBranchPhase ); // 1.975, 0.793, 0.375, 0.193 are good frequencies
float4 vWaves = (frac( vWavesIn.xxyy * float4(1.975, 0.793, 0.375, 0.193) ) * 2.0 - 1.0 ) * fSpeed * fDetailFreq;
vWaves = SmoothTriangleWave( vWaves );
float2 vWavesSum = vWaves.xz + vWaves.yw; // Edge (xy) and branch bending (z)
vPos.xyz += vWavesSum.xxy * float3(fEdgeAtten * fDetailAmp * vNormal.xy, fBranchAtten * fBranchAmp);
Crysis:
// vBendDetailParams.x = time
// vBendDetailParams.y = detail bend frequency
// vBendDetailParams.z = detail bend leaf amplitude
// vBendDetailParams.w = bend detail phase

// vVertexInfo.x = vertex color R ( edge info )
// vVertexInfo.y = vertex color G ( brach phase )
// vVertexInfo.z = 1 - vertex color B ( brach bend amount ), would save 1 alu with no inversion, but too late now for changing all assets
// vVertexInfo.w = bend detail branch amplitude

void _DetailBending(half3 worldPos, inout float3 vPos, float3 vNormal, half3 vVertexInfo, half4 vBendDetailParams)
{
#if %_VT_TYPE_MODIF || %_VT_TYPE
    #if %_VT_DET_BEND
        const half fTime = g_VS_AnimGenParams.z;

        half fSpeed = vBendDetailParams.w;
        #if %_VT_GRASS
            fSpeed *= (vPos.z);                                                                            // 1 alu
        #endif

        half fDetailFreq = vBendDetailParams.x;
        half fDetailLeafAmp = vBendDetailParams.y;
        half fDetailBranchAmp = vBendDetailParams.z;

        half fEdgeAtten = vVertexInfo.x;
        half fBranchPhase = vVertexInfo.y;
        half fBranchAtten = vVertexInfo.z;

        // Phases (object, vertex, branch)
        half fObjPhase = ( dot(worldPos.xyz, 2) );                                                       // 1 alu
        fBranchPhase += fObjPhase;                                                                       // 1 alu
        half fVtxPhase = ( dot(vPos, fBranchPhase) );                                                    // 1 alu

        // Detail bending for leaves/grass
        // x: is used for edges, y is used for branch
        half2 vWavesIn = fTime;
        vWavesIn += half2(fVtxPhase, fBranchPhase);                                                      // 1 alu

        half4 vWaves = (frac( vWavesIn.xxyy * half4(1.975, 0.793, 0.375,  0.193) ) * 2.0 - 1.0) * fDetailFreq * fSpeed;  //  5 alu
        vWaves = TriangleWave( vWaves );                                                                 // 4 alu

        // x: is used for edges, y is used for branches
        half2 vWavesSum = ( (vWaves.xz + vWaves.yw)) ;                                                   // 1 alu

        // Edge and branch bending (xy is used for edges, z for branches)
        vPos += vWavesSum.xxy * half3(fEdgeAtten * fDetailLeafAmp * vNormal.xy, fBranchAtten * fDetailBranchAmp); // 4 alu
    #endif
#endif
}
具体研究文件在ModificatorVT.cfi中,直接去CryEngine里看也可以,应该也有。
5.Anim texture

MADFINGER/FX/Anim texture
用来做阵列图播放,ShadowGun Demo中的海面焦散
该shader可以做到切换时的淡出淡入,比起直接切换要自然的多
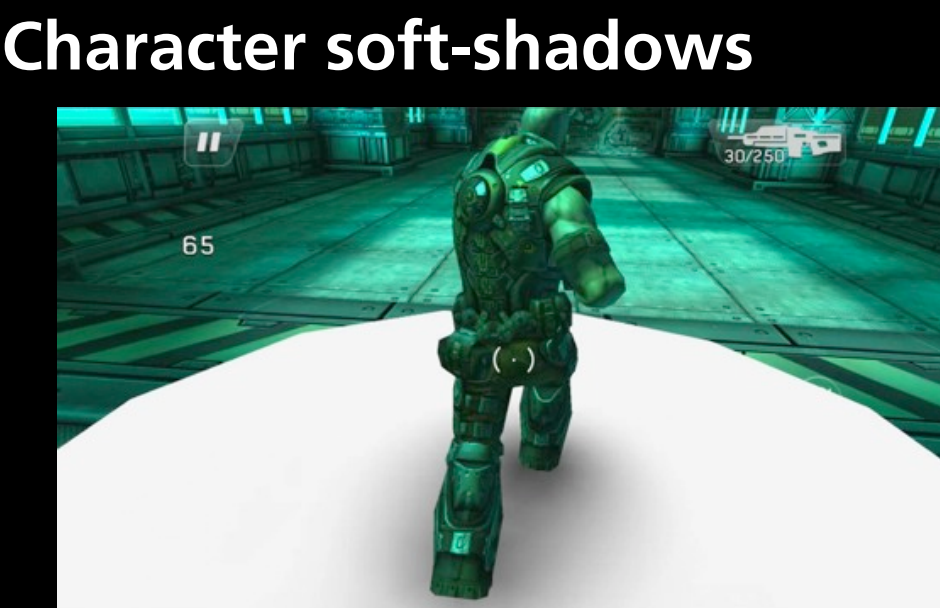
6.角色脚底软阴影

在ShadowGun的PPT里有提到,但是案例工程里没有。
并且PPT里直接说了参考了IQ大神的AO实现:
https://www.shadertoy.com/view/4djSDy
细分提到是"pre-tessellated",应该是离线计算好的,用Delaunay也可以做:
https://www.cnblogs.com/hont/p/15310157.html


【推荐】国内首个AI IDE,深度理解中文开发场景,立即下载体验Trae
【推荐】编程新体验,更懂你的AI,立即体验豆包MarsCode编程助手
【推荐】抖音旗下AI助手豆包,你的智能百科全书,全免费不限次数
【推荐】轻量又高性能的 SSH 工具 IShell:AI 加持,快人一步
· AI与.NET技术实操系列:向量存储与相似性搜索在 .NET 中的实现
· 基于Microsoft.Extensions.AI核心库实现RAG应用
· Linux系列:如何用heaptrack跟踪.NET程序的非托管内存泄露
· 开发者必知的日志记录最佳实践
· SQL Server 2025 AI相关能力初探
· winform 绘制太阳,地球,月球 运作规律
· 震惊!C++程序真的从main开始吗?99%的程序员都答错了
· AI与.NET技术实操系列(五):向量存储与相似性搜索在 .NET 中的实现
· 超详细:普通电脑也行Windows部署deepseek R1训练数据并当服务器共享给他人
· 【硬核科普】Trae如何「偷看」你的代码?零基础破解AI编程运行原理