Megacity Unity Demo研究
1.前言
Megacity Demo发布于2018左右,该Demo相较于之前的Book of the Dead,
体量相对较小,主要演示DOTS相关内容。
近期刚好空闲,故这几天把坑填上。
该Demo已上传百度网盘:
链接:https://pan.baidu.com/s/1X1gh6hQSRuB0KenlRZsOiw
提取码:iios
打开请使用Unity2019.1.0b7,其中Unity Package部分包会从Unity服务器下载,版本过老,
不保证是否能正确拉取,可以自行修复。
2.Hybrid ECS 部分
先讲一讲用到Hybrid ECS的几个功能。
2.1 HLOD
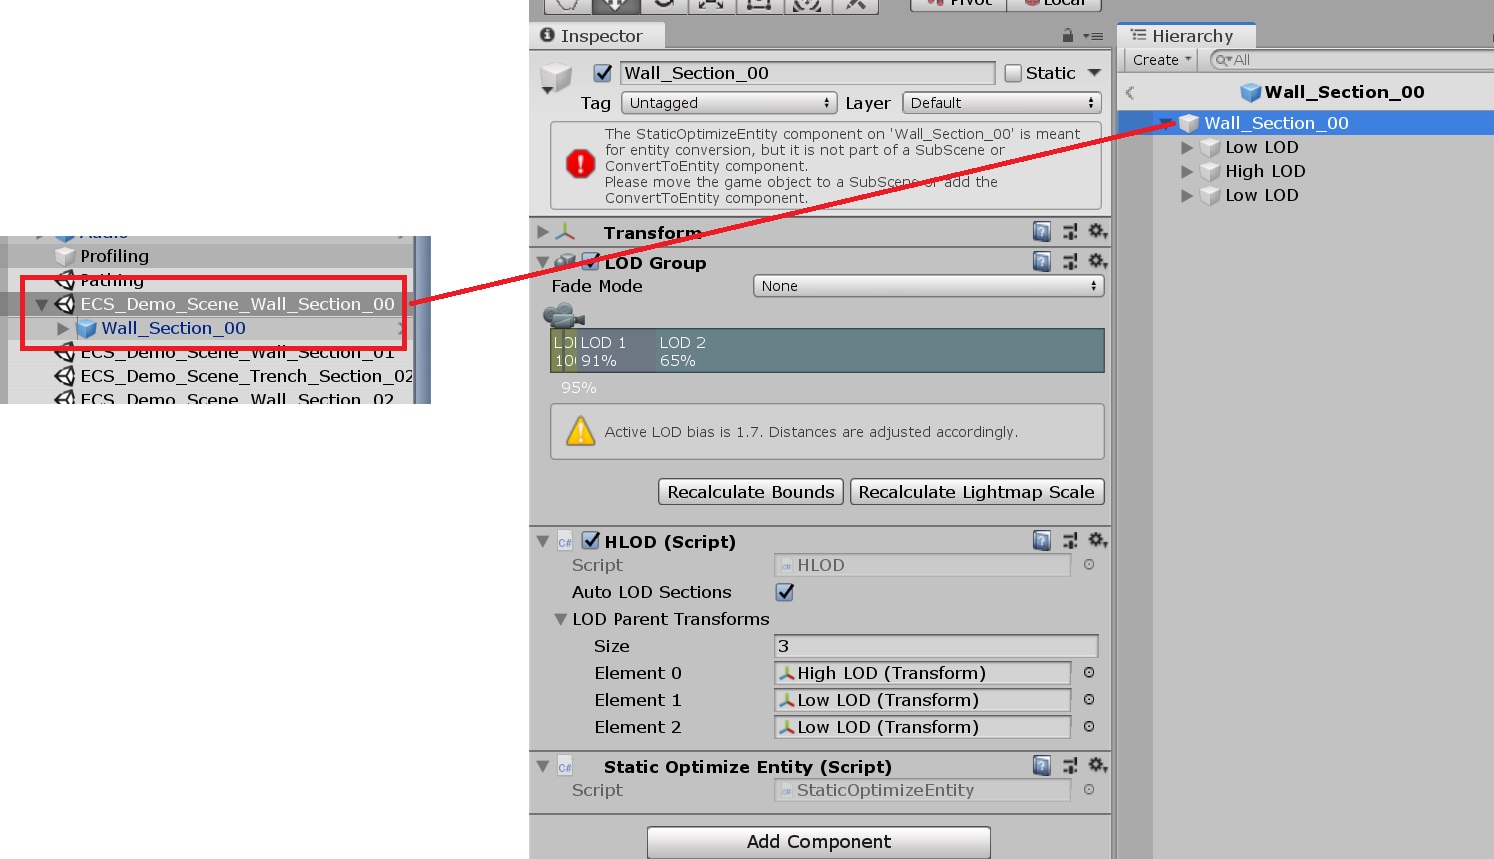
打开主场景MegaCity.unity后,在任意Section SubScene内,可以看见一些模型都套用有HLOD组件,
HOLD指的是场景内的细碎物件在到达最后一级LOD时,将这些物件的最后一级LOD合并进一个Mesh进行显示,
例如远处的三四个房屋,电线杆等等。
合批后将替换为合并Mesh的单个模型,而模型合并操作可以离线进行,提前生成好。
HOLD的缺点是内存中需要多放置HLOD模型,并且存在负优化的情况,具体看项目而定。
在MegaCity Demo中可通过脚本CombineMeshFromLOD.cs进行HLOD模型的离线创建。
而HLOD脚本则是Hybrid ECS内封装了部分功能,通过ECS计算HLOD的显示替换等一些逻辑处理,使用时需要确保LOD Group组件的LOD数量
与HLOD中的LodParentTransforms一致即可,例如下图中有2个Low LOD的GameObject,实际上是2个级别的HLOD:
(理论上是单个HLOD Mesh替换,但实际Unity支持多级别HLOD)
2.2 SubScene
SubScene是Unity通过DOTS实现的子场景嵌套功能,其核心博主认为是Unity开放的流式场景加载接口:
m_Streams[i].Operation = new AsyncLoadSceneOperation(entitiesBinaryPath, sceneData.FileSize, sceneData.SharedComponentCount, resourcesPath, entityManager);
m_Streams[i].SceneEntity = entity;
同时SubScene也附带了将场景内容转换为适合流式加载的二进制格式
3.ECS的一些前置概念
在开始看MegaCity之前,我觉得应该先写一些ECS的前置概念。
3.1 筛选机制
常规编写一个Manager类会通过注册(Register)/反注册(Unregister)的机制管理该类的对象,
而ECS中这样的逻辑变为了筛选机制,以MegaCity的BoxTriggerSystem为例,这是一个类似处理OnTriggerEnter事件触发的碰撞管理系统,
碰撞盒的注册通过HybridECS的Mono转换组件进行:
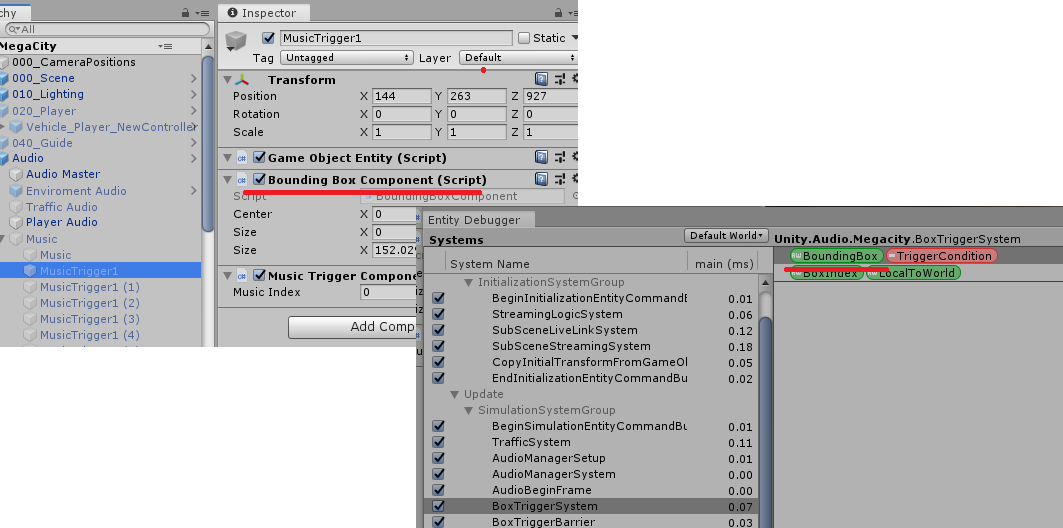
ECS的System中,筛选代码如下:
m_BBGroup = GetComponentGroup(
    new EntityArchetypeQuery
    {
        All = new ComponentType[] { typeof(BoundingBox) },
        None = new ComponentType[] { typeof(TriggerCondition) },
        Any = Array.Empty<ComponentType>(),
    });
其中含有BoundingBox的ComponentData将会被筛选到对应System中进行处理。
而传统Manager的Unregister操作在ECS中则是将这个ComponentData移除,这样下一帧筛选时就不会筛选到了。
3.2 Jobs中CommandBuffer处理
还是以MegaCity Demo的BoxTriggerSystem为例,struct Job用于处理多线程的各项任务,并可以通过Burst对底层代码进行加速,
而在Job中不能进行如ComponentData移除这样的删改操作,我们可以通过CommandBuffer来加入到操作队列,在Job结束之后进行处理,
这和渲染管线处理上的CommandBuffer有点像:
public struct TriggerJob : IJobChunk
{
    public EntityCommandBuffer.Concurrent m_EntityCommandBuffer;
  //...
    public void Execute(ArchetypeChunk chunk, int chunkIndex, int firstEntityIndex)
    {
        //...
        // add trigger component
        m_EntityCommandBuffer.AddComponent(chunkIndex, newBoundingBox, new TriggerCondition());
    }
}
3.3 标记逻辑处理
那么像BoxTriggerSystem这样的碰撞管理器,如何对已经产生碰撞的对象进行标记?
其实也是通过筛选处理的,在产生碰撞后为对应Entity实体增加一个ComponentData - TriggerCondition:
m_EntityCommandBuffer.AddComponent(chunkIndex, newBoundingBox, new TriggerCondition());
筛选时跳过含有TriggerCondition的实体即可:
m_BBGroup = GetComponentGroup(
    new EntityArchetypeQuery
    {
        All = new ComponentType[] { typeof(BoundingBox) },
        None = new ComponentType[] { typeof(TriggerCondition) },
        Any = Array.Empty<ComponentType>(),
    });
而在另一个音乐处理的System中,又会拿到标记了TriggerCondition和MusicTrigger的实体:
m_TriggerData = GetComponentGroup(
    new EntityArchetypeQuery
    {
        All = new ComponentType[] { typeof(TriggerCondition), typeof(MusicTrigger) },
        None = Array.Empty<ComponentType>(),
        Any = Array.Empty<ComponentType>()
    });
所以ECS的思路就是通过标记来代替传统OnEnable/OnDisable消息事件的触发。
4.MegaCity Demo本体
4.1 场景结构
先来看下静态置于MegaCity场景中的内容结构。
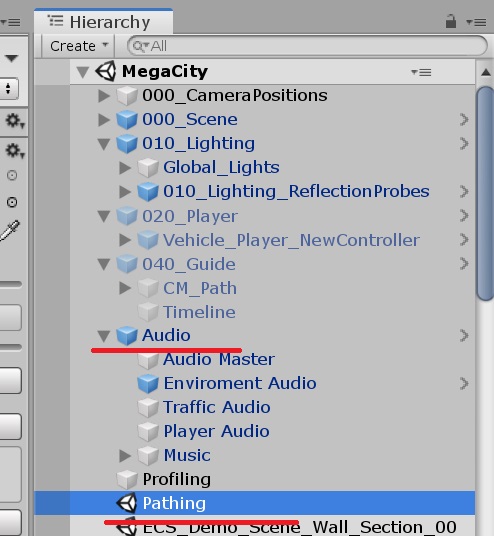
- Audio存放了音频配置,MegaCity运用了Unity开放出来的ECS音频模块DSPGraph,不过当时(指MegaCity Demo发布时)实现比较简陋,大概是满足了基本使用需求的情况。
- Pathing存放了飞船的路径信息,也是该Demo想展示的一个点。
- 玩家飞船相关的逻辑不写了,这部分没有用到DOTS
4.2 LightPoolSystem
LightPoolSystem主要是用ECS的形式,遍历当前飞船和相机视锥范围内的灯光,进行逻辑筛选并进行对象池复用。
因为借助了HDRP渲染管线,场景内的灯光将和体积雾效果产生交互,达到较好的显示呈现。
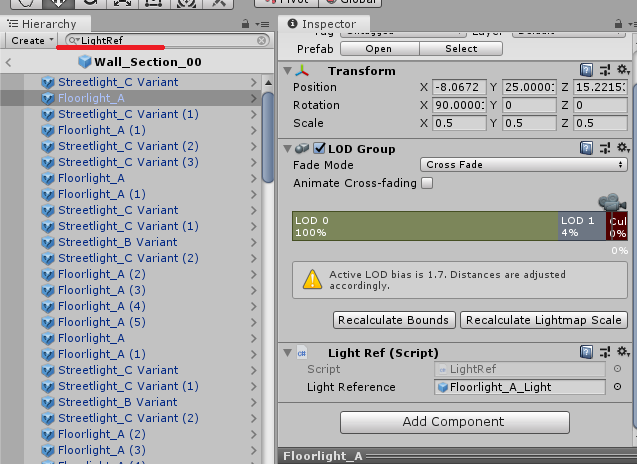
其中LightRef.cs脚本用于将场景中的灯光转换进ECS:
来到LightPoolSystem的OnUpdate中,对其中逻辑进行快速讲解:
protected override JobHandle OnUpdate(JobHandle handle)
{
    if (Camera.main == null || !AdditiveScene.isLoaded)
        return handle;

    #region Setup new lights

    #region Find closest lights

    #region Assign instances

    #region Update light intensity


    return handle;
}
1).第一步Setup new lights,拿到没有标记LightPoolCreatedTag组件数据的SharedLight,筛选结构如下:
m_NewSharedLights = GetComponentGroup
(
    ComponentType.ReadOnly<SharedLight>(),
    ComponentType.Exclude<LightPoolCreatedTag>()
);
SharedLight就是场景中HybridECS的转换对象,对应的MonoBehavior转换脚本是LightRef.cs
假设场景内当前加载了50盏灯光,那么这一步也会创建50个实体,但对应的对象池则是用到了哪种灯光模板在惰性创建。
这一步最后再标记上LightPoolCreatedTag,防止下一次Update时进入这部分逻辑。
2).第二步Find closest lights,对已经映射上的场景灯光进行视锥和距离筛选,存入另一份NativeArray - ClosestLights。
3).第三步Assign instances分配实例,对已经筛选出来的实体分配具体灯光,并存入另一份NativeArray - AssignedLights,方便后续操作。
4).第四步Update light intensity更新灯光强度,直接操作AssignedLights更新灯光亮度,对于Active标记为False的灯光,
将不断变暗直到亮度数值为0并进行回收。
4.3 StreamingLogic
流式加载场景的封装逻辑,因为Unity SubScene并没有完全封装对应的加载卸载逻辑处理,
只提供了接口,我们还需要额外编写一层逻辑。
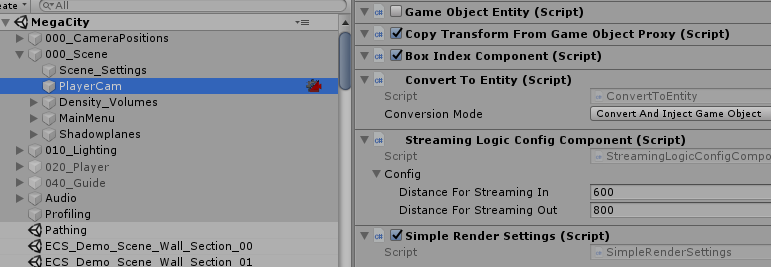
玩家对象上挂有配置脚本StreamingLogicConfigComponent处理流式加载的参数:
然后System中进行少量逻辑处理,最后用挂载ComponentData的方式通知Unity ECS的流式加载系统进行加载:
struct BuildCommandBufferJob : IJob
{
    public EntityCommandBuffer CommandBuffer;
    public NativeArray<Entity> AddRequestArray;
    public NativeArray<Entity> RemoveRequestArray;

    public void Execute()
    {
        foreach (var entity in AddRequestArray)
        {
            CommandBuffer.AddComponent(entity, default(RequestSceneLoaded));
        }
        foreach (var entity in RemoveRequestArray)
        {
            CommandBuffer.RemoveComponent<RequestSceneLoaded>(entity);
        }
    }
}
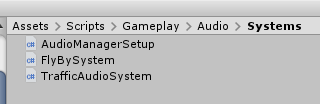
4.4 Megacity Audio System
或许这个系统才是重点,但发现最最重要的部分仍是Unity封装好的接口。
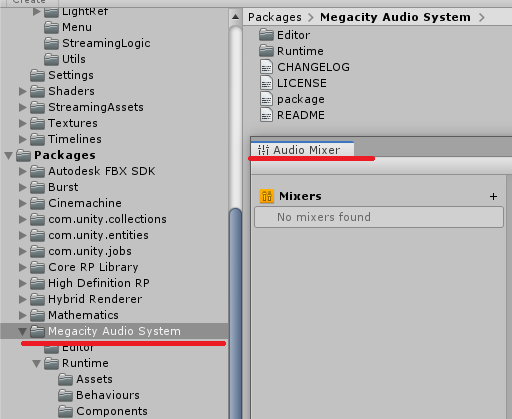
首先在Package Manager中可以看见该系统的相关代码,同时也可以发现AudioMixer中空空如也,这也MegaCity Demo的不同之处,
其内部所有的音频都是基于这套系统开发的。
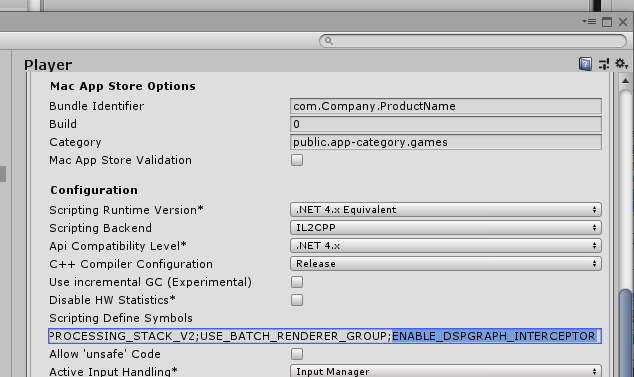
在项目宏定义处加上ENABLE_DSPGRAPH_INTERCEPTOR宏以开启调试器:
开启后可以在Window/DSP Graph处打开调试器窗口,可看见所有的音频Graph结构最终如何汇总输出:
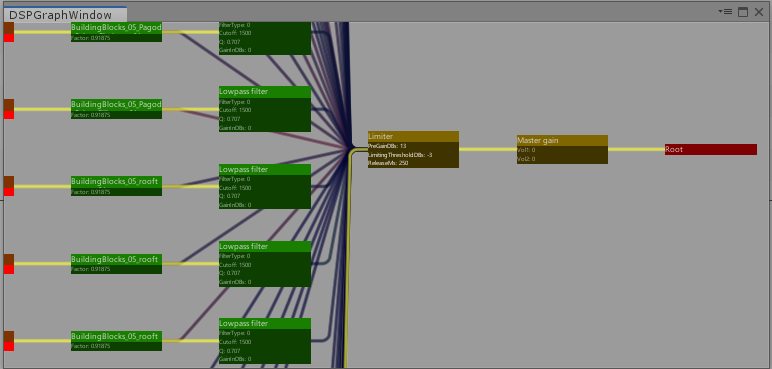
Megacity demo中飞机之间快速擦过(FlyBySystem)以及交通中的各类音频都是调用了这个System
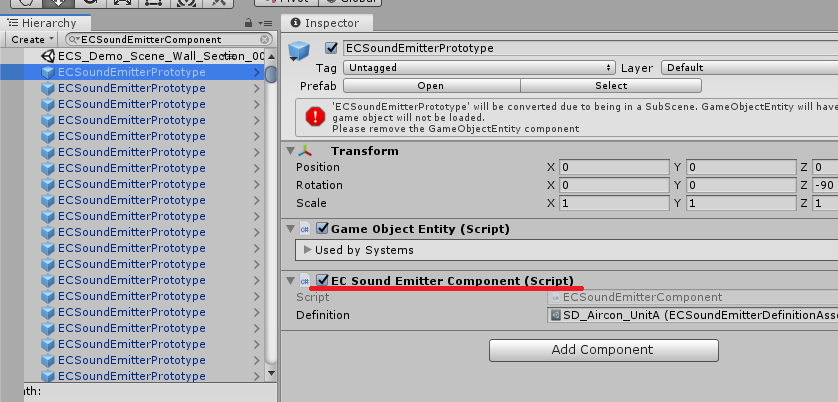
其中ECSoundEmitterComponent.cs可挂载,类似于AudioSource:
游戏内的音频会先挂载到PlaybackSystem,好比先把Audio放置于Graph内,再将音频暂时关闭,需要时打开:
var playbackSystem = World.Active.GetOrCreateManager<SamplePlaybackSystem>();
playbackSystem.AddClip(clip);
而真正去用,则是其他地方另行处理,可以看见读取缓存的AudioClip通过GetInstanceID:
var sample = EntityManager.CreateEntity();
AddClip(clip);
EntityManager.AddComponentData(sample, new AdditiveState());
EntityManager.AddComponentData(sample, new SamplePlayback { Volume = 1, Loop = 1, Pitch = 1 });
EntityManager.AddComponentData(sample, new SharedAudioClip { ClipInstanceID = clip.GetInstanceID() });
m_SampleEntities.Add(sample);
最后看音效实现,好像没有对应接口,也是通过类似挂载AudioClip的方式,定时播放和移除挂载。
其思路和Wwise/FMod也不相似,没有事件逻辑,只是性能系统设计。
4.5 Traffic 交通逻辑处理
这是MegaCity Demo中最让我眼前一亮的模块。
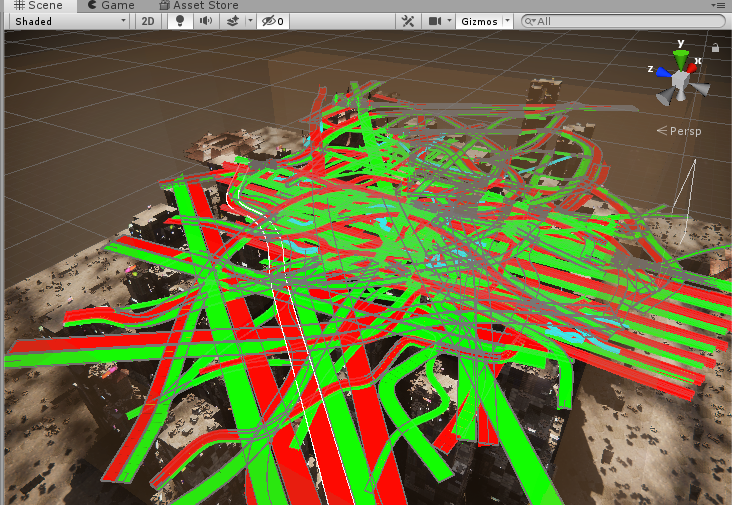
4.5.1 道路处理
MegaCity Demo中玩家路径用的是Cinemachine Path,NPC飞船用的路径是自己写的Path.cs:
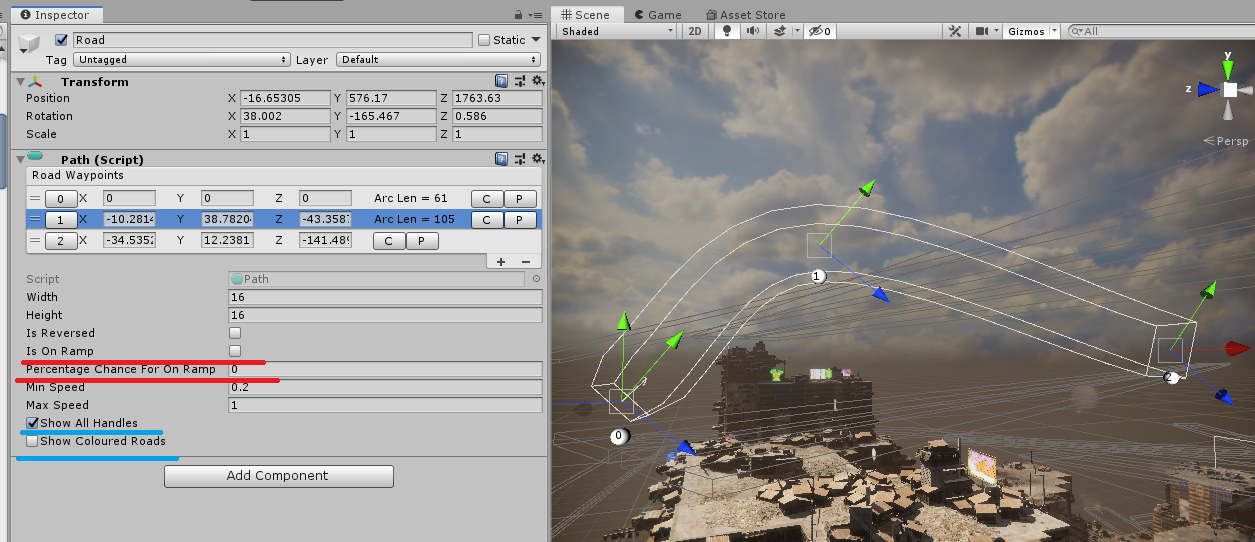
若需要编辑Path,需要勾选Show All Handles,Show Coloured Roads则是查看路网的开关。
Is On Ramp用于标记主干道(匝道),Percetage Chance For On Ramp用于标记从分支进入主干道的概率。
勾选Show Coloured Roads:
4.5.2 NPC飞船寻路处理
NPC飞船通过Path拿到道路信息,并且通过CatmullRom插值进行路径计算,非常巧妙的一点是它利用了
CatmulRom的导数得到曲线变化率,并以此直接作为系数实现飞船移动的匀速曲线采样:
public void Execute(ref VehiclePathing p, ref VehicleTargetPosition pos, [ReadOnly] ref VehiclePhysicsState physicsState)
{
    var rs = RoadSections[p.RoadIndex];

    float3 c0 = CatmullRom.GetPosition(rs.p0, rs.p1, rs.p2, rs.p3, p.curvePos);
    float3 c1 = CatmullRom.GetTangent(rs.p0, rs.p1, rs.p2, rs.p3, p.curvePos);
    float3 c2 = CatmullRom.GetConcavity(rs.p0, rs.p1, rs.p2, rs.p3, p.curvePos);

    float curveSpeed = length(c1);

    pos.IdealPosition = c0;
    pos.IdealSpeed = p.speed;

    if (lengthsq(physicsState.Position - c0) < kMaxTetherSquared)
    {
        p.curvePos += Constants.VehicleSpeedFudge / rs.arcLength * p.speed / curveSpeed * DeltaTimeSeconds;
    }
}
其中c1是一阶导数,c2二阶导数。
4.5.3 NPC飞船生成
在VehicleSpawnJob.cs中可以查看场景中飞船生成的代码,其中在处理飞船UID时,使用了原子性加减操作:
public void Execute(Entity entity, int index, ref Spawner thisSpawner)
{
    if (thisSpawner.delaySpawn > 0)
        thisSpawner.delaySpawn--;
    else
    {
        RoadSection rs = RoadSections[thisSpawner.RoadIndex];
        Interlocked.Increment(ref vehicleUID);

        float backOfVehiclePos = thisSpawner.Time - rs.vehicleHalfLen;
        float frontOfVehiclePos = thisSpawner.Time + rs.vehicleHalfLen;
...
即使在多线程下,也可以使变量安全的递增。
在函数GetSpawnVehicleIndex内有一段位运算操作:
public int GetSpawnVehicleIndex(ref Unity.Mathematics.Random random, uint poolSpawn)
{
    if (poolSpawn==0)
        return random.NextInt(0, VehiclePool.Length);

    // Otherwise we need to figure out which vehicle to assign
    // Todo: could bake the num set bits out!
    uint pool = poolSpawn;
    uint numSetBits = poolSpawn - ((poolSpawn >> 1) & 0x55555555);
    numSetBits = (numSetBits & 0x33333333) + ((numSetBits >> 2) & 0x33333333);
    numSetBits = ((numSetBits + (numSetBits >> 4) & 0x0F0F0F0F) * 0x01010101) >> 24;

    // we now have a number between 0 & 32,
    int chosenBitIdx = random.NextInt(0, (int)numSetBits)+1;
    uint poolTemp = poolSpawn;
    uint lsb = poolTemp;
    //TODO: make the below better?
    while(chosenBitIdx>0)
    {
        lsb = poolTemp;
        poolTemp &= poolTemp - 1;    // clear least significant set bit
        lsb ^= poolTemp;             // lsb contains the index (1<<index) of the pool for this position
        chosenBitIdx--;
    }

    float fidx = math.log2(lsb);

    return (int) (fidx);
}
首先路段允许存在哪些飞船是掩码进行控制,
poolSpawn参数是掩码,如果掩码为0则直接随机跳过,
然后通过下面这部分找到这个掩码中有多少个1
uint numSetBits = poolSpawn - ((poolSpawn >> 1) & 0x55555555);
numSetBits = (numSetBits & 0x33333333) + ((numSetBits >> 2) & 0x33333333);
numSetBits = ((numSetBits + (numSetBits >> 4) & 0x0F0F0F0F) * 0x01010101) >> 24;
再用这个数进行随机:
int chosenBitIdx = random.NextInt(0, (int)numSetBits)+1;
最后挨个去看,对应这个数字的掩码是多少,返回索引。
4.5.5 飞船销毁
当飞船沿着路径飞至尽头则直接销毁
public struct VehicleDespawnJob : IJobProcessComponentDataWithEntity<VehiclePathing>
{
    public EntityCommandBuffer.Concurrent EntityCommandBuffer;

    public void Execute(Entity entity, int index, [ReadOnly] ref VehiclePathing vehicle)
    {
        if (vehicle.curvePos >= 1.0f)
        {
            EntityCommandBuffer.DestroyEntity(index, entity);
        }
    }
}
4.5.6 Lane/Occupation 车道占用处理
不同的NPC飞船有不同的车道,如果车道被占用则会在Job里调起换道逻辑,
如果车道前方通畅,则会进行适当加速。
4.5.7 避障处理
通过Hash算法,对空间中每个格子进行数据量化并转换为Hash,代码在VehicleHashJob.cs中,
public static int Hash(float3 v, float cellSize)
{
    return Hash(Quantize(v, cellSize));
}
Cells是一个多值哈希表:
[ReadOnly] public NativeMultiHashMap<int, VehicleCell> Cells;
意味着可以存放每个Hash格子里的所有载具数据。
当发现障碍物时,尝试通过叉乘得到方向并迭代循环当前格子里的所有载具,
并且尽可能避开障碍:
do
{
    // For the vehicle in the cell, calculate its anticipated position
    float3 anticipated = cell.Position + cell.Velocity * TimeStep;
    float3 currDelta = pos - cell.Position;
    float3 delta = anticipated - ownAnticipated;

    // Don't avoid self
    if (lengthsq(currDelta) < 0.3f)
        continue;

    float dz = dot(delta, vnorm);
    // Ignore this vehicle if it's behind or too far away
    if (dz < 0.0f || dz > maxScanRangeMeters)
        continue;

    float lsqDelta = lengthsq(delta);
    // Only update if the distance between anticipated positions is less than the current closest and radii
    if (lsqDelta < closestDist && lsqDelta < (cell.Radius + radius) * (cell.Radius + radius))
    {
        float dx = dot(delta, right);
        float dy = dot(delta, up);

        closestDist = lsqDelta;

        xa = dx;
        ya = dy;
        mag = cell.Radius + radius;
    }
} while (Cells.TryGetNextValue(out cell, ref iter));
5.杂项
5.1 ComponentDataFromEntity<T>通过实体快速映射组件
以Demo中的代码为例:
foreach (var newFlyby in New)//New = Entities
{
    var positional = PositionalFromEntity[newFlyby];
可以通过这个类直接得到组件,目前在新版本ECS中该类改名为了:
ComponentLookup<T>
5.2 DelayLineDopplerHack
这个脚本放在了Script文件夹外,并没有在项目里实装,它用了比较HACK的方法直接处理音频,并且
尝试实现哈斯HAAS效应:
var haasDelay = (int)((s.m_Attenuation[0] - s.m_Attenuation[1]) * m_Haas * (c * 2 - 1));
var delaySamples = Mathf.Clamp (delaySamplesBase + haasDelay, 0, maxLength);
哈斯(Haas)通过实验表明:两个同声源的声波若到达听音者的时间差Δt在5~35ms以内,人无法区分两个声源,给人以方位听感的只是前导声(超前的声源),滞后声好似并不存在;若延迟时间Δt在35~50ms时,人耳开始感知滞后声源的存在,但听感做辨别的方位仍是前导声源;若时间差Δt>50ms时,人耳便能分辨出前导声与滞后声源的方位,即通常能听到清晰的回声。哈斯对双声源的不同延时给人耳听感反映的这一描述,称为哈斯效应。这种效应有助于建立立体声的听音环境
5.3 ChunkEntityEnumerable
通过工具类ChunkEntityEnumerable,简化了在Job中遍历Chunk时的翻页处理:
public bool MoveNext()
{
    if (++elementIndex >= currChunkLength)
    {
        if (++chunkIndex >= chunks.Length)
        {
            return false;
        }

        elementIndex = 0;
        currChunk = chunks[chunkIndex].GetNativeArray(entityType);
        currChunkLength = currChunk.Length;
    }
    return true;
}
Unity2022新版MegacityDemo下载:https://unity.com/de/demos/megacity-competitive-action-sample
Unity多人联机版本Megacity: https://unity.com/cn/demos/megacity-competitive-action-sample
Unity2019旧版本Megacity下载:https://discussions.unity.com/t/megacity-feedback-discussion/736246/81?page=5
Book of the Dead 死者之书Demo工程回顾与学习:https://www.cnblogs.com/hont/p/15815167.html

 浙公网安备 33010602011771号