Vim
模式
- normal(普通)模式
- insert(插入)模式(
i) - 替换模式(
R) - visual(可视)模式(
v进入一般模式,V进入行模式(line),Ctrl+v进入块模式(block)) - command(命令)模式(
:)
插入模式
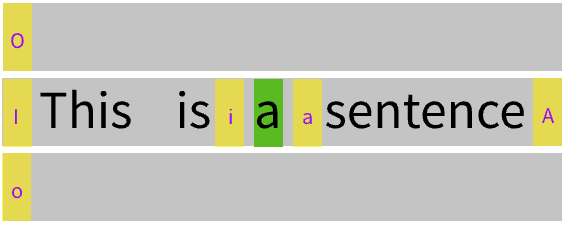
绿色表示当前光标位置,黄色表示不同插入命令对应的插入位置

You can use block mode and insert command to implement batch insertion.
Firstly, use Ctrl + v enter into block mode, and select the column.
Secondly, you can execute I{string}<Esc> to insert string to the left of the selected column. Or you can execute A{string}<Esc> to insert string to the right of the selected column.
Note that before you press down the Esc button, the modification will only show up at the first line, only you press down the Esc button, all modification will complete.
命令模式
在命令模式下,可以使用vim直接运行外部命令。语法为:! + 外部命令。
在外部命令之外,还存在一些特殊的指令,实现对文件的读写。
:w + 文件名:可以实现将文件内容另存到其他文件中。特殊的是,若在visual模式下选择部分文字,然后通过w + 文件名可实现将部分内容存储至文件中:r + 文件名:可以实现将指定文件内容写入到当前文件中。特殊的是,除了可以读入文件内容,也可以读入外部命令的输出结果,例如:r !ls
如何查看历史输入的命令
:Ctrl + p:调出上一条命令
:Ctrl + n:调出下一条命令
q:调出命令历史窗口,以查看之前输入的命令
光标移动
以单词为单位进行移动
ge:向前移动到上一个单词的末尾b:向前移动到当前或上一个单词的开头e:向后移动到当前或下一个单词的末尾w:向后移动到下一个单词的开头

以行为单位进行移动
-
0:移动到当前行的行首 -
^:移动到当前行的第一个非空字符 -
$:移动到当前行的行尾 -
gg:移动到文件的第一行 -
G:移动到文件的最后一行 -
<line number>G:移动到指定行数(line number)的行
通过设置
ruler显示或关闭光标的位置显示 或 通过命令Ctrl + g
Ctrl + o:光标跳转至之前的位置Ctrl + i:光标跳转至最新的位置
以页面为单位
Ctrl+u:向上翻页(up),移动半页面距离Ctrl+d:向下翻页(down),移动半页面距离
查找
行内查找
f{字符},t{字符}:向后查找,f会跳转到第一个匹配的字符处,t会跳转到第一个匹配的字符前一个字符F{字符},T{字符}:向前查找,F同f,T会跳转到第一个匹配的字符的后一个字符
全文查找
- 在命令模式下输入
/{正则表达式}或在normal模式下直接输入/{正则表达式}用于正向查找指令内容,通过n向后匹配,N向前匹配 - 在命令模式下输入
?{正则表达式}或在normal模式下直接输入?{正则表达式}用于反向查找指令内容,通过n向后匹配,N向前匹配
在查找时,常用的选项包括以下三种
icignorecase忽略字母大小写isincsearch显示部分匹配hlshlsearch高亮显示匹配项
通过set <属性名>设置以上选项(完整/缩写均可),通过set no<属性名>取消设置
q/调出搜索记录窗口,以查看之前搜索的内容
替换
行内替换
语法格式::[start_line, end_line]s/<待替换字符串>/<替换字符串>/[gc] <回车>
g和c可以同时不存在,也可以同时存在,以下分别阐述其作用:
- option为空:将光标所在行的第一个待替换字符串进行替换
- g:将光标所在行的所有待替换字符串进行替换
通过添加start_line和end_line能替换start_line行到end_line行中的所有匹配项 - c:进行替换前,进行询问是否替换
全文替换
语法格式::%s/<待替换字符串>/<替换字符串>/[gc] <回车>
g和c选项的含义同行内替换,但由于%已经指定了全文替换,此时g加或不加效果是相同的
动作
d{移动命令}:删除
由于整行删除操作具有高频度,因此采用
dd简化整行删除操作,此简化命令同样可与数字结合使用
-
x:删除光标处字符(等价于dl) -
s:修改从光标开始处的几个连续字符(等价于xi) -
S:修改从光标所在行开始的几个连续行 -
r:替换(此命令只进行单词替换,进入替换模式实现连续替换) -
y:复制 -
c:剪切/改变,剪切和改变这两种说法虽然都可以将现有内容删除且切换至insert模式,但是只说剪切会限制其对使用场景的想象(见动作和修饰语结合使用一小节) -
p:粘贴 -
u:撤销(undo) -
U:撤销当前行的修改 -
Ctrl + r:重做(撤销之前的撤销redo)
替换操作的4种实现方式(
r、R、s、S)区别
首先在不考虑大小写的情况下,r是replace的缩写,即更换,s是substitute的缩写,即取代。从原词上可以看出两者细微的差别,更换过程始终处在normal模式下,取代过程会删除原有内容然后进入insert模式。
除了模式转变方面的区别,四者在与数字结合时的批量操作上也存在不同
动作和数字结合使用
数字、动词和名词的结合指令格式为:数字 + 动词 + 名词,示例如下
3w: 向前移动三个词5j: 向下移动5行7dw: 删除7个词
动作和修饰语结合使用
修饰语用于修饰名词,包括以下两种
i:表示在指定名词的内部a:表示在指定名词的周围
命令格式为动词 + 修饰语 + 名词,示例如下所示
ci(: 改变当前括号内的内容da': 删除一个单引号字符串, 包括周围的单引号
Other useful commands
.(dot command): repeat last change
快速纠错
处在insert模式
ctrl + h: 删除上一个字符
ctrl + w: 删除上一个单词
ctrl + u: 删除当前行
快速删除
处于normal模式
x:删除一个字符
d:daw(delete around word):删除一个单词;dt<具体字符>:删除字符到<具体字符>
<数字> + x/d: 重复执行<数字>次
ctrl + [: insert和normal模式切换
gi: 从normal模式跳转到上次编辑的位置并进入插入模式
多文件操作

normal模式下
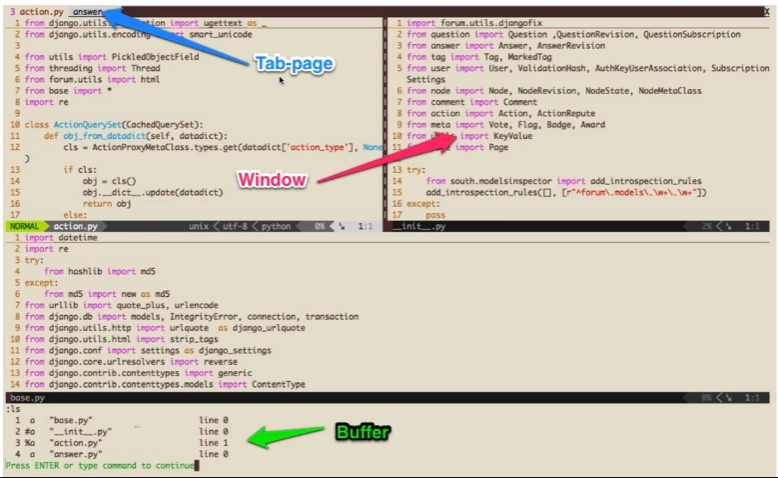
buffer概念
vim打开的文件是加载在内存缓冲区中的,在:w执行之前的修改都是保存在内存缓冲区中的,执行后才会写入文件
:ls:列举当前缓冲区
:b n:跳转至第n个缓冲区
b <文件名>:跳转至<文件名>
window概念
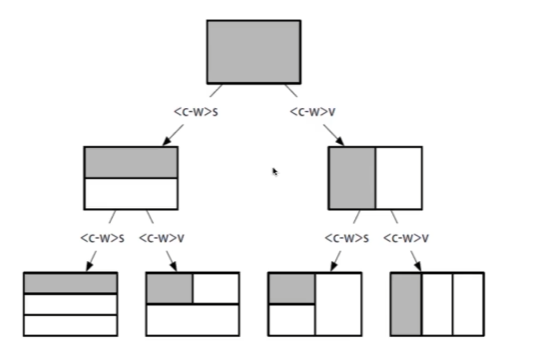
一个buffer可以分割为多个window,每个window可以打开不同buffer
<Ctrl+w> + s = :sp:水平分割
<Ctrl+w> + v = :vs: 垂直分割
<Ctrl+w> + hjkl:光标在窗口间移动
<Ctrl+w> + HJKL:窗口互相交换移动

宏
normal模式下录制回放,用于重复性任务
1.q <寄存器名称>:开始录制
可使用寄存器包括0-9、a-z、A-Z
- 正常执行一次操作
n @ <寄存器名称>:回放n次上述录制
注意:回放是在normal模式下,也可以在命令模式下通过
normal n @ <寄存器名称>执行
如何编写宏?
首先要明确的是,宏并不是一个通用的脚本,多数情况下无法把任务的全部组成部分交由宏完成,只能利用宏完成任务中一些重复的部分,因此编写宏重要的是要找到任务中重复的操作单元
下面以xml格式转变为json格式的过程为例,梳理编写宏的方法
以下是待转换的原始xml格式
<people>
    <person>
        <name>ghy2022</name>
        <email>ghy2022@gmail.com</email>
    </person>
    <person>
        <name>ghy2023</name>
        <email>ghy2023@gmail.com</email>
    </person>
</people>
以下是预期的json格式
{
  "people": {
    "person": [
      {
        "name": "ghy2022",
        "email": "ghy2022@gmail.com"
      },
      {
        "name": "ghy2023",
        "email": "ghy2023@gmail.com"
      }
    ]
  }
}
首先尝试使用文字描述归纳转换流程
- 删除首尾的
<people> - 将第一个
<person>修改为{ - 将
<name>左侧的<修改为" - 将
<name>右侧的>修改为": " - 将
</name>修改为", - 将
<email>左侧的<修改为" - 将
<email>右侧的>修改为": " - 将
</email>修改为" - 将
</person>修改为}, - 转到下一组的
<person> - 重复2到10步
不难发现的是,2到9步是一组<person></person>的转换流程,2到10步的重复执行就能完成整体任务,因此2到10步即为此任务最大的重复操作单元
然后分析这一操作单元,判断内部是否存在更小的重复操作单元
可以发现对<name>和<email>的处理是类似的过程,唯一不同的点在于<name>最后还需要添加逗号,所以说重复的过程是对标签本身的处理,添加逗号的过程可以放在外部较大的单元中
综上所述,实现过程分为两个操作单元(内部为3到5步,外部为2到10步),每个操作单元使用一个单独的宏完成,最后添加json格式所需的其他内容
注:通过实现过程可以看出,在多数现实情况下,宏并不能完成全部的任务,只能用于大任务中的一些重复的小任务,还需要编码者自行寻找到重复的单元
配置
配置即在.vimrc下的配置
可配置项类型
- boolean can only be on or off
- number has a numeric value
- string has a string value
Plugin
If you are using Vim version 8 or higher you can use its built-in package management; see :help packages for more information.
Before learning about how to add a plugin, you ought to know the process of vim starting. When Vim starts up, after processing your .vimrc, it scans all directories in 'packpath' for plugins under the "pack/*/start" directory.
So, if you want to add a plugin, you can download the plugin and put it into the ~/.vim/pack//start ( is a wildcard). Vim recommend that each plugin project gets its own directory within ~/.vim/pack. For example, if you were to install the NERDTree plugin and the imaginary foo plugin, you would create this structure:
$ mkdir -p ~/.vim/pack/NERDTree/start/
$ git clone https://github.com/preservim/nerdtree.git ~/.vim/pack/NERDTree/start/NERDTree
$ mkdir -p ~/.vim/pack/foo/start/
$ git clone https://notabug.org/foo/foo.git ~/.vim/pack/foo/start/foo
In this way, the plugin will load automatically every time you launch Vim. I guess it will affect
How to configure plugins ?
You can add configurations for plugin by editting the .vimrc file.
How to load plugins manually ?
If you don't want a plugin to load automatically every time you launch Vim, you can create an opt directory in your ~/.vim/pack/* directory. For example,
~/.vim/pack/NERDTree/start/NERDTree becomes ~/.vim/pack/NERDTree/opt/NERDTree, ~/.vim/pack/foo/start/foo becomes ~/.vim/pack/foo/opt/foo.
Any plugins installed into opt are available to Vim, but they're not loaded into memory until you add them to a session with the :packadd <plugin name> command.
For more details, please refer to How to install Vim plugins and Using Vim packages
Register
There are ten types of registers:
- The unnamed register ""
- 10 numbered registers "0 to "9
- The small delete register "-
- 26 named registers "a to "z or "A to "Z
- Three read-only registers ":, "., "%
- Alternate buffer register "#
- The expression register "=
- The selection and drop registers "*, "+ and "~
- The black hole register "_
- Last search pattern register "/
By default, copying and pasting data use the unnamed register "". How can we use the named registers ?
- In the process of copying, there are 4 steps.
- Selecting the content what you want to copy in visual mode
- Use double english quotation mark
"to trigger the register - Input the register name which you want to use
- Use
yto copy the content to the register
- In the process of pasting, there are also 4 steps.
- Selecting the location where you want to paste
- Use double english quotation mark
"to trigger the register - Input the register name which you want to use
- Use
pto paste the content
A special usage of unnamed register
If the result of command vim --version | grep clipboard contains the +clipboard. You can add a configuration set clipboard=unnamed to set up the data exchange between system clipboard and vim's unnamed register.
For more details, please refer to the official document. You can use the command :help registers to get it.
Reference
- [1] Vim 中文用户手册
- [2] Vim 中文参考手册
- [3] vim教学
- [4] Vim实用技巧


 浙公网安备 33010602011771号