慢牛系列四:好玩的React Native
在上次随笔(系列三)中,我试着用RN实现了一个Demo,感觉很不错,当时遇到的问题这篇文章里基本都解决了,比如导航动画问题,这篇文章里主要介绍RN的动画,学会动画以后,各种小创意都可以实现了^^
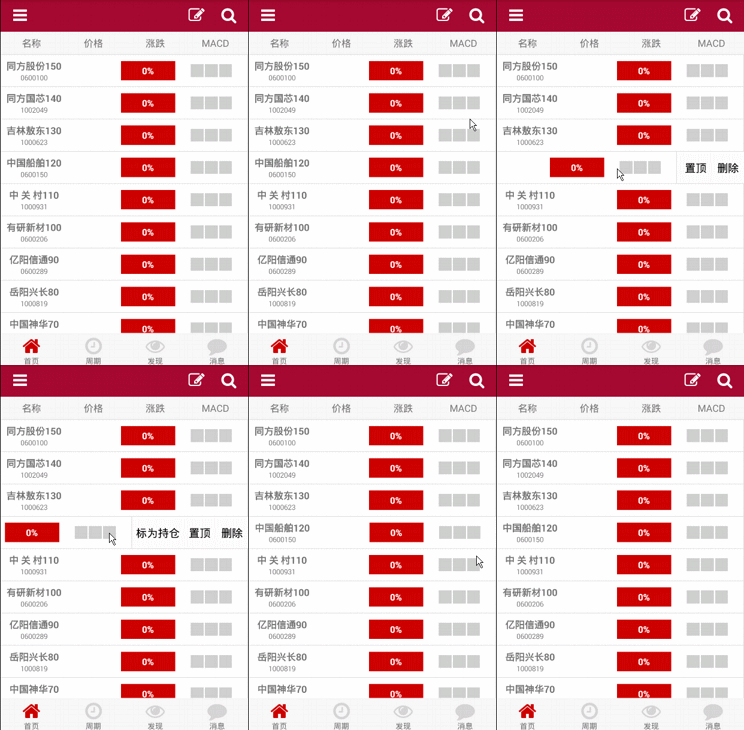
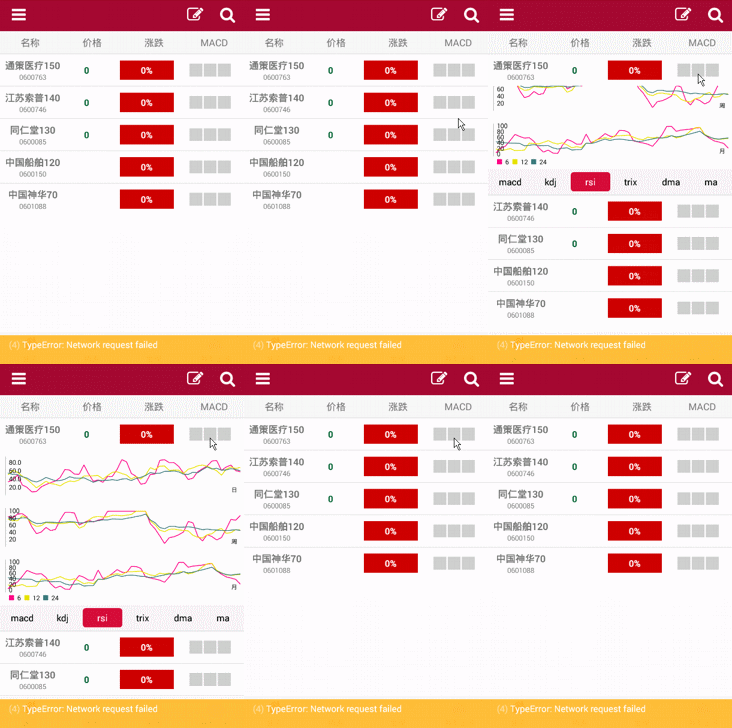
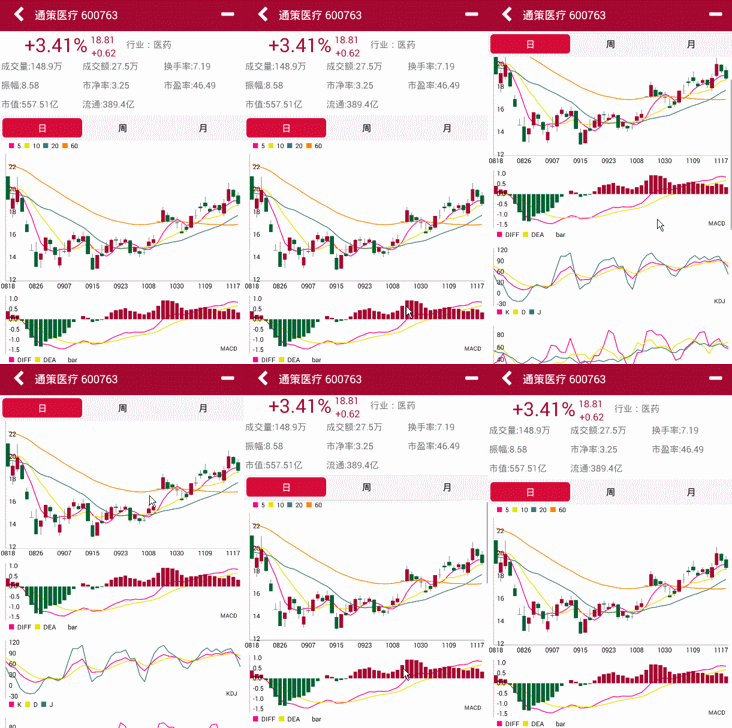
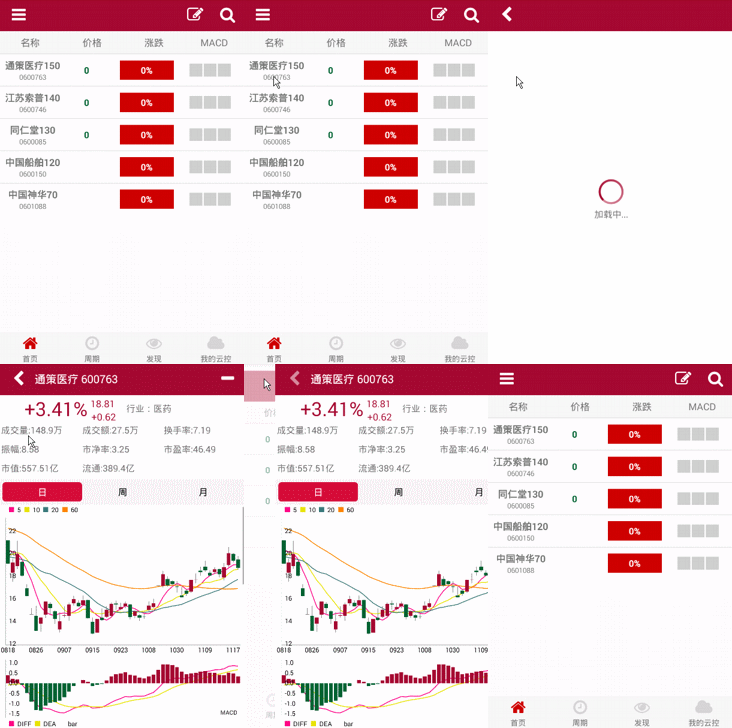
下面是我自己做的效果:
1、列表项滑动显示操作按钮

2、列表行滑出

3、K线页面

4、转场动画

一、React Native动画
RN的动画实现类似Jquery和CSS3的动画实现,设定某一属性的输入和输出值,后台实现相关的动画计算,简化了动画的开发,下面是一段代码,可以直观感受下
class Playground extends React.Component {
  constructor(props: any) {
    super(props);
    this.state = {
      bounceValue: new Animated.Value(0), //设定初始值
    };
  }
  render(): ReactElement {
    return (
      <Animated.Image                         // Base: Image, Text, View,这三个标签可以实现动画,必须是Animate.开头,普通的Image不能实现动画。
        source={{uri: 'http://i.imgur.com/XMKOH81.jpg'}}
        style={{
          flex: 1,
          transform: [                        // `transform` 类似CSS3
            {scale: this.state.bounceValue},  // 设置 `bounceValue` 给 `scale`,注意,这里要使用上面再state里创建的对象,不能重新实例一个对象赋值。
          ]
        }}
      />
    );
  }
 //UI渲染结束后执行该方法
  componentDidMount() {
    this.state.bounceValue.setValue(1.5);     // 设定初始大小,使用的依旧是在state中创建的对象。
    Animated.spring(                          // Base: spring, decay, timing,这个三个方法是三种动画,spring是类似弹簧的动画
      this.state.bounceValue,                 // Animate `bounceValue`初始输入值
      {
        toValue: 0.8,                         // Animate to smaller size,动画目标值
        friction: 1,                          // Bouncier spring,这个值类似设置弹簧的弹性。
      }
    ).start();                                // Start the animation,开始动画,start的参数是一个动画结束的callback。
  }
}
RN动画的主要类库是Animated库,Animated库包括Value和ValueXY两个类型,Value是单值的动画,比较简单,就是某个属性值的改变,ValueXY是向量的动画,就是两个值的改变,参数X,Y是元素的坐标,根据XY的变化计算运动方向。目前支持动画的元素View, Text, and Image,用户可以自己创建动画元素,通过Animated.createAnimatedComponent来创建。
目前主要有三种动画实现:spring, decay, timing,
spring: 类似弹簧的实现,动画结束时会有个渐弱的摆动,上面的第一个和第二个动画就是用spring实现。friction: 数值越小,弹的越厉害,默认是7。tension: 动画的速度,默认是40。
decay: 动画的速度逐渐变慢,最后停止,类似上面的转场动画。velocity: 初始速度。deceleration: 减速度,默认是 0.997.
timing:线性动画,在设定时间内移动到终点,中间的动画可以设置,类似CSS3的animation-timing-functionduration: 动画持续时间 500.easing:类似css3的animation-timing-function,具体的实现在Easing模块里,是贝塞尔曲线(Bézier curve)的一个实现,这样使用 Easing.bezier(0.42, 0, 1, 1),参数设置参考这个网址:http://cubic-bezier.com/,默认的实现Easing.in和Easing.out和Easing.inOut。delay: 动画延迟开始时间。
组合动画:
如果需要同时执行多个动画,或者按顺序执行动画,就需要将动画组合执行,RN提供了parallel, sequence, stagger, delay, 这个四个方法组合动画,这些方法的参数都是一个动画的数组,使用起来很简单,parallel是并行执行, sequence是顺序执行, stagger是每个动画延迟一段时间执行, delay是延时,下面是代码示例:
Animated.sequence([            // spring to start and twirl after decay finishes
  Animated.decay(position, {   // coast to a stop
    velocity: {x: gestureState.vx, y: gestureState.vy}, // velocity from gesture release
    deceleration: 0.997,
  }),
  Animated.parallel([          // after decay, in parallel:
    Animated.spring(position, {
      toValue: {x: 0, y: 0}    // return to start
    }),
    Animated.timing(twirl, {   // and twirl
      toValue: 360,
    }),
  ]),
]).start();                    // start the sequence group
关于RN动画更多内容参考:http://facebook.github.io/react-native/docs/animations.html#content
二、动画demo
我做了一个动画的demo,这里只是改变了元素的left属性,大家体验下:


/* @flow */
'use strict';

var React = require('react-native');
var Easing = require('Easing');
var {
  TouchableWithoutFeedback,
  StyleSheet,
  View,
  Image,
  Text,
  Animated,
  Dimensions,
  InteractionManager
} = React;
var SCREEN_WIDTH = Dimensions.get('window').width;
var Component = React.createClass({
    getInitialState: function() {
        return {
            first:new Animated.Value(0),
            second:new Animated.Value(0),
            three:new Animated.Value(0)
        };
    },
    reset:function (argument) {
        this.state.first.setValue(0);
        this.state.second.setValue(0);
        this.state.three.setValue(0);
    },
    getAnimations:function (argument) {
        return[
            Animated.spring(                          // Base: spring, decay, timing
              this.state.first,                 // Animate `bounceValue`
              {
                toValue: SCREEN_WIDTH-50,                         // Animate to smaller size
                friction: 7,
                tension:40                      // Bouncier spring
              }
            ),
           Animated.decay(                          // Base: spring, decay, timing
              this.state.second,                 // Animate `bounceValue`
              {
                //toValue: SCREEN_WIDTH-50,                         // Animate to smaller size
                velocity: 1,
                deceleration:0.997               // Bouncier spring
              }
            ),
            Animated.timing(                          // Base: spring, decay, timing
              this.state.three,                 // Animate `bounceValue`
              {
                toValue: SCREEN_WIDTH-50,                         // Animate to smaller size
                easing: Easing.inOut(Easing.ease),
                delay:0                  // Bouncier spring
              }
            )
        ];
    },
    onStagger:function (argument) {
        this.reset();
        Animated.stagger(150,this.getAnimations()).start();
    },
    onParallel:function (argument) {
        this.reset();
        Animated.parallel(this.getAnimations()).start();
    },
    onSequence:function (argument) {
        this.reset();
        Animated.sequence(this.getAnimations()).start();
    },
    onAll:function (argument) {
        var me=this;
        this.reset();
        Animated.sequence([
            Animated.stagger(50,me.getAnimations()),
            Animated.sequence([
                Animated.spring(                          // Base: spring, decay, timing
                  this.state.first,                 // Animate `bounceValue`
                  {
                    toValue: 0,                         // Animate to smaller size
                    friction: 7,
                    tension:40                      // Bouncier spring
                  }
                ),
                   Animated.decay(                          // Base: spring, decay, timing
                  this.state.second,                 // Animate `bounceValue`
                  {
                    //toValue: SCREEN_WIDTH-50,                         // Animate to smaller size
                    velocity: -1,
                    deceleration:0.997               // Bouncier spring
                  }
                ),
                Animated.timing(                          // Base: spring, decay, timing
                  this.state.three,                 // Animate `bounceValue`
                  {
                    toValue: 0,                         // Animate to smaller size
                    easing: Easing.bezier(.13,.93,.79,.07),
                    delay:0                  // Bouncier spring
                  }
                )
        ]),
        Animated.parallel(me.getAnimations())
        ]).start();
    },
    render: function() {
        return (
          <View style={styles.container}>
              <View style={{flex:1}}>
                  <Animated.View style={[styles.view,{top:50,left:this.state.first}]}><Text>spring</Text></Animated.View>
                  <Animated.View style={[styles.view,{top:150,left:this.state.second}]}><Text>decay</Text></Animated.View>
                  <Animated.View style={[styles.view,{top:250,left:this.state.three}]}><Text>timing</Text></Animated.View>
              </View>
              <View style={{flexDirection:'row',height:80,justifyContent :'center',alignItems: 'center'}}>
                  <TouchableWithoutFeedback onPress={this.onStagger}>
                      <View style={styles.btn}><Text>stagger</Text></View>
                  </TouchableWithoutFeedback>
                  <TouchableWithoutFeedback onPress={this.onParallel}>
                      <View style={styles.btn}><Text>parallel</Text></View>
                  </TouchableWithoutFeedback>
                  <TouchableWithoutFeedback onPress={this.onSequence}>
                      <View style={styles.btn}><Text>sequence</Text></View>
                  </TouchableWithoutFeedback>
                  <TouchableWithoutFeedback onPress={this.onAll}>
                      <View style={styles.btn}><Text>组合</Text></View>
                  </TouchableWithoutFeedback>
              </View>
          </View>
        );
    }
});

var styles = StyleSheet.create({
    container:{
        flex:1
    },
    view:{
        position:'absolute',
        backgroundColor:'red',
        width:50,
        height:50,
        justifyContent :'center',
        alignItems: 'center',
    },
    btn:{
        width:100,
        height:50,
        backgroundColor:'red',
        justifyContent :'center',
        alignItems: 'center',
        margin:5
    }
});


module.exports = Component;
三、性能优化
主要是在执行动画时,避免执行其他工作量比较大的代码,比如,最好不要一边渲染,一边执行动画,而是先执行动画,等动画执行结束后在渲染,可以setTimeout来延时执行渲染,最好是用官方推荐的做法,利用InteractionManager,下面是代码示例:
  componentDidMount() {
    InteractionManager.runAfterInteractions(() => {
      this.setState({renderPlaceholderOnly: false});
    });
  }
InteractionManager.runAfterInteractions是在动画或者操作结束后执行,还有其他两种方法:
- requestAnimationFrame(): H5的标准,RN实现了它,下一帧渲染时执行,更好的利用浏览器的刷新频率,避免丢帧。
- setImmediate/setTimeout(): 定时执行,有可能影响动画的流畅度。
另外,这个项目里用了MPAndroidChart组件,我对MPAndroidChart做了桥接,有想用的用户可以试试这个项目:
https://github.com/hongyin163/react-native-chart-android
如果有想体验React Native的用户,可以下载慢牛APP的APK体验:
关注慢牛的公众号:发送react,返回apk下载链接,apk大小8M,最好连接WiFi下载。

最后,欢迎园友提出好的想法,评论留名!谢谢!


