Elasticsearch 问题收集
Elasticsearch 问题收集
Mac端安装
安装elasticsearch
安装elasticsearch
❯ brew install elasticsearch
Running `brew update --auto-update`...
==> Auto-updated Homebrew!
Updated 1 tap (homebrew/core).

Error: elasticsearch has been disabled because it is switching to an incompatible license. Check out `opensearch` instead!
异常
安装elasticsearch-full
❯ brew install elastic/tap/elasticsearch-full
==> Tapping elastic/tap
Cloning into '/usr/local/Homebrew/Library/Taps/elastic/homebrew-tap'...
remote: Enumerating objects: 1395, done.
remote: Counting objects: 100% (574/574), done.
remote: Compressing objects: 100% (53/53), done.
remote: Total 1395 (delta 547), reused 531 (delta 521), pack-reused 821
Receiving objects: 100% (1395/1395), 331.44 KiB | 2.42 MiB/s, done.
Resolving deltas: 100% (1087/1087), done.
Tapped 17 formulae (37 files, 445.5KB).
==> Fetching elastic/tap/elasticsearch-full
==> Downloading https://artifacts.elastic.co/downloads/elasticsearch/elasticsearch-7.17.4-darwin-x86_64.tar.gz?tap=elastic/homeb
######################################################################## 100.0%
==> Installing elasticsearch-full from elastic/tap
Warning: Tried to install empty array to /usr/local/etc/elasticsearch/jvm.options.d
==> codesign -f -s - /usr/local/Cellar/elasticsearch-full/7.17.4/libexec/modules/x-pack-ml/platform/darwin-x86_64/controller.app
==> find /usr/local/Cellar/elasticsearch-full/7.17.4/libexec/jdk.app/Contents/Home/bin -type f -exec codesign -f -s - {} ;
==> Caveats
Data:    /usr/local/var/lib/elasticsearch/elasticsearch_hongda/
Logs:    /usr/local/var/log/elasticsearch/elasticsearch_hongda.log
Plugins: /usr/local/var/elasticsearch/plugins/
Config:  /usr/local/etc/elasticsearch/

To start elastic/tap/elasticsearch-full now and restart at login:
  brew services start elastic/tap/elasticsearch-full
Or, if you don't want/need a background service you can just run:
  elasticsearch
==> Summary
🍺  /usr/local/Cellar/elasticsearch-full/7.17.4: 946 files, 476.2MB, built in 8 seconds
==> Running `brew cleanup elasticsearch-full`...
Disable this behaviour by setting HOMEBREW_NO_INSTALL_CLEANUP.
Hide these hints with HOMEBREW_NO_ENV_HINTS (see `man brew`).
查看
❯ brew info elasticsearch-full
==> elastic/tap/elasticsearch-full: stable 7.17.4
Distributed search & analytics engine
https://www.elastic.co/products/elasticsearch
Conflicts with:
  elasticsearch
/usr/local/Cellar/elasticsearch-full/7.17.4 (946 files, 476.2MB) *
  Built from source on 2022-12-21 at 11:37:26
From: https://github.com/elastic/homebrew-tap/blob/HEAD/Formula/elasticsearch-full.rb
==> Caveats
Data:    /usr/local/var/lib/elasticsearch/elasticsearch_hongda/
Logs:    /usr/local/var/log/elasticsearch/elasticsearch_hongda.log
Plugins: /usr/local/var/elasticsearch/plugins/
Config:  /usr/local/etc/elasticsearch/

To restart elastic/tap/elasticsearch-full after an upgrade:
  brew services restart elastic/tap/elasticsearch-full
Or, if you don't want/need a background service you can just run:
  elasticsearch
启动
brew services start elastic/tap/elasticsearch-full
❯ elasticsearch -version
warning: usage of JAVA_HOME is deprecated, use ES_JAVA_HOME
Future versions of Elasticsearch will require Java 11; your Java version from [/Library/Java/JavaVirtualMachines/graalvm-ee-java8/Contents/Home/jre] does not meet this requirement. Consider switching to a distribution of Elasticsearch with a bundled JDK. If you are already using a distribution with a bundled JDK, ensure the JAVA_HOME environment variable is not set.
Version: 7.17.4, Build: default/tar/79878662c54c886ae89206c685d9f1051a9d6411/2022-05-18T18:04:20.964345128Z, JVM: 1.8.0_321
Curl查看
❯ curl http://127.0.0.1:9200/
{
  "name" : "hongda-iMac.local",
  "cluster_name" : "elasticsearch_hongda",
  "cluster_uuid" : "xs9f7EnQRw28UJLcZUbJvg",
  "version" : {
    "number" : "7.17.4",
    "build_flavor" : "default",
    "build_type" : "tar",
    "build_hash" : "79878662c54c886ae89206c685d9f1051a9d6411",
    "build_date" : "2022-05-18T18:04:20.964345128Z",
    "build_snapshot" : false,
    "lucene_version" : "8.11.1",
    "minimum_wire_compatibility_version" : "6.8.0",
    "minimum_index_compatibility_version" : "6.0.0-beta1"
  },
  "tagline" : "You Know, for Search"
}
安装kibana
❯ brew install elastic/tap/kibana-full
==> Fetching elastic/tap/kibana-full
==> Downloading https://artifacts.elastic.co/downloads/kibana/kibana-7.17.4-darwin-x86_64.tar.gz?tap=elastic/homebrew-tap
######################################################################## 100.0%
==> Installing kibana-full from elastic/tap
==> Caveats
Config: /usr/local/etc/kibana/
If you wish to preserve your plugins upon upgrade, make a copy of
/usr/local/opt/kibana-full/plugins before upgrading, and copy it into the
new keg location after upgrading.

To start elastic/tap/kibana-full now and restart at login:
  brew services start elastic/tap/kibana-full
Or, if you don't want/need a background service you can just run:
  kibana
==> Summary
🍺  /usr/local/Cellar/kibana-full/7.17.4: 37,690 files, 630.8MB, built in 49 seconds
==> Running `brew cleanup kibana-full`...
Disable this behaviour by setting HOMEBREW_NO_INSTALL_CLEANUP.
Hide these hints with HOMEBREW_NO_ENV_HINTS (see `man brew`).
查看版本
❯ kibana --version
7.17.4
启动
❯ brew services start elastic/tap/kibana-full
==> Successfully started `kibana-full` (label: homebrew.mxcl.kibana-full)
查看
❯ curl --location --request GET 'http://127.0.0.1:9200/_cat/indices?v'
health status index                           uuid                   pri rep docs.count docs.deleted store.size pri.store.size
green  open   .geoip_databases                uZ17Xau6RgGNet5_dZZqGw   1   0         40           37     38.1mb         38.1mb
green  open   .apm-custom-link                mE3YFQn0RCuhbfNd7t2JPQ   1   0          0            0       226b           226b
yellow open   user_admin                      g3-wI7CaSKGjTu7r0d4FSg   1   1          3            0     10.1kb         10.1kb
green  open   .apm-agent-configuration        5P4eIDpcTn2UuDuLouOuPg   1   0          0            0       226b           226b
green  open   .kibana_task_manager_7.17.4_001 Ni7AVwi9QLCFpRmY-mWCMQ   1   0         17          466     95.6kb         95.6kb
yellow open   user                            eKuLL-pvT4irwxEsXra15Q   1   1          2            0      9.5kb          9.5kb
green  open   .kibana_7.17.4_001              RNF7VkEfSIOWjdelat-2aQ   1   0        317         1920      2.5mb          2.5mb
安装smartcn分词器
❯ elasticsearch-plugin install analysis-smartcn
warning: usage of JAVA_HOME is deprecated, use ES_JAVA_HOME
Future versions of Elasticsearch will require Java 11; your Java version from [/Library/Java/JavaVirtualMachines/jdk1.8.0_271.jdk/Contents/Home/jre] does not meet this requirement. Consider switching to a distribution of Elasticsearch with a bundled JDK. If you are already using a distribution with a bundled JDK, ensure the JAVA_HOME environment variable is not set.
-> Installing analysis-smartcn
-> Downloading analysis-smartcn from elastic
[=================================================] 100%
-> Installed analysis-smartcn
-> Please restart Elasticsearch to activate any plugins installed
smartcn是目前ES官方推荐的中文分词插件,不过目前不支持自定义词库。
重启
❯ brew services restart elasticsearch-full
Stopping `elasticsearch-full`... (might take a while)
==> Successfully stopped `elasticsearch-full` (label: homebrew.mxcl.elasticsearch-full)
==> Successfully started `elasticsearch-full` (label: homebrew.mxcl.elasticsearch-full)
安装ik中文分词
安装ik插件:
// 到这里找跟自己ES版本一致的插件地址
https://github.com/medcl/elasticsearch-analysis-ik/releases
我本地使用的ES版本是7.17.4,所以选择的Ik插件版本地址是:
https://github.com/medcl/elasticsearch-analysis-ik/releases/download/v7.17.4/elasticsearch-analysis-ik-7.17.4.zip
当然你也可以尝试根据我给出这个地址,直接修改版本号,试试看行不行。
安装命令
{ES安装目录}/bin/elasticsearch-plugin install https://github.com/medcl/elasticsearch-analysis-ik/releases/download/v7.17.4/elasticsearch-analysis-ik-7.17.4.zip
ik分词插件支持 ik_smart 和 ik_max_word 两种分词器
- ik_smart - 粗粒度的分词
- ik_max_word - 会尽可能的枚举可能的关键词,就是分词比较细致一些,会分解出更多的关键词
❯ elasticsearch-plugin install https://github.com/medcl/elasticsearch-analysis-ik/releases/download/v7.17.4/elasticsearch-analysis-ik-7.17.4.zip
warning: usage of JAVA_HOME is deprecated, use ES_JAVA_HOME
Future versions of Elasticsearch will require Java 11; your Java version from [/Library/Java/JavaVirtualMachines/jdk1.8.0_271.jdk/Contents/Home/jre] does not meet this requirement. Consider switching to a distribution of Elasticsearch with a bundled JDK. If you are already using a distribution with a bundled JDK, ensure the JAVA_HOME environment variable is not set.
-> Installing https://github.com/medcl/elasticsearch-analysis-ik/releases/download/v7.17.4/elasticsearch-analysis-ik-7.17.4.zip
-> Downloading https://github.com/medcl/elasticsearch-analysis-ik/releases/download/v7.17.4/elasticsearch-analysis-ik-7.17.4.zip
[=================================================] 100%
@@@@@@@@@@@@@@@@@@@@@@@@@@@@@@@@@@@@@@@@@@@@@@@@@@@@@@@@@@@
@     WARNING: plugin requires additional permissions     @
@@@@@@@@@@@@@@@@@@@@@@@@@@@@@@@@@@@@@@@@@@@@@@@@@@@@@@@@@@@
* java.net.SocketPermission * connect,resolve
See https://docs.oracle.com/javase/8/docs/technotes/guides/security/permissions.html
for descriptions of what these permissions allow and the associated risks.

Continue with installation? [y/N]y
-> Installed analysis-ik
-> Please restart Elasticsearch to activate any plugins installed
ik自定义词库
/usr/local/etc/elasticsearch/analysis-ik at 08:59:01
❯ touch demo.dic
demo.dict内容
上海大学
复旦大学
人民广场
一行一个词条即可
<?xml version="1.0" encoding="UTF-8"?>
<!DOCTYPE properties SYSTEM "http://java.sun.com/dtd/properties.dtd">
<properties>
	<comment>IK Analyzer 扩展配置</comment>
	<!--用户可以在这里配置自己的扩展字典 -->
	<entry key="ext_dict">demo.dic</entry>
	 <!--用户可以在这里配置自己的扩展停止词字典-->
	<entry key="ext_stopwords"></entry>
	<!--用户可以在这里配置远程扩展字典 -->
	<!-- <entry key="remote_ext_dict">words_location</entry> -->
	<!--用户可以在这里配置远程扩展停止词字典-->
	<!-- <entry key="remote_ext_stopwords">words_location</entry> -->
</properties>
重启es
Ik新增扩展词库,支持热更新,不用重启ES,使用remote_ext_dict和remote_ext_stopwords配置远程词库地址即可,词库地址需要返回两个头部(header),一个是
Last-Modified,一个是ETag,ES靠这两个头识别是否需要更新词库,不了解这两个HTTP头,可以搜一下。
Elasticsearch vs RDBMS
Elasticsearch 中,索引是一个集合,相当于数据库 ( RDBMS , 关系数据库管理系统 ) 中的数据库
集合中的每个映射,相当于 RDBMS 中的表
而索引中的每个 JSON 对象,又相当于 RDBMS 中的数据行
所以,Elasticsearch,集合是一些包含了 JSON 对象的映射的集合
详细的对比如下
| Elasticsearch | RDBMS |
|---|---|
| Index 索引 | Database |
| Shard | Shard |
| Mapping | Table |
| Field | Field |
| JSON Object | Tuple |
| Elasticsearch | 索引 | 类型 | 文档 |
|---|---|---|---|
| DB | 库 | 表 | 行 |
集群内部通过 Elasticsearch 的选主算法选出主节点,而集群外部则是可以通过任何节点进行操作,无主从节点之分 ( 对外表现对等/去中心化,有利于客户端编程,例如故障重连 )
type(文档类型)
在新版的Elasticsearch中,已经不使用文档类型了,在Elasticsearch老的版本中文档类型,代表一类文档的集合,index(索引)类似mysql的数据库、文档类型类似Mysql的表。
既然新的版本文档类型没什么作用了,那么index(索引)就类似mysql的表的概念,ES没有数据库的概念了。
提示:在Elasticsearch7.0以后的版本,已经废弃文档类型了,如果大家不是接手老的项目,可以不必理会文档类型,可以直接将index(索引)类比Mysql的表。
分片
Elasticsearch 在保存索引时会选择适合的 「 主分片 」 ( Primary Shard ),把索引保存到其中
我们可以把分片理解为一块物理存储区域
分片的分法是固定的,而且是安装时候就必须要决定好的 ( 默认是 5 ),后面就不能改变了
既然有主分片,那肯定是有 「 从 」 分片的,但 Elasticsearch 里称之为 「 副本分片 」 ( Replica Shard )
副本分片主要有两个作用:
-
高可用
某分片节点挂了的话可走其他副本分片节点,节点恢复后上面的分片数据可通过其他节点恢复
-
负载均衡
Elasticsearch 会自动根据负载情况控制搜索路由,副本分片可以将负载均摊
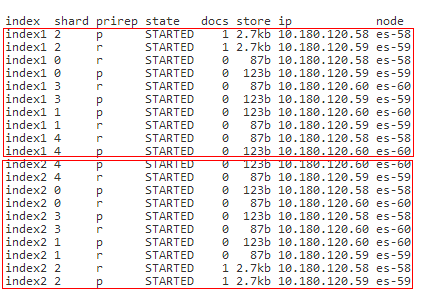
上图中:
- 3 个 Elasticsearch 节点 ( es-58/59/60 ) 组成一个集群
- 搭建集群时使用默认的主分片数 5,shard0 ~ shard4
- 该集群内有加入两个索引 index1、index2
- 这两个索引中分别 「 索引 」 ( 保存 ) 了两个文档
- index1 索引中这个文档被 Elasticsearch 自动保存到了分片 2 中,主分片在 es-58 节点,副本分片在 es-59 节点
- index2 索引中这个文档被 Elasticsearch 自动保存到了分片 2 中,主分片在 es-59 节点,副本分片在 es-58 节点
primary shard ( 主分片 )
每个文档都会被保存在一个主分片上
当我们索引一个文档时,它将在一个主分片上进行索引,然后才放到该主分片的各副本分片上
默认情况下,一个索引有 5 个主分片
我们可以指定更少或更多的主分片来伸缩索引可处理的文档数
需要注意的是,一旦索引创建,就不能修改主分片个数
replica shard ( 副本分片 )
每个主分片可以拥有 0 个或多个副本分片,一个副本分片是主分片的一份拷贝
这样做有两个主要原因:
-
故障转移
当主分片失效时,一个副本分片会被提升为主分片
-
提高性能
获取与搜索请求可以被主分片或副本分片处理
默认情况下,每个主分片都有一个副本分片,副本分片的数量可以动态调整
在同一个节点上,副本分片和其主分片不会同时运行
筛选
boolean
- must:必须匹配,会影响算分结果
- should:选择性匹配,也会影响算分结果
- must_not:必须不能匹配,不会影响算分
- filter:必须匹配,不会影响算分
那么如果不指定minimum_should_match,可能这四个条件中有一个满足就能查到,但是如果指定了minimum_should_match=3,那么这四个条件中必须满足三个才会返回。
POST _search
{
  "query": {
    "bool" : {
      "must" : {
        "term" : { "user.id" : "kimchy" }
      },
      "filter": {
        "term" : { "tags" : "production" }
      },
      "must_not" : {
        "range" : {
          "age" : { "gte" : 10, "lte" : 20 }
        }
      },
      "should" : [    # 一个数组,包括了两个term查询,如果没有指定must条件,那么should查询中的term必须至少满足一条查询
        { "term" : { "tags" : "env1" } },
        { "term" : { "tags" : "deployed" } }
      ],
      "minimum_should_match" : 1,
      "boost" : 1.0
    }
  }
}
更新 put是替换了整个文档,而不是更新name这一个字段
post更新的是文档的局部字段,原来有的字段更新,没有的字段则新增这个字段
1)数据先写入内存buffer,在写入buffer的同时将数据写入translog日志文件,注意:此时数据还没有被成功es索引记录,因此无法搜索到对应数据;
2)如果buffer快满了或者到一定时间,es就会将buffer数据refresh到一个新的segment file中,但是此时数据不是直接进入segment file的磁盘文件,而是先进入os cache的。这个过程就是refresh。
每隔1秒钟,es将buffer中的数据写入一个新的segment file,因此每秒钟会产生一个新的磁盘文件segment file,这个segment file中就存储最近1秒内buffer中写入的数据。
操作系统中,磁盘文件其实都有一个操作系统缓存os cache,因此数据写入磁盘文件之前,会先进入操作系统级别的内存缓存os cache中。
一旦buffer中的数据被refresh操作,刷入os cache中,就代表这个数据就可以被搜索到了。
这就是为什么es被称为准实时(NRT,near real-time):因为写入的数据默认每隔1秒refresh一次,也就是数据每隔一秒才能被 es 搜索到,之后才能被看到,所以称为准实时。
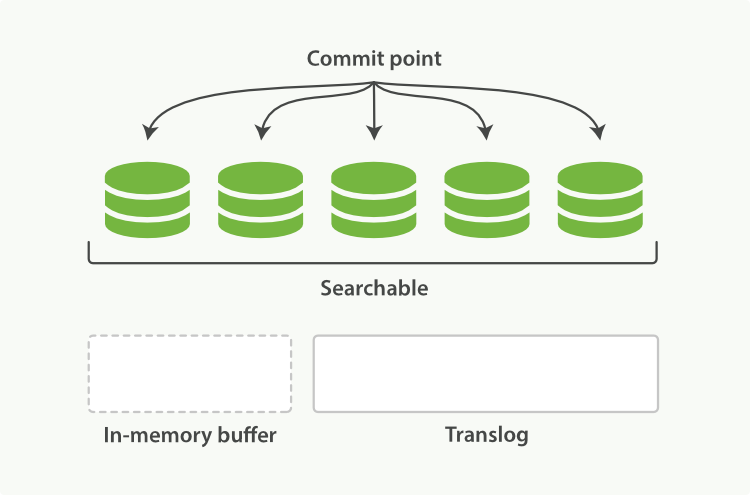
只要数据被输入os cache中,buffer就会被清空,并且数据在translog日志文件里面持久化到磁盘了一份,此时就可以让这个segment file的数据对外提供搜索了。
3)重复1~2步骤,新的数据不断进入buffer和translog,不断将buffer数据写入一个又一个新的segment file中去,每次refresh完,buffer就会被清空,同时translog保留一份日志数据。随着这个过程推进,translog文件会不断变大。当translog文件达到一定程度时,就会执行commit操作。
4)commit操作发生第一步,就是将buffer中现有数据refresh到os cache中去,清空buffer。
5)将一个 commit point 写入磁盘文件,里面标识着这个 commit point 对应的所有 segment file,同时强行将 os cache 中目前所有的数据都 fsync 到磁盘文件中去。
6)将现有的translog清空,然后再次重启启用一个translog,此时commit操作完成。
translog日志文件的作用是什么?
在你执行commit操作之前,数据要么是停留在buffer中,要么是停留在os cache中,无论是buffer还是os cache都是内存,一旦这台机器死了,内存中的数据就全丢了。
因此需要将数据对应的操作写入一个专门的日志文件,也就是translog日志文件,一旦此时机器宕机,再次重启的时候,es会自动读取translog日志文件中的数据,恢复到内存buffer和os cache中去。
综上可以看出:
es是准实时的,因此数据写入1秒后才可以搜索到。
如果translog是异步写入的话,es可能会丢失数据:有n秒的数据停留在buffer、translog的os cache、segment file的os cache中,也就是这n秒的数据不在磁盘上,此时如果宕机,会导致n秒的数据丢失。
translog
写入ES的数据首先会被写入translog文件,该文件持久化到磁盘,保证服务器宕机的时候数据不会丢失,由于顺序写磁盘,速度也会很快。
同步写入:每次写入请求执行的时候,translog在fsync到磁盘之后,才会给客户端返回成功
异步写入:写入请求缓存在内存中,每经过固定时间之后才会fsync到磁盘,写入量很大,对于数据的完整性要求又不是非常严格的情况下,可以开启异步写入
ES整体结构
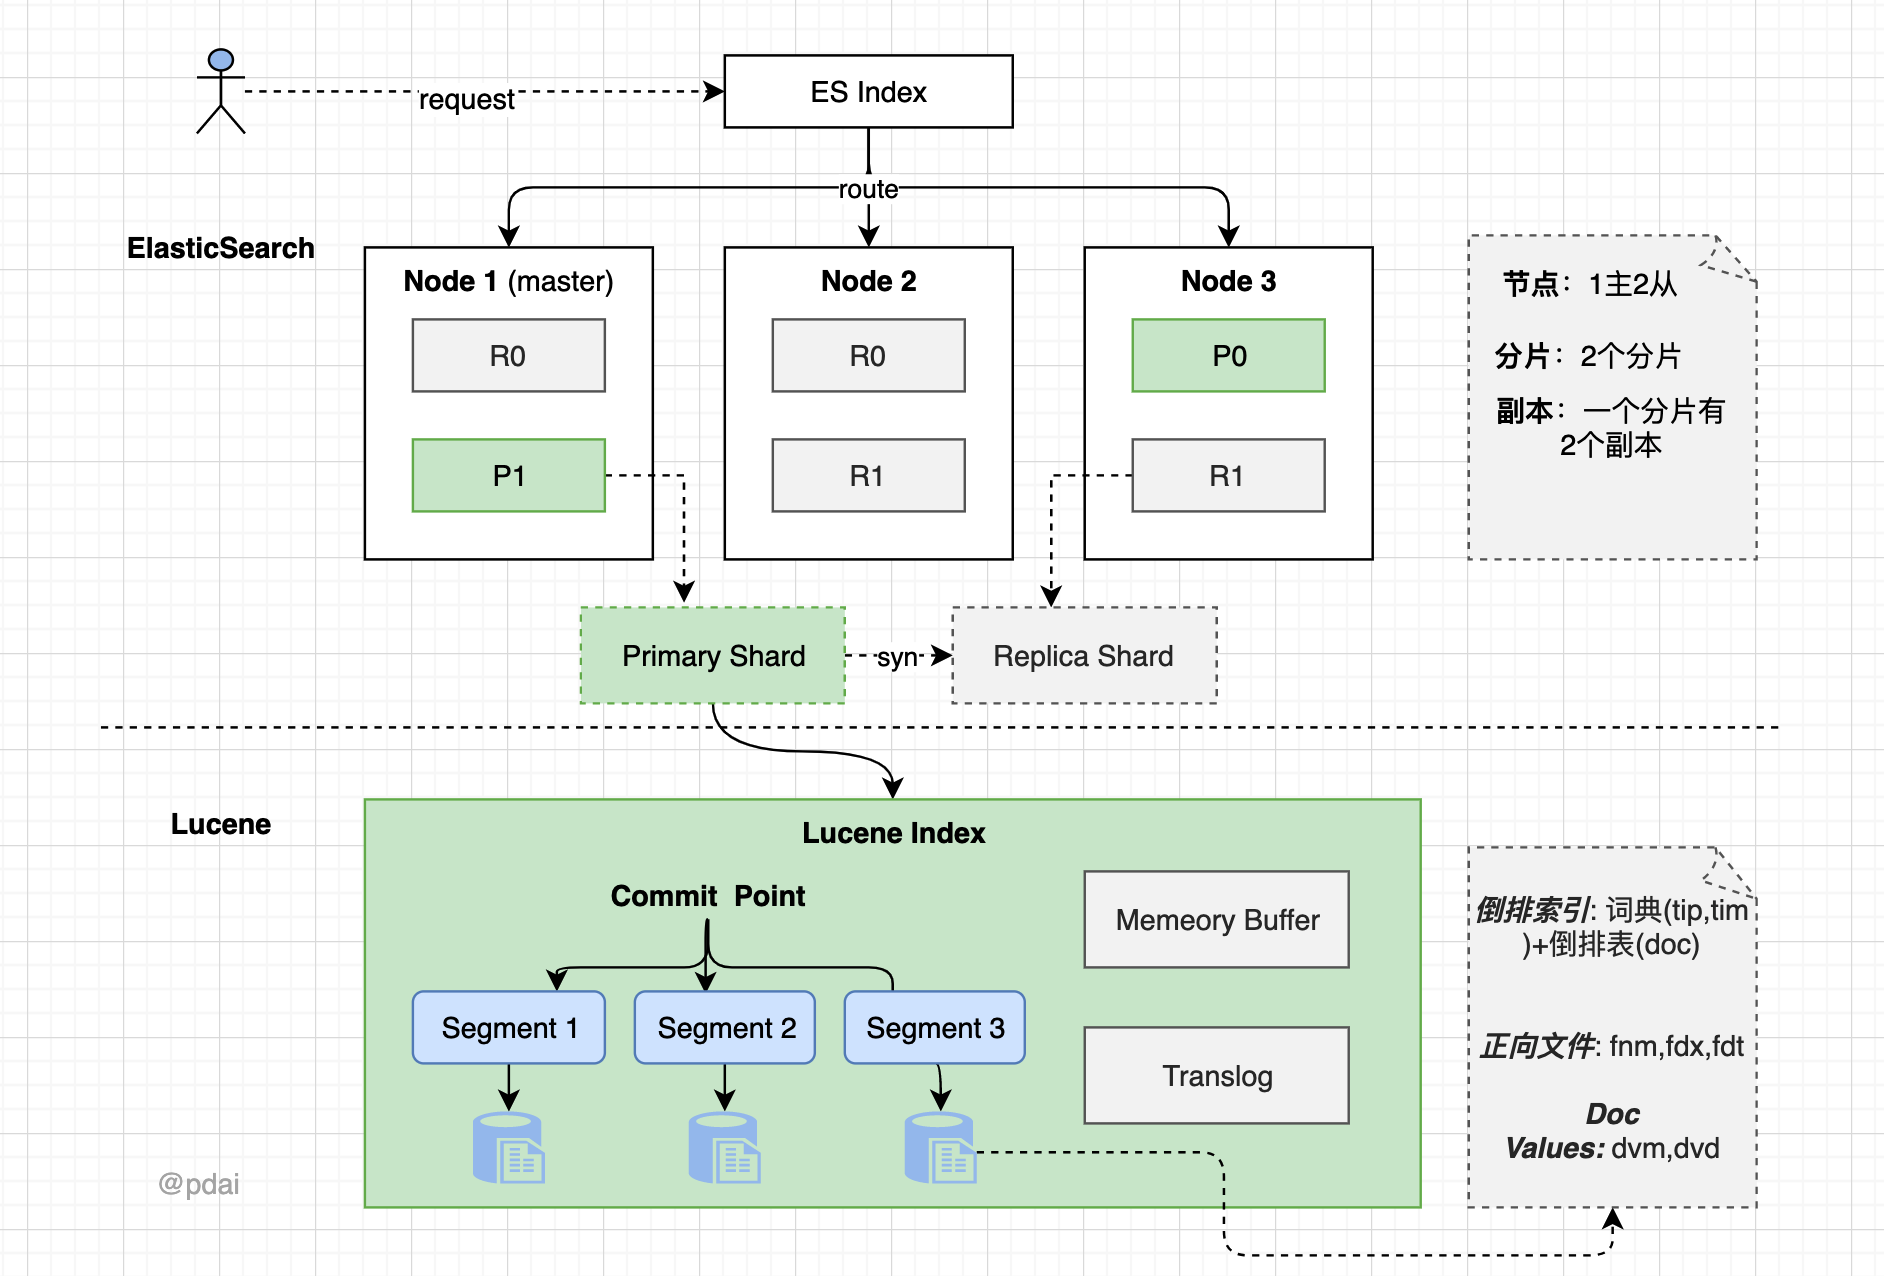
- 一个 ES Index 在集群模式下,有多个 Node (节点)组成。每个节点就是 ES 的Instance (实例)。
- 每个节点上会有多个 shard (分片), P1 P2 是主分片, R1 R2 是副本分片
- 每个分片上对应着就是一个 Lucene Index(底层索引文件)
- Lucene Index 是一个统称由多个 Segment (段文件,就是倒排索引)组成。每个段文件存储着就是 Doc 文档。commit point记录了所有 segments 的信息
Master选举
master选举
选举策略
如果集群中存在master,认可该master,加入集群
如果集群中不存在master,从具有master资格的节点中选id最小的节点作为master
选举时机
集群启动:后台启动线程去ping集群中的节点,按照上述策略从具有master资格的节点中选举出master
现有的master离开集群:后台一直有一个线程定时ping master节点,超过一定次数没有ping成功之后,重新进行master的选举
避免脑裂
脑裂问题是采用master-slave模式的分布式集群普遍需要关注的问题,脑裂一旦出现,会导致集群的状态出现不一致,导致数据错误甚至丢失。
ES避免脑裂的策略:过半原则,可以在ES的集群配置中添加一下配置,避免脑裂的发生
文档的唯一性由 _index, _type, 和 routing values的组合来确定。
搜索发生时
搜索时,Lucene会搜索所有的segment然后将每个segment的搜索结果返回,最后合并呈现给客户。
Lucene的一些特性使得这个过程非常重要:
-
Segments是不可变的(immutable)
- Delete? 当删除发生时,Lucene做的只是将其标志位置为删除,但是文件还是会在它原来的地方,不会发生改变
- Update? 所以对于更新来说,本质上它做的工作是:先删除,然后重新索引(Re-index)
-
随处可见的压缩
Lucene非常擅长压缩数据,基本上所有教科书上的压缩方式,都能在Lucene中找到。
-
缓存所有的所有
Lucene也会将所有的信息做缓存,这大大提高了它的查询效率。
分步骤看数据持久化过程
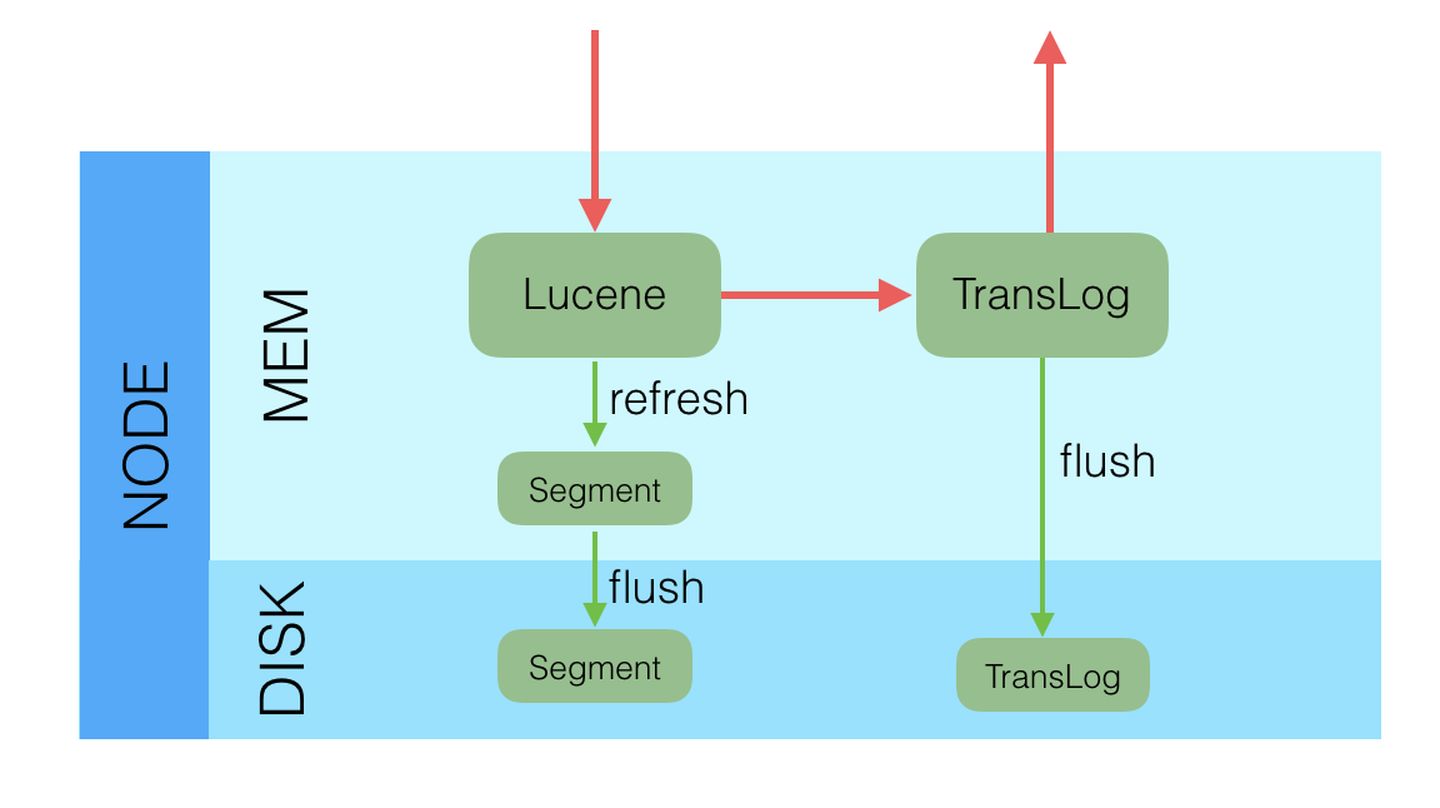
通过分步骤看数据持久化过程:write -> refresh -> flush -> merge
- write 过程
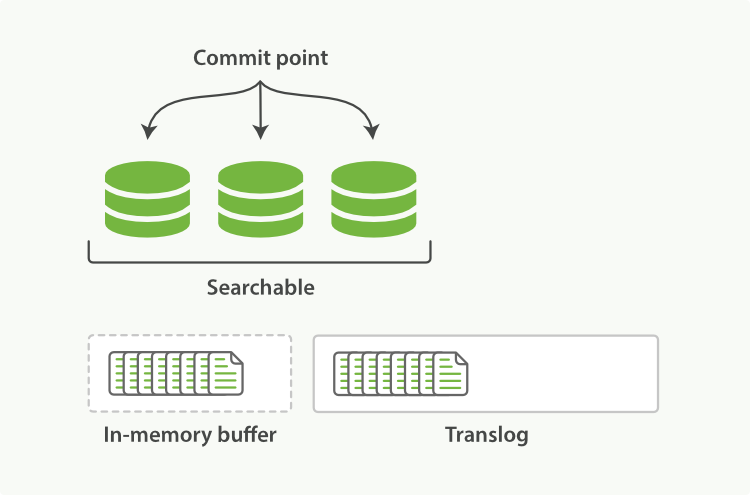
一个新文档过来,会存储在 in-memory buffer 内存缓存区中,顺便会记录 Translog(Elasticsearch 增加了一个 translog ,或者叫事务日志,在每一次对 Elasticsearch 进行操作时均进行了日志记录)。
这时候数据还没到 segment ,是搜不到这个新文档的。数据只有被 refresh 后,才可以被搜索到。
- refresh 过程
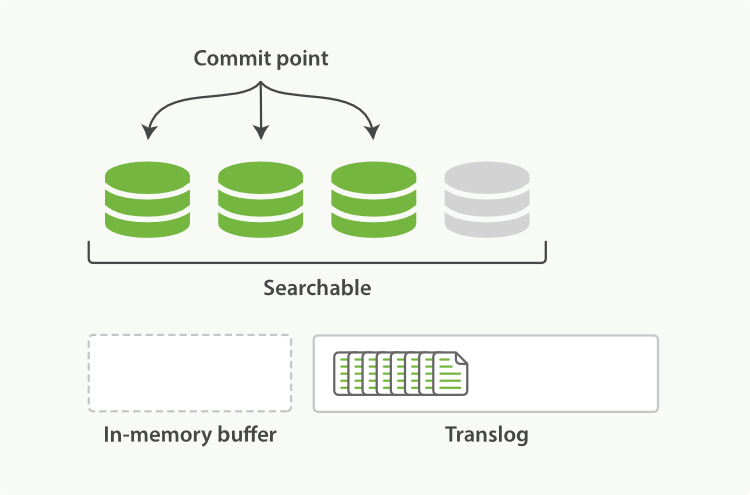
refresh 默认 1 秒钟,执行一次上图流程。ES 是支持修改这个值的,通过 index.refresh_interval 设置 refresh (冲刷)间隔时间。refresh 流程大致如下:
- in-memory buffer 中的文档写入到新的 segment 中,但 segment 是存储在文件系统的缓存中。此时文档可以被搜索到
- 最后清空 in-memory buffer。注意: Translog 没有被清空,为了将 segment 数据写到磁盘
- 文档经过 refresh 后, segment 暂时写到文件系统缓存,这样避免了性能 IO 操作,又可以使文档搜索到。refresh 默认 1 秒执行一次,性能损耗太大。一般建议稍微延长这个 refresh 时间间隔,比如 5 s。因此,ES 其实就是准实时,达不到真正的实时。
- flush 过程
每隔一段时间—例如 translog 变得越来越大—索引被刷新(flush);一个新的 translog 被创建,并且一个全量提交被执行
上个过程中 segment 在文件系统缓存中,会有意外故障文档丢失。那么,为了保证文档不会丢失,需要将文档写入磁盘。那么文档从文件缓存写入磁盘的过程就是 flush。写入次怕后,清空 translog。具体过程如下:
- 所有在内存缓冲区的文档都被写入一个新的段。
- 缓冲区被清空。
- 一个Commit Point被写入硬盘。
- 文件系统缓存通过 fsync 被刷新(flush)。
- 老的 translog 被删除。
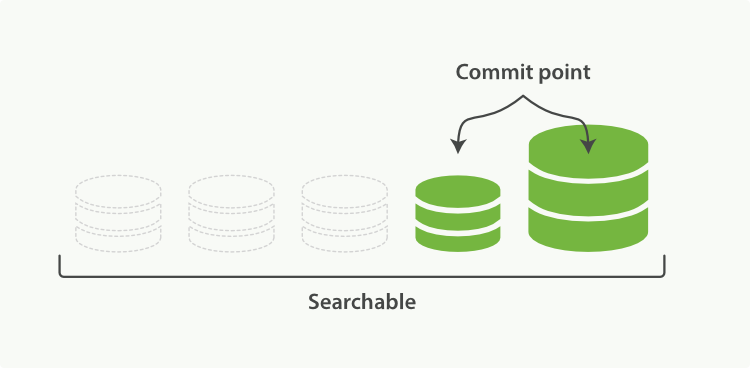
- merge 过程
由于自动刷新流程每秒会创建一个新的段 ,这样会导致短时间内的段数量暴增。而段数目太多会带来较大的麻烦。 每一个段都会消耗文件句柄、内存和cpu运行周期。更重要的是,每个搜索请求都必须轮流检查每个段;所以段越多,搜索也就越慢。
Elasticsearch通过在后台进行Merge Segment来解决这个问题。小的段被合并到大的段,然后这些大的段再被合并到更大的段。
当索引的时候,刷新(refresh)操作会创建新的段并将段打开以供搜索使用。合并进程选择一小部分大小相似的段,并且在后台将它们合并到更大的段中。这并不会中断索引和搜索。
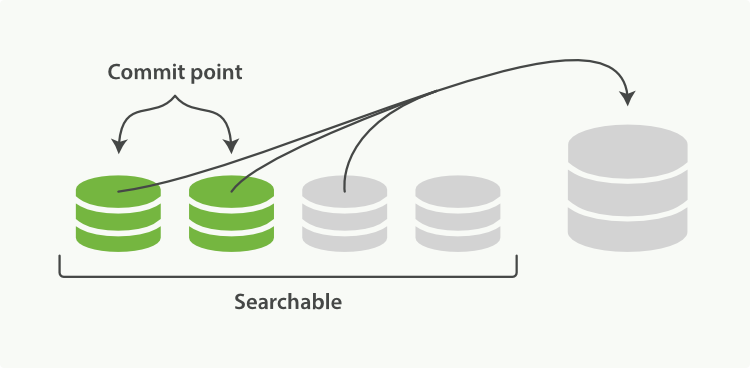
一旦合并结束,老的段被删除:
- 新的段被刷新(flush)到了磁盘。 ** 写入一个包含新段且排除旧的和较小的段的新提交点。
- 新的段被打开用来搜索。
- 老的段被删除。
合并大的段需要消耗大量的I/O和CPU资源,如果任其发展会影响搜索性能。Elasticsearch在默认情况下会对合并流程进行资源限制,所以搜索仍然 有足够的资源很好地执行。
采用多个副本后,避免了单机或磁盘故障发生时,对已经持久化后的数据造成损害,但是Elasticsearch里为了减少磁盘IO保证读写性能,一般是每隔一段时间(比如5分钟)才会把Lucene的Segment写入磁盘持久化,对于写入内存,但还未Flush到磁盘的Lucene数据,如果发生机器宕机或者掉电,那么内存中的数据也会丢失,这时候如何保证?
对于这种问题,Elasticsearch学习了数据库中的处理方式:增加CommitLog模块,Elasticsearch中叫TransLog。
索引优化设置
索引优化主要是在 Elasticsearch 的插入层面优化,Elasticsearch 本身索引速度其实还是蛮快的,具体数据,我们可以参考官方的 benchmark 数据。我们可以根据不同的需求,针对索引优化。
批量提交
当有大量数据提交的时候,建议采用批量提交(Bulk 操作);此外使用 bulk 请求时,每个请求不超过几十M,因为太大会导致内存使用过大。
比如在做 ELK 过程中,Logstash indexer 提交数据到 Elasticsearch 中,batch size 就可以作为一个优化功能点。但是优化 size 大小需要根据文档大小和服务器性能而定。
像 Logstash 中提交文档大小超过 20MB,Logstash 会将一个批量请求切分为多个批量请求。
如果在提交过程中,遇到 EsRejectedExecutionException 异常的话,则说明集群的索引性能已经达到极限了。这种情况,要么提高服务器集群的资源,要么根据业务规则,减少数据收集速度,比如只收集 Warn、Error 级别以上的日志。
增加 Refresh 时间间隔
为了提高索引性能,Elasticsearch 在写入数据的时候,采用延迟写入的策略,即数据先写到内存中,当超过默认1秒(index.refresh_interval)会进行一次写入操作,就是将内存中 segment 数据刷新到磁盘中,此时我们才能将数据搜索出来,所以这就是为什么 Elasticsearch 提供的是近实时搜索功能,而不是实时搜索功能。
如果我们的系统对数据延迟要求不高的话,我们可以通过延长 refresh 时间间隔,可以有效地减少 segment 合并压力,提高索引速度。比如在做全链路跟踪的过程中,我们就将 index.refresh_interval 设置为30s,减少 refresh 次数。再如,在进行全量索引时,可以将 refresh 次数临时关闭,即 index.refresh_interval 设置为-1,数据导入成功后再打开到正常模式,比如30s。
在加载大量数据时候可以暂时不用 refresh 和 repliccas,index.refresh_interval 设置为-1,index.number_of_replicas 设置为0。
相关原理,请参考[原理:ES原理之索引文档流程详解]
修改 index_buffer_size 的设置
索引缓冲的设置可以控制多少内存分配给索引进程。这是一个全局配置,会应用于一个节点上所有不同的分片上。
indices.memory.index_buffer_size: 10%
indices.memory.min_index_buffer_size: 48mb
indices.memory.index_buffer_size 接受一个百分比或者一个表示字节大小的值。默认是10%,意味着分配给节点的总内存的10%用来做索引缓冲的大小。这个数值被分到不同的分片(shards)上。如果设置的是百分比,还可以设置 min_index_buffer_size (默认 48mb)和 max_index_buffer_size(默认没有上限)。
修改 translog 相关的设置
一是控制数据从内存到硬盘的操作频率,以减少硬盘 IO。可将 sync_interval 的时间设置大一些。默认为5s。
index.translog.sync_interval: 5s
也可以控制 tranlog 数据块的大小,达到 threshold 大小时,才会 flush 到 lucene 索引文件。默认为512m。
index.translog.flush_threshold_size: 512mb
translog我们在[原理:ES原理之索引文档流程详解]也有介绍。
注意 _id 字段的使用
_id 字段的使用,应尽可能避免自定义 _id,以避免针对 ID 的版本管理;建议使用 ES 的默认 ID 生成策略或使用数字类型 ID 做为主键。
注意 _all 字段及 _source 字段的使用
_all 字段及 _source 字段的使用,应该注意场景和需要,_all 字段包含了所有的索引字段,方便做全文检索,如果无此需求,可以禁用;_source 存储了原始的 document 内容,如果没有获取原始文档数据的需求,可通过设置 includes、excludes 属性来定义放入 _source 的字段。
合理的配置使用 index 属性
合理的配置使用 index 属性,analyzed 和 not_analyzed,根据业务需求来控制字段是否分词或不分词。只有 groupby 需求的字段,配置时就设置成 not_analyzed,以提高查询或聚类的效率。
减少副本数量
Elasticsearch 默认副本数量为3个,虽然这样会提高集群的可用性,增加搜索的并发数,但是同时也会影响写入索引的效率。
在索引过程中,需要把更新的文档发到副本节点上,等副本节点生效后在进行返回结束。使用 Elasticsearch 做业务搜索的时候,建议副本数目还是设置为3个,但是像内部 ELK 日志系统、分布式跟踪系统中,完全可以将副本数目设置为1个。
查询方面优化
Elasticsearch 作为业务搜索的近实时查询时,查询效率的优化显得尤为重要。
路由优化
当我们查询文档的时候,Elasticsearch 如何知道一个文档应该存放到哪个分片中呢?它其实是通过下面这个公式来计算出来的。
shard = hash(routing) % number_of_primary_shards
routing 默认值是文档的 id,也可以采用自定义值,比如用户 ID。
不带 routing 查询
在查询的时候因为不知道要查询的数据具体在哪个分片上,所以整个过程分为2个步骤:
- 分发:请求到达协调节点后,协调节点将查询请求分发到每个分片上。
- 聚合:协调节点搜集到每个分片上查询结果,再将查询的结果进行排序,之后给用户返回结果。
带 routing 查询
查询的时候,可以直接根据 routing 信息定位到某个分配查询,不需要查询所有的分配,经过协调节点排序。
向上面自定义的用户查询,如果 routing 设置为 userid 的话,就可以直接查询出数据来,效率提升很多。
Filter VS Query
尽可能使用过滤器上下文(Filter)替代查询上下文(Query)
- Query:此文档与此查询子句的匹配程度如何?
- Filter:此文档和查询子句匹配吗?
Elasticsearch 针对 Filter 查询只需要回答「是」或者「否」,不需要像 Query 查询一样计算相关性分数,同时Filter结果可以缓存。
深度翻页
在使用 Elasticsearch 过程中,应尽量避免大翻页的出现。
正常翻页查询都是从 from 开始 size 条数据,这样就需要在每个分片中查询打分排名在前面的 from+size 条数据。协同节点收集每个分配的前 from+size 条数据。协同节点一共会受到 N*(from+size) 条数据,然后进行排序,再将其中 from 到 from+size 条数据返回出去。如果 from 或者 size 很大的话,导致参加排序的数量会同步扩大很多,最终会导致 CPU 资源消耗增大。
可以通过使用 Elasticsearch scroll 和 scroll-scan 高效滚动的方式来解决这样的问题。
也可以结合实际业务特点,文档 id 大小如果和文档创建时间是一致有序的,可以以文档 id 作为分页的偏移量,并将其作为分页查询的一个条件。
协调节点(Coordinating Node)
协调节点用于做分布式里的协调,将各分片或节点返回的数据整合后返回。该节点不会被选作主节点,也不会存储任何索引数据。该服务器主要用于查询负载均衡。在查询的时候,通常会涉及到从多个 node 服务器上查询数据,并将请求分发到多个指定的 node 服务器,并对各个 node 服务器返回的结果进行一个汇总处理,最终返回给客户端。在 ES 集群中,所有的节点都有可能是协调节点,但是,可以通过设置 node.master、node.data、node.ingest 都为 false 来设置专门的协调节点。需要较好的 CPU 和较高的内存。
- node.master:false和node.data:true,该node服务器只作为一个数据节点,只用于存储索引数据,使该node服务器功能单一,只用于数据存储和数据查询,降低其资源消耗率。
- node.master:true和node.data:false,该node服务器只作为一个主节点,但不存储任何索引数据,该node服务器将使用自身空闲的资源,来协调各种创建索引请求或者查询请求,并将这些请求合理分发到相关的node服务器上。
- node.master:false和node.data:false,该node服务器即不会被选作主节点,也不会存储任何索引数据。该服务器主要用于查询负载均衡。在查询的时候,通常会涉及到从多个node服务器上查询数据,并将请求分发到多个指定的node服务器,并对各个node服务器返回的结果进行一个汇总处理,最终返回给客户端。
收集
- now的值不受time-zone影响
参考:
ElasticSearch查询DSL之组合查询(bool、boosting、constant_score、dis_max)介绍


【推荐】国内首个AI IDE,深度理解中文开发场景,立即下载体验Trae
【推荐】编程新体验,更懂你的AI,立即体验豆包MarsCode编程助手
【推荐】抖音旗下AI助手豆包,你的智能百科全书,全免费不限次数
【推荐】轻量又高性能的 SSH 工具 IShell:AI 加持,快人一步
· 无需6万激活码!GitHub神秘组织3小时极速复刻Manus,手把手教你使用OpenManus搭建本
· C#/.NET/.NET Core优秀项目和框架2025年2月简报
· Manus爆火,是硬核还是营销?
· 终于写完轮子一部分:tcp代理 了,记录一下
· 【杭电多校比赛记录】2025“钉耙编程”中国大学生算法设计春季联赛(1)
2017-12-22 ReadResolve方法与序列化
2016-12-22 基数排序
2016-12-22 归并排序