win10 使用LxRunOffline安装wsl2
电脑环境
618买了台联想小新pro13 锐龙版 4800U,将台式机中的win10系统迁移到笔记本。
目前win10是最新的2004版本,wsl为版本1,想要将其升级为wsl2使用,因为vmware 20H1可以和hyper-v兼容使用了,以前因为需要经常使用vmware,所以一直没有升级,这次趁着新电脑的机会搞一下。
目前的子系统为:
D:\Scoop\apps\cmder\current>wsl -l -v
  NAME            STATE           VERSION
* Ubuntu-18.04    Stopped         1
迁移系统的,发现现在状态为stopped
D:\Scoop\apps\cmder\current>wsl.exe -d Ubuntu-18.04

D:\Scoop\apps\cmder\current>wsl -l -v
  NAME            STATE           VERSION
* Ubuntu-18.04    Running         1
但是没有任何用,过不了一会又会变成Stopped。
卸载以前的wsl
D:\Scoop\apps\cmder\current
λ wslconfig /list
适用于 Linux 的 Windows 子系统分发版:
Ubuntu-18.04 (默认)

D:\Scoop\apps\cmder\current
λ wslconfig /unregister Ubuntu-18.04
正在注销...

D:\Scoop\apps\cmder\current
λ wsl -l -v
适用于 Linux 的 Windows 子系统没有已安装的分发版。
可以通过访问 Microsoft Store 来安装分发版:
https://aka.ms/wslstore
注意,我以前安装过wsl,所有很多配置信息都不需要再次配置。
这里记录一下需要的配置命令:
安装LxRunOffline
scoop bucket add extras
scoop install lxrunoffline
查看具体版本
D:\Program Files (x86)\JetBrains
λ lxrunoffline l
Ubuntu-18.04
查看具体路径
D:\Program Files (x86)\JetBrains
λ lxrunoffline di -n Ubuntu-18.04
D:\Program Files (x86)\JetBrains\CanonicalGroupLimited.Ubuntu18.04onWindows_1804.2018.817.0_x64__79rhkp1fndgsc
使用lxrunoffline进行备份
D:\Program Files (x86)\JetBrains
λ lxrunoffline export -n Ubuntu-18.04 -f Ubuntu-18.04.tar.gz
[WARNING] Ignoring an unsupported file "\\?\D:\Program Files (x86)\JetBrains\CanonicalGroupLimited.Ubuntu18.04onWindows_1804.2018.817.0_x64__79rhkp1fndgsc\rootfs\dev\full" of type 0020000.
[WARNING] Ignoring an unsupported file "\\?\D:\Program Files (x86)\JetBrains\CanonicalGroupLimited.Ubuntu18.04onWindows_1804.2018.817.0_x64__79rhkp1fndgsc\rootfs\dev\null" of type 0020000.
[WARNING] Ignoring an unsupported file "\\?\D:\Program Files (x86)\JetBrains\CanonicalGroupLimited.Ubuntu18.04onWindows_1804.2018.817.0_x64__79rhkp1fndgsc\rootfs\dev\ptmx" of type 0020000.
[WARNING] Ignoring an unsupported file "\\?\D:\Program Files (x86)\JetBrains\CanonicalGroupLimited.Ubuntu18.04onWindows_1804.2018.817.0_x64__79rhkp1fndgsc\rootfs\dev\random" of type 0020000.
[WARNING] Ignoring an unsupported file "\\?\D:\Program Files (x86)\JetBrains\CanonicalGroupLimited.Ubuntu18.04onWindows_1804.2018.817.0_x64__79rhkp1fndgsc\rootfs\dev\tty" of type 0020000.
[WARNING] Ignoring an unsupported file "\\?\D:\Program Files (x86)\JetBrains\CanonicalGroupLimited.Ubuntu18.04onWindows_1804.2018.817.0_x64__79rhkp1fndgsc\rootfs\dev\urandom" of type 0020000.
[WARNING] Ignoring an unsupported file "\\?\D:\Program Files (x86)\JetBrains\CanonicalGroupLimited.Ubuntu18.04onWindows_1804.2018.817.0_x64__79rhkp1fndgsc\rootfs\dev\zero" of type 0020000.
-n :wsl的别名,就是之前用list查看的其中一个
-f :备份的路径,我这直接备份到当前路径backup.tar.gz
注意这里只能导出wsl为版本1的,版本2的不行,必须先转换成版本1的才行。
卸载旧系统,迁移位置
D:\MyLinux
λ lxrunoffline uninstall -n Ubuntu-18.04

D:\MyLinux
λ lxrunoffline l
恢复备份
D:\MyLinux
[WARNING] Love this tool? Would you like to make a donation: https://github.com/DDoSolitary/LxRunOffline/blob/master/README.md#donation
指定运行某个发行版本
D:\MyLinux
λ lxrunoffline r -n Ubuntu-18
[oh-my-zsh] Would you like to update? [Y/n] Y
等同于
wsl -d <WSL名称>
创建快捷方式
使用微软应用商店安装的 WSL 会在开始菜单添加应用图标(快捷方式),而使用 LxRunOffline 安装 WSL 时可以通过添加 -s 参数在桌面创建快捷方式。如果你安装时忘记添加参数,可以使用以下命令进行创建。
lxrunoffline s -n <WSL名称> -f <快捷方式路径>.lnk
导出指定的 WSL 配置文件到目标路径
lxrunoffline ec -n <WSL名称> -f <配置文件路径>.xml
配置信息可以输入
lxrunoffline sm -n <WSL名称>查看
取消注册(这个操作不会删除目录)
lxrunoffline ur -n <WSL名称>
使用新名称注册
lxrunoffline rg -n <WSL名称> -d <WSL路径> -c <配置文件路径>.xml
设置默认 WSL
设置默认 WSL 后,可以在 cmd 和 powershell 中输入 wsl 直接调用默认的 WSL 。
lxrunoffline sd -n <WSL名称>
等同于
wsl -s <WSL名称>
安装wsl2的前置设置
进入页面 更新 WSL 2 Linux 内核
下载Linux内核更新包,安装更新。
bcdedit /set hypervisorlaunchtype auto

#用管理员模式启动PowerShell然后运行
dism.exe /online /enable-feature /featurename:Microsoft-Windows-Subsystem-Linux /all /norestart
dism.exe /online /enable-feature /featurename:VirtualMachinePlatform /all /norestart
这两个安装完成直接 重启 !!!!!!!!!重启!!!!!!
安装CentOS子系统
下载 Centos的docker 镜像
可以参考 https://github.com/RoliSoft/WSL-Distribution-Switcher 来下载。
或者直接下载
使用LxRunOffline安装CentOS
D:\MyLinux
λ lxrunoffline install -n centos -d D:\MyLinux\CentOS -f centos-7-docker.tar.xz
[WARNING] Love this tool? Would you like to make a donation: https://github.com/DDoSolitary/LxRunOffline/blob/master/README.md#donation

D:\MyLinux
λ lxrunoffline l
centos

D:\MyLinux
λ wsl
[root@qhong-Computer MyLinux]# uname
Linux
[root@qhong-Computer MyLinux]# uname -r
4.4.0-19041-Microsoft
[root@qhong-Computer MyLinux]# uname -a
Linux qhong-Computer 4.4.0-19041-Microsoft #1-Microsoft Fri Dec 06 14:06:00 PST 2019 x86_64 x86_64 x86_64 GNU/Linux
[root@qhong-Computer CentOS]# cd /
[root@qhong-Computer /]# cat /etc/redhat-release
CentOS Linux release 7.6.1810 (Core)
上面的D:\MyLinux\CentOS是安装的位置。
其中 -d 后面是要安装到的目录; -f 后面是第二部下载的镜像存放位置;-n 用来指定名称
安装完成之后,使用LxRunOffine 来开启 Centos lxrunoffline run -n centos
如果,你只安装了一个WSL,那么直接在cmder输入wsl即可启动CentOS了。
查看:
D:\MyLinux
λ wsl -l -v
  NAME      STATE           VERSION
* centos    Running         1
将其升级为wsl2
D:\MyLinux
λ wsl --set-version centos 2
正在进行转换,这可能需要几分钟时间...
有关与 WSL 2 的主要区别的信息,请访问 https://aka.ms/wsl2
转换完成。

D:\MyLinux
λ wsl -l -v
  NAME      STATE           VERSION
* centos    Stopped         2
但是升级以后是stopped,必须运行起来
D:\MyLinux
λ lxrunoffline r -n centos
[root@qhong-Computer MyLinux]# ll
total 0
drwxrwxrwx 1 root root 4096 Jun 27 17:40 CentOS

[root@qhong-Computer MyLinux]# cat /etc/redhat-release
CentOS Linux release 7.8.2003 (Core)
这里使用的是lxrunoffline的run命令
相当于 wsl -d centos
win10中查看子系统的文件
在centos中执行命令:
explorer.exe .
安装Ubuntu子系统
这个就简单了,照猫画虎就行
我以前就有Ubuntu-18.04的子系统,这次升级为wsl2就行。
D:\MyLinux
λ lxrunoffline install -n Ubuntu-18.04 -d D:\MyLinux\Ubuntu -f Ubuntu-18.04.tar.gz

D:\MyLinux
λ wsl -l -v
  NAME            STATE           VERSION
* centos          Running         2
  Ubuntu-18.04    Stopped         1

D:\MyLinux
λ wsl --set-version Ubuntu-18.04 2
正在进行转换,这可能需要几分钟时间...
有关与 WSL 2 的主要区别的信息,请访问 https://aka.ms/wsl2
转换完成。

D:\MyLinux
λ wsl -l -v
  NAME            STATE           VERSION
* centos          Running         2
  Ubuntu-18.04    Stopped         2

D:\MyLinux
λ lxrunoffline l
centos
Ubuntu-18.04

D:\MyLinux
λ lxrunoffline r -n Ubuntu-18.04
[oh-my-zsh] Would you like to update? [Y/n] Y
安装Ubuntu以后,默认是停止的,而且是版本1,必须转换成版本2,而且再次运行即可。
在CentOS中安装jdk,maven
下载maven
wget https://mirrors.bfsu.edu.cn/apache/maven/maven-3/3.6.3/binaries/apache-maven-3.6.3-bin.tar.gz

mv apache-maven-3.6.3-bin.tar.gz /usr/local/
cd /usr/local
tar -zxvf apache-maven-3.6.3-bin.tar.gz
rm -rf apache-maven-3.6.3-bin.tar.gz
下载jdk(发现oracle拒绝wget方式进行获取,估计下载链接有时效)
链接:https://pan.baidu.com/s/1oa4tTy_7TIu6CXK9kVYcqw 提取码:aesn
mv jdk-8u251-linux-x64.tar.gz /usr/local/
cd /usr/local/
tar -zxvf jdk-8u251-linux-x64.tar.gz
rm -rf jdk-8u251-linux-x64.tar.gz
配置环境变量
在/etc/profile文件尾部添加配置
export JAVA_HOME=/usr/local/jdk1.8.0_251
export MAVEN_HOME=/usr/local/apache-maven-3.6.3
export M2_HOME=/usr/local/apache-maven-3.6.3
export CLASSPATH=.:$JAVA_HOME/jre/lib/rt.jar:$JAVA_HOME/lib/dt.jar:$JAVA_HOME/lib/tools.jar
export PATH=$JAVA_HOME/bin:$MAVEN_HOME/bin:$PATH

source /etc/profile
再安装git,各种配置以后,希望可以使用子系统开发调试java项目,结果,性能慢的要死。
使用wsl命令进行导出,导入
- Export distro to a file:
wsl.exe --export Ubuntu-18.04 C:\folder\file.tar.gz - Import to new name:
wsl.exe --import MyDistro C:\folder C:\folder\file.tar.gz - Convert:
wsl.exe --set-version MyDistro 2
wsl --export centos8 centos8.tar.gz
从wsl中删除win10带过来的PATH变量
创建/etc/wsl.conf文件
[interop]
enabled=false # enable launch of Windows binaries; default is true
appendWindowsPath=false # append Windows path to $PATH variable; default is true
第一个是是否允许运行window中的程序
第二个是否带入window中的环境变量
停止wsl,再重新启动即可。
wsl --shutdown

wsl -d centos
使用scp命令下载文件
从远程服务器18.16.200.107中路径为/data/log/huishi-server下的asdf.cap文件,用户名为root,端口为22,下载到本机的/mnt/d/目录
scp -P 22 root@18.16.200.107:/data/log/huishi-server/asdf.cap /mnt/d/

scp -P 22 root@pre:/data/log/huishi-server/asdf.cap /mnt/d/
拷贝文件夹,则多加一个 -r 参数即可
wsl2中设置代理
在wsl2中直接访问window宿主机,访问不了
这是因为设置的防火墙的缘故
window将wsl的访问当成了外部网络方式
使用管理员PowerShell执行:
New-NetFirewallRule -DisplayName "WSL" -Direction Inbound -InterfaceAlias "vEthernet (WSL)" -Action Allow
这样wsl2可以通过宿主机ip访问(不是window本身的ip,这个要开启对外防火墙)
可以查看window中的防火墙,查看入站规则里面多了一个WSL的规则。
查看宿主机ip:
$ echo $(grep -oP '(?<=nameserver\ ).*' /etc/resolv.conf)
172.25.16.1
在~/.bashrc文件中加入
# CUSTOM CONFIG
export HOST_IP=$(grep -oP '(?<=nameserver\ ).*' /etc/resolv.conf)
export PORXY_ADDR="http://$HOST_IP:8118"

# GLOBAL PROXY FOR BASH

# if ~/.bash_proxy not exist , then create it.
if [ ! -f ~/.bash_proxy ]; then
    touch ~/.bash_proxy
fi
# execute ~/.bash_proxy
. ~/.bash_proxy

function proxy() {
    # export all_proxy="$PORXY_ADDR"
    # export http_proxy="$PORXY_ADDR"
    # export https_proxy="$PORXY_ADDR"
    # export ALL_PROXY="$PORXY_ADDR"
    # export HTTP_PROXY="$PORXY_ADDR"
    # export HTTPS_PROXY="$PORXY_ADDR"
    echo -e "export {all_proxy,http_proxy,https_proxy,ALL_PROXY,HTTP_PROXY,HTTPS_PROXY}=\"$PORXY_ADDR\";" | tee ~/.bash_proxy >/dev/null
    # apply
    . ~/.bash_proxy
    # declare
    echo "current proxy status: using $PORXY_ADDR, proxying"
}

function unproxy() {
    # unset all_proxy http_proxy https_proxy ALL_PROXY HTTP_PROXY HTTPS_PROXY
    echo -e "unset all_proxy http_proxy https_proxy ALL_PROXY HTTP_PROXY HTTPS_PROXY" | tee ~/.bash_proxy >/dev/null
    # apply
    . ~/.bash_proxy
    # declare
    echo "current proxy status:  direct connect, not proxying"
}
在~/.zshrc头部中加入
source ~/.bashrc
使用proxy命令即可设置代理,使用unproxy命令即可解除代理
wsl1与wsl2区别
虚拟网卡
wsl1没有虚拟网卡,wsl2有,体现在使用tcpdump命令时
wsl1:
[root@qhong-Computer MyLinux]# tcpdump -D
wsl2:
[root@qhong-Computer MyLinux]# tcpdump -D
1.eth0
2.nflog (Linux netfilter log (NFLOG) interface)
3.nfqueue (Linux netfilter queue (NFQUEUE) interface)
4.any (Pseudo-device that captures on all interfaces)
5.lo [Loopback]
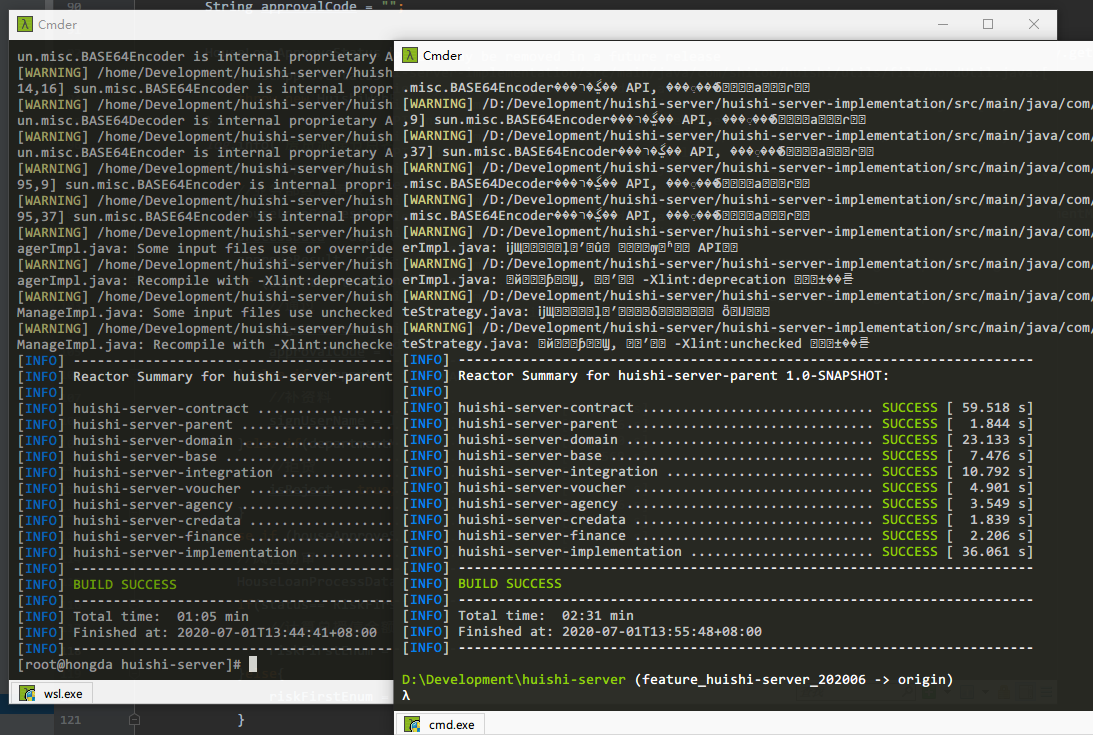
wsl与win10编译java项目性能对比


左边是wsl2,右边是win10,最下边的是wsl1,同一台电脑,差距还是很大的。
参考:
安装VMware16兼容Hyper-v+WSL2+Docker+解决0x80370102报错


 浙公网安备 33010602011771号