Python多线程编程-GIL
Python GIL:global interpreter lock (cpython)
1、python中一个线程对应于c语言中的一个线程
2、gil使得同一个时刻只有一个线程在一个cpu上执行字节码, 无法将多个线程映射到多个cpu上执行
3、gil会根据执行的字节码行数以及时间片释放gil,gil在遇到io的操作时候主动释放
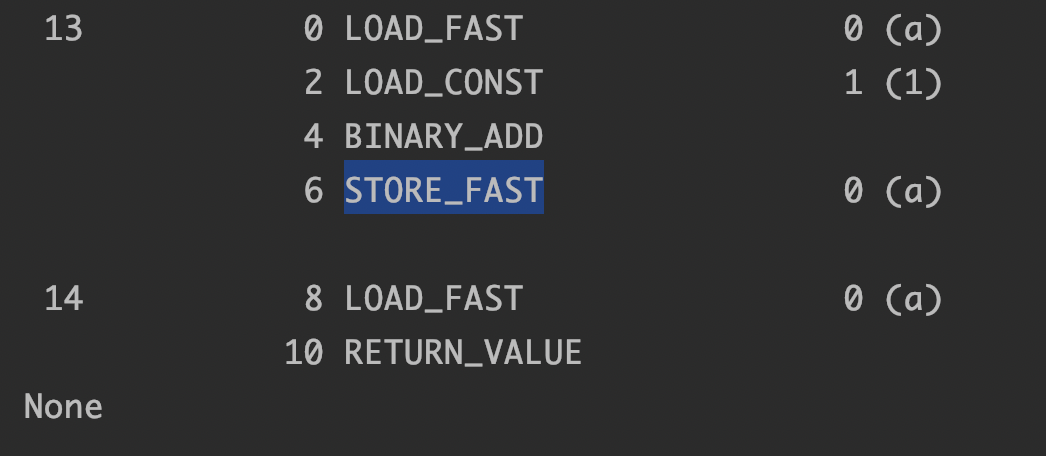
查看Python的字节码文件
import dis
def fun(a):
    a = a + 1
    return a
print(dis.dis(fun))
对于第三点的解释:当我们对同一个变量(total)进行加减操作时,会发现最后的运算结果实际上每次都是不一样的,原因在于gil释放锁的时间有区别
1 2 3 4 5 6 7 8 9 10 11 12 13 14 15 16 17 18 19 20 21 22 23 | total = 0def add(): global total for i in range(1000000): total += 1def desc(): global total for i in range(1000000): total -= 1import threadingthread1 = threading.Thread(target=add)thread2 = threading.Thread(target=desc)thread1.start()thread2.start()thread1.join()thread2.join()print(total) |
Python 多线程编程
对于io操作来说,多线程和多进程性能差别不大
Python中使用多线程的方式
1.通过Thread类实例化


 1 import threading
 2 import time
 3
 4
 5 def get_detail_html(url):
 6     print("get detail html started")
 7     time.sleep(3)  # 处理业务
 8     print("get detail html end ")
 9
10
11 def get_detail_html_url():
12     print("get detail html url started")
13     time.sleep(3)  # 处理业务
14     print("get detail html url end ")
15
16
17 thread1 = threading.Thread(target=get_detail_html_url, args=("",))
18 thread2 = threading.Thread(target=get_detail_html, args=("",))
19 thread1.start()
20 thread2.start()
21 thread2.setDaemon(True)  # 设置守护线程
22 thread1.join()  # 等待线程执行完成在执行后续主线程
23 thread2.join()
setDaemon 设置线程为守护线程时:主线程结束,子线程也会结束
join 设置jion时,表示子线程未运行完成,主线程不会执行jion后的代码
当二者都不设置时,主线和子线程会并行,且即使主线程运行完成子线程未处理完成会继续运行
2.继承Thread类完成
 1 class GetDetailHtml(threading.Thread):
 2     def __init__(self, name):
 3         super().__init__(name=name)
 4
 5     def run(self):
 6         print("get detail html started")
 7         time.sleep(2)
 8         print("get detail html end")
 9
10
11 class GetDetailUrl(threading.Thread):
12     def __init__(self, name):
13         super().__init__(name=name)
14
15     def run(self):
16         print("get detail url started")
17         time.sleep(4)
18         print("get detail url end")
19
20 if  __name__ == "__main__":
21     thread1 = GetDetailHtml("get_detail_html")
22     thread2 = GetDetailUrl("get_detail_url")
23     start_time = time.time()
24     thread1.start()
25     thread2.start()
26
27     thread1.join()
28     thread2.join()
重载run方法,适用与比较复杂的线程
多线程通信
1、多线程可以通过共享变量进行通信 (多进程是不行的)
- 全局变量
- 不具备线程安全
- 队列
- 具备线程安全(Python 双端队列)
线程同步
1、使用threading 中Lock锁
1 lock = Lock()
2 lock.acquire()
3  共享变量
4 lock.release()
使用锁会影响程序的性能,引发死锁的原因:资源竞争、循环等待
当一个线程内要多次锁进行资源绑定时,可以使用Python的可从入锁RLock,但是acquire和release次数要相等
2、使用条件变量(condiction),用于Python复杂线程的通信
  1 import threading
  2
  3 #条件变量, 用于复杂的线程间同步
  4 # class XiaoAi(threading.Thread):
  5 #     def __init__(self, lock):
  6 #         super().__init__(name="小爱")
  7 #         self.lock = lock
  8 #
  9 #     def run(self):
 10 #         self.lock.acquire()
 11 #         print("{} : 在 ".format(self.name))
 12 #         self.lock.release()
 13 #
 14 #         self.lock.acquire()
 15 #         print("{} : 好啊 ".format(self.name))
 16 #         self.lock.release()
 17 #
 18 # class TianMao(threading.Thread):
 19 #     def __init__(self, lock):
 20 #         super().__init__(name="天猫精灵")
 21 #         self.lock = lock
 22 #
 23 #     def run(self):
 24 #
 25 #         self.lock.acquire()
 26 #         print("{} : 小爱同学 ".format(self.name))
 27 #         self.lock.release()
 28 #
 29 #         self.lock.acquire()
 30 #         print("{} : 我们来对古诗吧 ".format(self.name))
 31 #         self.lock.release()
 32
 33 #通过condition完成协同读诗
 34
 35 class XiaoAi(threading.Thread):
 36     def __init__(self, cond):
 37         super().__init__(name="小爱")
 38         self.cond = cond
 39
 40     def run(self):
 41         with self.cond:
 42             self.cond.wait()
 43             print("{} : 在 ".format(self.name))
 44             self.cond.notify()
 45
 46             self.cond.wait()
 47             print("{} : 好啊 ".format(self.name))
 48             self.cond.notify()
 49
 50             self.cond.wait()
 51             print("{} : 君住长江尾 ".format(self.name))
 52             self.cond.notify()
 53
 54             self.cond.wait()
 55             print("{} : 共饮长江水 ".format(self.name))
 56             self.cond.notify()
 57
 58             self.cond.wait()
 59             print("{} : 此恨何时已 ".format(self.name))
 60             self.cond.notify()
 61
 62             self.cond.wait()
 63             print("{} : 定不负相思意 ".format(self.name))
 64             self.cond.notify()
 65
 66 class TianMao(threading.Thread):
 67     def __init__(self, cond):
 68         super().__init__(name="天猫精灵")
 69         self.cond = cond
 70
 71     def run(self):
 72         with self.cond:
 73             print("{} : 小爱同学 ".format(self.name))
 74             self.cond.notify()
 75             self.cond.wait()
 76
 77             print("{} : 我们来对古诗吧 ".format(self.name))
 78             self.cond.notify()
 79             self.cond.wait()
 80
 81             print("{} : 我住长江头 ".format(self.name))
 82             self.cond.notify()
 83             self.cond.wait()
 84
 85             print("{} : 日日思君不见君 ".format(self.name))
 86             self.cond.notify()
 87             self.cond.wait()
 88
 89             print("{} : 此水几时休 ".format(self.name))
 90             self.cond.notify()
 91             self.cond.wait()
 92
 93             print("{} : 只愿君心似我心 ".format(self.name))
 94             self.cond.notify()
 95             self.cond.wait()
 96
 97
 98
 99 if __name__ == "__main__":
100     from concurrent import futures
101     cond = threading.Condition()
102     xiaoai = XiaoAi(cond)
103     tianmao = TianMao(cond)
104
105     #启动顺序很重要
106     #在调用with cond之后才能调用wait或者notify方法
107     #condition有两层锁, 一把底层锁会在线程调用了wait方法的时候释放, 上面的锁会在每次调用wait的时候分配一把并放入到cond的等待队列中,等到notify方法的唤醒
108     xiaoai.start()
109     tianmao.start()
wait和notify要成对出现
#在调用with cond之后才能调用wait或者notify方法
#condition有两层锁, 一把底层锁会在线程调用了wait方法的时候释放, 上面的锁会在每次调用wait的时候分配一把并放入到cond的等待队列中,等到notify方法的唤醒
3、信号量
 1 #Semaphore 是用于控制进入数量的锁
 2 #文件, 读、写, 写一般只是用于一个线程写,读可以允许有多个
 3
 4 #做爬虫
 5 import threading
 6 import time
 7
 8 class HtmlSpider(threading.Thread):
 9     def __init__(self, url, sem):
10         super().__init__()
11         self.url = url
12         self.sem = sem
13
14     def run(self):
15         time.sleep(2)
16         print("got html text success")
17         self.sem.release()
18
19 class UrlProducer(threading.Thread):
20     def __init__(self, sem):
21         super().__init__()
22         self.sem = sem
23
24     def run(self):
25         for i in range(20):
26             self.sem.acquire()
27             html_thread = HtmlSpider("https://baidu.com/{}".format(i), self.sem)
28             html_thread.start()
29
30 if __name__ == "__main__":
31     sem = threading.Semaphore(3)
32     url_producer = UrlProducer(sem)
33     url_producer.start()
4、Semaphore 并发控制
 1 #Semaphore 是用于控制进入数量的锁
 2 #文件, 读、写, 写一般只是用于一个线程写,读可以允许有多个
 3
 4 #做爬虫
 5 import threading
 6 import time
 7
 8 class HtmlSpider(threading.Thread):
 9     def __init__(self, url, sem):
10         super().__init__()
11         self.url = url
12         self.sem = sem
13
14     def run(self):
15         time.sleep(2)
16         print("got html text success")
17         self.sem.release()
18
19 class UrlProducer(threading.Thread):
20     def __init__(self, sem):
21         super().__init__()
22         self.sem = sem
23
24     def run(self):
25         for i in range(20):
26             self.sem.acquire()
27             html_thread = HtmlSpider("https://baidu.com/{}".format(i), self.sem)
28             html_thread.start()
29
30 if __name__ == "__main__":
31     sem = threading.Semaphore(3)
32     url_producer = UrlProducer(sem)
33     url_producer.start()


【推荐】国内首个AI IDE,深度理解中文开发场景,立即下载体验Trae
【推荐】编程新体验,更懂你的AI,立即体验豆包MarsCode编程助手
【推荐】抖音旗下AI助手豆包,你的智能百科全书,全免费不限次数
【推荐】轻量又高性能的 SSH 工具 IShell:AI 加持,快人一步
· 分享一个免费、快速、无限量使用的满血 DeepSeek R1 模型,支持深度思考和联网搜索!
· 使用C#创建一个MCP客户端
· 基于 Docker 搭建 FRP 内网穿透开源项目(很简单哒)
· ollama系列1:轻松3步本地部署deepseek,普通电脑可用
· 按钮权限的设计及实现