Spring Bean 定义常见错误
案例 1:隐式扫描不到 Bean 的定义
Spring Boot 的默认扫描规则
@Target(ElementType.TYPE)
@Retention(RetentionPolicy.RUNTIME)
@Documented
@Inherited
@SpringBootConfiguration
@EnableAutoConfiguration
@ComponentScan(excludeFilters = { @Filter(type = FilterType.CUSTOM, classes = TypeExcludeFilter.class),
      @Filter(type = FilterType.CUSTOM, classes = AutoConfigurationExcludeFilter.class) })
public @interface SpringBootApplication {
//省略非关键代码
}
从定义可以看出,SpringBootApplication 开启了很多功能,其中一个关键功能就是 ComponentScan,参考其配置如下:
@ComponentScan(excludeFilters = { @Filter(type =
FilterType.CUSTOM, classes = TypeExcludeFilter.class)
当 Spring Boot 启动时,ComponentScan 的启用意味着会去扫描出所有定义的 Bean,那么扫描什么位置呢?这是由 ComponentScan 注解的 basePackages 属性指定的,具体可参考如下定义:
public @interface ComponentScan {

/**
 * Base packages to scan for annotated components.
 * <p>{@link #value} is an alias for (and mutually exclusive with) this
 * attribute.
 * <p>Use {@link #basePackageClasses} for a type-safe alternative to
 * String-based package names.
 */
@AliasFor("value")
String[] basePackages() default {};
//省略其他非关键代码
}
而在我们的案例中,我们直接使用的是 SpringBootApplication 注解定义的 ComponentScan,它的 basePackages 没有指定,所以默认为空(即{})。此时扫描的是什么包?这里不妨带着这个问题去调试下(调试位置参考 ComponentScanAnnotationParser#parse 方法),调试视图如下:
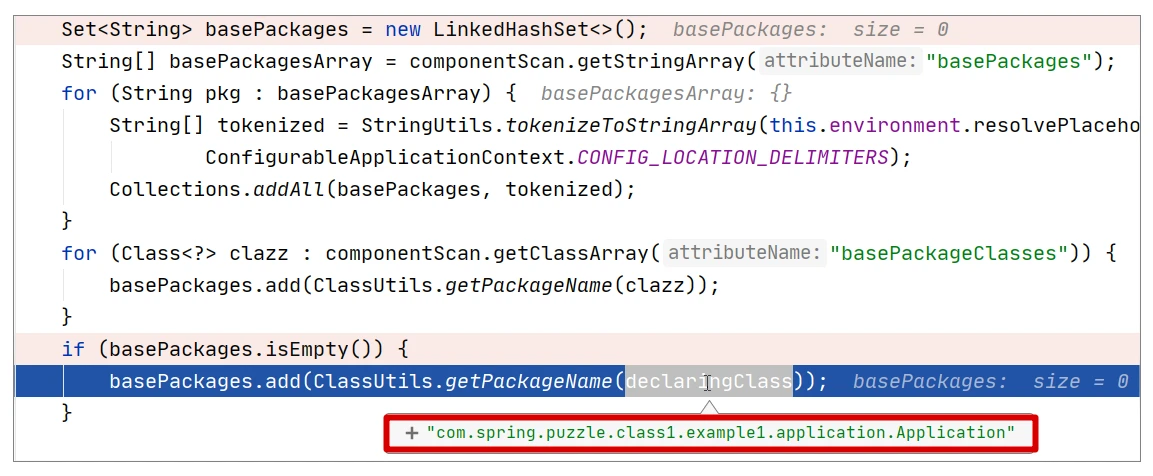
从上图可以看出,当 basePackages 为空时,扫描的包会是 declaringClass 所在的包,在本案例中,declaringClass 就是 Application.class,所以扫描的包其实就是它所在的包,即 com.spring.puzzle.class1.example1.application。
问题修正
针对这个案例,有了源码的剖析,我们可以快速找到解决方案了。当然了,我们所谓的解决方案肯定不是说把 HelloWorldController 移动回原来的位置,而是真正去满足需求。在这里,真正解决问题的方式是显式配置 @ComponentScan。具体修改方式如下:
@SpringBootApplication
@ComponentScan("com.spring.puzzle.class1.example1.controller")
public class Application {
    public static void main(String[] args) {
        SpringApplication.run(Application.class, args);
    }
}
通过上述修改,我们显式指定了扫描的范围为 com.spring.puzzle.class1.example1.controller。不过需要注意的是,显式指定后,默认的扫描范围(即 com.spring.puzzle.class1.example1.application)就不会被添加进去了。另外,我们也可以使用 @ComponentScans 来修复问题,使用方式如下:
@ComponentScans(value = { @ComponentScan(value =
"com.spring.puzzle.class1.example1.controller") })
此时,细心的你可能会发现:如果对源码缺乏了解,很容易会顾此失彼。以 ComponentScan 为例,原有的代码扫描了默认包而忽略了其它包;而一旦显式指定其它包,原来的默认扫描包就被忽略了。
2:定义的 Bean 缺少隐式依赖
@Service
public class ServiceImpl {

    private String serviceName;

    public ServiceImpl(String serviceName){
        this.serviceName = serviceName;
    }

}
ServiceImpl 因为标记为 @Service 而成为一个 Bean。另外我们 ServiceImpl 显式定义了一个构造器。但是,上面的代码不是永远都能正确运行的,有时候会报下面这种错误:
Parameter 0 of constructor in
com.spring.puzzle.class1.example2.ServiceImpl required a bean of type
'java.lang.String' that could not be found.
当创建一个 Bean 时,调用的方法是 AbstractAutowireCapableBeanFactory#createBeanInstance。它主要包含两大基本步骤:寻找构造器和通过反射调用构造器创建实例。对于这个案例,最核心的代码执行,你可以参考下面的代码片段:
// Candidate constructors for autowiring?
Constructor<?>[] ctors = determineConstructorsFromBeanPostProcessors(beanClass, beanName);
if (ctors != null || mbd.getResolvedAutowireMode() == AUTOWIRE_CONSTRUCTOR ||
      mbd.hasConstructorArgumentValues() || !ObjectUtils.isEmpty(args)) {
   return autowireConstructor(beanName, mbd, ctors, args);
}
Spring 会先执行 determineConstructorsFromBeanPostProcessors 方法来获取构造器,然后通过 autowireConstructor 方法带着构造器去创建实例。很明显,在本案例中只有一个构造器,所以非常容易跟踪这个问题。
问题修正
从源码级别了解了错误的原因后,现在反思为什么会出现这个错误。追根溯源,正如开头所述,因为不了解很多隐式的规则:我们定义一个类为 Bean,如果再显式定义了构造器,那么这个 Bean 在构建时,会自动根据构造器参数定义寻找对应的 Bean,然后反射创建出这个 Bean。
了解了这个隐式规则后,解决这个问题就简单多了。我们可以直接定义一个能让 Spring 装配给 ServiceImpl 构造器参数的 Bean,例如定义如下:
//这个bean装配给ServiceImpl的构造器参数“serviceName”
@Bean
public String serviceName(){
    return "MyServiceName";
}
再次运行程序,发现一切正常了。所以,我们在使用 Spring 时,不要总想着定义的 Bean 也可以在非 Spring 场合直接用 new 关键字显式使用,这种思路是不可取的。
@Service
public class ServiceImpl {
    private String serviceName;
    public ServiceImpl(String serviceName){
        this.serviceName = serviceName;
    }
    public ServiceImpl(String serviceName, String otherStringParameter){
        this.serviceName = serviceName;
    }
}
如果我们仍用非 Spring 的思维去审阅这段代码,可能不会觉得有什么问题,毕竟 String 类型可以自动装配了,无非就是增加了一个 String 类型的参数而已。
但是如果你了解 Spring 内部是用反射来构建 Bean 的话,就不难发现问题所在:存在两个构造器,都可以调用时,到底应该调用哪个呢?最终 Spring 无从选择,只能尝试去调用默认构造器,而这个默认构造器又不存在,所以测试这个程序它会出错。
3:原型 Bean 被固定
接下来,我们再来看另外一个关于 Bean 定义不生效的案例。在定义 Bean 时,有时候我们会使用原型 Bean,例如定义如下:
@Service
@Scope(ConfigurableBeanFactory.SCOPE_PROTOTYPE)
public class ServiceImpl {
}
然后我们按照下面的方式去使用它:
@RestController
public class HelloWorldController {

    @Autowired
    private ServiceImpl serviceImpl;

    @RequestMapping(path = "hi", method = RequestMethod.GET)
    public String hi(){
         return "helloworld, service is : " + serviceImpl;
    };
}
结果,我们会发现,不管我们访问多少次http://localhost:8080/hi,访问的结果都是不变的,如下:
helloworld, service is : com.spring.puzzle.class1.example3.error.ServiceImpl@4908af
当一个属性成员 serviceImpl 声明为 @Autowired 后,那么在创建 HelloWorldController 这个 Bean 时,
会先使用构造器反射出实例,然后来装配各个标记为 @Autowired 的属性成员(装配方法参考 AbstractAutowireCapableBeanFactory#populateBean)。
具体到执行过程,它会使用很多 BeanPostProcessor 来做完成工作,其中一种是 AutowiredAnnotationBeanPostProcessor,它会通过 DefaultListableBeanFactory#findAutowireCandidates 寻找到 ServiceImpl 类型的 Bean,然后设置给对应的属性(即 serviceImpl 成员)。
关键执行步骤可参考 AutowiredAnnotationBeanPostProcessor.AutowiredFieldElement#inject
protected void inject(Object bean, @Nullable String beanName, @Nullable PropertyValues pvs) throws Throwable {
   Field field = (Field) this.member;
   Object value;
   //寻找“bean”
   if (this.cached) {
      value = resolvedCachedArgument(beanName, this.cachedFieldValue);
   }
   else {
     //省略其他非关键代码
     value = beanFactory.resolveDependency(desc, beanName, autowiredBeanNames, typeConverter);
   }
   if (value != null) {
      //将bean设置给成员字段
      ReflectionUtils.makeAccessible(field);
      field.set(bean, value);
   }
}
待我们寻找到要自动注入的 Bean 后,即可通过反射设置给对应的 field。这个 field 的执行只发生了一次,所以后续就固定起来了,它并不会因为 ServiceImpl 标记了 SCOPE_PROTOTYPE 而改变。
所以,当一个单例的 Bean,使用 autowired 注解标记其属性时,你一定要注意这个属性值会被固定下来。
问题修正
通过上述源码分析,我们可以知道要修正这个问题,肯定是不能将 ServiceImpl 的 Bean 固定到属性上的,而应该是每次使用时都会重新获取一次。所以这里我提供了两种修正方式:
- 自动注入Context
即自动注入 ApplicationContext,然后定义 getServiceImpl() 方法,在方法中获取一个新的 ServiceImpl 类型实例。修正代码如下:
@RestController
public class HelloWorldController {

    @Autowired
    private ApplicationContext applicationContext;

    @RequestMapping(path = "hi", method = RequestMethod.GET)
    public String hi(){
         return "helloworld, service is : " + getServiceImpl();
    };

    public ServiceImpl getServiceImpl(){
        return applicationContext.getBean(ServiceImpl.class);
    }

}
- 使用Lookup注解
类似修正方法 1,也添加一个 getServiceImpl 方法,不过这个方法是被 Lookup 标记的。修正代码如下:
@RestController
public class HelloWorldController {

    @RequestMapping(path = "hi", method = RequestMethod.GET)
    public String hi(){
         return "helloworld, service is : " + getServiceImpl();
    };

    @Lookup
    public ServiceImpl getServiceImpl(){
        return null;
    }

}
通过这两种修正方式,再次测试程序,我们会发现结果已经符合预期(每次访问这个接口,都会创建新的 Bean)。
这里我们不妨再拓展下,讨论下 Lookup 是如何生效的。
毕竟在修正代码中,我们看到 getServiceImpl 方法的实现返回值是 null,这或许很难说服自己。首先,我们可以通过调试方式看下方法的执行,参考下图:


