Spark-Zk-ES集群环境搭建
Spark分布式集群环境搭建
一、硬件情况
三台服务器
操作系统版本:Linux version 3.10.0-693.17.1.el7.x86_64
二、软件包
Jdk-8u171-linux-x64.tar(java version 1.8.0_171)
Scala-2.11.7
Spark-2.3.1-bin-hadoop2.7
二、Spark分布式集群环境搭建过程
1、修改计算机环境
1) 集群环境:1台master,2台slave,即slave1、slave2
2) 修改主机名hostname,将第一台主机名改为master,另外两台改为slave1、slave2,并查看修改后的主机名,之后必须重启计算机!!否则执行其他命令时会报错。
vi /etc/hostname
more / etc/hostname
3) 修改自身的IP地址,可通过ifconfig查看修改后的IP地址。
4) 修改hosts文件
注意:hosts文件里正常会存在一个localhost 及其对应的IP地址,千万不要删除它,直接把ip与对应的主机名信息加到后边就行了,删除了localhost,Spark会找不到入口!
vi /etc/hosts
2、更新apt(不是必须的)
使用命令sudo apt-get update进行更新,目的是更新所有的依赖软件,以防后面某些软件安装不成功。如果所有主机 Ubuntu 的软件都是最新的,就不需要这一步了。
3、安装vim
apt-get update
4、安装JDK
1) 在~/spark目录下,使用命令tar -zvxf jdk-8u171-linux-x64.tar.gz解压该压缩包。
2) 修改环境变量,使用命令sudo vi /etc/profile 修改配置文件,之后使用命令 source /etc/profile,使文件修改生效。
3) 使用命令java –version检查jdk是否安装成功。
5、安装SCALA
1) 在~/spark目录下,使用命令tar -zvxf scala-2.11.7.tgz解压该压缩包, 修改环境变量.
2) 使用命令scala –version检查scala是否安装成功
3) 使用命令which scala查看scala的安装位置路径
4) 与JDK一样,使用命令sudo vi /etc/profile 修改环境变量的配置文件,之后使用命令 source /etc/profile,使文件修改生效。
6、安装SSH服务
使用命令sudo apt-get install openssh-server进行安装,
7、配置master与slave
1) 配置每台主机的SSH免密码登录环境
2) 在每台主机上生成公钥和私钥对
ssh-keygen –t rsa
3) 将slave1与slave2上的id_rsa.pub发送给master
scp ~/.ssh/id_rsa.pub root@master:~/.ssh/id_rsa.pub.slave1
4) 在master上,将所有公钥加载到用于认证的公钥文件authorized_key中,并查看生成的文件。
cat ~/.ssh/id_rsa.pub* >> ~/.ssh/authorized_keys
5) 将master上的公钥文件authorized_key分发给slave1、slave2.
scp ~/.ssh/ authorized_keys root@slave1:~/.ssh/
scp ~/.ssh/ authorized_keys root@slave2:~/.ssh/
6) 最后使用SSH命令,检验是否能免密码登录。
从master登陆slave1
ssh slave1
8、安装Spark(先在master上安装再复制到其他slave上)
1) 在~/spark目录下,解压已下载的spark压缩包。
2) 使用命令cd spark/spark-2.3.1/conf,在该目录下,看到很多文件都是以template结尾的,这是因为spark给我们提供的是模板配置文件,我们可以先拷贝一份,然后将.template给去掉,变成真正的配置文件后再编辑
3) 配置spark-env.sh,该文件包含spark的各种运行环境
cd spark/spark-2.3.1/conf
cp spark-env.sh.template spark-env.sh
vi spark-env.sh
配置以下信息
export SCALA_HOME=
export JAVA_HOME=
SPARK_MASTER_IP=master
SPARK_LOCAL_DIRS=
SPARK_DRIVER_MEMORY=2G
4) 配置slaves文件
cp slaves.template slaves
vi slaves
配置以下信息
master
slaver1
slaver2
5) 将配置好的spark-2.3.1文件分发给所有slave
scp –r ~/spark/spark-2.3.1 root@slave1:~/spark/spark-2.3.1
scp –r ~/spark/spark-2.3.1 root@slave2:~/spark/spark-2.3.1
6) 启动spark集群
cd spark/spark-2.3.1
sbin/start-all.sh
7) 查看Spark集群信息
使用jps命令查看spark进程。
Master中进程:
Worker
Master
Jps
Slave中进程:
Worker
Jps
查看spark管理界面,在浏览器中输入:http://master:8080
8) 运行 spark-shell,可以进入 Spark 的 shell 控制台
./bin/spark-shell
9) 停止运行集群
运行sbin/stop-all.sh停止Spark集群
.使用zookeeper搭建高可用spark集群
- 先安装好zookeeper和spark集群
- 将conf/spark-env.sh中master的地址注释掉
- 然后引用zookeeper相关的配置,添加一个属性SPARK_DAEMON_JAVA_OPTS
export SPARK_DAEMON_JAVA_OPTS="-Dspark.deploy.recoveryMode=ZOOKEEPER -Dspark.deploy.zookeeper.url=master:2181,slave1:2181, slave1:2181 -Dspark.deploy.zookeeper.dir=/spark"
参数说明
spark.deploy.recoveryMode:恢复模式(Master重新启动的模式)
有三种:(1)ZooKeeper (2) FileSystem (3)NONE
FileSystem在测试阶段用,生产中用Zookeeper,因为基于文件系统的需要我们手动启动挂掉的Master,NONE表示不恢复;
spark.deploy.zookeeper.url:ZooKeeper的Server地址,以及端口号;
spark.deploy.zookeeper.dir:指定对应保存在zookeeper上的节点目录。即集群元数据信息的文件、目录,包括Worker,Driver和Application的信息。
- 配置结束以后,将配置文件复制到其他节点上
scp spark-env.sh root@slave1:~/spark/spark-2.3.1/conf/spark-env.sh
scp spark-env.sh root@slave2:~/spark/spark-2.3.1/conf/spark-env.sh
- 启动zookeeper集群,在zookeeper安装目录的bin下输入sh zkServer.sh start,每个节点都要启动。
- 启动Spark集群,先在哪台机器上运行启动命令,就会先在哪台机器上构建Master。
在一个spark节点的sbin目录下运行./start-all.sh
- 启动备用master节点,在另外一个节点上运行start-master.sh命令。
通过在浏览器输入ip:8080来查看master的状态,一个是alive状态,一个是standby状态。
3.Elasticsearch集群搭建
Linux环境: CentOS7
elasticsearch版本: ES6.2.2
每个服务器安装好ES
这里举例三台服务器,需要水平扩展如此类推
node-1 172.24.1.55
node-2 172.24.1.108
node-3 172.24.1.101
……
修改配置文件
vim /etc/elasticsearch/elasticsearch.yml
要求:
集群名称必须同一个,节点名称不能重复
对应的端口需要开放,嫌麻烦关闭防火墙
3.1node-1配置
172.24.1.55的配置
# ======================== Elasticsearch Configuration =========================
#
# NOTE: Elasticsearch comes with reasonable defaults for most settings.
#       Before you set out to tweak and tune the configuration, make sure you
#       understand what are you trying to accomplish and the consequences.
#
# The primary way of configuring a node is via this file. This template lists
# the most important settings you may want to configure for a production cluster.
#
# Please consult the documentation for further information on configuration options:
# https://www.elastic.co/guide/en/elasticsearch/reference/index.html
#
# ---------------------------------- Cluster -----------------------------------
#
# Use a descriptive name for your cluster:
#
#集群的名称
cluster.name: dsa_cluster
#
# ------------------------------------ Node ------------------------------------
#
# Use a descriptive name for the node:
#
#节点名称
node.name: dsa-node-1
#
#master和data同时配置会产生一些奇异的效果:
#1) 当master为false,而data为true时,会对该节点产生严重负荷;
#2) 当master为true,而data为false时,该节点作为一个协调者;
#3) 当master为false,data也为false时,该节点就变成了一个负载均衡器
#
#指定该节点是否有资格被选举成为master节点,默认是true,es是默认集群中的第一台机器为master,如果这台机挂了就会重新选举master
node.master: true
#允许该节点存储数据(默认开启)
node.data: true
#
# Add custom attributes to the node:
#
#node.attr.rack: r1
#
# ----------------------------------- Paths ------------------------------------
#
# Path to directory where to store the data (separate multiple locations by comma):
#
#索引数据的存储路径
path.data: /data/audit/elasticsearch
#
# Path to log files:
#
#日志文件的存储路径
path.logs: /var/log/elasticsearch
#
# path to snapshot
#数据备份
path.repo: ["/data/snapshot/dsa"]
# ----------------------------------- Memory -----------------------------------
#
# Lock the memory on startup:
#
#设置为true来锁住内存。因为内存交换到磁盘对服务器性能来说是致命的,当jvm开始swapping时es的效率会降低,所以要保证它不swap交换分区
bootstrap.memory_lock: true
bootstrap.system_call_filter: true
#
# Make sure that the heap size is set to about half the memory available
# on the system and that the owner of the process is allowed to use this
# limit.
#
# Elasticsearch performs poorly when the system is swapping the memory.
#
# ---------------------------------- Network -----------------------------------
#
# Set the bind address to a specific IP (IPv4 or IPv6):
#
#绑定的ip地址,主要用于内部集群访问
network.host: 172.24.1.55
#
# Set a custom port for HTTP:
#
#设置对外服务的http端口,默认为9200
http.port: 9200
# 设置节点间交互的tcp端口,默认是9300
transport.tcp.port: 9300
#
# For more information, consult the network module documentation.
#
# --------------------------------- Discovery ----------------------------------
#
# Pass an initial list of hosts to perform discovery when new node is started:
# The default list of hosts is ["127.0.0.1", "[::1]"]
#
#需要发现新的节点配置Elasticsearch将绑定到可用的环回地址,并将扫描端口9300到9305以尝试连接到运行在同一台服务器上的其他节点。
#这提供了自动集群体验,而无需进行任何配置。数组设置或逗号分隔的设置。每个值的形式应该是host:port或host
#(如果没有设置,port默认设置会transport.profiles.default.port 回落到transport.tcp.port)。
#请注意,IPv6主机必须放在括号内。默认为127.0.0.1, [::1]
discovery.zen.ping.unicast.hosts:["172.24.1.55:9300","172.24.1.108:9300","172.24.1.101:9300"]
#
# Prevent the "split brain" by configuring the majority of nodes (total number of master-eligible nodes / 2 + 1):
#
#如果没有这种设置,遭受网络故障的集群就有可能将集群分成两个独立的集群 - 分裂的大脑 - 这将导致数据丢失,防止脑裂丢失数据,master节点候选者必须超过半数存活 (master_eligible_nodes / 2) + 1)
#discovery.zen.minimum_master_nodes:
# For more information, consult the zen discovery module documentation.
#
# ---------------------------------- Gateway -----------------------------------
#
# Block initial recovery after a full cluster restart until N nodes are started:
#设置集群中N个节点启动时进行数据恢复,默认为1
#gateway.recover_after_nodes: 3
#
# For more information, consult the gateway module documentation.
#
# ---------------------------------- Various -----------------------------------
#
# Require explicit names when deleting indices:
#
#action.destructive_requires_name: true
#是否支持跨域访问资源
http.cors.enabled: true
#允许访问资源的类型
http.cors.allow-origin: "*"
2node-2配置
172.24.1.108配置
# ======================== Elasticsearch Configuration =========================
#
# NOTE: Elasticsearch comes with reasonable defaults for most settings.
#       Before you set out to tweak and tune the configuration, make sure you
#       understand what are you trying to accomplish and the consequences.
#
# The primary way of configuring a node is via this file. This template lists
# the most important settings you may want to configure for a production cluster.
#
# Please consult the documentation for further information on configuration options:
# https://www.elastic.co/guide/en/elasticsearch/reference/index.html
#
# ---------------------------------- Cluster -----------------------------------
#
# Use a descriptive name for your cluster:
#
#集群的名称
cluster.name: dsa_cluster
#
# ------------------------------------ Node ------------------------------------
#
# Use a descriptive name for the node:
#
#节点名称
node.name: dsa-node-2
#
#master和data同时配置会产生一些奇异的效果:
#1) 当master为false,而data为true时,会对该节点产生严重负荷;
#2) 当master为true,而data为false时,该节点作为一个协调者;
#3) 当master为false,data也为false时,该节点就变成了一个负载均衡器
#
#指定该节点是否有资格被选举成为master节点,默认是true,es是默认集群中的第一台机器为master,如果这台机挂了就会重新选举master
node.master: true
#允许该节点存储数据(默认开启)
node.data: true
#
# Add custom attributes to the node:
#
#node.attr.rack: r1
#
# ----------------------------------- Paths ------------------------------------
#
# Path to directory where to store the data (separate multiple locations by comma):
#
#索引数据的存储路径
path.data: /data/audit/elasticsearch
#
# Path to log files:
#
#日志文件的存储路径
path.logs: /var/log/elasticsearch
#
# path to snapshot
#数据备份
path.repo: ["/data/snapshot/dsa"]
# ----------------------------------- Memory -----------------------------------
#
# Lock the memory on startup:
#
#设置为true来锁住内存。因为内存交换到磁盘对服务器性能来说是致命的,当jvm开始swapping时es的效率会降低,所以要保证它不swap交换分区
bootstrap.memory_lock: true
bootstrap.system_call_filter: true
#
# Make sure that the heap size is set to about half the memory available
# on the system and that the owner of the process is allowed to use this
# limit.
#
# Elasticsearch performs poorly when the system is swapping the memory.
#
# ---------------------------------- Network -----------------------------------
#
# Set the bind address to a specific IP (IPv4 or IPv6):
#
#绑定的ip地址,主要用于内部集群访问
network.host: 172.24.1.108
#
# Set a custom port for HTTP:
#
#设置对外服务的http端口,默认为9200
http.port: 9200
# 设置节点间交互的tcp端口,默认是9300
transport.tcp.port: 9300
#
# For more information, consult the network module documentation.
#
# --------------------------------- Discovery ----------------------------------
#
# Pass an initial list of hosts to perform discovery when new node is started:
# The default list of hosts is ["127.0.0.1", "[::1]"]
#
#需要发现新的节点配置Elasticsearch将绑定到可用的环回地址,并将扫描端口9300到9305以尝试连接到运行在同一台服务器上的其他节点。
#这提供了自动集群体验,而无需进行任何配置。数组设置或逗号分隔的设置。每个值的形式应该是host:port或host
#(如果没有设置,port默认设置会transport.profiles.default.port 回落到transport.tcp.port)。
#请注意,IPv6主机必须放在括号内。默认为127.0.0.1, [::1]
discovery.zen.ping.unicast.hosts: ["172.24.1.108:9300", "172.24.1.55:9300", "172.24.1.101:9300"]
#
# Prevent the "split brain" by configuring the majority of nodes (total number of master-eligible nodes / 2 + 1):
#
#如果没有这种设置,遭受网络故障的集群就有可能将集群分成两个独立的集群 - 分裂的大脑 - 这将导致数据丢失,防止脑裂丢失数据,master节点候选者必须超过半数存活 (master_eligible_nodes / 2) + 1)
#discovery.zen.minimum_master_nodes:
# For more information, consult the zen discovery module documentation.
#
# ---------------------------------- Gateway -----------------------------------
#
# Block initial recovery after a full cluster restart until N nodes are started:
#设置集群中N个节点启动时进行数据恢复,默认为1
#gateway.recover_after_nodes: 3
#
# For more information, consult the gateway module documentation.
#
# ---------------------------------- Various -----------------------------------
#
# Require explicit names when deleting indices:
#
#action.destructive_requires_name: true
#是否支持跨域访问资源
http.cors.enabled: true
#允许访问资源的类型
http.cors.allow-origin: "*"
node-3配置
172.24.1.101配置
======================== Elasticsearch Configuration =========================
#
# NOTE: Elasticsearch comes with reasonable defaults for most settings.
#       Before you set out to tweak and tune the configuration, make sure you
#       understand what are you trying to accomplish and the consequences.
#
# The primary way of configuring a node is via this file. This template lists
# the most important settings you may want to configure for a production cluster.
#
# Please consult the documentation for further information on configuration options:
# https://www.elastic.co/guide/en/elasticsearch/reference/index.html
#
# ---------------------------------- Cluster -----------------------------------
#
# Use a descriptive name for your cluster:
#
#集群的名称
cluster.name: dsa_cluster
#
# ------------------------------------ Node ------------------------------------
#
# Use a descriptive name for the node:
#
#节点名称
node.name: dsa-node-3
#
#master和data同时配置会产生一些奇异的效果:
#1) 当master为false,而data为true时,会对该节点产生严重负荷;
#2) 当master为true,而data为false时,该节点作为一个协调者;
#3) 当master为false,data也为false时,该节点就变成了一个负载均衡器
#
#指定该节点是否有资格被选举成为master节点,默认是true,es是默认集群中的第一台机器为master,如果这台机挂了就会重新选举master
node.master: true
#允许该节点存储数据(默认开启)
node.data: true
#
# Add custom attributes to the node:
#
#node.attr.rack: r1
#
# ----------------------------------- Paths ------------------------------------
#
# Path to directory where to store the data (separate multiple locations by comma):
#
#索引数据的存储路径
path.data: /data/audit/elasticsearch
#
# Path to log files:
#
#日志文件的存储路径
path.logs: /var/log/elasticsearch
#
# path to snapshot
#数据备份
path.repo: ["/data/snapshot/dsa"]
# ----------------------------------- Memory -----------------------------------
#
# Lock the memory on startup:
#
#设置为true来锁住内存。因为内存交换到磁盘对服务器性能来说是致命的,当jvm开始swapping时es的效率会降低,所以要保证它不swap交换分区
bootstrap.memory_lock: true
bootstrap.system_call_filter: true
#
# Make sure that the heap size is set to about half the memory available
# on the system and that the owner of the process is allowed to use this
# limit.
#
# Elasticsearch performs poorly when the system is swapping the memory.
#
# ---------------------------------- Network -----------------------------------
#
# Set the bind address to a specific IP (IPv4 or IPv6):
#
#绑定的ip地址,主要用于内部集群访问
network.host: 172.24.1.101
#
# Set a custom port for HTTP:
#
#设置对外服务的http端口,默认为9200
http.port: 9200
# 设置节点间交互的tcp端口,默认是9300
transport.tcp.port: 9300
#
# For more information, consult the network module documentation.
#
# --------------------------------- Discovery ----------------------------------
#
# Pass an initial list of hosts to perform discovery when new node is started:
# The default list of hosts is ["127.0.0.1", "[::1]"]
#
#需要发现新的节点配置Elasticsearch将绑定到可用的环回地址,并将扫描端口9300到9305以尝试连接到运行在同一台服务器上的其他节点。
#这提供了自动集群体验,而无需进行任何配置。数组设置或逗号分隔的设置。每个值的形式应该是host:port或host
#(如果没有设置,port默认设置会transport.profiles.default.port 回落到transport.tcp.port)。
#请注意,IPv6主机必须放在括号内。默认为127.0.0.1, [::1]
discovery.zen.ping.unicast.hosts: ["172.24.1.101:9300","172.24.1.108:9300", "172.24.1.55:9300"]
#
# Prevent the "split brain" by configuring the majority of nodes (total number of master-eligible nodes / 2 + 1):
#
#如果没有这种设置,遭受网络故障的集群就有可能将集群分成两个独立的集群 - 分裂的大脑 - 这将导致数据丢失,防止脑裂丢失数据,master节点候选者必须超过半数存活 (master_eligible_nodes / 2) + 1)
#discovery.zen.minimum_master_nodes:
# For more information, consult the zen discovery module documentation.
#
# ---------------------------------- Gateway -----------------------------------
#
# Block initial recovery after a full cluster restart until N nodes are started:
#设置集群中N个节点启动时进行数据恢复,默认为1
#gateway.recover_after_nodes: 3
#
# For more information, consult the gateway module documentation.
#
# ---------------------------------- Various -----------------------------------
#
# Require explicit names when deleting indices:
#
#action.destructive_requires_name: true
#是否支持跨域访问资源
http.cors.enabled: true
#允许访问资源的类型
http.cors.allow-origin: "*"
3.4配置完后启动
service elasticsearch restart

成功后用curl命令测试集群是否搭建成功,每个节点的配置node.master 属性设置为true时,先启动哪一台机器都可以,但是先启动的机器会被选为master
curl http://172.24.1.55:9200/_cat/health?v

curl http://172.24.1.108:9200/_cat/nodes?v

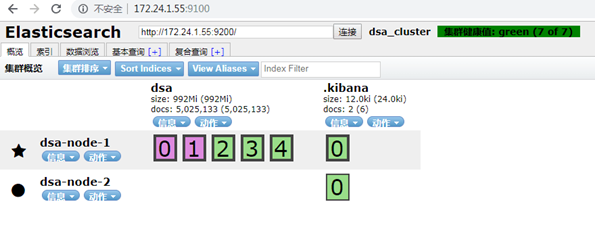
head插件访问效果