自用单机测试 Kafka---ZK---ES----安装及配置说明
一、系统基础环境
Centos7.4 64位系统
jdk1.8
mysql5.7.24
二、需安装的软件包
kafka_2.12-2.2.0
zookeeper-3.4.9
Python-3.6.0 (暂时不用)
elasticsearch-6.2.2
scala-2.11.7 (暂时不用)
spark-2.3.1-bin-hadoop2.7 (暂时不用)
nmap-7.70-1.x86_64 (暂时不用)
snmp-yum命令安装 (暂时不用)
三、Zookeeper安装
1.将zookeeper安装包放到系统任意目录下然后解压,将解压后的文件夹mv到/opt目录(约定安装的软件统一放到该目录)下并重命名位zookeeper;
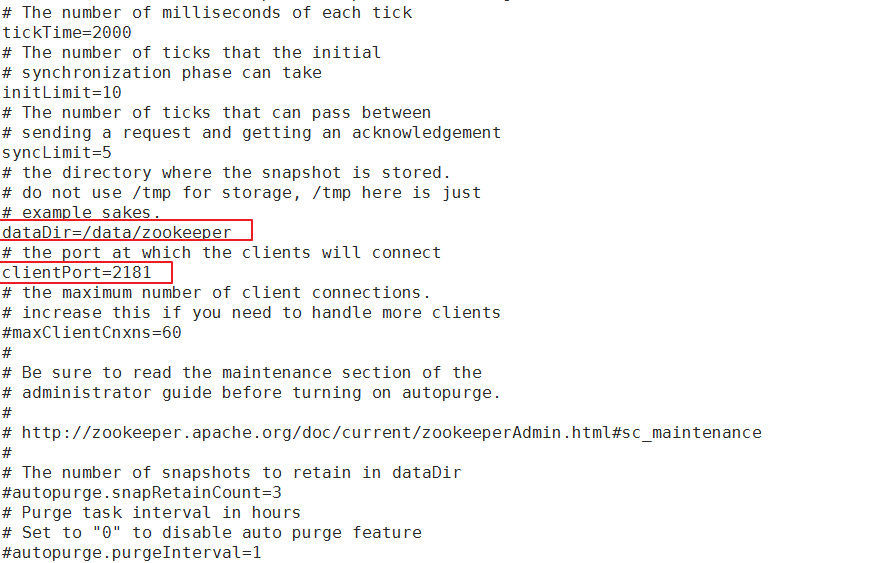
2.进入到zookeeper的conf目录,对zoo_sample.cfg进行复制一份,并命名为zoo.cfg,然后对zoo.cfg进行编辑,修改dataDir为/data/zookeeper用于存储zk节点信息,
在最后为zookeeper添加SASL支持,添加如下内容(SASL是kafka的一种认证方式 即给kafka加上账号密码验证)
authProvider.1=org.apache.zookeeper.server.auth.SASLAuthenticationProvider
requireClientAuthScheme=sasl
jaasLoginRenew=3600000
此处标记部分常用修改
带认证的配置

3.在conf目录新建zk_server_jaas.conf文件,为Zookeeper添加认证信息如下
Server {

    org.apache.kafka.common.security.plain.PlainLoginModule required

    username="admin"

    password="admin"

    user_alice="alice"

    user_admin="admin";

};
username和paasword是zk集群之间的认证密码。
user_kafka="kafkapwd"定义了一个用户"kafka",密码是"kafkapwd",可定义多个用户,最后一个要用分号“;”结尾。
4.将Kafka相关jar包导入到Zookeeper(到这里你需要事先把kafka的安装包先解压才行)
Zookeeper的认证机制是使用插件,“org.apache.kafka.common.security.plain.PlainLoginModule”,所以需要导入Kafka相关jar包,kafka-clients相关jar包,在kafka服务下的lib目录中可以找到,根据kafka不同版本,相关jar包版本会有所变化。所需要jar包如下,在zookeeper下创建目录zk_sasl_lib并将以下的jar包放入该目录:
kafka-clients-2.1.0.jar
lz4-java-1.5.0.jar
slf4j-api-1.7.25.jar
slf4j-log4j12-1.7.25.jar
snappy-java-1.1.7.2.jar
5.修改zkEnv.sh,主要目的就是将这几个jar包使zookeeper能够读取到,在zookeeper的/bin目录下找到zkEnv.sh文件,在文件最后添加如下代码
for i in /home/zookeeper/zk_sasl_lib/*.jar;

do

    CLASSPATH="$i:$CLASSPATH"

done

SERVER_JVMFLAGS="-Djava.security.auth.login.config=/opt/zookeeper/conf/zk_server_jaas.conf"
6.重启Zookeeper服务
zkServer.sh restart
service zookeeper restart
7.查看状态
zkServer.sh status
service zookeeper status
四、Kafka安装
1解压安装包
将kafka_2.12-2.2.0.tgz安装包放到系统任意目录下然后解压,将解压后的文件夹mv到/opt目录(约定安装的软件统一放到该目录)下并重命名位kafka
2修改kafka/ config/目录下的配置文件server.properties
此处标记一下常用改的地方
配置内容主要修改标红的
# Licensed to the Apache Software Foundation (ASF) under one or more
# contributor license agreements.  See the NOTICE file distributed with
# this work for additional information regarding copyright ownership.
# The ASF licenses this file to You under the Apache License, Version 2.0
# (the "License"); you may not use this file except in compliance with
# the License.  You may obtain a copy of the License at
#
#    http://www.apache.org/licenses/LICENSE-2.0
#
# Unless required by applicable law or agreed to in writing, software
# distributed under the License is distributed on an "AS IS" BASIS,
# WITHOUT WARRANTIES OR CONDITIONS OF ANY KIND, either express or implied.
# See the License for the specific language governing permissions and
# limitations under the License.

# see kafka.server.KafkaConfig for additional details and defaults

############################# Server Basics #############################

# The id of the broker. This must be set to a unique integer for each broker.
broker.id=0
port=9092
host.name=172.19.1.58
#delete.topic.enable=true 删除主题时打开
############################# Socket Server Settings #############################

# The address the socket server listens on. It will get the value returned from
# java.net.InetAddress.getCanonicalHostName() if not configured.
#   FORMAT:
#     listeners = listener_name://host_name:port
#   EXAMPLE:
#     listeners = PLAINTEXT://your.host.name:9092
listeners=PLAINTEXT://172.19.1.58:9092

############################# Sasl Settings #############################
#listeners=SASL_PLAINTEXT://172.19.1.58:9092
#security.inter.broker.protocol=SASL_PLAINTEXT
#sasl.mechanism.inter.broker.protocol=PLAIN
#sasl.enabled.mechanisms=PLAIN
#allow.everyone.if.no.acl.found=true
#authorizer.class.name=kafka.security.auth.SimpleAclAuthorizer
#super.users=User:admin;User:alice
#advertised.listeners=SASL_PLAINTEXT://172.19.1.58:9092

# Hostname and port the broker will advertise to producers and consumers. If not set,
# it uses the value for "listeners" if configured.  Otherwise, it will use the value
# returned from java.net.InetAddress.getCanonicalHostName().
advertised.listeners=PLAINTEXT://172.19.1.58:9092

# Maps listener names to security protocols, the default is for them to be the same. See the config documentation for more details
#listener.security.protocol.map=PLAINTEXT:PLAINTEXT,SSL:SSL,SASL_PLAINTEXT:SASL_PLAINTEXT,SASL_SSL:SASL_SSL

# The number of threads that the server uses for receiving requests from the network and sending responses to the network
num.network.threads=3

# The number of threads that the server uses for processing requests, which may include disk I/O
num.io.threads=8

# The send buffer (SO_SNDBUF) used by the socket server
socket.send.buffer.bytes=102400

# The receive buffer (SO_RCVBUF) used by the socket server
socket.receive.buffer.bytes=102400

# The maximum size of a request that the socket server will accept (protection against OOM)
socket.request.max.bytes=104857600


############################# Log Basics #############################

# A comma separated list of directories under which to store log files
# 数据存储路径
log.dirs=/data/logs/kafka

# The default number of log partitions per topic. More partitions allow greater
# parallelism for consumption, but this will also result in more files across
# the brokers.
num.partitions=1

# The number of threads per data directory to be used for log recovery at startup and flushing at shutdown.
# This value is recommended to be increased for installations with data dirs located in RAID array.
num.recovery.threads.per.data.dir=1

############################# Internal Topic Settings  #############################
# The replication factor for the group metadata internal topics "__consumer_offsets" and "__transaction_state"
# For anything other than development testing, a value greater than 1 is recommended for to ensure availability such as 3.
offsets.topic.replication.factor=1
transaction.state.log.replication.factor=1
transaction.state.log.min.isr=1

############################# Log Flush Policy #############################

# Messages are immediately written to the filesystem but by default we only fsync() to sync
# the OS cache lazily. The following configurations control the flush of data to disk.
# There are a few important trade-offs here:
#    1. Durability: Unflushed data may be lost if you are not using replication.
#    2. Latency: Very large flush intervals may lead to latency spikes when the flush does occur as there will be a lot of data to flush.
#    3. Throughput: The flush is generally the most expensive operation, and a small flush interval may lead to excessive seeks.
# The settings below allow one to configure the flush policy to flush data after a period of time or
# every N messages (or both). This can be done globally and overridden on a per-topic basis.

# The number of messages to accept before forcing a flush of data to disk
#log.flush.interval.messages=10000

# The maximum amount of time a message can sit in a log before we force a flush
#log.flush.interval.ms=1000

# 消息最大字节(5M)
message.max.bytes=5242880
# 每个分区试图获取的消息字节数(6M)要大于等于message.max.bytes
replica.fetch.max.bytes=6291456

############################# Log Retention Policy #############################

# The following configurations control the disposal of log segments. The policy can
# be set to delete segments after a period of time, or after a given size has accumulated.
# A segment will be deleted whenever *either* of these criteria are met. Deletion always happens
# from the end of the log.

# The minimum age of a log file to be eligible for deletion due to age
log.retention.hours=168

# A size-based retention policy for logs. Segments are pruned from the log unless the remaining
# segments drop below log.retention.bytes. Functions independently of log.retention.hours.
#log.retention.bytes=1073741824

# The maximum size of a log segment file. When this size is reached a new log segment will be created.
log.segment.bytes=1073741824

# The interval at which log segments are checked to see if they can be deleted according
# to the retention policies
log.retention.check.interval.ms=300000

############################# Zookeeper #############################

# Zookeeper connection string (see zookeeper docs for details).
# This is a comma separated host:port pairs, each corresponding to a zk
# server. e.g. "127.0.0.1:3000,127.0.0.1:3001,127.0.0.1:3002".
# You can also append an optional chroot string to the urls to specify the
# root directory for all kafka znodes.
zookeeper.connect=localhost:2181

# Timeout in ms for connecting to zookeeper
zookeeper.connection.timeout.ms=60000


############################# Group Coordinator Settings #############################

# The following configuration specifies the time, in milliseconds, that the GroupCoordinator will delay the initial consumer rebalance.
# The rebalance will be further delayed by the value of group.initial.rebalance.delay.ms as new members join the group, up to a maximum of max.poll.interval.ms.
# The default value for this is 3 seconds.
# We override this to 0 here as it makes for a better out-of-the-box experience for development and testing.
# However, in production environments the default value of 3 seconds is more suitable as this will help to avoid unnecessary, and potentially expensive, rebalances during application startup.
group.initial.rebalance.delay.ms=0
3配置kafka SASL/PLAIN 安全认证
1.创建kafka_server_jaas.conf文件,该文件名可以自己修改,为kafka添加认证信息
内容如下:
KafkaServer {

    org.apache.kafka.common.security.plain.PlainLoginModule required

    username="admin"

    password="admin"

    user_admin="admin"

    user_alice="alice";

};

Client{

 org.apache.kafka.common.security.plain.PlainLoginModule required

 username="admin"

 password="admin";

};
KafkaServer中的username和paasword是kafka集群之间的认证密码。
Client的username和paasword与Zookeeper配置的kafka用户相对应。
KafkaServer与后期调用时读取的KafkaClient相对应,是消费生产的账号密码,不要弄混了。
2.在Kafka配置文件 server.properties添加、修改如下信息
listeners=SASL_PLAINTEXT://172.19.1.58:9092

security.inter.broker.protocol=SASL_PLAINTEXT

sasl.mechanism.inter.broker.protocol=PLAIN

sasl.enabled.mechanisms=PLAIN

allow.everyone.if.no.acl.found=true

authorizer.class.name=kafka.security.auth.SimpleAclAuthorizer

super.users=User:admin;User:alice

advertised.listeners=SASL_PLAINTEXT://172.19.1.58:9092
3.Kafka启动脚本中加入配置,读取第一步创建的文件,kafka_server_jaas.conf
修改kafka的kafka-server-start.sh文件中export KAFKA_HEAP_OPTS的值
# 修改前

if [ "x$KAFKA_HEAP_OPTS" = "x" ]; then

    export KAFKA_HEAP_OPTS="-Xmx1G -Xms1G"

fi

# 修改后

if [ "x$KAFKA_HEAP_OPTS" = "x" ]; then

    export      KAFKA_HEAP_OPTS="-Xmx1G-Xms1G-Djava.security.auth.login.config=/opt /kafka/config/kafka_server_jaas.conf"

fi
4启动Kafka服务,查看日志是否正常
在kafka的bin目录下,执行以下命令启动kafka
./kafka-server-start.sh -daemon ../config/server.properties
在kafka的logs目录下,通过tail -f server.log查看 kafka服务日志
启动成功后,在任意地方执行jps指令,可以看到kafka进程如下,可以通过此命令判断kafka是否启动成功,如果启动失败,jps将看不到kafka进程

关闭kafka服务命令
./kafka-server-stop.sh -daemon ../config/server.properties
*为了以后方便启动,把kafka加service启动
kafka.service:
[Unit]
Description=kafka server
After=network.target remote-fs.target nss-lookup.target

[Service]
Type=forking
WorkingDirectory=/opt/kafka/bin
ExecStart=/opt/kafka/bin/kafka-server-start.sh -daemon /opt/kafka/config/server.properties
ExecStop=/opt/kafka/bin/kafka-server-stop.sh -daemon /opt/kafka/config/server.properties
PrivateTmp=true
RestartSec=10
Restart=always

[Install]
WantedBy=multi-user.target
1.把提供的kafka.service脚本放入/usr/lib/systemd/system/目录下
2.执行以下命令systemctl daemon-reload 重新加载单元
3.就可以使用以下命令操作kafka了
service kafka start|stop|restart|status
5创建topic和分区(注:这步很重要,目前的配置主题需要2个分区)
2.5.1创建记录主题、分区
/opt/kafka/bin/kafka-topics.sh --create --zookeeper 127.0.0.1:2181 --replication-factor 1 --partitions 2 --topic aas-audit-log
2.5.2创建资产主题、分区
/opt/kafka/bin/kafka-topics.sh --create --zookeeper 127.0.0.1:2181 --replication-factor 1 --partitions 2 --topic aas-db-info
2.5.3创建资产流量会话主题、分区
/opt/kafka/bin/kafka-topics.sh –create --zookeeper 127.0.0.1:2181 --replication-factor 1 --partitions 2 –topic aas-flow-info
2.5.4查看主题信息
/opt/kafka/bin/kafka-topics.sh --list --zookeeper 127.0.0.1:2181

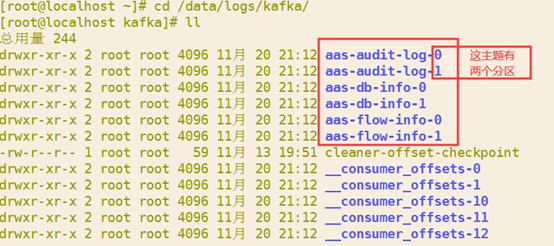
或者进入kafka存储目录
cd /data/logs/kafka
2.5.5修改主题分区数
如果主题已经创建,分区数只有一个时,执行如下命令可修改分区数
/opt/kafka/bin/kafka-topics.sh --alter --zookeeper 127.0.0.1:2181 --topic aas-audit-log --partitions 2
五、Elasticsearch安装
安装包:
es版本6.2.2 :elasticsearch-6.2.2.rpm
kibana版本6.2.2:kibana-6.2.2-x86_64.rpm
1.安装ES
如果已经安装了其它版本的ES,先卸载,没有就直接执行安装
查看当前系统中安装的所有的软件包
rpm –qa
2.找到确定了要卸载的软件的名称,就可以开始实际卸载该软件了,键入命令:
rpm -e [package name]
示例:
rpm -e elasticsearch-6.1.1-1.noarch
3.执行安装
rpm -ivh elasticsearch-6.2.2.rpm
4.安装后默认在etc目录中,这里指定安装到opt,把elasticsearch剪切到opt目录下
mv /etc/elasticsearch /opt/
这个安装包安装后,已经把es加入了service服务中了,需要改如下文件
5 vim /etc/rc.d/init.d/elasticsearch
# 把默认路径改成你指的安装目录
ES_PATH_CONF="/opt/elasticsearch"
6.vim /etc/sysconfig/elasticsearch
# 把默认路径改成你指的安装目录
ES_PATH_CONF=/opt/elasticsearch
7.vim /usr/lib/systemd/system/elasticsearch.service
# 把默认路径改成你指的安装目录
Environment=ES_PATH_CONF=/opt/elasticsearch
9.ES配置
elasticsearch.yml,ES的配置文件;
jvm.options,ES的JVM配置文件;
log4j2.properties,ES的日志配置文件;
1.修改ES的配置文件
vim /opt/elasticsearch/elasticsearch.yml
# ======================== Elasticsearch Configuration =========================
#
# NOTE: Elasticsearch comes with reasonable defaults for most settings.
#       Before you set out to tweak and tune the configuration, make sure you
#       understand what are you trying to accomplish and the consequences.
#
# The primary way of configuring a node is via this file. This template lists
# the most important settings you may want to configure for a production cluster.
#
# Please consult the documentation for further information on configuration options:
# https://www.elastic.co/guide/en/elasticsearch/reference/index.html
#
# ---------------------------------- Cluster -----------------------------------
#
# Use a descriptive name for your cluster:
#
cluster.name: simp_cluster
#
# ------------------------------------ Node ------------------------------------
#
# Use a descriptive name for the node:
#
node.name: simp-node-1
#
# Add custom attributes to the node:
#
#node.attr.rack: r1
#
node.master: true
node.data: true
# ----------------------------------- Paths ------------------------------------
#
# Path to directory where to store the data (separate multiple locations by comma):
#
path.data: /data/elasticsearch
#
# Path to log files:
#
path.logs: /data/logs/elasticsearch
#
# ----------------------------------- Memory -----------------------------------
#
# Lock the memory on startup:
#
#bootstrap.memory_lock: true
#
# Make sure that the heap size is set to about half the memory available
# on the system and that the owner of the process is allowed to use this
# limit.
#
# Elasticsearch performs poorly when the system is swapping the memory.
#
# ---------------------------------- Network -----------------------------------
#
# Set the bind address to a specific IP (IPv4 or IPv6):
#
network.host: 172.21.1.254
#
# Set a custom port for HTTP:
#
http.port: 9200
transport.tcp.port: 9300
#
# For more information, consult the network module documentation.
#
# --------------------------------- Discovery ----------------------------------
#
# Pass an initial list of hosts to perform discovery when new node is started:
# The default list of hosts is ["127.0.0.1", "[::1]"]
#
discovery.zen.ping.unicast.hosts: ["172.21.1.254"]
#
# Prevent the "split brain" by configuring the majority of nodes (total number of master-eligible nodes / 2 + 1):
#
discovery.zen.minimum_master_nodes: 1
#
# For more information, consult the zen discovery module documentation.
#
# ---------------------------------- Gateway -----------------------------------
#
# Block initial recovery after a full cluster restart until N nodes are started:
#
#gateway.recover_after_nodes: 3
#
# For more information, consult the gateway module documentation.
#
# ---------------------------------- Various -----------------------------------
#
# Require explicit names when deleting indices:
#
#action.destructive_requires_name: true
http.cors.enabled: true
http.cors.allow-origin: "*"
2.Jvm配置
vim /opt/elasticsearch/jvm.options
## JVM configuration
################################################################
## IMPORTANT: JVM heap size
################################################################
##
## You should always set the min and max JVM heap
## size to the same value. For example, to set
## the heap to 4 GB, set:
##
## -Xms4g
## -Xmx4g
##
## See https://www.elastic.co/guide/en/elasticsearch/reference/current/heap-size.html
## for more information
##
################################################################
# Xms represents the initial size of total heap space
# Xmx represents the maximum size of total heap space
-Xms4g
-Xmx4g
3.最后创建关键目录并赋予角色权限
这是你在elasticsearch.yml配置文件中填写的两个关键路径,不能用root访问,不然启动ES会找不到目录报错
es数据存放目录
path.data: /data/elasticsearch
创建目录并赋予拥有者elasticsearch
mkdir -p /data/elasticsearch
chown -R elasticsearch:elasticsearch /data/elasticsearch
es日志存放目录
path.logs: /data/logs/elasticsearch
创建目录并赋予拥有者elasticsearch
mkdir -p /data/logs/elasticsearch
chown -R elasticsearch:elasticsearch /data/logs/elasticsearch
ES启动
service elasticsearch start|stop|restart|status
初始化ES
进入/opt/es_initial/目录下执行初始化脚本sh initES.sh 172.21.1.254:9200/aassimp 返回结果如下说明初始化成功,通过Elasticsearch Head可视化工具可查看{"acknowledged":true}{ "acknowledged" : true, "shards_acknowledged" : true, "index" : "aassimp"}
脚本内容(博主Shell有点垃圾 0.0):
#!/bin/bash
echo "开始执行Es初始化脚本"
esAddressIndex=$1
auditIndexName=$esAddressIndex"/aassimp-auditlog"
dbstatusIndexName=$esAddressIndex"/aassimp-dbstatus"
sleep 5
curl -XPUT $auditIndexName?pretty -H 'Content-Type: application/json' --data-binary @./auditRecord.json
sleep 5
curl -XPUT $dbstatusIndexName?pretty -H 'Content-Type: application/json' --data-binary @./dbstatusReord.json
对应的索引文件内容(自己JSON格式化一下 修改自己需要的索引 已标红):
{
"settings": {
"index": {
"number_of_shards": 5,
"number_of_replicas": 0,
"warmer.enabled": "false",
"refresh_interval": "60s",
"store.type": "niofs",
"translog.durability": "async",
"translog.sync_interval": "5s",
"max_result_window": 10000000
}
},
"mappings": {
"aasauditlog": {
"properties": {
"destIp": {
"type": "keyword"
},
"fieldName": {
"type": "keyword"
},
"dbName": {
"type": "keyword"
},
"systemUser": {
"type": "keyword"
},
"visitTool": {
"type": "keyword"
},
"protectObjectName": {
"type": "keyword"
},
"srcPort": {
"type": "integer"
},
"operType": {
"type": "keyword"
},
"tableName": {
"type": "keyword"
},
"destPort": {
"type": "integer"
},
"rowNum": {
"type": "integer"
},
"ruleType": {
"type": "integer"
},
"appAccount": {
"type": "keyword"
},
"dbUser": {
"type": "keyword"
},
"ruleName": {
"type": "keyword"
},
"id": {
"type": "keyword"
},
"destMac": {
"type": "keyword"
},
"devUuid": {
"type": "keyword"
},
"happenTime": {
"type": "long"
},
"indexTime": {
"type": "long"
},
"returnContent": {
"analyzer": "standard",
"type": "text"
},
"srcIp": {
"type": "keyword"
},
"dealState": {
"type": "integer"
},
"dbType": {
"type": "integer"
},
"sessionId": {
"type": "keyword"
},
"operSentenceLen": {
"type": "integer"
},
"returnContentLen": {
"type": "integer"
},
"sqlBindValue": {
"type": "keyword"
},
"operSentence": {
"type": "text"
},
"riskLev": {
"type": "integer"
},
"sqlResponse": {
"type": "integer"
},
"srcMac": {
"type": "keyword"
},
"sqlExecTime": {
"type": "double"
},
"systemHost": {
"type": "keyword"
}
}
}
}
}
3.安装Kibana可视化工具
必须要和ES版本一致
rpm -ivh kibana-6.2.2-x86_64.rpm
1.默认安装在etc目录,剪切到指定目录
mv /etc/kibana /opt/
2.设置kibana.yml配置文件
vim /opt/kibana/kibana.yml
# Kibana is served by a back end server. This setting specifies the port to use.
server.port: 5601
# Specifies the address to which the Kibana server will bind. IP addresses and host names are both valid values.
# The default is 'localhost', which usually means remote machines will not be able to connect.
# To allow connections from remote users, set this parameter to a non-loopback address.
server.host: "172.21.1.254"
# Enables you to specify a path to mount Kibana at if you are running behind a proxy.
# Use the `server.rewriteBasePath` setting to tell Kibana if it should remove the basePath
# from requests it receives, and to prevent a deprecation warning at startup.
# This setting cannot end in a slash.
#server.basePath: ""
# Specifies whether Kibana should rewrite requests that are prefixed with
# `server.basePath` or require that they are rewritten by your reverse proxy.
# This setting was effectively always `false` before Kibana 6.3 and will
# default to `true` starting in Kibana 7.0.
#server.rewriteBasePath: false
# The maximum payload size in bytes for incoming server requests.
#server.maxPayloadBytes: 1048576
# The Kibana server's name.  This is used for display purposes.
#server.name: "your-hostname"
# The URLs of the Elasticsearch instances to use for all your queries.
elasticsearch.url: "http://172.21.1.254:9200"
修改service服务启动文件
vim /etc/rc.d/init.d/kibana
# 把默认路径改为自己的安装路径
args=-c\\\ /opt/kibana/kibana.yml
启动kibana
# 前提是先要启动es
service kibana start|stop|restart|status
浏览器访问

本篇内有很多自用的业务字段 大家可忽略改成自己的即可
或者进入kafka存储目录
cd /data/logs/kafka
