APP学习9(跳转,数据传递与回传,任务栈以及初步的fragment学习)
1. 数据传递
方式1:
MainActivity.java
public void myClick1(View view){
        //1.显示意图的使用方法实现页面跳转
        //第一个参数:当前页面;第二个参数:要跳转的页面
        Intent intent = new Intent(MainActivity.this,SecondActivity.class);
        //intent传递数据方式1:putExtra(数据名称,数据内容)
         intent.putExtra("username","xiaohua");
         intent.putExtra("age",23);
         intent.putExtra("hobby",new String[]{"游泳","唱歌","打游戏"});
        //执行意图
        this.startActivity(intent);
    }
SecondActivity.java
package com.example.myapp;

import androidx.appcompat.app.AppCompatActivity;

import android.content.Intent;
import android.os.Bundle;
import android.widget.Toast;

public class SecondActivity extends AppCompatActivity {

    @Override
    protected void onCreate(Bundle savedInstanceState) {
        super.onCreate(savedInstanceState);
        setContentView(R.layout.activity_second);
        //接收intent意图
        Intent intent = this.getIntent();
        //从intent中取值
        String name = intent.getStringExtra("username");
        int age = intent.getIntExtra("age",-1);//指有可能取不到值,则返回-1;
        String[] hobby = intent.getStringArrayExtra("hobby");
        Toast.makeText(SecondActivity.this,name+" "+age+" "+hobby[1],Toast.LENGTH_SHORT).show();
    }
}
方式2:
MainActivity.java
public void myClick1(View view){
        //1.显示意图的使用方法实现页面跳转
        //第一个参数:当前页面;第二个参数:要跳转的页面
        Intent intent = new Intent(MainActivity.this,SecondActivity.class);
        //intent传递数据方式1:putExtra(数据名称,数据内容)
//         intent.putExtra("username","xiaohua");
//         intent.putExtra("age",23);
//         intent.putExtra("hobby",new String[]{"游泳","唱歌","打游戏"});
        //intent传递方式2:Bundle
         Bundle bundle=new Bundle();
         bundle.putString("uname","xiaoming");
         bundle.putInt("age",23);
         bundle.putStringArray("hobby",new String[]{"音乐","游泳","读书"});
         intent.putExtras(bundle);
         //执行意图
        this.startActivity(intent);
    }
SecondActivity.java
package com.example.myapp;

import androidx.appcompat.app.AppCompatActivity;

import android.content.Intent;
import android.os.Bundle;
import android.widget.Toast;

public class SecondActivity extends AppCompatActivity {

    @Override
    protected void onCreate(Bundle savedInstanceState) {
        super.onCreate(savedInstanceState);
        setContentView(R.layout.activity_second);
        //接收intent意图
        Intent intent = this.getIntent();
        //从intent中取值
//        String name = intent.getStringExtra("username");
//        int age = intent.getIntExtra("age",-1);//指有可能取不到值,则返回-1;
//        String[] hobby = intent.getStringArrayExtra("hobby");
        Bundle bundle=intent.getExtras();
        String name=bundle.getString("uname");
        int age = bundle.getInt("age");
        String[] hobby=bundle.getStringArray("hobby");

        Toast.makeText(SecondActivity.this,name+" "+age+" "+hobby[1],Toast.LENGTH_SHORT).show();
    }
}
2. 数据回传
activity_main.xml
<?xml version="1.0" encoding="utf-8"?>
<LinearLayout xmlns:android="http://schemas.android.com/apk/res/android"
    android:layout_width="match_parent"
    android:layout_height="match_parent"
    android:orientation="vertical"
    >

   <Button
       android:layout_width="match_parent"
       android:layout_height="wrap_content"
      android:text="跳转到第二个页面"
      android:id="@+id/btn1"
       android:onClick="myClick1"
      ></Button>
</LinearLayout>
activity_second.xml
<?xml version="1.0" encoding="utf-8"?>
<androidx.constraintlayout.widget.ConstraintLayout xmlns:android="http://schemas.android.com/apk/res/android"
    xmlns:app="http://schemas.android.com/apk/res-auto"
    xmlns:tools="http://schemas.android.com/tools"
    android:layout_width="match_parent"
    android:layout_height="match_parent"
    tools:context=".SecondActivity">

    <Button
        android:id="@+id/button"
        android:layout_width="209dp"
        android:layout_height="176dp"
        android:text="第二个页面"
        android:onClick="myClick2"
        tools:layout_editor_absoluteX="101dp"
        tools:layout_editor_absoluteY="292dp"
        tools:ignore="MissingConstraints" />
</androidx.constraintlayout.widget.ConstraintLayout>
MainActivity.java
package com.example.myapp;


import androidx.annotation.Nullable;
import androidx.appcompat.app.AppCompatActivity;


import android.content.Intent;
import android.os.Bundle;
import android.view.View;
import android.widget.Toast;


public class MainActivity extends AppCompatActivity {
    @Override
    protected void onCreate(Bundle savedInstanceState) {
        super.onCreate(savedInstanceState);
        setContentView(R.layout.activity_main);

    }
    public void myClick1(View view){
        Intent intent = new Intent(MainActivity.this,SecondActivity.class);
        //数据的获取
        startActivityForResult(intent,1);//第二个参数是请求码

    }

    @Override
    protected void onActivityResult(int requestCode, int resultCode, @Nullable Intent data) {
        super.onActivityResult(requestCode, resultCode, data);
        if(requestCode==1&&resultCode==22){
            String msg=data.getStringExtra("uname");
            Toast.makeText(MainActivity.this,msg,Toast.LENGTH_SHORT).show();
        }
    }
}
SecondActivity.java
package com.example.myapp;

import androidx.appcompat.app.AppCompatActivity;


import android.content.Intent;
import android.os.Bundle;
import android.view.View;


public class SecondActivity extends AppCompatActivity {

    @Override
    protected void onCreate(Bundle savedInstanceState) {
        super.onCreate(savedInstanceState);
        setContentView(R.layout.activity_second);

    }

    public  void  myChick2(View view){
        //数据回传
        //创建回传用的意图
        Intent intent2=new Intent();
        intent2.putExtra("uname","xiaohua");
        //将intent2这个意图作为回传的载体,将他设置为result,结果编码是22
        setResult(22,intent2);
        //关闭当前activity
        finish();
    }
}
3.任务栈
一种用来存放Activity实例的容器。
特点:先进后出。操作:压栈和出栈。
singleTop模式会判断要启动的Activity实例是否位于栈顶,如果位于栈顶则直接复用,否则创建新的实例。
singleInstance模式会启动一个新的任务栈来管理Activity实例
在清单文件中找到对应的添加launchMode。
4.Fragment(碎片)
Fragment是一种可以嵌入在Activity的UI片段,他可以用来描述Activity中的一部分布局。
两种实现方式:
4.1
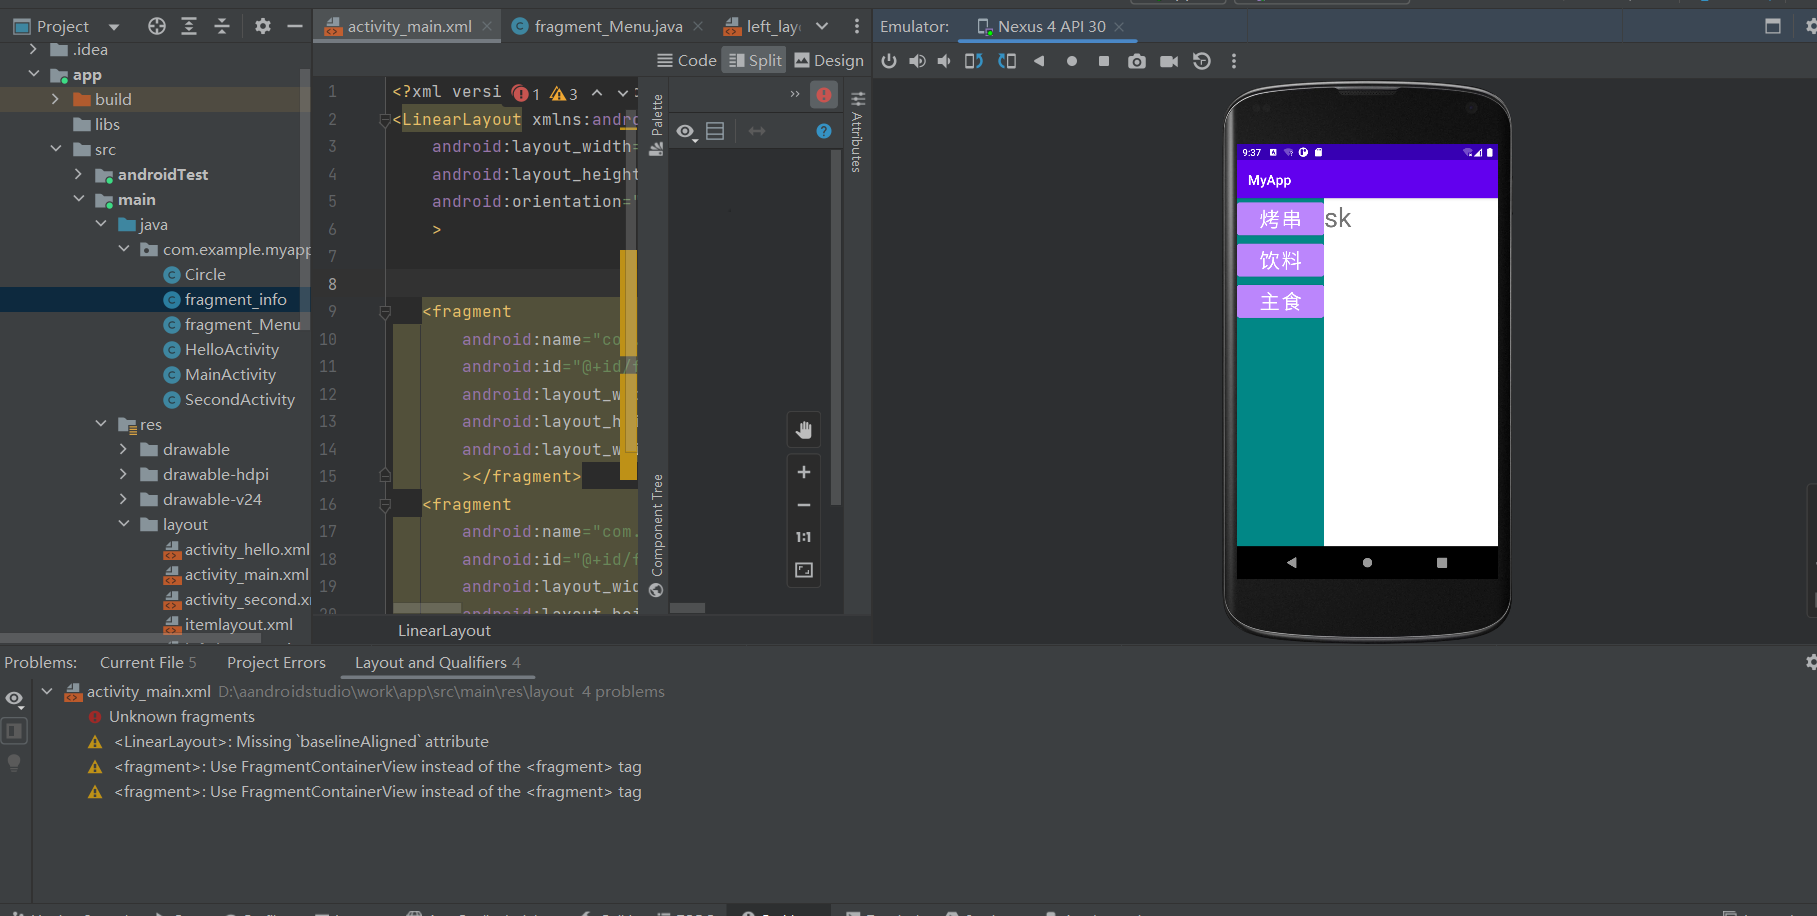
这里不知道为什么会显示unknown fragment,但是运行还是会有界面的。


代码:初步,还没有实现如点击饮料然后进行切换。
过程,线建立一个大的layout,然后建立左layout和右layout,leftlayout和rightlayout要建立java文件,并且将在da的layout文件的fragment中添加name属性。
MainActivity.xml
<?xml version="1.0" encoding="utf-8"?>
<LinearLayout xmlns:android="http://schemas.android.com/apk/res/android"
    android:layout_width="match_parent"
    android:layout_height="match_parent"
    android:orientation="horizontal"
    >


   <fragment
       android:name="com.example.myapp.fragment_Menu"
       android:id="@+id/fragment1"
       android:layout_width="0dp"
       android:layout_height="match_parent"
       android:layout_weight="1"
       ></fragment>
   <fragment
       android:name="com.example.myapp.fragment_info"
       android:id="@+id/fragment2"
       android:layout_width="0dp"
       android:layout_height="match_parent"
       android:layout_weight="2"
       ></fragment>
</LinearLayout>
left_layout.xml
<?xml version="1.0" encoding="utf-8"?>
<LinearLayout xmlns:android="http://schemas.android.com/apk/res/android"
    android:layout_width="match_parent"
    android:layout_height="match_parent"
    android:orientation="vertical"
    android:background="@color/teal_700">

    <Button
        android:layout_width="match_parent"
        android:layout_height="wrap_content"
        android:id="@+id/btn1"
        android:backgroundTint="@color/purple_200"
        android:text="烤串"
        android:textSize="30sp"></Button>

    <Button
        android:layout_width="match_parent"
        android:layout_height="wrap_content"
        android:id="@+id/btn2"
        android:backgroundTint="@color/purple_200"
        android:text="饮料"
        android:textSize="30sp"></Button>

    <Button
        android:layout_width="match_parent"
        android:layout_height="wrap_content"
        android:id="@+id/btn3"
        android:backgroundTint="@color/purple_200"
        android:text="主食"
        android:textSize="30sp"></Button>

</LinearLayout>
right_layout.xml
<?xml version="1.0" encoding="utf-8"?>
<LinearLayout xmlns:android="http://schemas.android.com/apk/res/android"
    android:layout_width="match_parent"
    android:layout_height="match_parent"
    >
    <TextView
        android:layout_width="match_parent"
        android:layout_height="wrap_content"
        android:text="sk"
        android:textSize="40sp"
        ></TextView>

</LinearLayout>
fragment_Menu.java
package com.example.myapp;

import android.os.Bundle;
import android.view.LayoutInflater;
import android.view.View;
import android.view.ViewGroup;

import androidx.annotation.NonNull;
import androidx.annotation.Nullable;
import androidx.fragment.app.Fragment;

//Fragment_Menu类将碎片和对应的布局产生关联
public class fragment_Menu extends Fragment {
    @Nullable
    @Override
    //通过onCreateView用于构建某个碎片和布局的关联
    public View onCreateView(@NonNull LayoutInflater inflater, @Nullable ViewGroup container, @Nullable Bundle savedInstanceState) {
        View v = inflater.inflate(R.layout.left_layout,container,false);

        return v;
    }
}
fragment_info.java
package com.example.myapp;

import android.os.Bundle;
import android.view.LayoutInflater;
import android.view.View;
import android.view.ViewGroup;

import androidx.annotation.NonNull;
import androidx.annotation.Nullable;
import androidx.fragment.app.Fragment;

public class fragment_info extends Fragment {
    @Nullable
    @Override
    public View onCreateView(@NonNull LayoutInflater inflater, @Nullable ViewGroup container, @Nullable Bundle savedInstanceState) {
        View view=inflater.inflate(R.layout.right_layout,container,false);
        return view;
    }
}


【推荐】国内首个AI IDE,深度理解中文开发场景,立即下载体验Trae
【推荐】编程新体验,更懂你的AI,立即体验豆包MarsCode编程助手
【推荐】抖音旗下AI助手豆包,你的智能百科全书,全免费不限次数
【推荐】轻量又高性能的 SSH 工具 IShell:AI 加持,快人一步
· 10年+ .NET Coder 心语 ── 封装的思维:从隐藏、稳定开始理解其本质意义
· 提示词工程——AI应用必不可少的技术
· 地球OL攻略 —— 某应届生求职总结
· 字符编码:从基础到乱码解决
· SpringCloud带你走进微服务的世界