prometheus-学习笔记
一、简介
1.1、监控系统概述
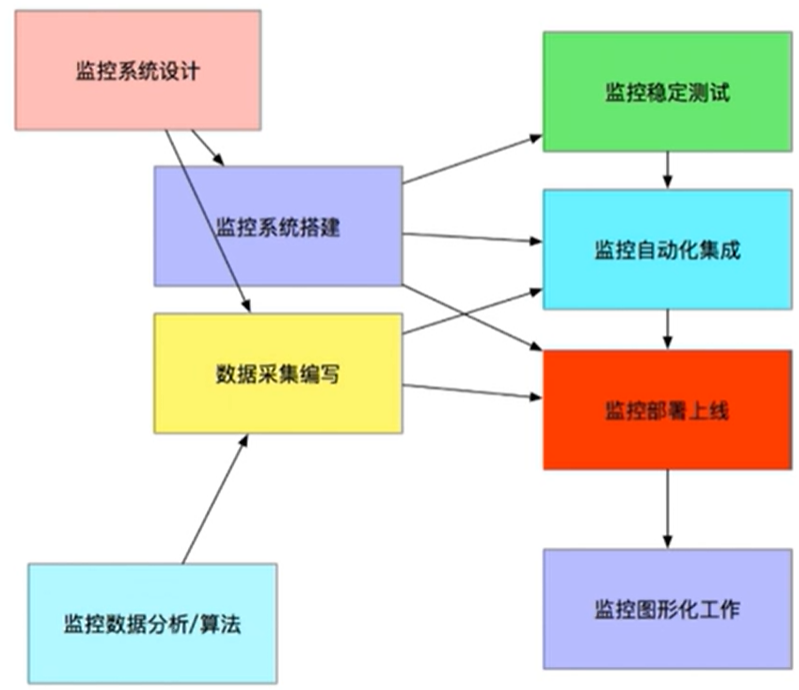
注意:监控和告警 是有区别的,注意区分
- 监控系统设计:
- 评估系统的业务流程 、业务种类、架构体系。对于各个地方的细节需要一定程度的认知
- 分类出所需的监控项种类:
- 业务监控:QPS,PV,UV,SUCC_RATE,投诉率 ...
- 系统监控:CPU,MEM,Load,IO,Traffic ...
- 网络监控:Tcp Retran,丢包,延迟 ...
- 日志监控:各种需要采集的日志,一般是单独设计和实现
- 程序监控:嵌入程序内部,直接获取流量或者开放特定的接口或者特殊的日志格式
- 监控技术方案/软件选取:结合内部架构特点,大小、种类人员多少等选取合适的方案
- 监控体系的人员安排:责任到人、分块进行。开发团队配合选取
- 监控系统搭建步骤:
- 单点服务端搭建
- 单点客户端部署
- 单点客户端测试
- 采集程序单点部署
- 采集程序批量部署
- 监控服务端HA
- 监控数据图形化搭建 (Grafana)
- 报警系统测试
- 报警规则测试
- 监控+报警联合测试
- 正式上线监控
- 数据采集:
- 可选用脚本作为数据采集途径:
- 例如: shell/python/awk/lua/perl/go 等
- 数据采集的形式分类:
- 周期性采集:例如conrtab 每隔一段时间采集一次
- 后台式采集:采集程序以守护进程方式运行在后台,持续不断的采集数据
- ...
- 可选用脚本作为数据采集途径:
- 监控数据分析/算法:
- 如何判断指标。比如cpu load大于10,持续多久才告警?
- qps的当前值和历史值(同时段)的值的差异是多少该告警?
- ...
- 监控稳定测试:
- 不管是一次性测试,还是后台采集。只要进行采集都会对系统有一定的影响
- 稳定性测试,就是通过一定时间的单点部署观察,来判断影响范围
- 监控自动化:
- 监控客户端的批量部署,服务端HA,监控项修改。。。都需要大量的人工参与
- 自动化工具推荐:puppet(配置文件部署),Jenkins(持续集成部署),CMDB(配置管理)
- 监控图形化:
- granfa ...
常见的监控工具:Nagios/Cacti/Zabbix/Ntop/Prometheus/...
常见的告警工具: PagerDuty/自建语音告警系统/自建短信通知/自建邮件系统/...
监控的方向:自愈式监控体系/全链路监控
1.2、Prometheus简介
- Prometheus到底是什么?
Prometheus is an open-source systems monitoring and alerting toolkit originally built at SoundCloud. Since its inception in 2012, many companies and organizations have adopted Prometheus, and the project has a very active developer and user community. It is now a standalone open source project and maintained independently of any company. To emphasize this, and to clarify the project's governance structure, Prometheus joined the Cloud Native Computing Foundation in 2016 as the second hosted project, after Kubernetes.
- Prometheus特性
基于时间序列的数据模型 //数据存储
基于K/V的数据模型 //数据存储
采集数据的查询 完全基于数学运算(函数) 而不是其他的表达式,并提供有专门的查询web //数据展示
采用HTTP pull/push两种对应的数据采集传输方式 //数据传输
开源,且大量的社区插件 //插件扩展
push的方法,非常的灵活,几乎支持任何形式的数据 //数据传输
本身自带图形调试(较为简单) //数据展示
精细的数据采样,理论上可以到秒级 //数据存储
不支持集群化 //新版本支持联邦
被监控集群规模较大的情况下,有性能瓶颈 //不足
偶尔发生数据丢失 //2.0之后已改进
中文支持不好,中文资料较少 //不足
1.3、Prometheus架构
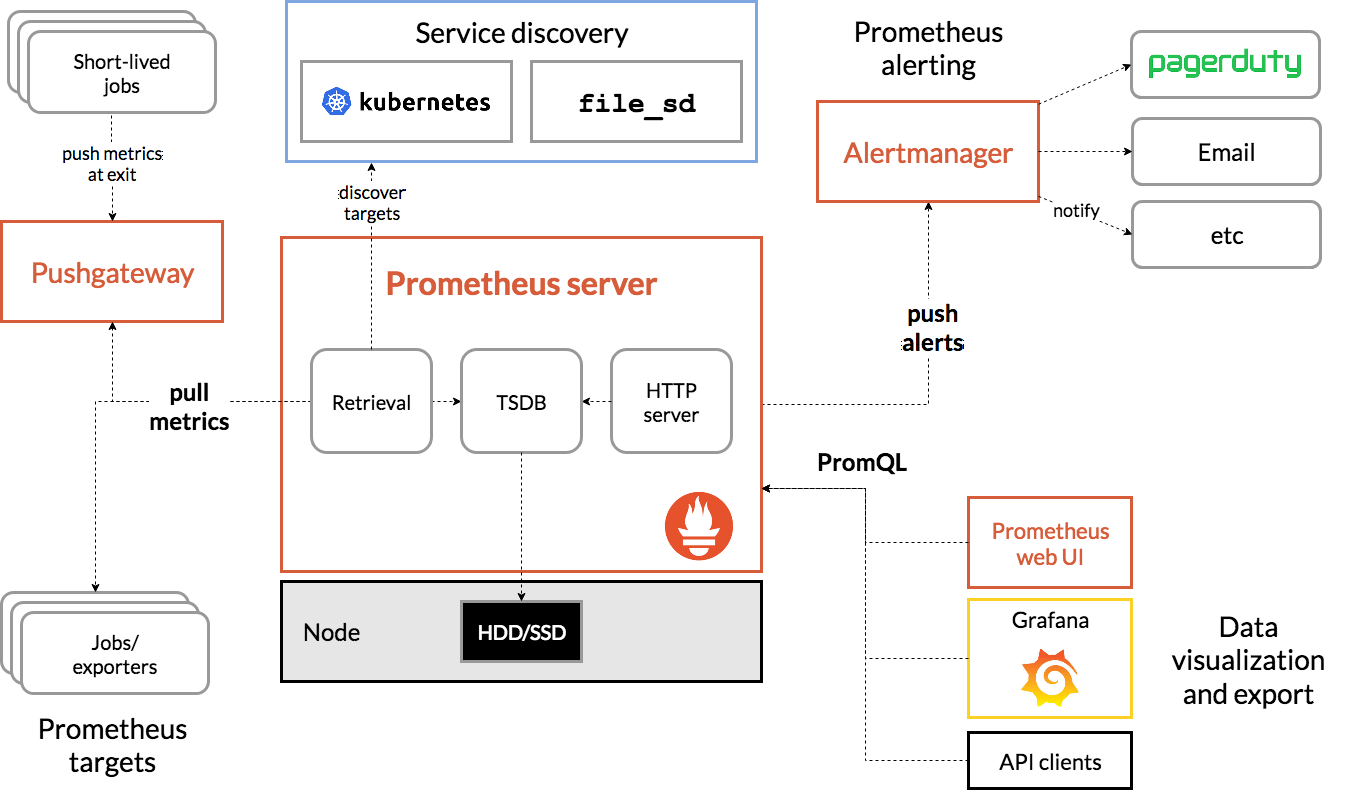
- Prometheus Server: 收集和存储、检索时间序列数据
- Pushgateway: 用于prometheus无法直接pull的监控部分支持
- service discovery: 服务发现
- Alertmanager: 处理告警
- PromQL: 用于查询和展示
1.4、storage
Promtheus支持本地存储时间序列数据,也支持远程存储
- Prometheus采用的是时间序列的方式以一种自定义的格式存储在本地硬盘上
- Prometheus的本地时间序列数据库以每2h为间隔来分block(块)存储,每一个块中又分为多个chunk文件,chunk文件是用来存放时间序列数据、metadata和索引index
- index文件是对metric(prometheus中一次K/V采集数据叫做一个metric)和label(标签)进行索引之后存储在chunk中 chunk是作为存储的基本单位,index and metadata作为子集
- prometheus平时是将采集的数据先存放在内存中(prometheus对内存的消耗,还是比较小的),以类似缓存的方式用于加速搜索和快速访问
- 当出现宕机时,prometheus有一种保护机制叫做WAL,可以将数据定期存入硬盘中chunk来表示。并在重新启动时用于恢复进入内存
1.4.1、Data model
prmetheus基本上将所有数据存储为时间序列time series 并且Every time series is uniquely identified by its *metric name* and optional key-value pairs called *labels*.
metric命名格式要求:[a-zA-Z_:][a-zA-Z0-9_:]* ,Label 格式要求 [a-zA-Z_][a-zA-Z0-9_]并以_开头的label是内部使用的。Label的value为空的Label被认为是和不存在该Label的
时间序列的表示格式:
<metric name>{<label name>=<label value>, ...} #metric_name对应多个label,不通label的结合对应不同的value
api_http_requests_total{method="POST", handler="/messages"} #举例
OpenTSDB的使用说明:http://opentsdb.net/docs/build/html/index.html
[root@master1 pushgateway-1.4.1.linux-amd64]# curl -s  http://127.0.0.1:9100/metrics  |grep -v "#"
...
node_cpu_guest_seconds_total{cpu="0",mode="nice"} 0
node_cpu_guest_seconds_total{cpu="0",mode="user"} 0
node_cpu_guest_seconds_total{cpu="1",mode="nice"} 0
node_cpu_guest_seconds_total{cpu="1",mode="user"} 0
node_cpu_seconds_total{cpu="0",mode="idle"} 446008.08
node_cpu_seconds_total{cpu="0",mode="iowait"} 1063.97
node_cpu_seconds_total{cpu="0",mode="irq"} 0
node_cpu_seconds_total{cpu="0",mode="nice"} 0.18
node_cpu_seconds_total{cpu="0",mode="softirq"} 710.98
node_cpu_seconds_total{cpu="0",mode="steal"} 0
node_cpu_seconds_total{cpu="0",mode="system"} 4323.16
node_cpu_seconds_total{cpu="0",mode="user"} 8415.35
...
1.4.2、Metric types
Prometheus 目前支持的四种Metric类型
- Gauges
最简单的度量指标,只有一个简单的返回值,或者叫瞬时状态,例如,我们想衡量一个待处理的队列中任务的个数:
例如:监控磁盘容量或者内存的使用量,可以使用Gauges的metrics格式来度量。因为硬盘的容量或者内存的使用量是随着时间的推移 不断变化的
- Counters
计数器,从数据量0开始计算,只能增长或者被重置为0
举例:采集用户的访问量,被访问一次就+1;理想情况下是永远递增的最多保持不变
- Histograms
Histogram 可以理解为柱状图的意思,常用于跟踪事件发生的规模,例如:请求耗时、响应大小。它特别之处是可以对记录的内容进行分组,提供 count 和 sum 全部值的功能。例如:{小于10=5次,小于20=1次,小于30=2次},count=8次,sum=8次的求和值
举例:http_response_time(http响应时间),抓取nginx_access.log 采集用户的平均访问时间。
方式1:统计全天的nginx_access.log中http_response_time的值,sum求和/用户量得到该值,问题,这样采集到的值有什么意义?
特殊场景1:上午9:00系统部长,平均响应时间1~3s,但是只持续了5min;总的一天的平均值并不能体现什么
特殊场景2:没有故障,平均响应时间0.05s,但是总有一些慢请求,如果看平均值就发现不了问题。
Histograms 和 summary 类型,可以分别统计出全部用户的响应时间中=0.5s的量有多少,00.5s、大于2s的分别有多少,各个样本的分布情况
- summary
与 Histogram 类型类似,用于表示一段时间内的数据采样结果(通常是请求持续时间或响应大小等),它提供一个quantiles的功能,可以按%比划分跟踪的结果。例如:quantile取值0.95,表示取采样值里面的95%数据。比Histograms更为精确也更为消耗资源

1.4.3、Storage
可以存储在本地,也可以存储到远程系统上
[root@master1 data]# ll
总用量 20
drwxr-xr-x 3  700 root    68 5月  30 21:02 01F6YNX0G290KVDSW5B0CV9F9N
drwxr-xr-x 3  700 root    68 6月   4 09:34 01F7AAGYNM9WJVQWEE76C3C4S3
drwxr-xr-x 3  700 root    68 6月   4 13:01 01F7APBV7124ZZXEDH0WFXNVBF
drwxr-xr-x 3  700 root    68 6月   4 19:00 01F7BAWAD1RMETVR2QJ7JR2C15
drwxr-xr-x 3  700 root    68 6月   7 11:12 01F7J79JZSQ4DZ393TZXRZ5HBA
drwxr-xr-x 3  700 root    68 6月   7 13:14 01F7JE8ZGWA0R0BNG87C8AMSSR
drwxr-xr-x 3  700 root    68 6月   7 19:00 01F7K22E6PDT4A5JTRXYV1QYE9
drwxr-xr-x 3 root root    68 6月   8 13:00 01F7MZVZAW0H7VBQV296FNKRGE
drwxr-xr-x 3 root root    68 6月   9 13:00 01F7QJ8PAVAJE5W4M5MW4QW2M2
drwxr-xr-x 3 root root    68 6月  10 01:00 01F7RVF1Y9CPN51HYDE5K3AW5K
drwxr-xr-x 3 root root    68 6月  13 15:19 01F823SWE6G0WV1K2WK0DQ34FP
drwxr-xr-x 3 root root    68 6月  13 15:19 01F823SWHHRDHM4MMP6WKKB0D3
drwxr-xr-x 3 root root    68 6月  13 15:19 01F823SWMH6HH1SQ8YKBV8399R
drwxr-xr-x 2  700 root    20 6月  13 16:00 chunks_head
-rw-r--r-- 1  700 root     0 5月  29 14:33 lock
-rw-r--r-- 1  700 root 20001 6月  13 16:05 queries.active
drwxr-xr-x 3  700 root    81 6月  13 15:31 wal

[root@master1 data]# cd  01F823SWMH6HH1SQ8YKBV8399R
[root@master1 01F823SWMH6HH1SQ8YKBV8399R]# ll
总用量 396
drwxr-xr-x 2 root root     20 6月  13 15:19 chunks
-rw-r--r-- 1 root root 395834 6月  13 15:19 index
-rw-r--r-- 1 root root    700 6月  13 15:19 meta.json
-rw-r--r-- 1 root root      9 6月  13 15:19 tombstones
[root@master1 01F823SWMH6HH1SQ8YKBV8399R]# ls chunks/
000001
[root@master1 01F823SWMH6HH1SQ8YKBV8399R]# ls chunks/000001
chunks/000001

默认每2h生成一个chunk子目录,目录内包含一个chunks子目录,该子目录包含该时间窗口的所有时间序列样本,一个元数据文件和一个索引文件(该索引文件将度量名称和标签索引到chunks目录中的时间序列)。chunks目录中的样本被组合到一个或多个段文件中,每个段文件的默认大小为512MB。当通过API删除序列时,删除记录存储在单独的tombstone文件中(而不是立即从块段中删除数据)。
近期数据的current block是保存在内存中的。通过WAL(write-ahead-log)来防止崩溃。可以在prometheus崩溃后重启replay使用。WAL日志存储在wal目录中,每128MB一个分片,这些文件中保存尚未压缩的原始数据。prometheus将保留至少3个wal文件


注意:
	1.由于本地local-storage么有集群和复制功能。建议底层使用raid。备份时建议使用快照
	2.外部存储可以通过 remote read/write api,但是性能和效率差异会很大

相关参数:
--storage.tsdb.path: Where Prometheus writes its database. Defaults todata/-storage.tsdb.retention.time: When to remove old data. Defaults to15d--storage.tsdb.retention.size: [EXPERIMENTAL] The maximum number of bytes of storage blocks to retain. The oldest data will be removed first. Defaults to0or disabled. This flag is experimental and may change in future releases. Units supported: B, KB, MB, GB, TB, PB, EB. Ex: "512MB"--storage.tsdb.wal-compression: Enables compression of the write-ahead log (WAL). Depending on your data, you can expect the WAL size to be halved with little extra cpu load. This flag was introduced in 2.11.0 and enabled by default in 2.20.0. Note that once enabled, downgrading Prometheus to a version below 2.11.0 will require deleting the WAL.
远程存储:
prometheus支持三种集成外部存储的方式:
- Prometheus can write samples that it ingests to a remote URL in a standardized format.
- Prometheus can receive samples from other Prometheus servers in a standardized format.
- Prometheus can read (back) sample data from a remote URL in a standardized format.

对应参数:--storage.remote.*
1.5、Service discovery
Prometheus可以通过自定义或者结合consul,k8s,dns等服务发现软件,进行服务发现和监控
具体支持的服务发现机制以及配置方法,参考: https://prometheus.io/docs/prometheus/latest/configuration/configuration/ 包含sd配置的
1.6、Pushgateway
prometheus的客户端主要有两种方式采集:
1、pull 主动拉取方式
客户端(被检控方)先安装各类已有exporters在系统上之后,exporters以守护进程的模式运行并开始采集数据;
exporter本身也是一个http_server可以对http请求做出响应,返会数据。prometheus用pull这种方式去拉的方式(HTTP get)去访问每个节点上exporter并采回需要的数据
2、被动推送方式Push
指的是在客户端(或者服务端)安装官方提供的pushgateway插件,然后,使用我们运维自行开发的各种脚本 把监控数据组织成k/v的形式metric形式 发送给pushgateway之后,pushgateway会再推送给prometheus
1.6.1、exporter
exporter的介绍:
不同于pushgateway,exporter是一个独立运行的采集程序。功能主要包含:
- 自身是HTTP服务器,可以响应从外发出来的HTTP GET请求
- 自身需要运行在后台,并可以定期触发抓取本地的监控数据
- 返回给prometheus-server的内容是需要符合prometheus规定的metric类型(key-value),其中value要求是(float int)
常用的exporter: https://prometheus.io/download/ 有很多的exporter,有go/Ruby/python等各种开发语言开发
- blackbox_exporter #黑盒采集查看,ICMP,TCP, ...
- consul_exporter #
- graphite_exporter
- haproxy_exporter #haproxy专用的exporter
- memcached_exporter
- mysqld_exporter
- node_exporter
- statsd_exporter
其中node_exporter用的最多,几乎把system中相关的监控项全部包含了。部分功能如下:
| Name | Description | OS |
|---|---|---|
| arp | Exposes ARP statistics from /proc/net/arp. |
Linux |
| bcache | Exposes bcache statistics from /sys/fs/bcache/. |
Linux |
| bonding | Exposes the number of configured and active slaves of Linux bonding interfaces. | Linux |
| btrfs | Exposes btrfs statistics | Linux |
| boottime | Exposes system boot time derived from the kern.boottime sysctl. |
Darwin, Dragonfly, FreeBSD, NetBSD, OpenBSD, Solaris |
| conntrack | Shows conntrack statistics (does nothing if no /proc/sys/net/netfilter/ present). |
Linux |
| cpu | Exposes CPU statistics | Darwin, Dragonfly, FreeBSD, Linux, Solaris, OpenBSD |
| cpufreq | Exposes CPU frequency statistics | Linux, Solaris |
| diskstats | Exposes disk I/O statistics. | Darwin, Linux, OpenBSD |
| edac | Exposes error detection and correction statistics. | Linux |
| entropy | Exposes available entropy. | Linux |
| exec | Exposes execution statistics. | Dragonfly, FreeBSD |
| fibrechannel | Exposes fibre channel information and statistics from /sys/class/fc_host/. |
Linux |
| filefd | Exposes file descriptor statistics from /proc/sys/fs/file-nr. |
Linux |
| filesystem | Exposes filesystem statistics, such as disk space used. | Darwin, Dragonfly, FreeBSD, Linux, OpenBSD |
...
1.6.2、pushgateway
pushgateway本身也是一个http server,运维可以通过写脚本程序。抓自己想要的监控数据然后推送到pushgateway(HTTP POST)再由pushgateweay推送到prometheus服务端
为什么需要铺设gateway?
exporter虽然采集类型已经很丰富了,但是我们仍然需要很多自定义的非规则化的监控数据
exporter采集信息量较大,很多我们用不到,pushgateway一般是定义一种类型的数据,数据采集就是节省资源
pushgateway脚本开发,远比开发一个全新的exporter简单快速的多。
1.7、AlertManager
prometheus server push alerts到Alertmanager,AlertManager推送告警到第三方告警通道。现在grafana上也可以实现告警推送
Prometheus告警包含两部分内容:1.promethues的alerting rules ; 2.prometheus发送告警到Alertmanager,alertmanager负责管理告警本身、静默期、告警聚合并发送通知给报警平台
注意:可以使用alertmanager推送告警,也可以通过grafana推送告警
安装告警和通知主要包含如下几个步骤:
- 安装和配置prometheus
- 配置prometheus 推送告警给alertmanager
- 给prometheus创建alertrule
- alertmanager专注于接受告警内容:
消除重复数据,分组,推送告警给告警网关 - Grouping: 将类似性质的告警分类为单个通知
- Inhibition:抑制告警。如果某些其他告警已经触发,则抑制某些告警的触发。举例:集群A不可用的告警已经触发,则集群A其他Firing的其他告警就不需要告警了,防止出现告警风暴,需要在alertmanager的配置文件中配置
- Silences: 在静默期内将告警静音,在web 界面配置
- Client behavisor: Alertmanager对其客户端的行为有特殊要求。这些仅适用于Prometheus不用于发送警报的高级用例。
- High Availability: alertmanager支持通过配置参数
cluster-*去实现高可用,需要在prometheus中配置alertmanger的列表
1.7.1、configuration
alertmanager有command-line flags 和 配置文件两种配置。
默认配置:
[root@master1 alertmanager-0.22.2.linux-amd64]# cat alertmanager.yml
route:
  group_by: ['alertname']  #分组
  group_wait: 30s #当一个新的报警分组被创建后,需要等待至少group_wait时间来初始化通知,这种方式可以确保您能有足够的时间为同一分组来获取多个警报,然后一起触发这个报警信息
  group_interval: 5m #当第一个报警发送后,等待'group_interval'时间来发送新的一组报警信息,在发送有关添加到已发送初始通知的警报组中的新警报的通知之前要等待多长时间(通常5m)
  repeat_interval: 1h  #如果一个报警信息已经发送成功了,等待'repeat_interval'时间来重新发送他们,组A和组B告警已经发送过一次,组A的重复告警间隔时间为1h发送。
  receiver: 'web.hook' #接收器
receivers:
- name: 'web.hook'
  webhook_configs:
  - url: 'http://127.0.0.1:5001/'
inhibit_rules:
  - source_match:
      severity: 'critical'
    target_match:
      severity: 'warning'
    equal: ['alertname', 'ev', 'instance']
global: 全局配置
route: 接受告警信息后的分组标签,用来设置分发策略
更多用法,请参考:https://prometheus.io/docs/alerting/latest/configuration/
1.7.2、notification template
告警内容调整,主要包含两个方面:1、prometheus的alertuels;2、alertmanager的receiver配置
有需要再深入了解:https://prometheus.io/docs/alerting/latest/notifications/
1.7.3、http api
GET /-/healthy #健康检查
GET /-/ready #就绪检查
POST /-/reload #重新加载配置
[root@master1 alertmanager-0.22.2.linux-amd64]# curl -X GET  http://192.168.56.101:9093/api/v1/status  | python -m json.tool |sed 's/\\n/\n\t/g'  #查看默认配置
1.8、PromQL
PromQL is the Prometheus Query Language. 它允许广泛的操作,包括聚合、切片和切分、预测和连接。
1.8.1、Basics
1、promtool查询
promtool支持的四种query,也可以在prometheus web控制台进行查询
  query instant [<flags>] <server> <expr>
    Run instant query.

  query range [<flags>] <server> <expr>  #使用表达式
    Run range query.

  query series --match=MATCH [<flags>] <server>
    Run series query.

  query labels [<flags>] <server> <name>
    Run labels query.


# 用法1 query instant
[root@master1 prometheus-2.24.0.linux-amd64]#  ./promtool query instant -o promql  http://127.0.0.1:9090 instance:node_cpu:avg_rate5m #不加 -o promql 输出一样 "instance:node_cpu:avg_rate5m" 是自定义的recordrule
instance:node_cpu:avg_rate5m{instance="master1:9100", severity="page"} => 6.533333333403178 @[1623656408.629]
instance:node_cpu:avg_rate5m{instance="master2:9100", severity="page"} => 1.79999999973613 @[1623656408.629]
instance:node_cpu:avg_rate5m{instance="master3:9100", severity="page"} => 1.6666666666666714 @[1623656408.629]

[root@master1 prometheus-2.24.0.linux-amd64]#  ./promtool query instant -o json  http://127.0.0.1:9090 instance:node_cpu:avg_rate5m
[{"metric":{"__name__":"instance:node_cpu:avg_rate5m","instance":"master1:9100","severity":"page"},"value":[1623656418.572,"6.533333333403178"]},{"metric":{"__name__":"instance:node_cpu:avg_rate5m","instance":"master2:9100","severity":"page"},"value":[1623656418.572,"1.6666666666666572"]},{"metric":{"__name__":"instance:node_cpu:avg_rate5m","instance":"master3:9100","severity":"page"},"value":[1623656418.572,"1.5999999999379213"]}]
[root@master1 prometheus-2.24.0.linux-amd64]#


#用法2 query range 查询一段时间内的值
[root@master1 prometheus-2.24.0.linux-amd64]# ./promtool query range --start=$(date -d '06/14/2021 16:00:00' +"%s") --end=$(date -d '06/14/2021 16:10:00' +"%s")   http://127.0.0.1:9090 '(1-((sum(increase(node_cpu_seconds_total{mode="idle"}[1m])) by (instance) / (sum(increase(node_cpu_seconds_total[1m])) by (instance))))) * 100' |grep -i instance -A2
{instance="master1:9100"} =>
3.522818254603355 @[1623657600]
3.522818254603355 @[1623657602]
--
{instance="master2:9100"} =>
0.9292431706227622 @[1623657600]
0.9292431706227622 @[1623657602]
--
{instance="master3:9100"} =>
0.8505875769438287 @[1623657600]
0.8505875769438287 @[1623657602]


#用法3 查询series
[root@master1 prometheus-2.24.0.linux-amd64]# ./promtool query series --match=instance:node_cpu:avg_rate5m  http://127.0.0.1:9090
{__name__="instance:node_cpu:avg_rate5m", instance="master1:9100", severity="page"}
{__name__="instance:node_cpu:avg_rate5m", instance="master2:9100", severity="page"}
{__name__="instance:node_cpu:avg_rate5m", instance="master3:9100", severity="page"}

也可以指定--start和--end
[root@master1 prometheus-2.24.0.linux-amd64]# ./promtool query series --match="node_netstat_Tcp_CurrEstab{instance='master1:9100'}" http://127.0.0.1:9090
{__name__="node_netstat_Tcp_CurrEstab", instance="master1:9100", job="prometheus"}
注意: 这里的match的value和 prometheus webconsole->Graph->输入"node_netstat_Tcp_CurrEstab{instance='master1:9100'}" 的效果一样,但是这里不会直接展示该metric的value,但是使用query instant就可以

[root@master1 prometheus-2.24.0.linux-amd64]# ./promtool query instant  http://127.0.0.1:9090 "node_netstat_Tcp_CurrEstab{instance='master1:9100'}"
node_netstat_Tcp_CurrEstab{instance="master1:9100", job="prometheus"} => 197 @[1623659608.478]


#用法4 query labe。查询包含该label的key/value的value有哪些
[root@master1 prometheus-2.24.0.linux-amd64]# ./promtool query labels http://127.0.0.1:9090 job
prometheus
pushgateway
[root@master1 prometheus-2.24.0.linux-amd64]# ./promtool query labels http://127.0.0.1:9090 instance
instance1
localhost:9091
localhost:9092
master1:9091
master1:9100
master2:9100
master3:9100
pushgateway_master1
2、Expression language data types表达式语言数据类型
In Prometheus's expression language, an expression or sub-expression can evaluate to one of four types:
- Instant vector - 瞬时矢量 a set of time series containing a single sample for each time series, all sharing the same timestamp,
- Range vector - 距离矢量 a set of time series containing a range of data points over time for each time series
- Scalar - 单一值 a simple numeric floating point value
- String - 字符串 a simple string value; currently unused
3、Time series Selectors时间序列选择器
- 1)Instant vector selectors 选择器
node_netstat_Tcp_CurrEstab #简单查询,不过滤
node_netstat_Tcp_CurrEstab{job=~".*pro.*"} #job匹配 pattern的
node_netstat_Tcp_CurrEstab{job=~".*pro.*",instance!~"master1.*"} #排除master1:9100
匹配规则:
=: Select labels that are exactly equal to the provided string.!=: Select labels that are not equal to the provided string.=~: Select labels that regex-match the provided string.!~: Select labels that do not regex-match the provided string.
http_requests_total{environment=~"staging|testing|development",method!="GET"}

匹配表达式最少需要一个不包含空string的值
{job=~".*"} # Bad!
{job=~".+"}              # Good!
{job=~".*",method="get"} # Good!
- 2)Range vector literals 选择器
类似于 instant vector但是他需要一个范围,http_requests_total{job="prometheus"}[5m]
- 3)Time Durations
ms - millisecondss - secondsm - minutesh - hoursd - days - assuming a day has always 24hw - weeks - assuming a week has always 7dy - years - assuming a year has always 365d
- 4)Offset modifer
offset modifer可以用于改变instant and range vectors 的偏移量
http_requests_total offset 5m #过去5min的sum(http_requests_total{method="GET"} offset 5m) // GOOD. #offset需要紧跟着selectorsum(http_requests_total{method="GET"}) offset 5m // INVALID.rate(http_requests_total[5m] offset 1w) #同样适用于ranget vectorrate(http_requests_total[5m] offset -1w) #可以指定负offset 用于对比和向前的时间比较
3、子查询
rate(pushgateway_http_requests_total[5m])[30m:1m] #返回过去30min内,per 5min的pushgateway_http_requests_total,每分钟取一次,30m/1m=30此,不同状态码各有30次。
1.8.2、Operators
operator支持基础的逻辑和算数运算符。
- 二进制运算符:
- 数学运算符:
+ - * / % ^ - 比较运算符:
== != > < >= <= - 逻辑运算符:
and(交集) or() unless(补集)
- 数学运算符:
- Aggeration operators (瞬时矢量)内置的聚合运算符有:
sum(calculate sum over dimensions)min(select minimum over dimensions)max(select maximum over dimensions)avg(calculate the average over dimensions)group(all values in the resulting vector are 1)stddev标准差stdvar标准方差count统计vector中的元素个数count_values统计具有相同值的元数个数bottomk最小k元素(按样本值)topk按样本值计算的最大k元素quantile(calculate φ-quantile (0 ≤ φ ≤ 1) over dimensions)- 用法:
用法1:<聚合运算符> [without|by (<label list>)] ([parameter,] <vector expression>)用法2:<聚合运算符>([parameter,] <vector expression>) [without|by (<label list>)]举例1:http_requests_total 这个metric 拥有application, instance, and group labels可以通过以下方式计算所有实例中每个应用程序和组看到的HTTP请求总数:sum without (instance) (http_requests_total)sum by (application, group) (http_requests_total)
- 运算符优先级,从高到底,同优先级左侧优先
^*,/,%+,-==,!=,<=,<,>=,>and,unlessor
1.8.3、Functions
这里抽几个常用的函数进行说明,其他的函数后续用到再深入研究
- rate函数
该函数是专门搭配counter类型数据使用的函数,它的功能是设定一个时间段。取出counter在这个时间中的平均每秒的增量。
rate(node_network_receive_packets_total{device="enp0s8"}[1m]) 统计"enp0s8" 平均每分钟内收到的包数量的变化值。
注意:只要是counter类型的数据,记得别的先不做,先给他加上一个rate()或者increase()函数,这样这个数据才变得有意义
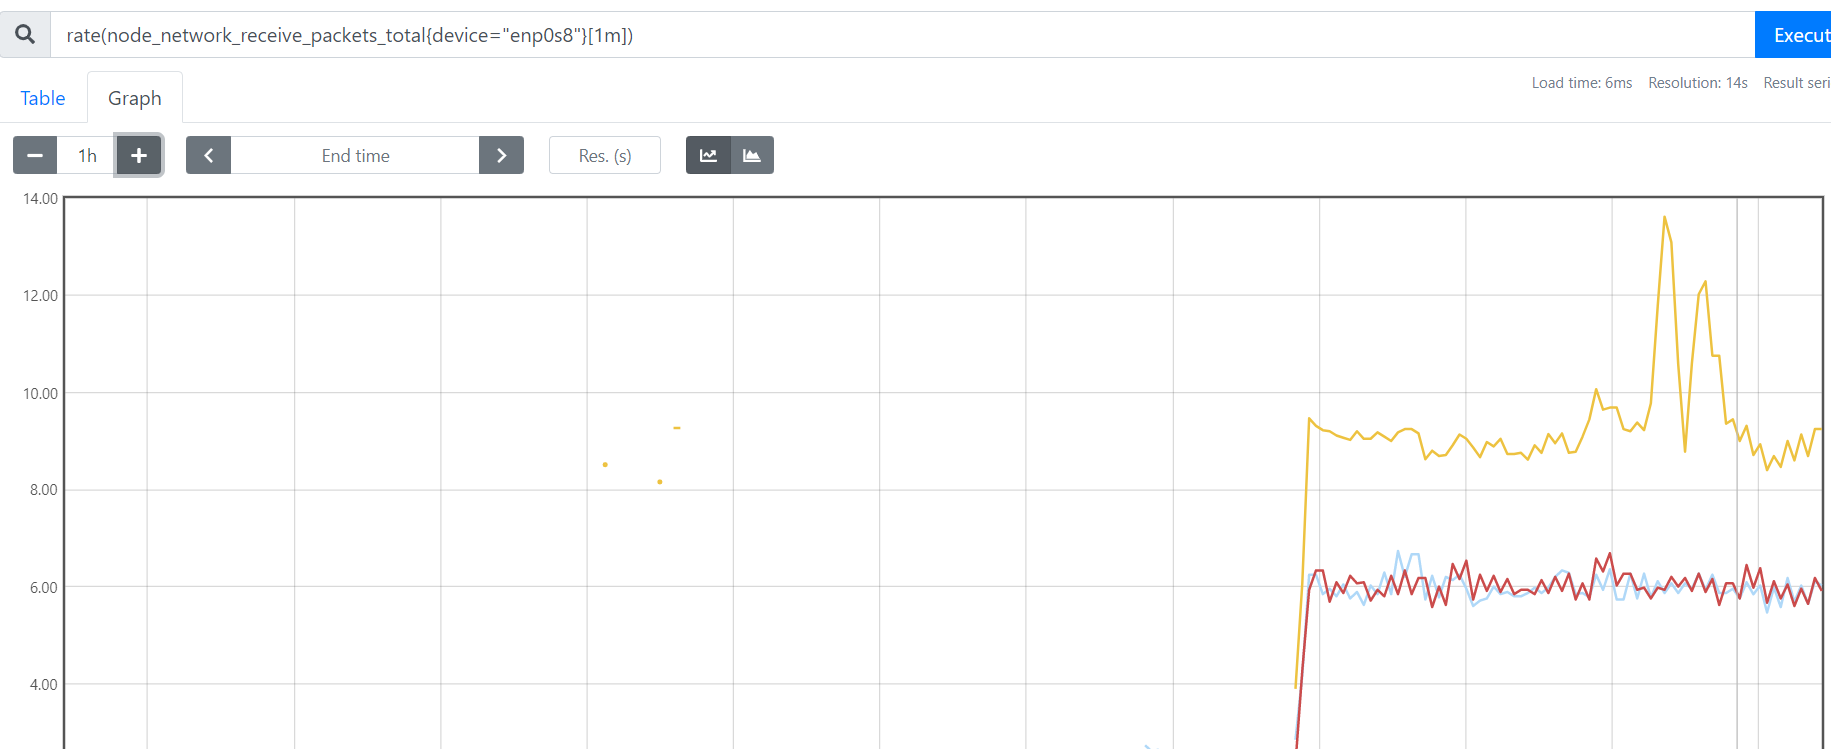
increase适合采集力度较为粗糙的,rate()适用于采集力度较为精细(比如网络io、硬盘io等)
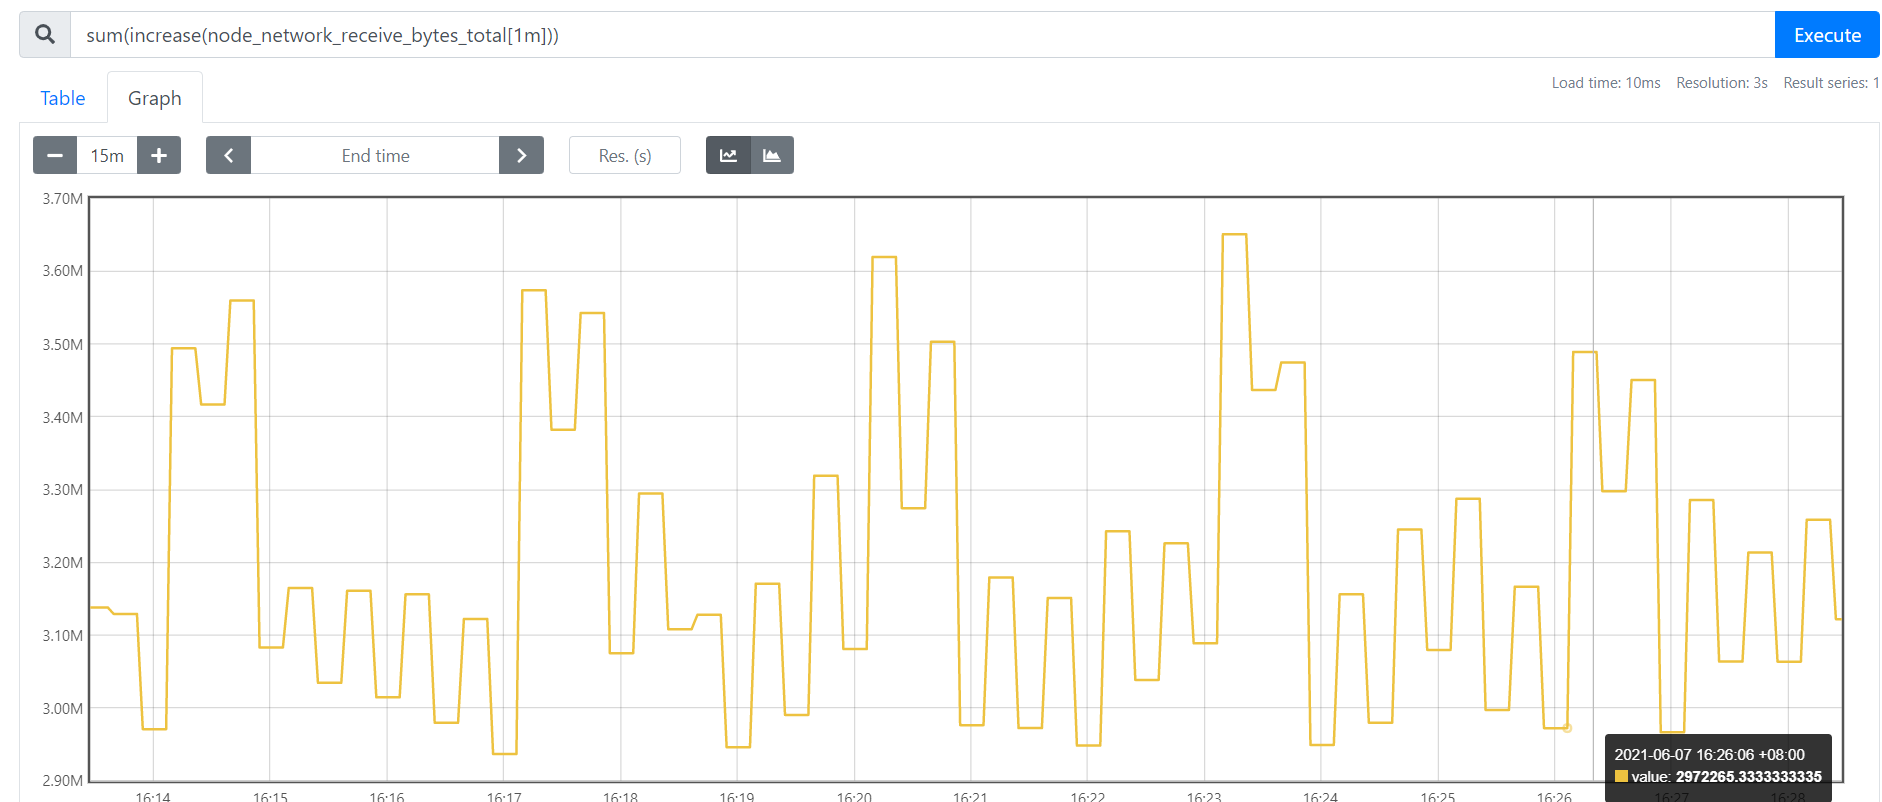
increase(node_network_receive_packets_total{device="enp0s8"}[1m]) 也能达到相同的效果

rate(1m)是取一段时间增量的平均每秒数量:一分钟的总增量/60s
increase(1m)则是取一段时间增量的总量: 取的是一分钟内的增量总量
- sum函数
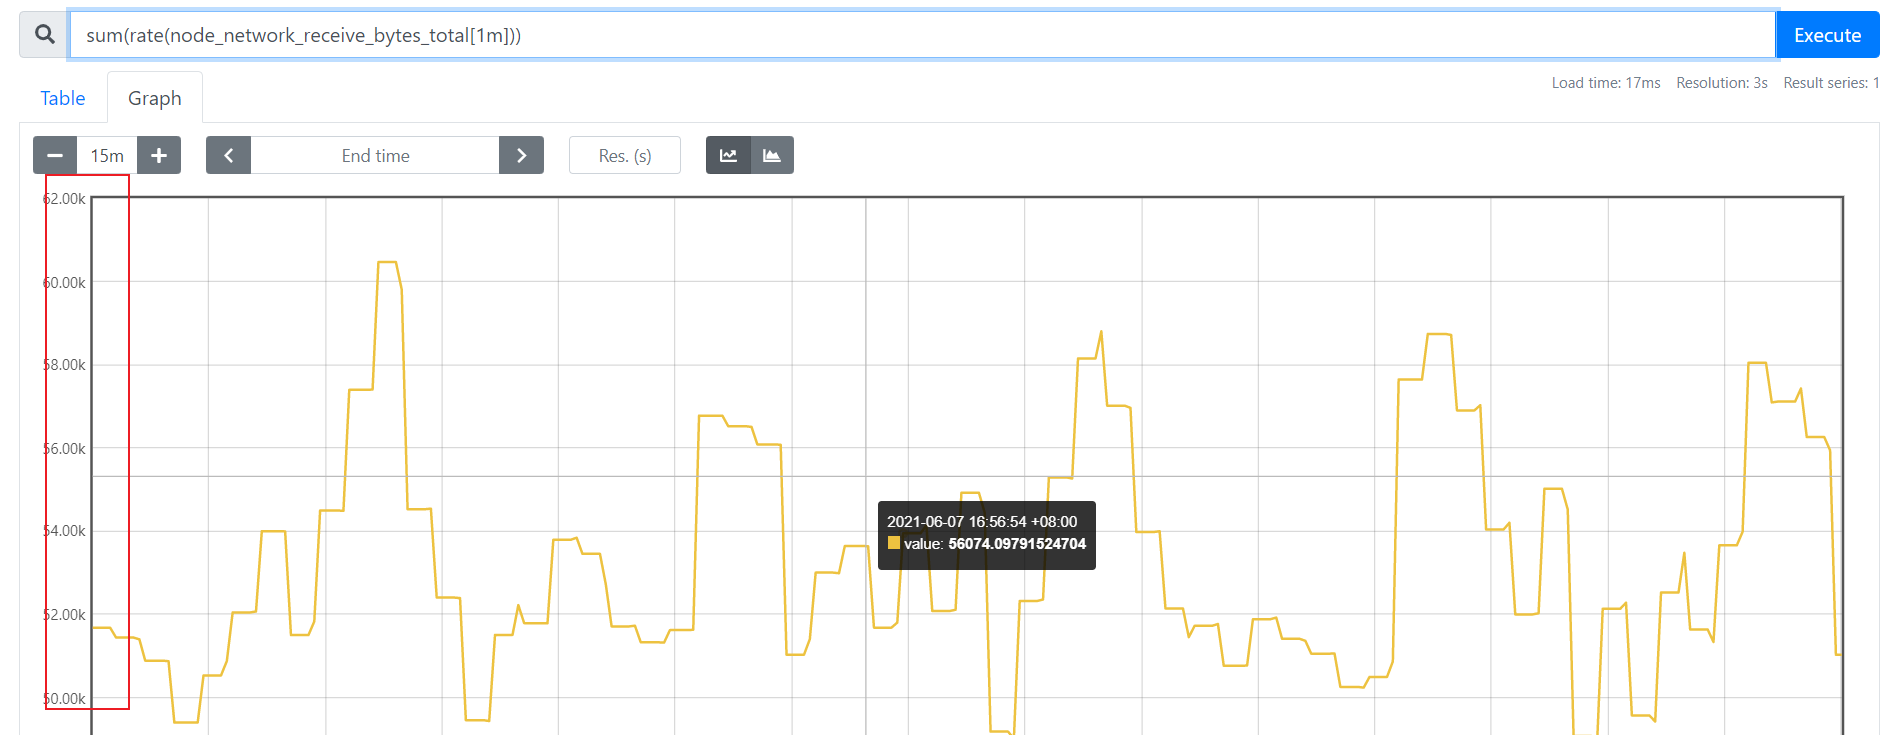
sum(rate(node_network_receive_bytes_total[1m])) 统计每分钟所有节点所有接口收到的字节数。
sum(rate(node_network_receive_bytes_total[1m]))by (instance) 根据instance进行区分

可以通过自定义标签的形式,by (cluster_name)进行区分不同的产品,比如db server/web server/middleware server/...
- topk
定义:取出前几位的最高值
Gause类型:topk(2,node_netstat_Tcp_CurrEstab) #当前tcp连接数最多的2个instance
Counter类型:topk(2,rate(node_network_receive_bytes_total[1m]) #统计1m内网络流量最高的节点
其他函数:https://prometheus.io/docs/prometheus/latest/querying/functions/#functions
见:https://prometheus.io/docs/prometheus/latest/querying/functions/
1.8.4、HTTP API
见: https://prometheus.io/docs/prometheus/latest/querying/api/,这里举出几个常用的
1、status api
[root@master1 rules]# curl -s  http://localhost:9090/api/v1/status/config | python -m json.tool |sed 's/\\n/\n\t/g'    #查看配置Configuration
[root@master1 rules]# curl -s  http://localhost:9090/api/v1/status/flags | python -m json.tool |sed 's/\\n/\n\t/g'   #查看prometheus默认配置
[root@master1 rules]# curl -s  http://localhost:9090/api/v1/status/buildinfo | python -m json.tool |sed 's/\\n/\n\t/g'   #查看prometheus版本信息
2、tsdb snapshot api
[root@master1 rules]# curl -s  http://localhost:9090/api/v1/status/tsdb | python -m json.tool |sed 's/\\n/\n\t/g'   #查看tsdb状态 或者使用 jq命令也可以格式化json输出

tsdb的admin api,要求--web.enable-admin-api is set. 已经开启
[root@master1 prometheus-2.24.0.linux-amd64]#  curl -s  -XPOST http://localhost:9090/api/v1/admin/tsdb/snapshot  | python -m json.tool  #创建snapshot
{
    "data": {
        "name": "20210618T070354Z-380704bb7b4d7c03"
    },
    "status": "success"
}
[root@master1 prometheus-2.24.0.linux-amd64]# ls -l data/snapshots/20210618T070354Z-380704bb7b4d7c03/  会在data-dir/snaphosts/...

删除series,删除参数
    match[]=<series_selector>: Repeated label matcher argument that selects the series to delete. At least one match[] argument must be provided.
    start=<rfc3339 | unix_timestamp>: Start timestamp. Optional and defaults to minimum possible time.
    end=<rfc3339 | unix_timestamp>: End timestamp. Optional and defaults to maximum possible time.

curl -X POST  -g 'http://localhost:9090/api/v1/admin/tsdb/delete_series?match[]=up&match[]=process_start_time_seconds{job="prometheus"}'
curl -X POST  -g 'http://localhost:9090/api/v1/admin/tsdb/delete_series?match[]=instance:node_mem:percent' #“instance:node_mem:percent” 为自定义的metric name


删除:tombstones
由于Prometheus Block的数据一般在写完后就不会变动。如果要删除部分数据,就只能记录一下删除数据的范围,由下一次compactor组成新block的时候删除。而记录这些信息的文件即是tomstones。
CleanTombstones removes the deleted data from disk and cleans up the existing tombstones. This can be used after deleting series to free up space.
[root@master1 prometheus-2.24.0.linux-amd64]# curl -X POST  -g 'http://localhost:9090/api/v1/admin/tsdb/clean_tombstones' -I  #204代表成功
HTTP/1.1 204 No Content
Date: Fri, 18 Jun 2021 07:20:09 GMT
3、target/rules/alerts/
1) target[root@master1 ~]# alias comm="python -m json.tool |sed 's/\\n/\n\t/g'" #或者使用 jq命令也可以[root@master1 ~]# curl -s http://localhost:9090/api/v1/targets | comm #返回当前prometheus target的概览信息[root@master1 ~]# curl -s http://localhost:9090/api/v1/targets?state=dropped |comm #可以过滤state=[dropped|active|any]2)rules[root@master1 ~]# curl -s http://localhost:9090/api/v1/rules |comm支持参数:type=alert|record3)alerts[root@master1 ~]# curl -s http://localhost:9090/api/v1/alerts | jq4)alertmanager[root@master1 ~]# curl -s http://localhost:9090/api/v1/alertmanagers | jq5)target metadata[root@master1 ~]# curl -s http://localhost:9090/api/v1/targets/metadata | jqmatch_target=<label_selectors>: Label selectors that match targets by their label sets. All targets are selected if left empty.metric=<string>: A metric name to retrieve metadata for. All metric metadata is retrieved if left empty.limit=<number>: Maximum number of targets to match.6)metric metadata[root@master1 ~]# curl -s http://localhost:9090/api/v1/metadata?limit=3 | jqlimit=<number>: Maximum number of metrics to return.metric=<string>: A metric name to filter metadata for. All metric metadata is retrieved if left empty.
1.8.5、manage API
GET /-/healthy #健康见擦汗[root@master1 ~]# curl http://127.0.0.1:9090/-/healthyPrometheus is Healthy.[root@master1 ~]# curl http://127.0.0.1:9090/-/readyPrometheus is Ready.[root@master1 ~]# curl -X POST http://127.0.0.1:9090/-/reload -I #重新加载配置HTTP/1.1 200 OKDate: Sat, 19 Jun 2021 06:37:47 GMTContent-Length: 0[root@master1 ~]# curl -X POST http://127.0.0.1:9090/-/quit #优雅的shutdonw
二、安装和配置
2.1、简化安装
2.1.1、prometheus安装
prometheus对时间要求比较高。因此ntp时间必须同步
[root@master1 opt]# mkdir /opt/prometheus ;cd /opt/prometheus/
[root@master1 prometheus]# wget https://github.com/prometheus/prometheus/releases/download/v2.24.0/prometheus-2.24.0.linux-amd64.tar.gz
[root@master1 prometheus]# tar xf prometheus-2.24.0.linux-amd64.tar.gz
[root@master1 prometheus]# cd prometheus-2.24.0.linux-amd64
[root@master1 prometheus-2.24.0.linux-amd64]# ll
总用量 165812
drwxr-xr-x 2 3434 3434       38 1月   6 23:36 cons	ole_libraries
drwxr-xr-x 2 3434 3434      173 1月   6 23:36 consoles
-rw-r--r-- 1 3434 3434    11357 1月   6 23:36 LICENSE
-rw-r--r-- 1 3434 3434     3420 1月   6 23:36 NOTICE
-rwxr-xr-x 1 3434 3434 89890157 1月   6 21:50 prometheus
-rw-r--r-- 1 3434 3434      926 1月   6 23:36 prometheus.yml
-rwxr-xr-x 1 3434 3434 79878587 1月   6 21:52 promtool
[root@master1 prometheus-2.24.0.linux-amd64]# nohup ./prometheus  &> ./prometheus.log  & #默认配置文件在 ./prometheus.yml ,即可在控制台 http://$ip:9090 打开prometheus的web界面
注意: --web.external-url=http://$替换的ip/prod/ 用于配置需要使用nginx或者slb 七层转发等
2.1.2、默认配置文件
[root@master1 prometheus-2.24.0.linux-amd64]# cat prometheus.yml
# my global config 全局定义
global:
  scrape_interval:     15s # Set the scrape interval to every 15 seconds. Default is every 1 minute.采集间隔
  evaluation_interval: 15s # Evaluate rules every 15 seconds. The default is every 1 minute. 采集rules计算时间
  #比如设置了cpu使用率大于75%告警,every 15s会进行一次计算判断是否达到阈值
  # scrape_timeout is set to the global default (10s).

# Alertmanager configuration #发送告警
alerting:
  alertmanagers:
  - static_configs:
    - targets:
      # - alertmanager:9093

# Load rules once and periodically evaluate them according to the global 'evaluation_interval'.
rule_files:
  # - "first_rules.yml"
  # - "second_rules.yml"

# A scrape configuration containing exactly one endpoint to scrape:
# Here it's Prometheus itself.
scrape_configs: #抓取数据的配置
  # The job name is added as a label `job=<job_name>` to any timeseries scraped from this config.
  - job_name: 'prometheus'

    # metrics_path defaults to '/metrics'
    # scheme defaults to 'http'.

    static_configs: #监控的target
    - targets: ['master1:9100','master2:9100','master3:9100']
注意:修改完需要重启或者 调用api /-/reload
--web.read-timeout=5m #timeout的等待时间--web.max-connections=10 #最大连接数--storage.tsdb.retention=15d #历史数据保留时间--storage.tsdb.path="/data" #存储路径
2.1.3、node_exporter安装
[root@master1 prometheus]# wget https://github.com/prometheus/node_exporter/releases/download/v1.1.0/node_exporter-1.1.0.linux-amd64.tar.gz[root@master1 prometheus]# tar xf node_exporter-1.1.0.linux-amd64.tar.gz [root@master1 prometheus]# cd node_exporter-1.1.0.linux-amd64[root@master1 node_exporter-1.1.0.linux-amd64]# nohup ./node_exporter &> ./node_exporter.log &[root@master1 node_exporter-1.1.0.linux-amd64]# netstat -tunlp |grep -i 9100 #默认监听9100tcp6 0 0 :::9100 :::* LISTEN 30400/./node_export [root@master1 node_exporter-1.1.0.linux-amd64]# curl http://localhost:9100/metrics |grep -i netstat #查看metric这里master2和master3也同样方式安装node_exporter

node_exporter默认开启的配置:https://github.com/prometheus/node_exporter
2.2、配置说明
2.2.1、配置文件格式参考
https://prometheus.io/docs/prometheus/latest/configuration/configuration/
2.2.2、Recording rules
Prometheus支持两种类型的规则:Recoding rules and Alerting rules。要在Prometheus中包含规则,需要创建一个包含必要规则语句的文件,并让Prometheus通过Prometheus配置中的rule_files字段加载该文件。规则文件使用YAML。Recording rules通常用于precompute计算比较耗时或者经常计算的表达式。并将其结果保存为一组新的时间序列,用以提高查询速度
Recording and alerting rules exist in a rule group. Rules within a group are run sequentially at a regular interval, with the same evaluation time. The names of recording rules must be valid metric names. The names of alerting rules must be valid label values.
promtool check rules /path/to/example.rules.yml #检查格式,
注意:这里的语法如果已经在prometheus是以pod的形式部署在k8s集群中可以使用kubectl explain prometheusrules 获取
语法:
# 修改prometheusrules.yml [root@master1 prometheus-2.24.0.linux-amd64]# cat prometheus.yml # my global configglobal: scrape_interval: 15s # Set the scrape interval to every 15 seconds. Default is every 1 minute. evaluation_interval: 15s # Evaluate rules every 15 seconds. The default is every 1 minute. # scrape_timeout is set to the global default (10s).# Alertmanager configurationalerting: alertmanagers: - static_configs: - targets: # - alertmanager:9093# Load rules once and periodically evaluate them according to the global 'evaluation_interval'.rule_files: # - "first_rules.yml" #如果是有多个,则依次读取 # - "second_rules.yml"- ./rules/*.yaml# A scrape configuration containing exactly one endpoint to scrape:# Here it's Prometheus itself.scrape_configs: # The job name is added as a label `job=<job_name>` to any timeseries scraped from this config. # 默认的job - job_name: 'prometheus' # metrics_path defaults to '/metrics' # scheme defaults to 'http'. static_configs: - targets: ['master1:9100','master2:9100','master3:9100'] # 自己创建的pushgateway的job - job_name: 'pushgateway' honor_labels: true #如果metric中的label和prometheus赋予的label冲突的话,true则保持抓取到的数据 static_configs: - targets: ['master1:9091']
[root@master1 prometheus-2.24.0.linux-amd64]# vim rules/recordrules.yaml[root@master1 prometheus-2.24.0.linux-amd64]# cat rules/recordrules.yaml groups:- name: recordrules interval: 10s rules: - record: instance:node_cpu:avg_rate5m expr: 100 - avg (irate(node_cpu_seconds_total{mode="idle"}[5m])) by (instance) * 100 #for: 10s 在record rules中不能出现for labels: severity: page - record: instance:node_mem:percent expr: (node_memory_MemTotal_bytes - (node_memory_MemFree_bytes + node_memory_Cached_bytes + node_memory_Buffers_bytes)) / node_memory_MemTotal_bytes * 100[root@master1 prometheus-2.24.0.linux-amd64]# ./promtool check rules rules/recordrules.yaml Checking rules/recordrules.yaml SUCCESS: 2 rules found[root@master1 prometheus-2.24.0.linux-amd64]# curl -X POST http://127.0.0.1:9090/-/reload -IHTTP/1.1 200 OKDate: Mon, 14 Jun 2021 03:06:15 GMTContent-Length: 0我这里prometheus启动了 -web.enable-lifecycle 特性,可以通过http api让prometheus重新加载配置


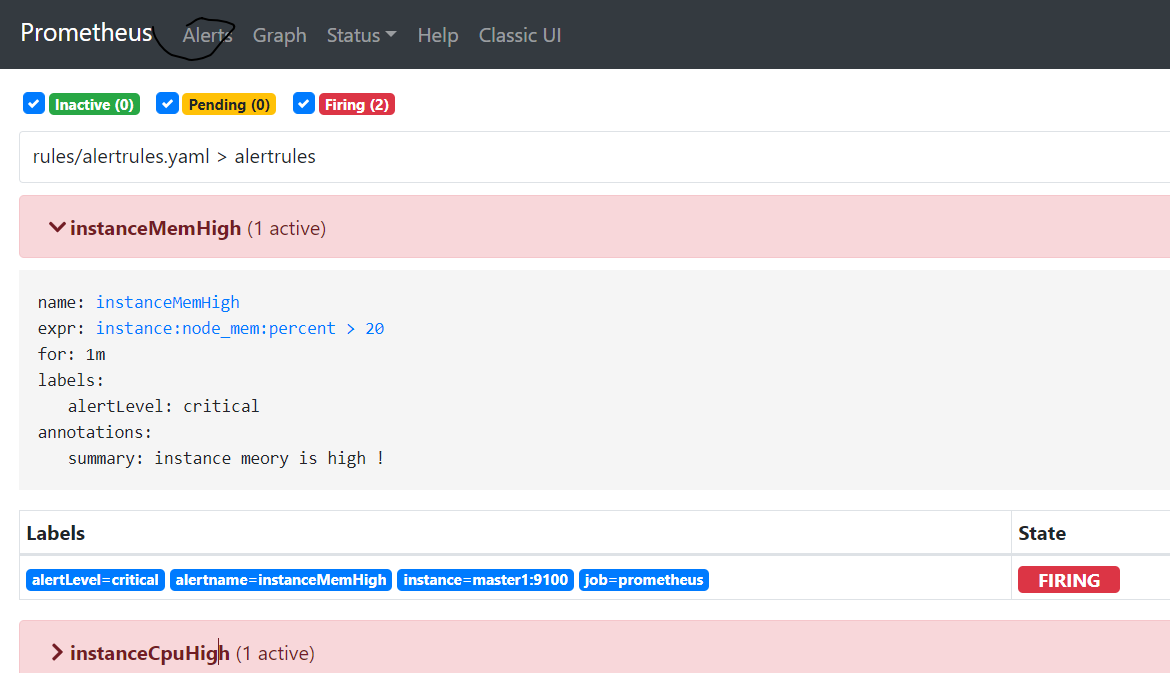
2.4.3、Alerting rules
[root@master1 prometheus-2.24.0.linux-amd64]# vi rules/alertrules.yaml
groups:
- name: alertrules
  rules:
  - alert: instanceMemHigh
    expr: instance:node_mem:percent > 20
    for: 1m  #持续多久后变成firing
    annotations:
      summary: instance meory is high !
    labels:  #可以自定义标签,已经存在的label会被这里的label覆盖,其中label和annotation可以被templated
      alertLevel: critical
  - alert: instanceCpuHigh
    expr: instance:node_cpu:avg_rate5m > 5
    for: 1m
    annotations:
      summary: instance CPU is high !
    labels:
      alertLevel: critical
[root@master1 prometheus-2.24.0.linux-amd64]# ./promtool check rules rules/alertrules.yaml
    Checking rules/alertrules.yaml
  SUCCESS: 2 rules found
[root@master1 prometheus-2.24.0.linux-amd64]# curl -X POST http://127.0.0.1:9090/-/reload -I
Label and annotation values can be templated using console templates. The $labels variable holds the label key/value pairs of an alert instance. The configured external labels can be accessed via the $externalLabels variable. The $value variable holds the evaluated value of an alert instance.
For pending and firing alerts, Prometheus also stores synthetic time series of the form ALERTS{alertname="<alert name>", alertstate="<pending or firing>", <additional alert labels>}.
groups:- name: alertrules rules: - alert: instanceMemHigh expr: instance:node_mem:percent > 20 for: 1m annotations: summary: "{{ $labels.instance }} mem is too high !" description: "instance's memory is too high, Plealse check. instance={{ $labels.instance }} severity={{ $externalLabels.alertLevel }}" labels: alertLevel: critical namespace: com - alert: instanceCpuHigh expr: instance:node_cpu:avg_rate5m > 5 for: 1m annotations: summary: "{{ $labels.instance }} CPU is too high !" description: "instance's cpu is too high, Plealse check. instance={{ $labels.instance }} job={{ $labels.alertname }}" labels: alertLevel: page
2.4.4、模板
以后有需要再深入 https://prometheus.io/docs/prometheus/latest/configuration/template_reference/
2.3、统计cpu使用率
CPU time分为User time/nice time/sys time/idle time/irq 等等..
CPU使用率:除了idle这个状态外其他所有CPU状态的和/总CPU时间
jiffer是内核中一个全局变量,用来记录自系统启动以来产生的节拍数,在linux中。一个节拍大致可理解为系统进程调度的最小时间片,不同linux内核可能值有所不同,通常在1ms到10ms之间
user:从系统启动开始累计到当前时刻,处于用户态的运行时间,不包含nice值为负进程
nice:从系统启动开始累计到当前时刻,nice值为负的进程所占用的cpu时间
system:从系统启动开始累计到当前时刻,处于核心态的运行时间
idle:从系统启动开始累计到当前时刻,除IO等待时间以外的其他等待时间iowait从系统启动开始累计到当前时刻。IO等待时间
irq:从系统启动开始累计到当前时刻,硬终端时间
softirq:从系统启动开始累计到当前时刻,软中断时间
stealstolen: 运行虚拟机操作系统花费的时间
...
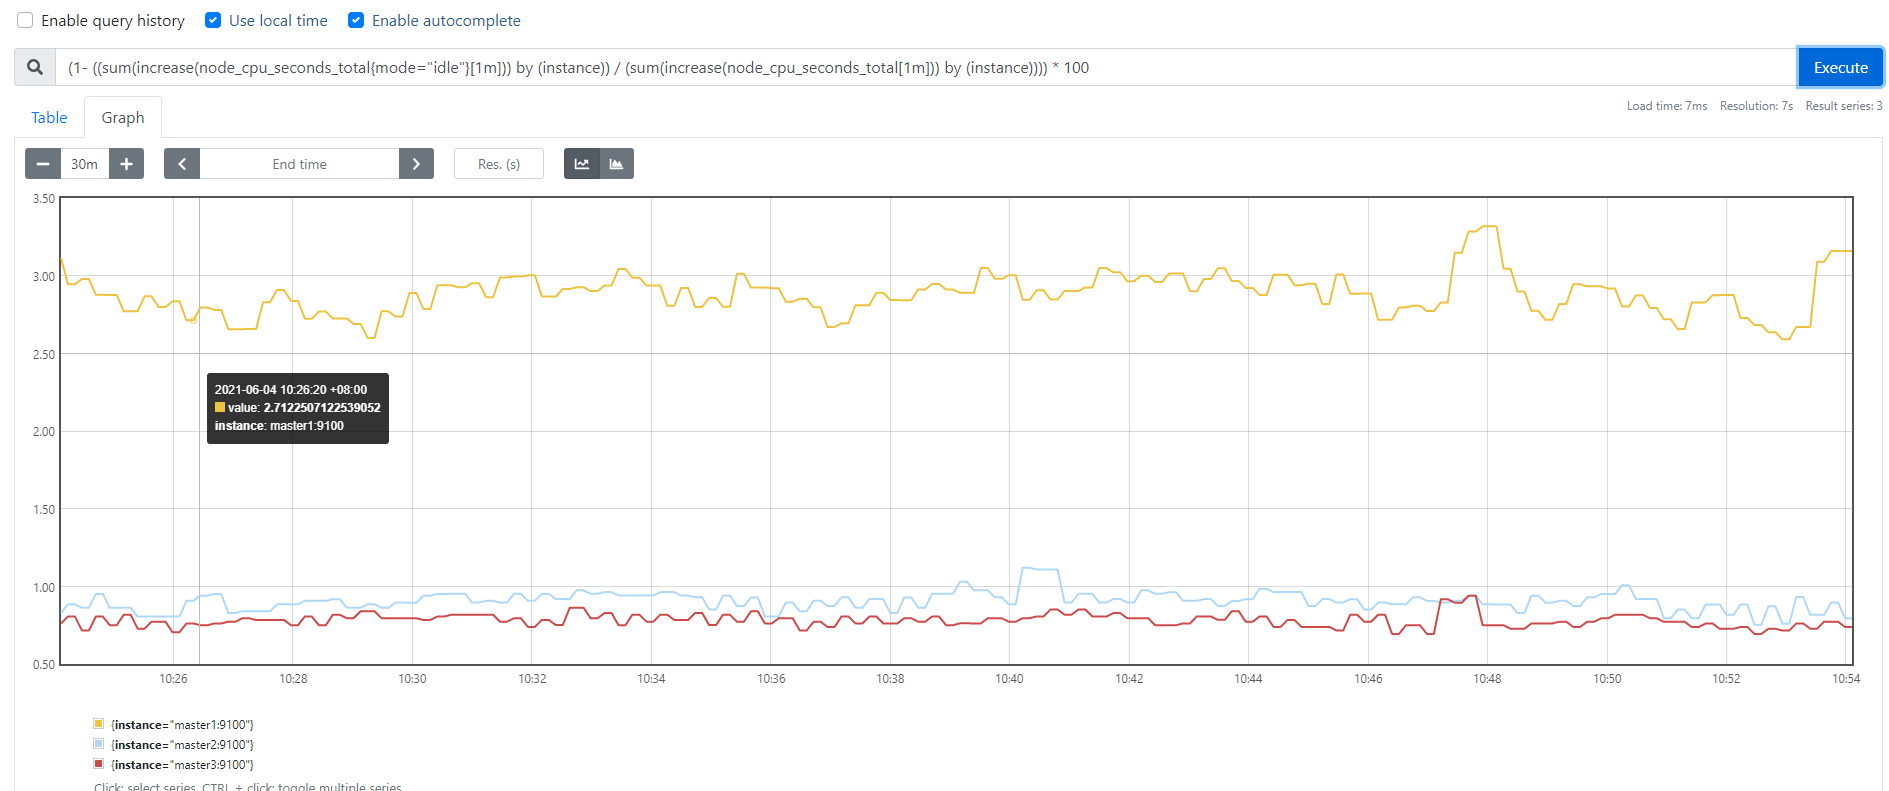
(1-((sum(increase(node_cpu_seconds_total{mode="idle"}[1m])) by (instance) / (sum(increase(node_cpu_seconds_total[1m])) by (instance))))) * 100
CPU使用率 = [所有非空闲状态的CPU使用时间总和] / (所有状态的CPU时间的总和)
(user + sys + iowait + ... ) / 总状态时间 ,或者CPU使用率 = 1-( (idle时间 ) / 总状态时间)
[root@master1 prometheus-2.24.0.linux-amd64]# curl -s http://localhost:9100/metrics |grep -i node_cpu_seconds_total # HELP node_cpu_seconds_total Seconds the CPUs spent in each mode.# TYPE node_cpu_seconds_total counter #node_cpu_seconds_total返会的值为 counter类型node_cpu_seconds_total{cpu="0",mode="idle"} 191343.67node_cpu_seconds_total{cpu="0",mode="iowait"} 460.84node_cpu_seconds_total{cpu="0",mode="irq"} 0node_cpu_seconds_total{cpu="0",mode="nice"} 0.08node_cpu_seconds_total{cpu="0",mode="softirq"} 334.57node_cpu_seconds_total{cpu="0",mode="steal"} 0node_cpu_seconds_total{cpu="0",mode="system"} 1898.07node_cpu_seconds_total{cpu="0",mode="user"} 3759.17node_cpu_seconds_total{cpu="1",mode="idle"} 191744.08node_cpu_seconds_total{cpu="1",mode="iowait"} 389.38node_cpu_seconds_total{cpu="1",mode="irq"} 0node_cpu_seconds_total{cpu="1",mode="nice"} 0.07node_cpu_seconds_total{cpu="1",mode="softirq"} 211.88node_cpu_seconds_total{cpu="1",mode="steal"} 0node_cpu_seconds_total{cpu="1",mode="system"} 1415.3node_cpu_seconds_total{cpu="1",mode="user"} 2920.7[root@master1 prometheus-2.24.0.linux-amd64]# curl -s http://localhost:9100/metrics |grep -i node_cpu_seconds_total # HELP node_cpu_seconds_total Seconds the CPUs spent in each mode.# TYPE node_cpu_seconds_total counternode_cpu_seconds_total{cpu="0",mode="idle"} 191477.72node_cpu_seconds_total{cpu="0",mode="iowait"} 461.3node_cpu_seconds_total{cpu="0",mode="irq"} 0node_cpu_seconds_total{cpu="0",mode="nice"} 0.08node_cpu_seconds_total{cpu="0",mode="softirq"} 334.81node_cpu_seconds_total{cpu="0",mode="steal"} 0node_cpu_seconds_total{cpu="0",mode="system"} 1899.43node_cpu_seconds_total{cpu="0",mode="user"} 3762node_cpu_seconds_total{cpu="1",mode="idle"} 191878.42node_cpu_seconds_total{cpu="1",mode="iowait"} 389.61node_cpu_seconds_total{cpu="1",mode="irq"} 0node_cpu_seconds_total{cpu="1",mode="nice"} 0.07node_cpu_seconds_total{cpu="1",mode="softirq"} 212node_cpu_seconds_total{cpu="1",mode="steal"} 0node_cpu_seconds_total{cpu="1",mode="system"} 1416.13node_cpu_seconds_total{cpu="1",mode="user"} 2922.54
node_cpu_seconds_total为counter类型,为一直增长的。我们可以截取1min内的增量值。然后拿这个值,计算1min内的cpu平均使用率,函数increase 在prometheus中是用来针对counter这种持续增长的数值,截取其中一段时间增量
node_cpu_seconds_total{instance="master1:9100"} #cpu的mode有(idle,iowait,nice,irq,softirq,user,system,steal)
increase(node_cpu_seconds_total{instance="master1:9100"}[1m]) #截取CPU总使用时间在1分钟内的增量,
sum(increase(node_cpu_seconds_total{instance="master1:9100"}[1m])) #多核cpu 提取多核之和作为参考指标更合适,如果不加instance的条件,则统计的是prometheus 统计的所有节点的所有核心之和
sum(increase(node_cpu_seconds_total{mode="idle"}[1m])) by (instance) #分开展示不同的节点(instance)
sum(increase(node_cpu_seconds_total[1m])) by (instance) #统计各个instance所有核心(以instance为单位)的 1m内的增量
(1-((sum(increase(node_cpu_seconds_total{mode="idle"}[1m])) by (instance) / (sum(increase(node_cpu_seconds_total[1m])) by (instance))))) * 100 #(1 - (cpu idel增量值) /(cpu all 增量值)) * 100% 作为百分比
效果图:
用户空间CPU使用率: ((sum(increase(node_cpu_seconds_total{mode="user"}[1m])) by (instance)) / (sum(increase(node_cpu_seconds_total[1m])) by (instance))) * 100
系统空间CPU使用率: ((sum(increase(node_cpu_seconds_total{mode="system"}[1m])) by (instance)) / (sum(increase(node_cpu_seconds_total[1m])) by (instance))) * 100。//其中node="system"为标签,实现筛选功能
2.4、pushgateway安装
pushgateway是采用一种被动推送的方式(而不是exporter主动获取)
wget https://github.com/prometheus/pushgateway/releases/download/v1.4.1/pushgateway-1.4.1.linux-amd64.tar.gz
单独为pushgateway定义一个job
[root@master1 prometheus-2.24.0.linux-amd64]# cat prometheus.yml
...
scrape_configs:
  - job_name: 'prometheus'
    static_configs:
    - targets: ['master1:9100','master2:9100','master3:9100']  #采集目标(主动采集)
  - job_name: 'pushgateway'
    static_configs:
    - targets: ['localhost:9091','localhost:9092'] #监听端口和地址(被动采集)
pushgateway本身没有任何抓取监控数据的能力,只是被动的等待推送过来
#!/bin/bash
#要求不能是localhost
instance_name=`hostname -f|cut -d' ' -f1`
if [ $instance_name == "localhost" ] ;then
	echo "Must FQDN hostname.."
	exit 1
fi
#定义一个新的key
label="count_netstat_wait_connections"
count_netstat_wait_connections=`netstat -an |grep -i wait |wc -l`
echo "$label $count_netstat_wait_connections"
echo "$label $count_netstat_wait_connections" |curl --data-binary @- http://localhost:9091/metrics/job/pushgateway/instance/instance1

#参数说明:
--data-binary 将HTTP POST请求中的数据发送给HTTP服务器(pushgateway),与用户提交HTML表单时浏览器的行为完全一样。数据格式为二进制
http url路径说明:
	job/pushgateway:第一个标签,推送到哪一个prometheus.yml定义的job里
	instance/$instance_name: 第二个标签,推送后显示的机器名
一般pushgateway脚本结合crontab或者while/for循环的方式。精确到秒级,可结合sleep实现
pushgateway的缺点:
1)pushgateway本身会形成一个单点瓶颈,假如多个脚本同时发送给要给pushgateway的进程,如果这个进程没了。那么监控数据也就没了。
2)pushgateway并不能对发送过来的数据 进行更智能的判断。加入脚本中间采集出问题了。那么有问题的数据pushgateway一样会发送给prometheus
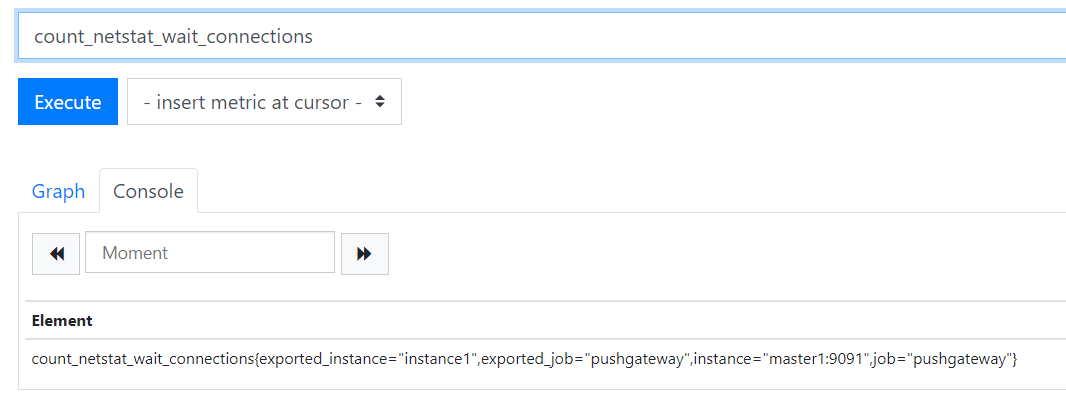
count_netstat_wait_connections{exported_instance="instance1",exported_job="pushgateway",instance="master1:9091",job="pushgateway"}
exported_instance="instance1": 注册的接口(脚本中定义的)
exported_job="pushgateway": 注册的job(脚本中定义的)
instance="master1:9091":
job="pushgateway:
2.5、基于文件的服务发现
[root@master1 alertmanager-0.22.2.linux-amd64]# vim ../prometheus-2.24.0.linux-amd64/prometheus.yml
...  #添加如下内容
  - job_name: 'fiile-sd'
    file_sd_configs:
    - files:
      - ./file_sd/*.yml
      refresh_interval: 3m
...
[root@master1 prometheus-2.24.0.linux-amd64]# curl http://127.0.0.1:9090/-/reload -XPOST #重新加载配置
[root@master1 prometheus-2.24.0.linux-amd64]# cat file_sd/file1.yml
- targets:
  - '192.168.56.103:9102'
  labels:
    node: "master3:9102"

2.6、alertmanager安装
2.6.1、安装
#1、下载alertmanager
[root@master1 prometheus]# wget https://github.com/prometheus/alertmanager/releases/download/v0.22.2/alertmanager-0.22.2.linux-amd64.tar.gz

#2、修改prometheus配置文件
[root@master1 prometheus-2.24.0.linux-amd64]# cat prometheus.yml   |egrep -v "^$|#"
global:
alerting:
  alertmanagers:
  - static_configs:
    - targets:
      - 127.0.0.1:9093
rule_files:
- ./rules/*.yaml
scrape_configs:
  - job_name: 'prometheus'
    static_configs:
    - targets: ['master1:9100','master2:9100','master3:9100']
  - job_name: 'pushgateway'
    static_configs:
    - targets: ['master1:9091']
[root@master1 prometheus-2.24.0.linux-amd64]# curl http://127.0.0.1:9090/-/reload -I -X POST
HTTP/1.1 200 OK
Date: Sun, 20 Jun 2021 10:12:16 GMT
Content-Length: 0

#3、启动alertmanager
[root@master1 alertmanager-0.22.2.linux-amd64]# nohup ./alertmanager --config.file="alertmanager.yml" &> ./a.log  &
2.6.2、配置钉钉告警
目的:实现基于dingding告警

#1、创建dingding
钉钉测试群->添加机器人->填写相应参数->复制"Webhook地址"
[root@master1 alertmanager-0.22.2.linux-amd64]# curl 'https://oapi.dingtalk.com/robot/send?access_token=$你的钉钉地址'  -H 'Content-Type: application/json'  -d '{"msgtype": "text","text": {"content":"我就是我, 是不一样的烟火"}}'  #注意测试ding可以正常访问


#2、下载
[root@master1 prometheus]# wget https://github.com/timonwong/prometheus-webhook-dingtalk/releases/download/v1.4.0/prometheus-webhook-dingtalk-1.4.0.linux-amd64.tar.gz
[root@master1 prometheus]# tar xvf prometheus-webhook-dingtalk-1.4.0.linux-amd64.tar.gz
prometheus-webhook-dingtalk-1.4.0.linux-amd64/
prometheus-webhook-dingtalk-1.4.0.linux-amd64/contrib/
prometheus-webhook-dingtalk-1.4.0.linux-amd64/contrib/templates/
prometheus-webhook-dingtalk-1.4.0.linux-amd64/contrib/templates/issue43/
prometheus-webhook-dingtalk-1.4.0.linux-amd64/contrib/templates/issue43/template.tmpl
prometheus-webhook-dingtalk-1.4.0.linux-amd64/contrib/templates/legacy/
prometheus-webhook-dingtalk-1.4.0.linux-amd64/contrib/templates/legacy/template.tmpl
prometheus-webhook-dingtalk-1.4.0.linux-amd64/prometheus-webhook-dingtalk
prometheus-webhook-dingtalk-1.4.0.linux-amd64/config.example.yml
prometheus-webhook-dingtalk-1.4.0.linux-amd64/LICENSE


#3、配置alertmanager
[root@master1 prometheus]# cat alertmanager-0.22.2.linux-amd64/alertmanager.yml
route:
  group_by: ['alertname']
  group_wait: 30s
  group_interval: 2m
  repeat_interval: 5m
  receiver: 'webhook'
receivers:
- name: 'webhook'
  webhook_configs:
  - url: 'http://127.0.0.1:8086/dingtalk/webhook1/send'
inhibit_rules:
  - source_match:
      severity: 'critical'
    target_match:
      severity: 'warning'
    equal: ['alertname', 'dev', 'instance']
注意:这里修改了webhook的地址,具体的url,可以在"prometheus-webhook-dingtalk"启动后有输出提示

#4、配置dingtalk
[root@master1 prometheus]# cd prometheus-webhook-dingtalk-1.4.0.linux-amd64
[root@master1 prometheus-webhook-dingtalk-1.4.0.linux-amd64]# cat config.example.yml  |egrep -v "^#|^$"
targets:
  webhook1:
    url: https://oapi.dingtalk.com/robot/send?access_token=$token
    # secret for signature
    secret: SEC000000000000000000000
  webhook2:
    url: https://oapi.dingtalk.com/robot/send?access_token=xxxxxxxxxxxx
  webhook_legacy:
    url: https://oapi.dingtalk.com/robot/send?access_token=xxxxxxxxxxxx
    # Customize template content
    message:
      # Use legacy template
      title: '{{ template "legacy.title" . }}'
      text: '{{ template "legacy.content" . }}'
  webhook_mention_all:
    url: https://oapi.dingtalk.com/robot/send?access_token=xxxxxxxxxxxx
    mention:
      all: true
  webhook_mention_users:
    url: https://oapi.dingtalk.com/robot/send?access_token=xxxxxxxxxxxx
    mention:
      mobiles: ['156xxxx8827', '189xxxx8325']

[root@master1 prometheus-webhook-dingtalk-1.4.0.linux-amd64]# nohup ./prometheus-webhook-dingtalk --web.enable-ui --config.file=./config.example.yml  --web.enable-lifecycle &> ./a.log &
- prometheus-webhook-dingtalk的ui界面:
http://$ip:8086/ui
默认推送到钉钉群的格式:
#1、单节点cpu告警
FIRING:1] instanceCpuHigh
Alerts Firing

[PAGE] master1:9100 CPU is too high !
Description: instance's cpu is too high, Plealse check. instance=master1:9100 job=
Graph: 📈
Details:
    alertname: instanceCpuHigh
    alertLevel: page
    instance: master1:9100
#2、单节点内存告警
[FIRING:1] instanceMemHigh
Alerts Firing
[] master1:9100 mem is too high !
Description: instance's memory is too high, Plealse check. instance=master1:9100 severity=
Graph: 📈
Details:
    alertname: instanceMemHigh
    alertLevel: critical
    instance: master1:9100
    job: prometheus
    namespace: com
#3、多节点内存告警,汇聚成了一条告警内容[FIRING:3] instanceMemHighAlerts Firing[] master1:9100 mem is too high !Description: instance's memory is too high, Plealse check. instance=master1:9100 severity=Graph: 📈Details: alertname: instanceMemHigh alertLevel: critical instance: master1:9100 job: prometheus namespace: com[] master2:9100 mem is too high !Description: instance's memory is too high, Plealse check. instance=master2:9100 severity=Graph: 📈Details: alertname: instanceMem High alertLevel: critical instance: master2:9100 job: prometheus namespace: com[] master3:9100 mem is too high !Description: instance's memory is too high, Plealse check. instance=master3:9100 severity=Graph: 📈Details: alertname: instanceMemHigh alertLevel: critical instance: master3:9100 job: prometheus namespace: com
alertrule中的配置内容:
[root@master1 prometheus-webhook-dingtalk-1.4.0.linux-amd64]# cat ../prometheus-2.24.0.linux-amd64/rules/alertrules.yaml
groups:
- name: alertrules
  rules:
  - alert: instanceMemHigh
    expr: instance:node_mem:percent > 20
    for: 1m
    annotations:
      summary: "{{ $labels.instance }} mem is too high !"
      description: "instance's memory is too high, Plealse check. instance={{ $labels.instance }} severity={{ $externalLabels.alertLevel }}"
    labels:
      alertLevel: critical
      namespace: com
  - alert: instanceCpuHigh
    expr: instance:node_cpu:avg_rate5m > 5
    for: 1m
    annotations:
      summary: "{{ $labels.instance }} CPU is too high !"
      description: "instance's cpu is too high, Plealse check. instance={{ $labels.instance }} job={{ $labels.alertname }}"
    labels:
      alertLevel: page
2.6.3、告警级别抑制
针对高级别进行告警
#1、创建不通级别
[root@master1 alertmanager-0.22.2.linux-amd64]# vim ../prometheus-2.24.0.linux-amd64/rules/alertrules.yaml
groups:
- name: alertrules
  rules:
  - alert: instanceMemHigh
    expr: instance:node_mem:percent > 5
    for: 1m
    annotations:
      summary: "{{ $labels.instance }} mem is too high !"
      description: "instance's memory is too high, Plealse check. instance={{ $labels.instance }} severity={{ $externalLabels.alertLevel }}"
    labels:
      alertLevel: page
      namespace: com
  - alert: instanceCpuHigh
    expr: instance:node_cpu:avg_rate5m > 5
    for: 1m
    annotations:
      summary: "{{ $labels.instance }} CPU is too high !"
      description: "instance's cpu is too high, Plealse check. instance={{ $labels.instance }} job={{ $labels.alertname }}"
    labels:
      alertLevel: page
  - alert: instanceMemHigh
    expr: instance:node_mem:percent > 10
    for: 1m
    annotations:
      summary: "{{ $labels.instance }} mem is too high ! values is {{ $value }}"
      description: "instance's memory is too high, Plealse check. instance={{ $labels.instance }} severity={{ $externalLabels.alertLevel }}"
    labels:
      alertLevel: critical
[root@master1 alertmanager-0.22.2.linux-amd64]# curl http://127.0.0.1:9090/-/reload -XPOST

注:这里针对内存告警创建了2个级别,page和critical

#2、区分告警
[root@master1 alertmanager-0.22.2.linux-amd64]# cat alertmanager.yml
route:
  group_by: ['alertname','alertLevel']
  group_wait: 30s
  group_interval: 2m
  repeat_interval: 5m
  receiver: 'webhook'
receivers:
- name: 'webhook'
  webhook_configs:
  - url: 'http://127.0.0.1:8086/dingtalk/webhook1/send'
inhibit_rules:
  - source_match:
      alertLevel: 'critical'
    target_match: #必须被抑制的告警
      alertLevel: 'page'
    equal: ['alertname']
这个配置文件作用为对相同 alertName的 告警 针对alertLevel为'critical'级别的内容进行告警,alertLevel为'papge'的进行屏蔽
2.6.3、单个告警静默

单独对某个告警进行屏蔽一段时间
三、grafana
3.1、安装
grafana是一款近几年新兴的开源数据绘图工具。默认支持多种数据源Prometheus/MySQL/InfluxDB/PgSql/ES/...,新版本grafana已经支持了告警,不再需要单独部署alertmanager,这个看个人爱好!
版本选择:https://grafana.com/grafana/download

wget https://dl.grafana.com/oss/release/grafana-7.5.0-1.x86_64.rpm
sudo yum install grafana-7.5.0-1.x86_64.rpm
systemctl start grafana-server
默认监听3000
3.2、界面介绍

3.2.1、第一个dashboard
-
步骤1创建数据源:点击"5"->Data Sources->Add data sources->prometheus-> 填写信息 -
步骤2创建空dashboard:点击"1"->Create Dashboard->Add an empty panel- Add an empty panel: 添加一个空面板
- Add a new row: 添加一行,在改行下的panel可以进行折叠
-
步骤3创建图表:Query -> Metrics -> "$表达式"#输入自定义表达式内容(1-((node_memory_Buffers_bytes + node_memory_Cached_bytes + node_memory_MemFree_bytes) / node_memory_MemTotal_bytes)) * 100- 点击右上角"Save"即可保存
3.2.1、创建界面介绍
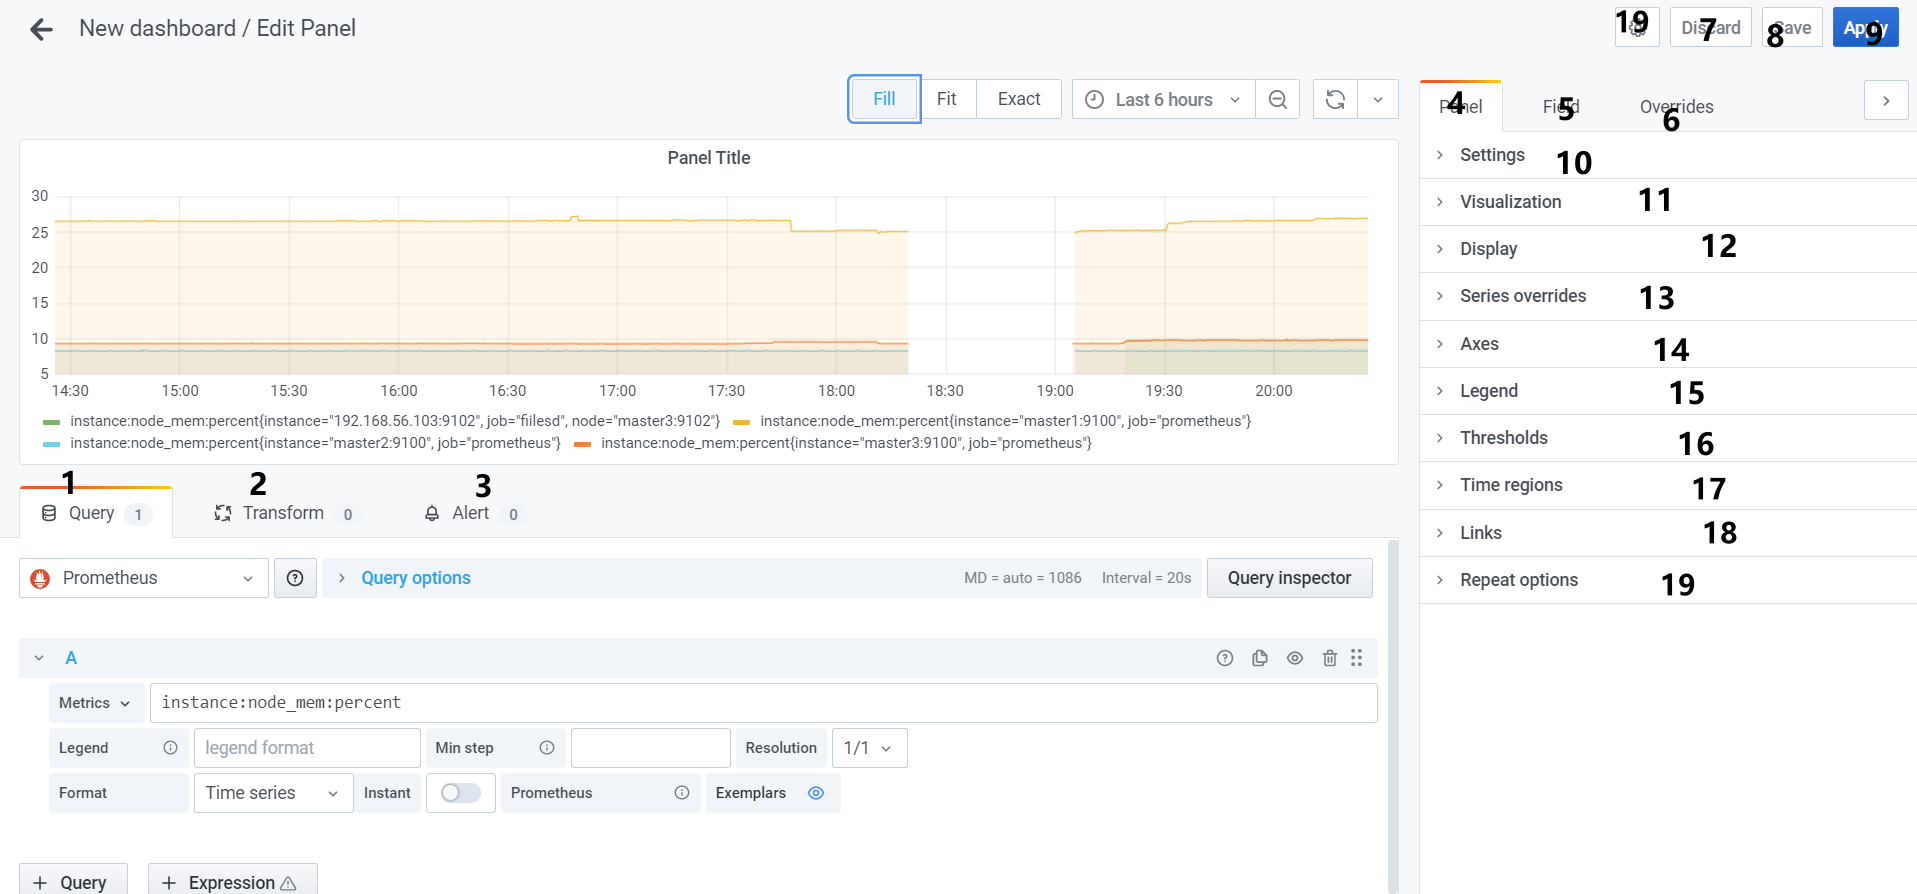
字段说明:(用到的时候再进行补充说明)
- 1、Query: prometheus对数据源进行查询以得到图标数据
- Metrics:时间序列的名称
- Legend:要展示的metric的主要信息,举例:
{{ instance }}则只展示master1:9100,master2:9100,...7 - Min step:prometheus range queries查询的最小间隔
- Format:
- Table: 只在 Visualization中有用
- Time series:
- Heatmap:适用于
Histogram类型的metric在Heatmap面板中展示
- Instant: 只提取最近一个值
- Query options:
- Max data points:
- Min interval:
- Interval:
- Relative time:
- TIme shift:
- 2、Transform:
- 3、Alert:
- 4、Panel:
- 5、Field:
- 6、Overrides:
- 7到9:
- Save:保存修改记录,如果确认有变更要修改
- Discard: 丢弃修改记录
- Apply: 应用到当前dashboard,刷新后修改会丢失
- 10、Settings:
- 11、Visualization:
- 12、Display:
- 13、Series override:
- 14、Axes:
- 15、Legend:
- 16、Thresholds
- 17、Time regions:
- 18、Links:
- 19、Repeat options:
各个字段说明:https://grafana.com/docs/grafana/latest/datasources/prometheus/
3.2.3、查询变量
用于查询metric的name和label 或者label对应的value
| Name | Description |
|---|---|
label_names() |
Returns a list of label names. |
label_values(label) |
Returns a list of label values for the label in every metric. |
label_values(metric, label) |
Returns a list of label values for the label in the specified metric. |
metrics(metric) |
Returns a list of metrics matching the specified metric regex. |
query_result(query) |
Returns a list of Prometheus query result for the query. |
3.2.4、其他常用功能
- 备份和还原
备份:点击单个dashboard->设置按钮->“view json”。可以备份json文件方式备份。
还原:grafana->左侧import
- grafana的告警功能
先在左侧添加:Alerting->Notification channels->创建new channel-> 中创建告警通道
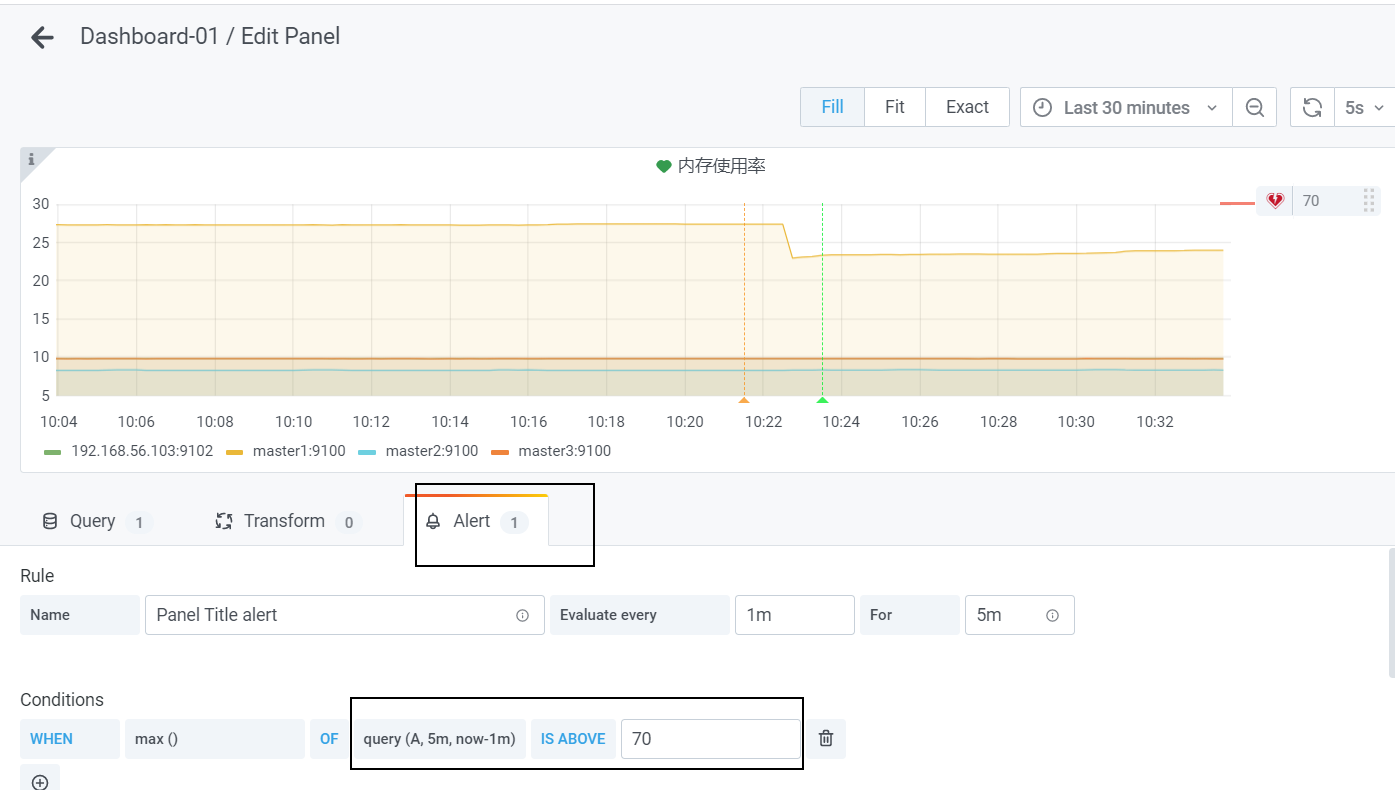
在这里添加后可以在左侧:Alerting->Alert rules-> 中看到,
- dashboard锁定:用于防止别人修改
点击 要锁定的dashboard->Settings->General->Editable[Read-only]
-
主题颜色调整:
左下角账户图标->preferences->UI Theme: -
dashboard如何设置:

dashboard-settings->variables
3.3、常见监控指标
- 监控CPU
100 - avg (irate(node_cpu_seconds_total{mode="idle"}[5m])) by (instance) * 100 #非空闲cpu使用率
((sum(increase(node_cpu_seconds_total{mode="user"}[1m])) by (instance)) / (sum(increase(node_cpu_seconds_total[1m])) by (instance))) * 100 #用户空间cpu使用率
((sum(increase(node_cpu_seconds_total{mode="system"}[1m])) by (instance)) / (sum(increase(node_cpu_seconds_total[1m])) by (instance))) * 100 #系统空间cpu使用率
- 监控内存
Linux实际可用内存=系统free memory+ buffer+cached
(1-((node_memory_Buffers_bytes + node_memory_Cached_bytes + node_memory_MemFree_bytes) / node_memory_MemTotal_bytes)) * 100
- 监控文件系统使用率
(1- ( node_filesystem_avail_bytes{device!="tmpfs",device!~".*centos-root"} / node_filesystem_size_bytes)) * 100
predict_linear() :可以实时检测硬盘使用率曲线变化情况。比如在很小一段时间内发现硬盘可使用空间急速的下降(跟之前相比较),那么这种下降的速度。进行一个一段时间的预测。如果发现未来比如5分钟内,按照这个速度要达到100%了。那么在当前使用率剩余20%的时候就告警。
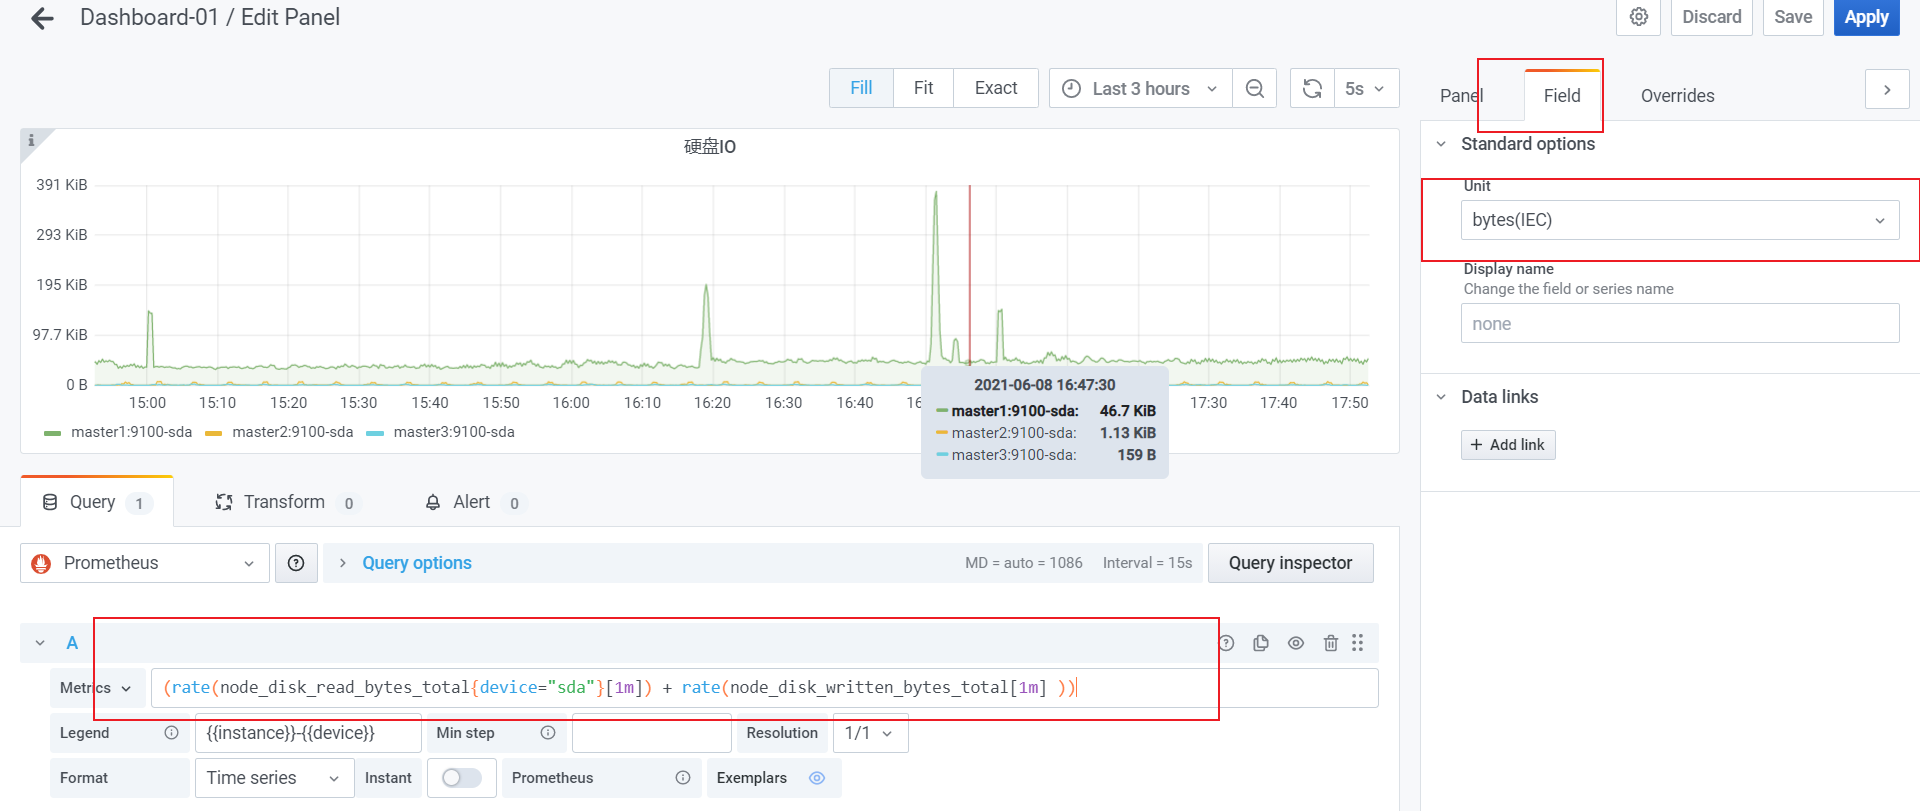
- 监控文件描述符使用率
文件描述符监控。linux对每一个进程能打开的文件数量都是由一个限制的。linux系统默认的最大文件描述符个数为1024。
( node_filefd_allocated / node_filefd_maximum ) * 100 文件描述符使用个数
3.4、dashboards
在:https://grafana.com/grafana/dashboards 进行下载然后根据需要进行调整和使用
示例:
下载: https://grafana.com/grafana/dashboards/13978 这个dashboard对应的json文件,然后官方文档提示替换所有 job=node的标签为自己对应的标签,其他dashboard要修改的内容可能有所区别,看具体的说明即可
grafana->左侧+图标->Upload JSON file->复制内容->Load->
效果图如下:
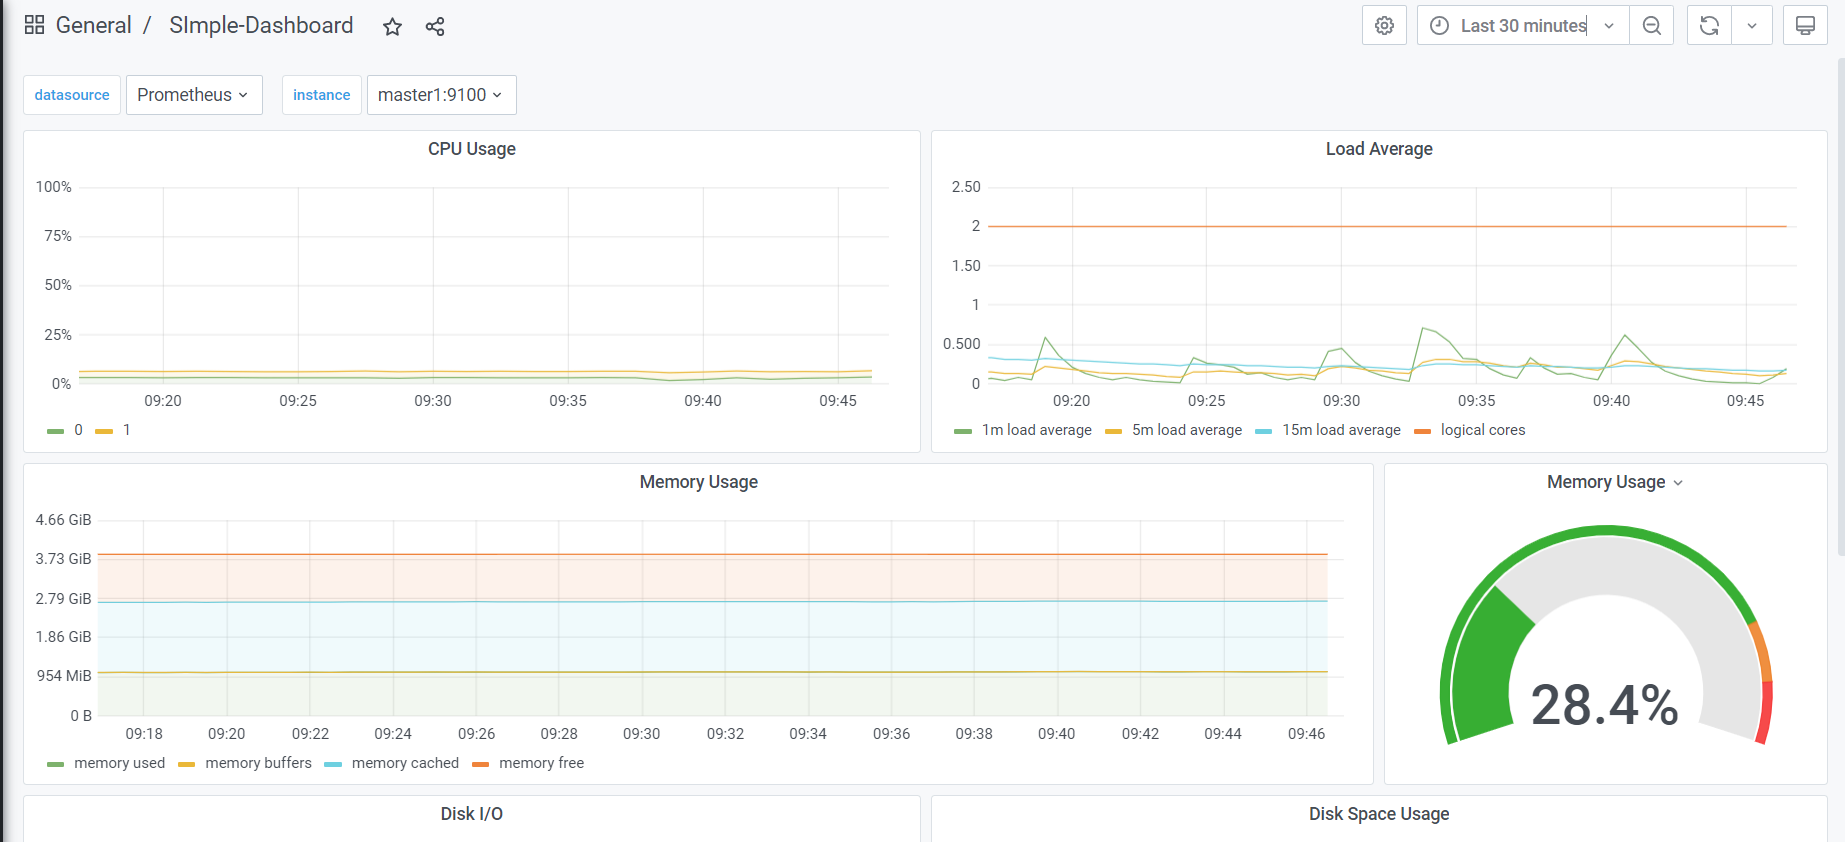
更多Grafna用法参考:https://grafana.com/docs/grafana/latest/basics/
四、k8s中安装
Prometheus安装方式较多,比如:
- GitEe:
https://gitee.com/liugpwwwroot/k8s-prometheus-grafana/tree/master/prometheus; - GItHub:
https://github.com/prometheus-operator/kube-prometheus - Helm:
https://artifacthub.io/packages/helm/grafana/grafana
4.1、prometheus-operator简介
创建Operator关键是对CRD(自定义k8s资源对象)的扩展。Operator的作用是将运维人员的知识给代码化,其核心主要有两个概念:资源: 对象的状态定义; 控制器:观测、分析和行动,以调节资源的分布
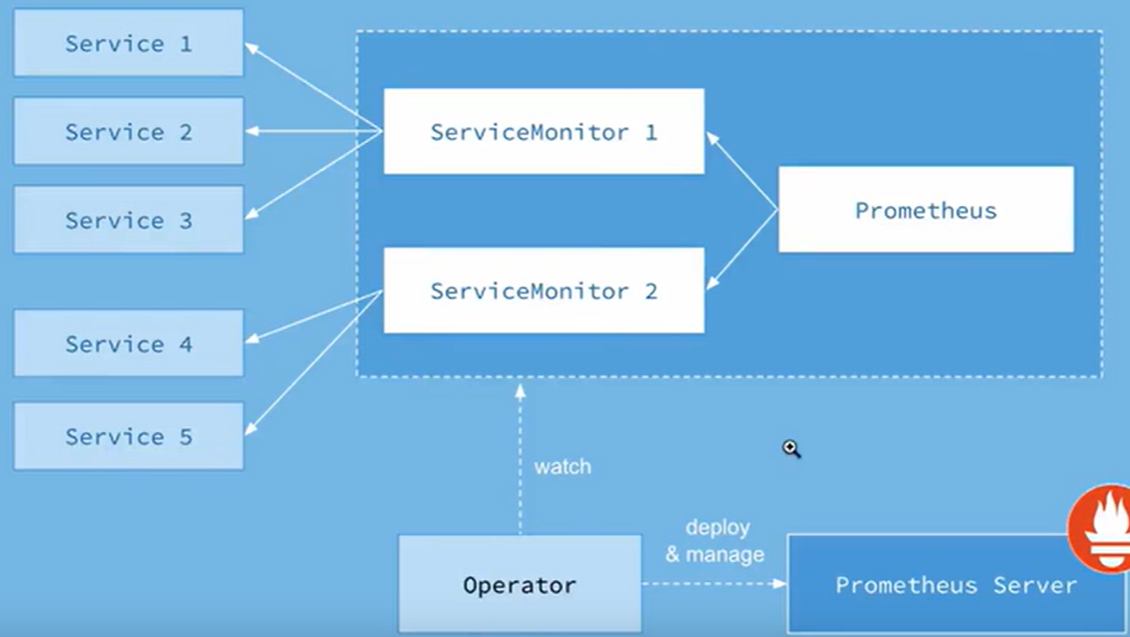
Operator会负责创建Prometheus,ServiceMonitor,Prometheus,Alertmanager,prometheusrules等对象,并一直监控和维护这些对象的状态。ServiceMonitor为各Exporter的抽象。service和serviceMonitor都是k8s的资源对象。一个ServiceMonitor通过label selector去匹配一类的service。部署后生成的crd有:
[root@master1 manifests]# kubectl get crd
NAME                                        CREATED AT
alertmanagerconfigs.monitoring.coreos.com   2021-06-30T09:55:49Z
alertmanagers.monitoring.coreos.com         2021-06-30T09:55:49Z
podmonitors.monitoring.coreos.com           2021-06-30T09:55:49Z
probes.monitoring.coreos.com                2021-06-30T09:55:49Z
prometheuses.monitoring.coreos.com          2021-06-30T09:55:49Z
prometheusrules.monitoring.coreos.com       2021-06-30T09:55:50Z
servicemonitors.monitoring.coreos.com       2021-06-30T09:55:50Z
thanosrulers.monitoring.coreos.com          2021-06-30T09:55:50Z

[root@master1 manifests]# kubectl api-resources |grep monitoring.coreos.com
alertmanagerconfigs                            monitoring.coreos.com          true        AlertmanagerConfig
alertmanagers                                  monitoring.coreos.com          true         Alertmanager
podmonitors                                    monitoring.coreos.com          true         PodMonitor
probes                                         monitoring.coreos.com          true         Probe
prometheuses                                   monitoring.coreos.com          true         Prometheus
prometheusrules                                monitoring.coreos.com          true         PrometheusRule
servicemonitors                                monitoring.coreos.com          true         ServiceMonitor
thanosrulers                                   monitoring.coreos.com          true         ThanosRuler
其中prometheus是为prometheus server存在的,servicemonitor是exporter(提供metric的接口)的各种抽象。prometheus通过ServiceMonitor提供的metrics数据接口去pull数据的。alertmanager对应的是alertmanager server,prometheusrules对应的是prometheus定义的各种告警文件
官网地址:https://prometheus-operator.dev/docs/prologue/introduction/
4.2、prometheus-operaotr安装
#1、安装
[root@master1 prometheus-yaml]# wget https://github.com/prometheus-operator/kube-prometheus/archive/refs/heads/main.zip
[root@master1 prometheus-yaml]# unzip main.zip ;cd kube-prometheus-main/manifests/setup
[root@master1 setup]# kubectl create -f .
[root@master1 setup]# cd ../; kubectl apply -f .

#2、暴露service,修改为nodePort
[root@master1 manifests]# kubectl edit svc/grafana -n monitoring
[root@master1 manifests]# kubectl edit svc/prometheus-k8s -n monitoring
查看prometheus
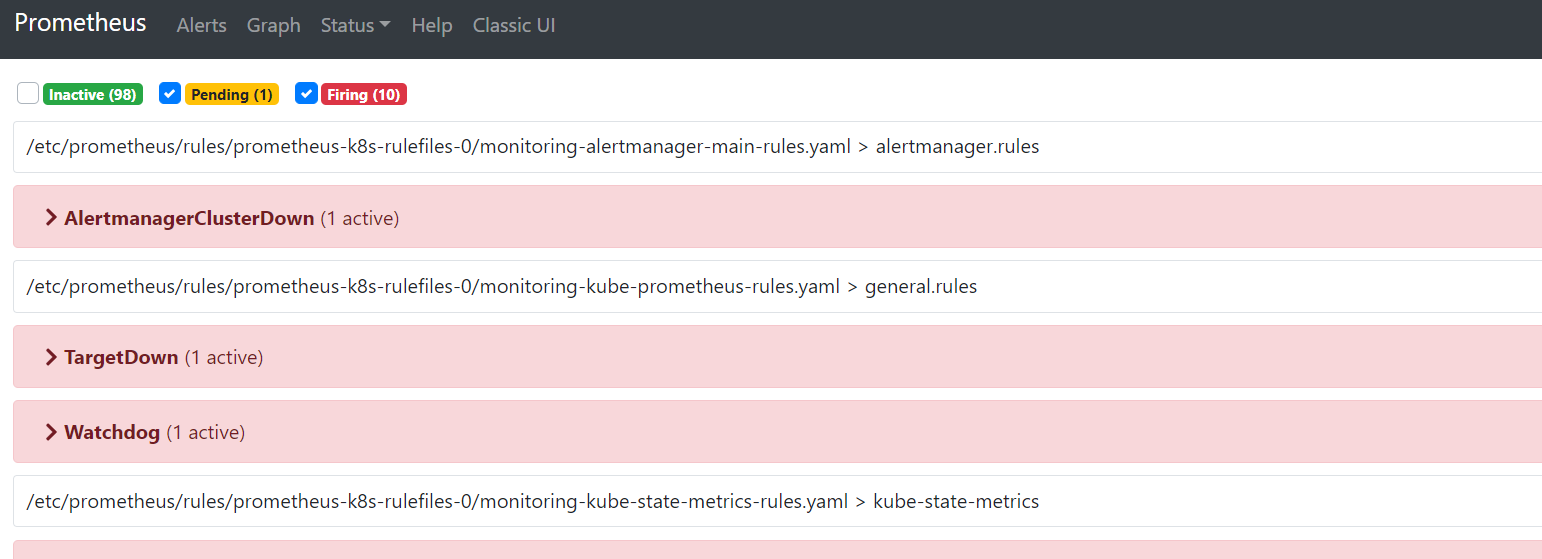
查看grafana
注意:如果集群没有安装dns插件,建议在grafana web界面添加datasource 使用ip方式添加。并设置为default

4.3、监控scheduler和controller
安装后查看grafana搭配那中 controller manager和scheudler grafana大盘无数据问题处理
1、监控scheduler
[root@master1 manifests]# kubectl delete servicemonitor/kube-scheduler -n monitoring
[root@master1 manifests]# vim kubernetes-serviceMonitorKubeScheduler.yaml
apiVersion: monitoring.coreos.com/v1
kind: ServiceMonitor
metadata:
  labels:
    app.kubernetes.io/name: kube-scheduler
  name: kube-scheduler
  namespace: kube-system
spec:
  endpoints:
  - bearerTokenFile: /var/run/secrets/kubernetes.io/serviceaccount/token
    interval: 30s
    port: http-metrics    #这里改为http-metrics
    scheme: http  #这里改为http
    tlsConfig:
      insecureSkipVerify: true
  jobLabel: app.kubernetes.io/name
  namespaceSelector:  #表示去匹配某一命名空间中的service,如果想从所有的namespace中匹配用any: true
    matchNames:
    - kube-system
  selector: # 匹配的 Service 的labels,如果使用mathLabels,则下面的所有标签都匹配时才会匹配该service,如果使用matchExpressions,则至少匹配一个标签的service都会被选择
    matchLabels:
      app.kubernetes.io/name: kube-scheduler
[root@master1 manifests]# kubectl apply -f kubernetes-serviceMonitorKubeScheduler.yaml

[root@master1 my-yaml]# cat scheduler.yaml  #为scheduler创建service
apiVersion: v1
kind: Service
metadata:
  namespace: kube-system
  name: kube-scheduler
  labels:
    app.kubernetes.io/name: kube-scheduler
spec:
  selector:
    component: kube-scheduler
  ports:
  - name: http-metrics
    port: 10251
    targetPort: 10251
    protocol: TCP

2、监控controller-manager
这里使用另外一种方法,servicemonitor(kube-controller-manager)仍然使用monitoring的namespace的
#1、查看默认的ServiceMonitor
[root@master1 manifests]# cat kubernetes-serviceMonitorKubeControllerManager.yaml
apiVersion: monitoring.coreos.com/v1
kind: ServiceMonitor
metadata:
  labels:
    app.kubernetes.io/name: kube-controller-manager
  name: kube-controller-manager
  namespace: monitoring
spec:
  endpoints:
  - bearerTokenFile: /var/run/secrets/kubernetes.io/serviceaccount/token
    interval: 30s
    metricRelabelings:
...
部分内容省略
...
    port: http-metrics  #因为我本地的为controller manger暴露的为http 的metric,这里修改
    scheme: http  #这里也要修改
    tlsConfig:
      insecureSkipVerify: true
  jobLabel: app.kubernetes.io/name
  namespaceSelector:
    matchNames:
    - kube-system
  selector:
    matchLabels:
      app.kubernetes.io/name: kube-controller-manager
[root@master1 manifests]# kubectl apply -f kubernetes-serviceMonitorKubeControllerManager.yaml

#2、创建service
[root@master1 my-yaml]# vi controller-manager.yaml
apiVersion: v1
kind: Service
metadata:
  namespace: kube-system
  name: kube-controller-manager
  labels:
    app.kubernetes.io/name: kube-controller-manager
spec:
  selector:
    component: kube-controller-manager
  ports:
  - name: http-metrics
    port: 10252
    targetPort: 10252
    protocol: TCP
[root@master1 my-yaml]# kubectl apply -f controller-manager.yaml
[root@master1 my-yaml]# kubectl get svc -l app.kubernetes.io/name=kube-controller-manager -n kube-system
NAME                      TYPE        CLUSTER-IP       EXTERNAL-IP   PORT(S)     AGE
kube-controller-manager   ClusterIP   10.102.211.176   <none>        10252/TCP   46s
[root@master1 my-yaml]# kubectl describe  svc -l app.kubernetes.io/name=kube-controller-manager -n kube-system
Name:              kube-controller-manager
Namespace:         kube-system
Labels:            app.kubernetes.io/name=kube-controller-manager
Annotations:       Selector:  component=kube-controller-manager
Type:              ClusterIP
IP:                10.102.211.176
Port:              http-metrics  10252/TCP
TargetPort:        10252/TCP
Endpoints:         192.168.56.101:10252
Session Affinity:  None
Events:            <none>

4.4、自定义监控etcd
把etcd看作一个集群外部的应用
#1、创建访问etcd的secret
[root@master1 my-yaml]# cd /etc/kubernetes/pki/etcd/
[root@master1 etcd]# ls
ca.crt  ca.key  healthcheck-client.crt  healthcheck-client.key  peer.crt  peer.key  server.crt  server.key
[root@master1 etcd]# kubectl -n monitoring create secret generic etcd-certs --from-file=./healthcheck-client.key --from-file=./healthcheck-client.crt  --from-file=./ca.crt
secret/etcd-certs created

#2、prometheus加载secret
[root@master1 manifests]# vim prometheus-prometheus.yaml
...
  image: www.mt.com:9500/prometheus/prometheus:v2.28.0
  secrets:
  - etcd-certs
...
[root@master1 manifests]# kubectl apply -f prometheus-prometheus.yaml
[root@master1 etcd]# kubectl exec  prometheus-k8s-0 -n monitoring -- /bin/ls "/etc/prometheus/secrets/etcd-certs" 2> /dev/null  #证书存放位置
ca.crt
healthcheck-client.crt
healthcheck-client.key

#3、创建servicemonitor
[root@master1 my-yaml]# vim prometheus-serviceMonitorEtcd.yaml
[root@master1 my-yaml]# cat prometheus-serviceMonitorEtcd.yaml
apiVersion: monitoring.coreos.com/v1
kind: ServiceMonitor
metadata:
  labels:
    app.kubernetes.io/name: etcd-k8s
  name: etcd-k8s
  namespace: kube-system
spec:
  jobLabel: etcd-k8s
  endpoints:
  - port: port
    interval: 3s
    scheme: https
    tlsConfig:
      caFile: /etc/prometheus/secrets/etcd-certs/ca.crt
      certFile: /etc/prometheus/secrets/etcd-certs/healthcheck-client.crt
      keyFile: /etc/prometheus/secrets/etcd-certs/healthcheck-client.key
      insecureSkipVerify: true
  selector:
    matchLabels:
      etcd-k8s: etcd
  namespaceSelector:
    matchNames:
    - kube-system
[root@master1 my-yaml]# kubectl create -f prometheus-serviceMonitorEtcd.yaml --dry-run

#4、创建service匹配serviceMonitor
注意:这里把etcd当作一个外部的应用来部署,不通过labelseletor,通过手动创建一个endpoints去指定etcd的访问地址,
[root@master1 my-yaml]# vim etcd-service.yaml
apiVersion: v1
kind: Service
metadata:
  namespace: kube-system
  name: etcd-k8s
  labels:
    etcd-k8s: etcd
spec:
  type: ClusterIP
  clusterIP: None
  ports:
  - name: port
    port: 2379
---
apiVersion: v1
kind: Endpoints
metadata:
  name: etcd-k8s
  namespace: kube-system
  labels:
    etcd-k8s: etcd
subsets:
- addresses:
  - ip: 192.168.56.101
    nodeName: etcd-master1
  ports:
  - name: port
    port: 2379
[root@master1 my-yaml]# kubectl apply -f etcd-service.yaml
service/etcd-k8s created
endpoints/etcd-k8s created
[root@master1 my-yaml]#  kubectl describe svc -n kube-system -l etcd-k8s=etcd  #确认是否关联成功
Name:              etcd-k8s
Namespace:         kube-system
Labels:            etcd-k8s=etcd
Annotations:       Selector:  <none>
Type:              ClusterIP
IP:                None
Port:              port  2379/TCP
TargetPort:        2379/TCP
Endpoints:         192.168.56.101:2379
Session Affinity:  None
Events:            <none>
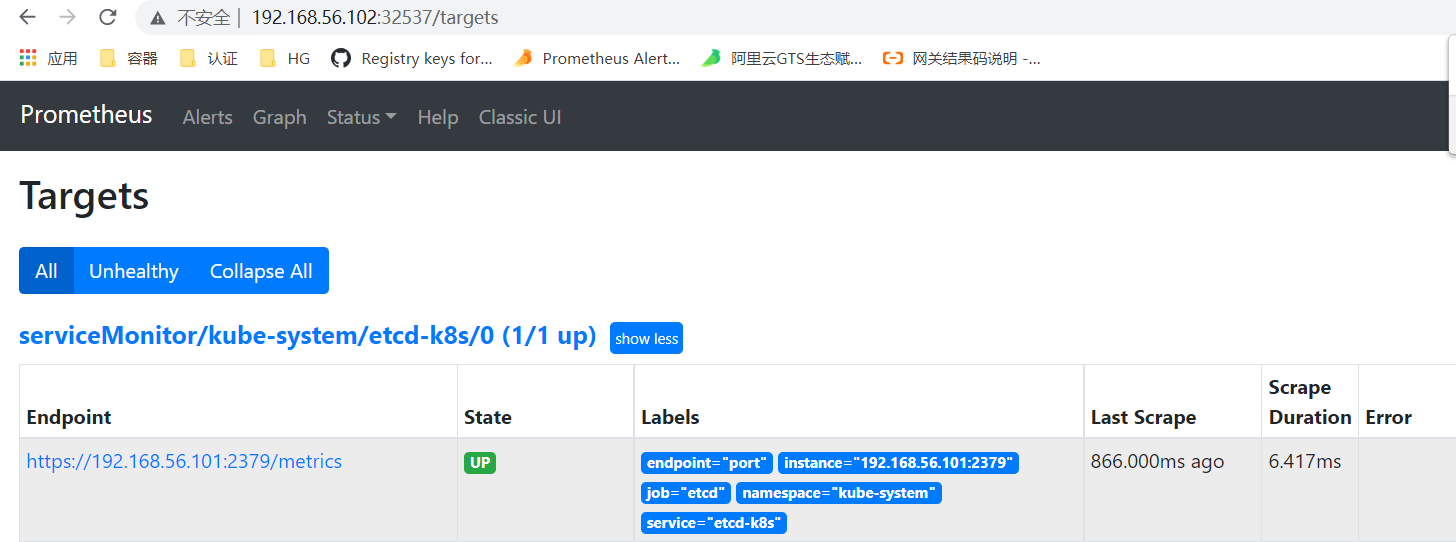
4.5、告警推送注意事项
高版本对不同namespace进行了隔离
alertManagerConfig的动态发现是只会发现当前namespace下面的,如果需要推送不同namespace的告警信息,注意事项:
#1、告警信息确认
1)确认当前有告警内容,确认告警内容的所属的namespace
2)确认alertmanager已经收到告警信息,可通过kubectl logs 确认

#2、确认alertmanager配置信息
alertmanager.spec.alertmanagerConfigNamespaceSelector  还是 alertmanager.spec.alertmanagerConfigSelector
这里对alertmanagerConfigNamespaceSelector 说明
...
spec:
  alertmanagerConfigNamespaceSelector:
    matchLabels:
       alertmanagerconfig: enabled #匹配有该label的namepsace告警才会被发送,相应的需要在对应的namespace上打上该标签
...

#3、确认prometheusrules的rule有对应的标签
[root@master1 manifests]# kubectl get prometheusrules/alertmanager-main-rules   -n monitoring  -o yaml
spec:
  groups:
  - name: alertmanager.rules
    rules:
    - alert: AlertmanagerFailedReload
      annotations:
        description: Configuration has failed to load for {{ $labels.namespace }}/{{
          $labels.pod}}.
        runbook_url: https://github.com/prometheus-operator/kube-prometheus/wiki/alertmanagerfailedreload
        summary: Reloading an Alertmanager configuration has failed.
      expr: |
        # Without max_over_time, failed scrapes could create false negatives, see
        # https://www.robustperception.io/alerting-on-gauges-in-prometheus-2-0 for details.
        max_over_time(alertmanager_config_last_reload_successful{job="alertmanager-main",namespace="monitoring"}[5m]) == 0
      for: 10m
      labels:
        severity: critical
        namespace: monitoring  #这里要加上自己所在namespace的标签才会被alertmanager推送

#4、创建alertmanagerconfig在需要推送告警的namespace
[root@master1 my-yaml]# cat alertmanagerconfig.yaml  #如果所有目标namespace配置都一样,则需要在不同的namespace apply以下,如果不同namespace有不同的alertmanagerconfig则需要单独创建,并在不同的namespace apply
apiVersion: monitoring.coreos.com/v1alpha1
kind: AlertmanagerConfig
metadata:
  name: alertmanager-config
  labels:
    alertmanagerconfig: example
spec:
  route:
    groupBy: ['alertname','job','severity']
    groupWait: 30s
    groupInterval: 2m
    repeatInterval: 5m
    receiver: 'webhook'
  receivers:
  - name: 'webhook'
    webhookConfigs:
    - url: 'http://127.0.0.1:8086/dingtalk/webhook1/send'
注意:当前版本alertmanagerconfig定义成了一个secret,修改 manifests/alertmanager-secret.yaml 即可,如果在其他集群中使用alertmanagerconfig这个k8s crd作为配置文件,则可通过apply的方式调整配置信息
4.6、其他
#1、规则文件
prometheu pod内查看
/prometheus $ ls /etc/prometheus/rules/prometheus-k8s-rulefiles-0/  #这里有所有定义的规则文件,或者自己创建prometheusrules 这个资源对象来创建
monitoring-alertmanager-main-rules.yaml          monitoring-node-exporter-rules.yaml
monitoring-kube-prometheus-rules.yaml            monitoring-prometheus-k8s-prometheus-rules.yaml
monitoring-kube-state-metrics-rules.yaml         monitoring-prometheus-operator-rules.yaml
monitoring-kubernetes-monitoring-rules.yaml

[root@master1 my-yaml]# kubectl get prometheus/k8s -n monitoring  -o yaml
...
  ruleSelector: #匹配这些标签的才会被,如果要自己创建prometheusrules则需要添加这两个标签
    matchLabels:
      prometheus: k8s
      role: alert-rules
...
[root@master1 my-yaml]# kubectl get prometheusrules -l prometheus=k8s,role=alert-rules -A
NAMESPACE    NAME                              AGE
monitoring   alertmanager-main-rules           45h
monitoring   kube-prometheus-rules             45h
monitoring   kube-state-metrics-rules          45h
monitoring   kubernetes-monitoring-rules       45h
monitoring   node-exporter-rules               45h
monitoring   prometheus-k8s-prometheus-rules   45h
monitoring   prometheus-operator-rules         45h
五、扩展
Prometheus在后续的性能扩展方面的策略
1、官方提供的联邦 Federation allows a Prometheus server to scrape selected time series from another Prometheus server. 。联邦提供两种不通的用例:1)从将数据从一个prometheus拉到另一个服务中;2)等级联邦,区分全局和局部prometheus
2、Thanos: Open source, highly available Prometheus setup with long term storage capabilities.实现跨集群联合、跨集群无限存储和全局查询为Prometheus增加高可用性的插件。重点开源。链接
检测工具和脚本
网络检测工具:smokePing
3、修改大盘默认时间间隔
grafana 大盘json文件
  "time": {
   "from": "now-6h",
	"to": "now"
4、修改登录超时时间
login_maximum_inactive_lifetime_duration = 2M
login_maximum_lifetime_duration = 2M
token_rotation_interval_minutes = 1000
Prometheus和alertmanager增加鉴权
步骤1:密码文件生成:
[root@iZ2zef0llgs69lx3vc9rfgZ prometheus-2.27.1.linux-amd64]# cat ../a.py
import getpass
import bcrypt

password = getpass.getpass("password: ")
hashed_password = bcrypt.hashpw(password.encode("utf-8"), bcrypt.gensalt())
print(hashed_password.decode())
步骤2:Prometheus:增加鉴权,一个是控制它,一个是访问alertmanager时提供用户名和密码
[root@iZ2zef0llgs69lx3vc9rfgZ prometheus-2.27.1.linux-amd64]# cat prometheus.yml
# my global config
global:
  scrape_interval:     15s # Set the scrape interval to every 15 seconds. Default is every 1 minute.
  evaluation_interval: 15s # Evaluate rules every 15 seconds. The default is every 1 minute.
  # scrape_timeout is set to the global default (10s).

# Alertmanager configuration
alerting:
  alertmanagers:
  - static_configs:
    - targets:
      - 127.0.0.1:9093
    basic_auth:
      username: admin
      password: admin123!

# Load rules once and periodically evaluate them according to the global 'evaluation_interval'.
rule_files:
  - ./rules/*.yml
  # - "second_rules.yml"

# A scrape configuration containing exactly one endpoint to scrape:
# Here it's Prometheus itself.
scrape_configs:
  # The job name is added as a label `job=<job_name>` to any timeseries scraped from this config.
  - job_name: 'prometheus'

    # metrics_path defaults to '/metrics'
    # scheme defaults to 'http'.

    static_configs:
    - targets: ['localhost:9100']

[root@iZ2zef0llgs69lx3vc9rfgZ prometheus-2.27.1.linux-amd64]# cat web.yml #
basic_auth_users:
  admin: $2b$12$Y1AmEmEipc3HOx/kVIkVAusFKE3WziWUzzVV.fOMfl1PkpZixW7x.
[root@iZ2zef0llgs69lx3vc9rfgZ prometheus-2.27.1.linux-amd64]# ./promtool check config prometheus.yml  #检查配置
[root@iZ2zef0llgs69lx3vc9rfgZ prometheus-2.27.1.linux-amd64]# ./promtool check web-config web.yml
web.yml SUCCESS
启动: nohup ./prometheus --web.enable-lifecycle --web.enable-admin-api --web.config.file=web.yml &>./a.log &
步骤3:Alertmanager添加鉴权
启动:
 nohup ./alertmanager --config.file=alertmanager.yml --web.config.file=./web.yml &>/dev/null &
配置文件:
[root@iZ2zef0llgs69lx3vc9rfgZ prometheus-2.27.1.linux-amd64]# cat ../alertmanager-0.22.2.linux-amd64/web.yml
basic_auth_users:
  admin: $2b$12$Y1AmEmEipc3HOx/kVIkVAusFKE3WziWUzzVV.fOMfl1PkpZixW7x.
5、修改prometheus钉钉告警模板
- 修改prometheus-webhook的配置
## Request timeout
# timeout: 5s
## Customizable templates path
templates:
  - contrib/templates/mytemplate.tmpl
targets:
  webhook1:
    url: https://oapi.dingtalk.com/robot/send?access_token=$你的TOKEN
    # secret for signature
    secret: SEC000000000000000000000
    message:
      text: '{{ template "_ding.link.content" . }}'
- 修改模板文件-template.tmpl
[root@iZyz800ony0blg7zox9h4gZ prometheus-webhook-dingtalk-1.4.0.linux-amd64]# cat contrib/templates/mytemplate.tmpl
{{ define "__subject" }}[{{ .Status | toUpper }}{{ if eq .Status "firing" }}:{{ .Alerts.Firing | len }}{{ end }}] {{ .GroupLabels.SortedPairs.Values | join " " }} {{ if gt (len .CommonLabels) (len .GroupLabels) }}({{ with .CommonLabels.Remove .GroupLabels.Names }}{{ .Values | join " " }}{{ end }}){{ end }}{{ end }}
{{ define "__alertmanagerURL" }}{{ .ExternalURL }}/#/alerts?receiver={{ .Receiver }}{{ end }}
{{ define "__text_alert_list" }}{{ range . }}
**Labels**
{{ range .Labels.SortedPairs }}> - {{ .Name }}: {{ .Value | markdown | html }}
{{ end }}
**Annotations**
{{ range .Annotations.SortedPairs }}> - {{ .Name }}: {{ .Value | markdown | html }}
{{ end }}
**Source:** [{{ .GeneratorURL }}]({{ .GeneratorURL }})
{{ end }}{{ end }}
{{ define "___text_alert_list" }}{{ range . }}
---
**告警主题:** {{ .Labels.alertname }}
**触发时间:** {{ dateInZone "2006.01.02 15:04:05" (.StartsAt) "Asia/Shanghai" }}
**事件信息:** {{ .Annotations.description }}
{{ end }}
{{ end }}
{{ define "___text_alertresovle_list" }}{{ range . }}
---
**告警主题:** {{ .Labels.alertname }}
**触发时间:** {{ dateInZone "2006.01.02 15:04:05" (.StartsAt) "Asia/Shanghai" }}
**结束时间:** {{ dateInZone "2006.01.02 15:04:05" (.EndsAt) "Asia/Shanghai" }}
**事件信息:** {{ .Labels.description }}
{{ end }}
{{ end }}
{{/* Default */}}
{{ define "_default.title" }}{{ template "__subject" . }}{{ end }}
{{ define "_default.content" }} [{{ .Status | toUpper }}{{ if eq .Status "firing" }}:{{ .Alerts.Firing | len }}{{ end }}\] **[{{ index .GroupLabels "alertname" }}]({{ template "__alertmanagerURL" . }})**
{{ if gt (len .Alerts.Firing) 0 -}}
**========告警触发========**
{{ template "___text_alert_list" .Alerts.Firing }}
{{- end }}
{{ if gt (len .Alerts.Resolved) 0 -}}

**========告警恢复========**
{{ template "___text_alertresovle_list" .Alerts.Resolved }}
{{- end }}
{{- end }}
{{/* Legacy */}}
{{ define "legacy.title" }}{{ template "__subject" . }}{{ end }}
{{ define "legacy.content" }} [{{ .Status | toUpper }}{{ if eq .Status "firing" }}:{{ .Alerts.Firing | len }}{{ end }}\] **[{{ index .GroupLabels "alertname" }}]({{ template "__alertmanagerURL" . }})**
{{ template "__text_alert_list" .Alerts.Firing }}
{{- end }}
{{/* Following names for compatibility */}}
{{ define "_ding.link.title" }}{{ template "_default.title" . }}{{ end }}
{{ define "_ding.link.content" }}{{ template "_default.content" . }}{{ end }}
参考博客: https://www.cnblogs.com/skymyyang/p/11093686.html
学习站点推荐
https://song-jia-yang.gitbook.io/prometheus/
https://github.com/grafana/loki


【推荐】国内首个AI IDE,深度理解中文开发场景,立即下载体验Trae
【推荐】编程新体验,更懂你的AI,立即体验豆包MarsCode编程助手
【推荐】抖音旗下AI助手豆包,你的智能百科全书,全免费不限次数
【推荐】轻量又高性能的 SSH 工具 IShell:AI 加持,快人一步
· AI与.NET技术实操系列:基于图像分类模型对图像进行分类
· go语言实现终端里的倒计时
· 如何编写易于单元测试的代码
· 10年+ .NET Coder 心语,封装的思维:从隐藏、稳定开始理解其本质意义
· .NET Core 中如何实现缓存的预热?
· 25岁的心里话
· 闲置电脑爆改个人服务器(超详细) #公网映射 #Vmware虚拟网络编辑器
· 基于 Docker 搭建 FRP 内网穿透开源项目(很简单哒)
· 零经验选手,Compose 一天开发一款小游戏!
· 一起来玩mcp_server_sqlite,让AI帮你做增删改查!!