【Redis】限流器
限流器
简介
限流器顾名思义,就是对流量的限制,准确的说应该是流量控制,当然并不是无理由的进行流量控制,应该是在计算机硬件能够承载的范围内,防止系统突然流量过高导致系统资源耗尽,最终 系统宕机或崩溃,使得服务器上的应用全部挂掉。限流器是在保证应用能够正常提供服务的前提下,通过流量控制实现对服务的一种保护手段。
当然流量的阈值到底是多少比较合适,这个可能需要根据实际硬件配置、系统环境以前其他相关参数经过各种测试与验证才能知道...
本篇文章仅讨论限流中相关的技术,在实际应用中使用的限流器,除了包含流量限制的作用,为了提高用户体验,还需要对流量超出是,做出对应的应对策略,比如直接拒绝服务,让请求进行排队 ,或者服务降级都是比较好的处理手段,这样既能给用户友好地体验,又能保证服务正常。
核心
有几个核心概念需要先了解到:
- 限流的目标对象:请求数量、网络流量、用户访问次数...
- 限流的维度:时间、IP、用户
- 限流的实现层面:前端页面、WEB代理、服务接口...
应用场景
- 防止服务接口短时间涌入大量请求导致服务器资源快速耗尽最终服务无法访问
- 突发流量时通过排队策略实现流量削峰,杜绝对服务器的冲击
- 针对ip、或用户控制对某个资源的访问次数
- 针对高频接口,控制单位时间内允许的请求次数
- 结合ip或其他因子防爬虫
限流方法
按数量进行控制,达到设置的阈值则进行限流,其中固定窗口,滑动窗口则是通过该方法实现。
固定窗口
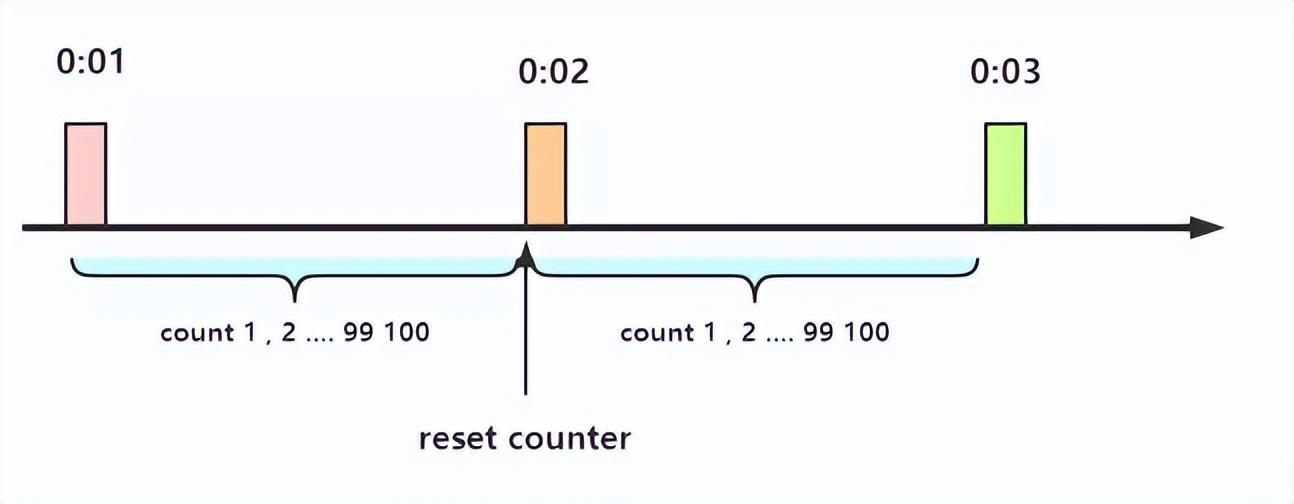
通过控制时间单元内允许的请求数量,一旦达到阈值,则不会处理该请求后续相关的业务或者直接让请求快速失败并给予提示。
代码实现
下面是简单的代码实现,QPS 限制为 2,这里的代码做了一些优化,并没有单独开一个线程去每隔 1 秒重置计数器,而是在每次调用时进行时间间隔计算来确定是否先重置计数器。
/**
 * @author https://www.wdbyte.com
 */
public class RateLimiterSimpleWindow {
    // 阈值
    private static Integer QPS = 2;
    // 时间窗口(毫秒)
    private static long TIME_WINDOWS = 1000;
    // 计数器
    private static AtomicInteger REQ_COUNT = new AtomicInteger();

    private static long START_TIME = System.currentTimeMillis();

    public synchronized static boolean tryAcquire() {
        if ((System.currentTimeMillis() - START_TIME) > TIME_WINDOWS) {
            REQ_COUNT.set(0);
            START_TIME = System.currentTimeMillis();
        }
        return REQ_COUNT.incrementAndGet() <= QPS;
    }

    public static void main(String[] args) throws InterruptedException {
        for (int i = 0; i < 10; i++) {
            Thread.sleep(250);
            LocalTime now = LocalTime.now();
            if (!tryAcquire()) {
                System.out.println(now + " 被限流");
            } else {
                System.out.println(now + " 做点什么");
            }
        }
    }
}
运行结果:
20:53:43.038922 做点什么
20:53:43.291435 做点什么
20:53:43.543087 被限流
20:53:43.796666 做点什么
20:53:44.050855 做点什么
20:53:44.303547 被限流
20:53:44.555008 被限流
20:53:44.809083 做点什么
20:53:45.063828 做点什么
20:53:45.314433 被限流
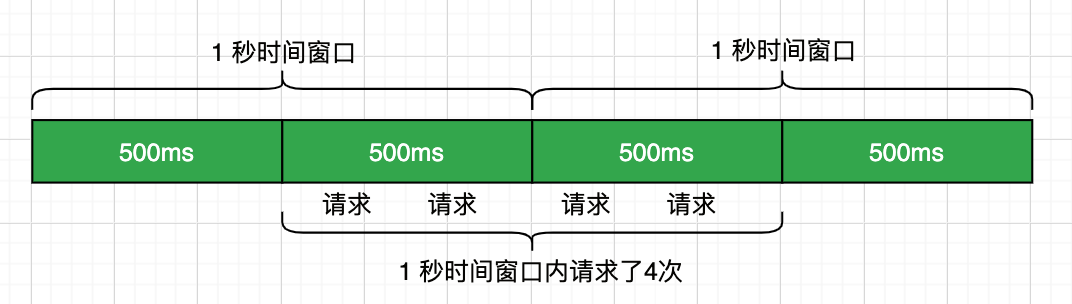
从输出结果中可以看到大概每秒操作 3 次,由于限制 QPS 为 2,所以平均会有一次被限流。看起来可以了,不过我们思考一下就会发现这种简单的限流方式是有问题的,虽然我们限制了 QPS 为 2,但是当遇到时间窗口的临界突变时,如 1s 中的后 500 ms 和第 2s 的前 500ms 时,虽然是加起来是 1s 时间,却可以被请求 4 次。
简单修改测试代码,可以进行验证:
// 先休眠 400ms,可以更快的到达时间窗口。
Thread.sleep(400);
for (int i = 0; i < 10; i++) {
    Thread.sleep(250);
    if (!tryAcquire()) {
        System.out.println("被限流");
    } else {
        System.out.println("做点什么");
    }
}
得到输出中可以看到连续 4 次请求,间隔 250 ms 没有却被限制。:
20:51:17.395087 做点什么
20:51:17.653114 做点什么
20:51:17.903543 做点什么
20:51:18.154104 被限流
20:51:18.405497 做点什么
20:51:18.655885 做点什么
20:51:18.906177 做点什么
20:51:19.158113 被限流
20:51:19.410512 做点什么
20:51:19.661629 做点什么
滑动窗口
我们已经知道固定窗口算法的实现方式以及它所存在的问题,而滑动窗口算法是对固定窗口算法的改进。既然固定窗口算法在遇到时间窗口的临界突变时会有问题,那么我们在遇到下一个时间窗口前也调整时间窗口不就可以了吗?
下面是滑动窗口的示意图。
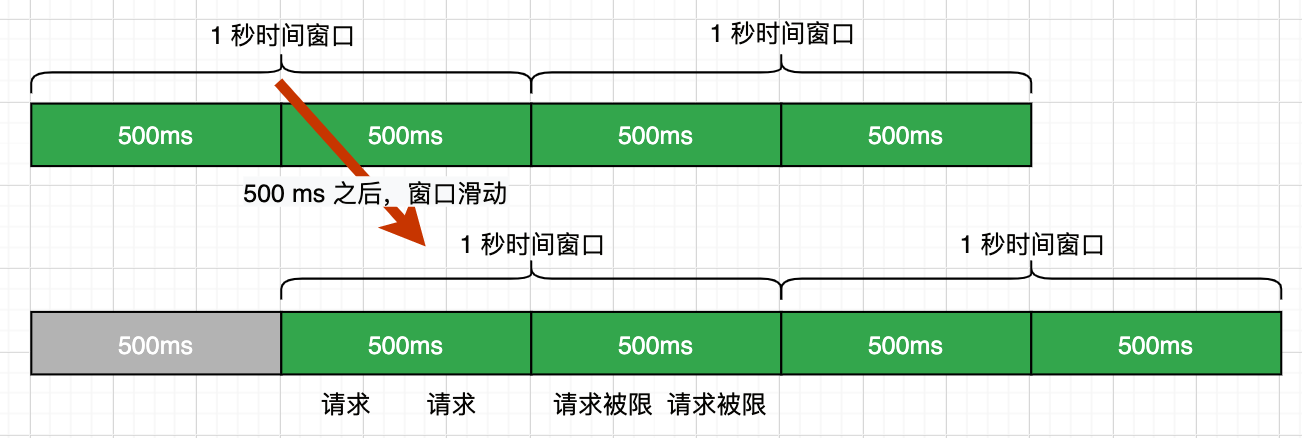
上图的示例中,每 500ms 滑动一次窗口,可以发现窗口滑动的间隔越短,时间窗口的临界突变问题发生的概率也就越小,不过只要有时间窗口的存在,还是有可能发生时间窗口的临界突变问题。
代码实现
下面是基于以上滑动窗口思路实现的简单的滑动窗口限流工具类。
package com.wdbyte.rate.limiter;

import java.time.LocalTime;
import java.util.concurrent.atomic.AtomicInteger;

/**
 * 滑动窗口限流工具类
 *
 * @author https://www.wdbyte.com
 */
public class RateLimiterSlidingWindow {
    /**
     * 阈值
     */
    private int qps = 2;
    /**
     * 时间窗口总大小(毫秒)
     */
    private long windowSize = 1000;
    /**
     * 多少个子窗口
     */
    private Integer windowCount = 10;
    /**
     * 窗口列表
     */
    private WindowInfo[] windowArray = new WindowInfo[windowCount];

    public RateLimiterSlidingWindow(int qps) {
        this.qps = qps;
        long currentTimeMillis = System.currentTimeMillis();
        for (int i = 0; i < windowArray.length; i++) {
            windowArray[i] = new WindowInfo(currentTimeMillis, new AtomicInteger(0));
        }
    }

    /**
     * 1. 计算当前时间窗口
     * 2. 更新当前窗口计数 & 重置过期窗口计数
     * 3. 当前 QPS 是否超过限制
     *
     * @return
     */
    public synchronized boolean tryAcquire() {
        long currentTimeMillis = System.currentTimeMillis();
        // 1. 计算当前时间窗口
        int currentIndex = (int)(currentTimeMillis % windowSize / (windowSize / windowCount));
        // 2.  更新当前窗口计数 & 重置过期窗口计数
        int sum = 0;
        for (int i = 0; i < windowArray.length; i++) {
            WindowInfo windowInfo = windowArray[i];
            if ((currentTimeMillis - windowInfo.getTime()) > windowSize) {
                windowInfo.getNumber().set(0);
                windowInfo.setTime(currentTimeMillis);
            }
            if (currentIndex == i && windowInfo.getNumber().get() < qps) {
                windowInfo.getNumber().incrementAndGet();
            }
            sum = sum + windowInfo.getNumber().get();
        }
        // 3. 当前 QPS 是否超过限制
        return sum <= qps;
    }

    private class WindowInfo {
        // 窗口开始时间
        private Long time;
        // 计数器
        private AtomicInteger number;

        public WindowInfo(long time, AtomicInteger number) {
            this.time = time;
            this.number = number;
        }
        // get...set...
    }
}
下面是测试用例,设置 QPS 为 2,测试次数 20 次,每次间隔 300 毫秒,预计成功次数在 12 次左右。
public static void main(String[] args) throws InterruptedException {
    int qps = 2, count = 20, sleep = 300, success = count * sleep / 1000 * qps;
    System.out.println(String.format("当前QPS限制为:%d,当前测试次数:%d,间隔:%dms,预计成功次数:%d", qps, count, sleep, success));
    success = 0;
    RateLimiterSlidingWindow myRateLimiter = new RateLimiterSlidingWindow(qps);
    for (int i = 0; i < count; i++) {
        Thread.sleep(sleep);
        if (myRateLimiter.tryAcquire()) {
            success++;
            if (success % qps == 0) {
                System.out.println(LocalTime.now() + ": success, ");
            } else {
                System.out.print(LocalTime.now() + ": success, ");
            }
        } else {
            System.out.println(LocalTime.now() + ": fail");
        }
    }
    System.out.println();
    System.out.println("实际测试成功次数:" + success);
}
下面是测试的结果。
当前QPS限制为:2,当前测试次数:20,间隔:300ms,预计成功次数:12
16:04:27.077782: success, 16:04:27.380715: success,
16:04:27.684244: fail
16:04:27.989579: success, 16:04:28.293347: success,
16:04:28.597658: fail
16:04:28.901688: fail
16:04:29.205262: success, 16:04:29.507117: success,
16:04:29.812188: fail
16:04:30.115316: fail
16:04:30.420596: success, 16:04:30.725897: success,
16:04:31.028599: fail
16:04:31.331047: fail
16:04:31.634127: success, 16:04:31.939411: success,
16:04:32.242380: fail
16:04:32.547626: fail
16:04:32.847965: success,
实际测试成功次数:11
滑动日志
滑动日志算法是实现限流的另一种方法,这种方法比较简单。基本逻辑就是记录下所有的请求时间点,新请求到来时先判断最近指定时间范围内的请求数量是否超过指定阈值,由此来确定是否达到限流,这种方式没有了时间窗口突变的问题,限流比较准确,但是因为要记录下每次请求的时间点,所以占用的内存较多。
代码实现
下面是简单实现的 一个滑动日志算法,因为滑动日志要每次请求单独存储一条记录,可能占用内存过多。所以下面这个实现其实不算严谨的滑动日志,更像一个把 1 秒时间切分成 1000 个时间窗口的滑动窗口算法。
package com.wdbyte.rate.limiter;

import java.time.LocalTime;
import java.util.HashSet;
import java.util.Set;
import java.util.TreeMap;

/**
 * 滑动日志方式限流
 * 设置 QPS 为 2.
 *
 * @author https://www.wdbyte.com
 */
public class RateLimiterSildingLog {

    /**
     * 阈值
     */
    private Integer qps = 2;
    /**
     * 记录请求的时间戳,和数量
     */
    private TreeMap<Long, Long> treeMap = new TreeMap<>();

    /**
     * 清理请求记录间隔, 60 秒
     */
    private long claerTime = 60 * 1000;

    public RateLimiterSildingLog(Integer qps) {
        this.qps = qps;
    }

    public synchronized boolean tryAcquire() {
        long now = System.currentTimeMillis();
        // 清理过期的数据老数据,最长 60 秒清理一次
        if (!treeMap.isEmpty() && (treeMap.firstKey() - now) > claerTime) {
            Set<Long> keySet = new HashSet<>(treeMap.subMap(0L, now - 1000).keySet());
            for (Long key : keySet) {
                treeMap.remove(key);
            }
        }
        // 计算当前请求次数
        int sum = 0;
        for (Long value : treeMap.subMap(now - 1000, now).values()) {
            sum += value;
        }
        // 超过QPS限制,直接返回 false
        if (sum + 1 > qps) {
            return false;
        }
        // 记录本次请求
        if (treeMap.containsKey(now)) {
            treeMap.compute(now, (k, v) -> v + 1);
        } else {
            treeMap.put(now, 1L);
        }
        return sum <= qps;
    }

    public static void main(String[] args) throws InterruptedException {
        RateLimiterSildingLog rateLimiterSildingLog = new RateLimiterSildingLog(3);
        for (int i = 0; i < 10; i++) {
            Thread.sleep(250);
            LocalTime now = LocalTime.now();
            if (rateLimiterSildingLog.tryAcquire()) {
                System.out.println(now + " 做点什么");
            } else {
                System.out.println(now + " 被限流");
            }
        }
    }
}
代码中把阈值 QPS 设定为 3,运行可以得到如下日志:
20:51:17.395087 做点什么
20:51:17.653114 做点什么
20:51:17.903543 做点什么
20:51:18.154104 被限流
20:51:18.405497 做点什么
20:51:18.655885 做点什么
20:51:18.906177 做点什么
20:51:19.158113 被限流
20:51:19.410512 做点什么
20:51:19.661629 做点什么
漏桶算法
漏桶算法中的漏桶是一个形象的比喻,这里可以用生产者消费者模式进行说明,请求是一个生产者,每一个请求都如一滴水,请求到来后放到一个队列(漏桶)中,而桶底有一个孔,不断的漏出水滴,就如消费者不断的在消费队列中的内容,消费的速率(漏出的速度)等于限流阈值。即假如 QPS 为 2,则每 1s / 2= 500ms 消费一次。漏桶的桶有大小,就如队列的容量,当请求堆积超过指定容量时,会触发拒绝策略。
下面是漏桶算法的示意图。
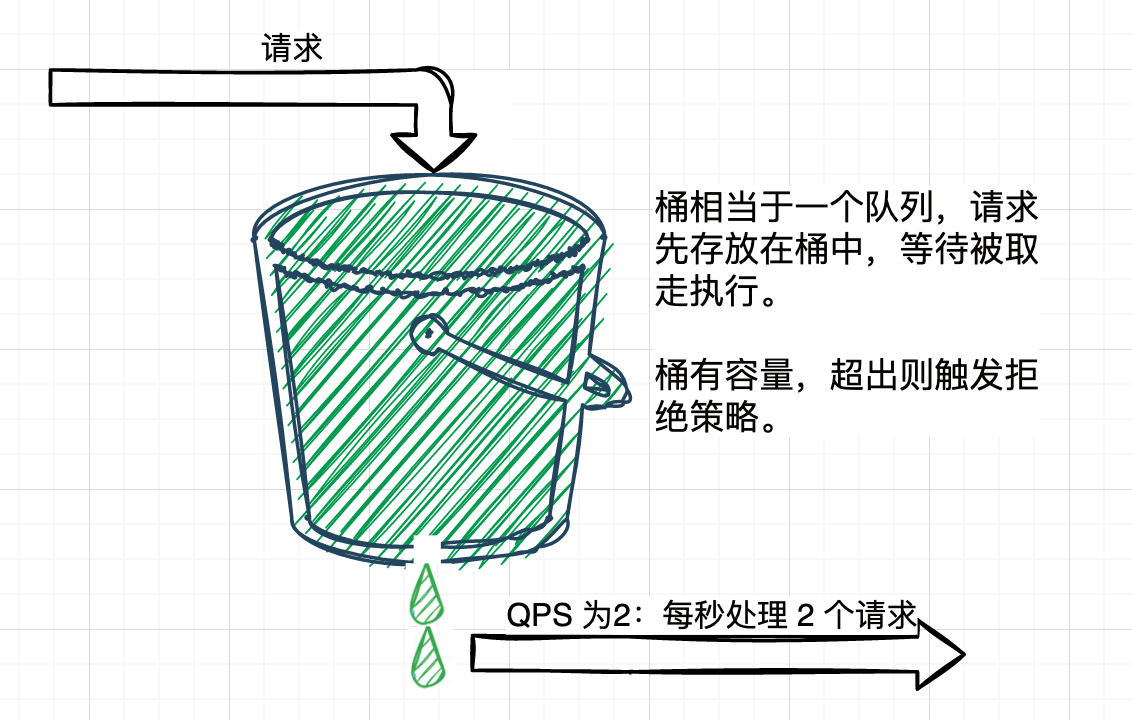
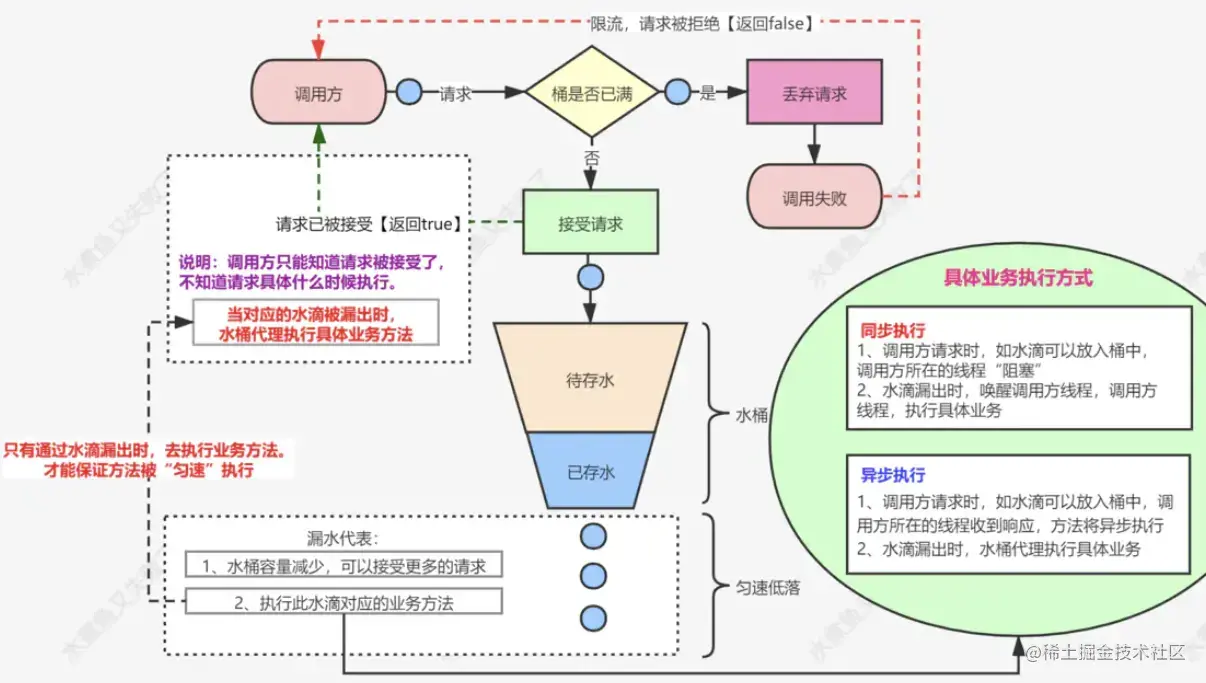
由介绍可以知道,漏桶模式中的消费处理总是能以恒定的速度进行,可以很好的保护自身系统不被突如其来的流量冲垮;但是这也是漏桶模式的缺点,假设 QPS 为 2,同时 2 个请求进来,2 个请求并不能同时进行处理响应,因为每 1s / 2= 500ms 只能处理一个请求
一个固定容量的桶,有水流进来,也有水流出去。对于流进来的水来说,我们无法预计一共有多少水会流进来,也无法预计水流的速度。但是对于流出去的水来说,这个桶可以固定水流出的速率(处理速度),从而达到流量整形和流量控制的效果。
漏桶算法有以下特点:
- 漏桶具有固定容量,出水速率是固定常量(流出请求)
- 如果桶是空的,则不需流出水滴
- 可以以任意速率流入水滴到漏桶(流入请求)
- 如果流入水滴超出了桶的容量,则流入的水滴溢出(新请求被拒绝)
漏桶限制的是常量流出速率(即流出速率是一个固定常量值),所以最大的速率就是出水的速率,不能出现突发流量。
问题:当短时间内如果有大量的突发请求时,即使服务器负载不高,每个请求也需要等待一段时间(水滴间隔)才能被响应
漏斗有一个进水口 和 一个出水口,出水口以一定速率出水,并且有一个最大出水速率:
在漏斗中没有水的时候,
- 如果进水速率小于等于最大出水速率,那么,出水速率等于进水速率,此时,不会积水
- 如果进水速率大于最大出水速率,那么,漏斗以最大速率出水,此时,多余的水会积在漏斗中
在漏斗中有水的时候
- 出水口以最大速率出水
- 如果漏斗未满,且有进水的话,那么这些水会积在漏斗中
- 如果漏斗已满,且有进水的话,那么这些水会溢出到漏斗之外
import java.util.Map;
import java.util.concurrent.ConcurrentHashMap;

/**
 * 漏斗限流算法
 *
 * @author dadiyang
 * @date 2018/9/28
 */
public class FunnelRateLimiter {
    private Map<String, Funnel> funnelMap = new ConcurrentHashMap<>();

    public static void main(String[] args) throws InterruptedException {
        FunnelRateLimiter limiter = new FunnelRateLimiter();
        int testAccessCount = 30;
        int capacity = 5;
        int allowQuota = 5;
        int perSecond = 30;
        int allowCount = 0;
        int denyCount = 0;
        for (int i = 0; i < testAccessCount; i++) {
            boolean isAllow = limiter.isActionAllowed("dadiyang", "doSomething", 5, 5, 30);
            if (isAllow) {
                allowCount++;
            } else {
                denyCount++;
            }
            System.out.println("访问权限:" + isAllow);
            Thread.sleep(1000);
        }
        System.out.println("报告:");
        System.out.println("漏斗容量:" + capacity);
        System.out.println("漏斗流动速率:" + allowQuota + "次/" + perSecond + "秒");

        System.out.println("测试次数=" + testAccessCount);
        System.out.println("允许次数=" + allowCount);
        System.out.println("拒绝次数=" + denyCount);
    }

    /**
     * 根据给定的漏斗参数检查是否允许访问
     *
     * @param username   用户名
     * @param action     操作
     * @param capacity   漏斗容量
     * @param allowQuota 每单个单位时间允许的流量
     * @param perSecond  单位时间(秒)
     * @return 是否允许访问
     */
    public boolean isActionAllowed(String username, String action, int capacity, int allowQuota, int perSecond) {
        String key = "funnel:" + action + ":" + username;
        if (!funnelMap.containsKey(key)) {
            funnelMap.put(key, new Funnel(capacity, allowQuota, perSecond));
        }
        Funnel funnel = funnelMap.get(key);
        return funnel.watering(1);
    }

    private static class Funnel {
        private int capacity;
        private float leakingRate;
        private int leftQuota;
        private long leakingTs;

        public Funnel(int capacity, int count, int perSecond) {
            this.capacity = capacity;
            // 因为计算使用毫秒为单位的
            perSecond *= 1000;
            this.leakingRate = (float) count / perSecond;
        }

        /**
         * 根据上次水流动的时间,腾出已流出的空间
         */
        private void makeSpace() {
            long now = System.currentTimeMillis();
            long time = now - leakingTs;
            int leaked = (int) (time * leakingRate);
            if (leaked < 1) {
                return;
            }
            leftQuota += leaked;
            // 如果剩余大于容量,则剩余等于容量
            if (leftQuota > capacity) {
                leftQuota = capacity;
            }
            leakingTs = now;
        }

        /**
         * 漏斗漏水
         *
         * @param quota 流量
         * @return 是否有足够的水可以流出(是否允许访问)
         */
        public boolean watering(int quota) {
            makeSpace();
            int left = leftQuota - quota;
            if (left >= 0) {
                leftQuota = left;
                return true;
            }
            return false;
        }
    }
}
令牌桶算法
令牌桶算法(Token Bucket)是网络流量整形(Traffic Shaping)和速率限制(Rate Limiting)中最常使用的一种算法。典型情况下,令牌桶算法用来控制发送到网络上的数据的数目,并允许突发数据的发送。
令牌桶算法同样是实现限流是一种常见的思路,最为常用的 Google 的 Java 开发工具包 Guava 中的限流工具类 RateLimiter 就是令牌桶的一个实现。令牌桶的实现思路类似于生产者和消费之间的关系。
系统服务作为生产者,按照指定频率向桶(容器)中添加令牌,如 QPS 为 2,每 500ms 向桶中添加一个令牌,如果桶中令牌数量达到阈值,则不再添加。
请求执行作为消费者,每个请求都需要去桶中拿取一个令牌,取到令牌则继续执行;如果桶中无令牌可取,就触发拒绝策略,可以是超时等待,也可以是直接拒绝本次请求,由此达到限流目的。
下面是令牌桶限流算法示意图。
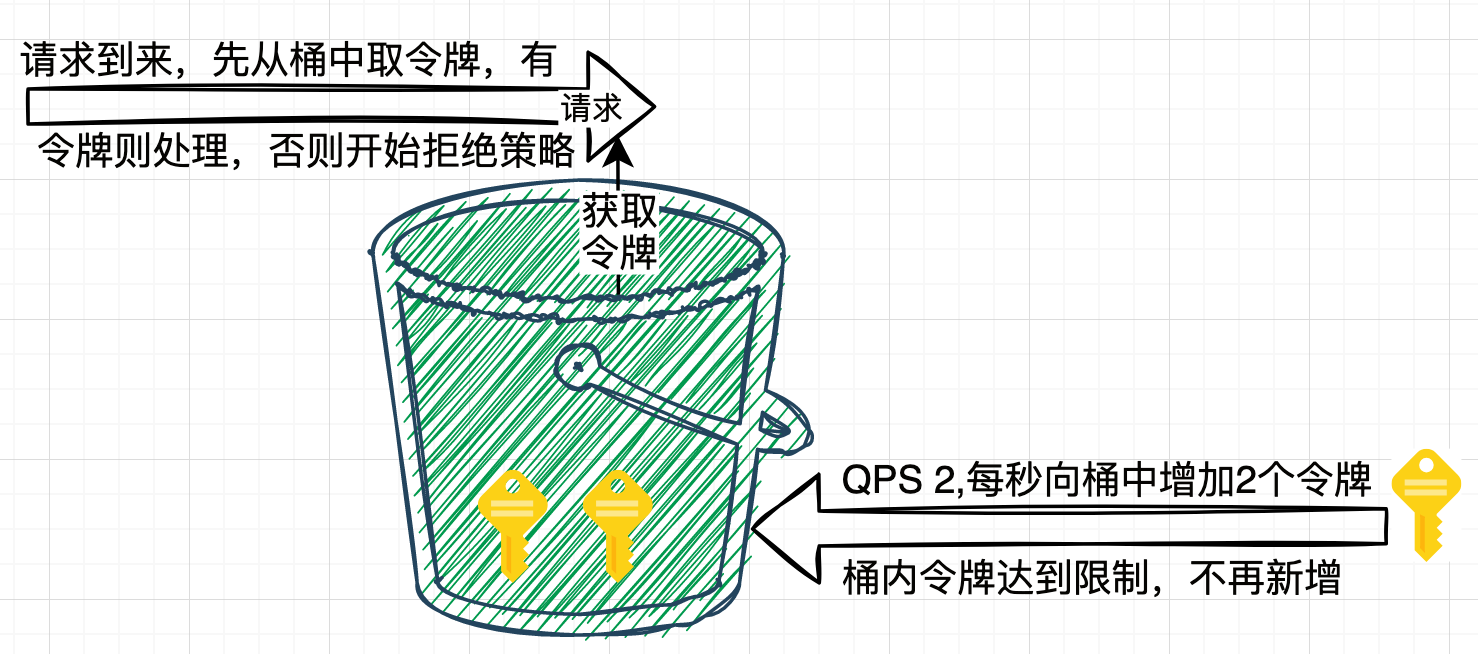
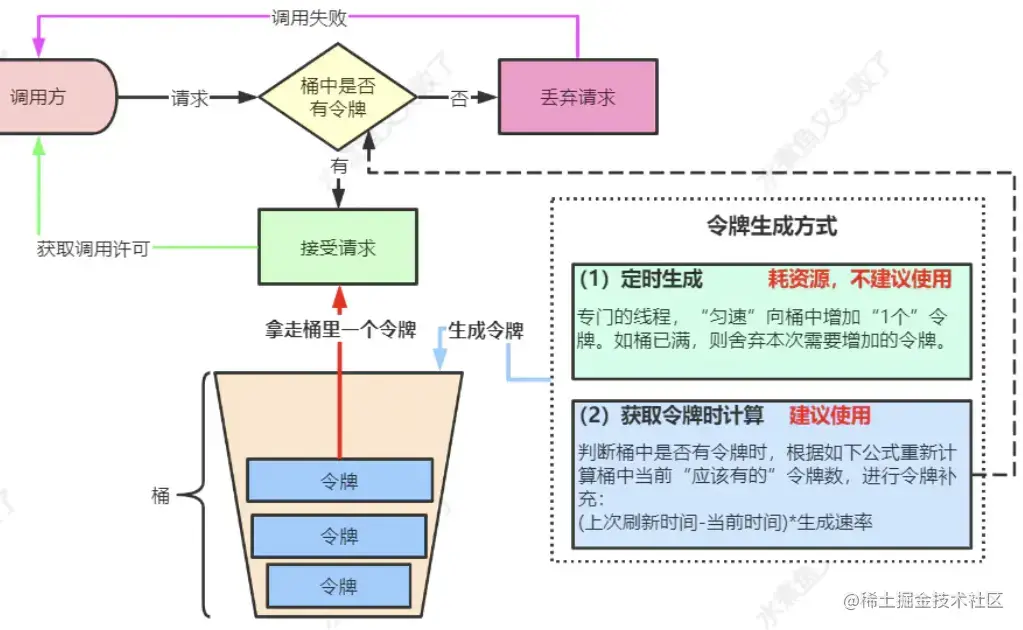
我们有一个固定的桶,桶里存放着令牌(token)。一开始桶是空的,系统按固定的时间(rate)往桶里添加令牌,直到桶里的令牌数满,多余的请求会被丢弃。当请求来的时候,从桶里移除一个令牌,如果桶是空的则拒绝请求或者阻塞。
思考令牌桶的实现可以以下特点。
- 令牌按固定的速率被放入令牌桶中
- 桶中最多存放 B 个令牌,当桶满时,新添加的令牌被丢弃或拒绝
- 如果桶中的令牌不足 N 个,则不会删除令牌,且请求将被限流(丢弃或阻塞等待)
令牌桶限制的是平均流入速率(允许突发请求,只要有令牌就可以处理,支持一次拿3个令牌,4个令牌...),并允许一定程度突发流量,所以也是非常常用的限流算法。
代码实现
Google 的 Java 开发工具包 Guava 中的限流工具类 RateLimiter 就是令牌桶的一个实现,日常开发中我们也不会手动实现了,这里直接使用 RateLimiter 进行测试。
引入依赖:
<exclusion>
  	<groupId>com.google.guava</groupId>
    <artifactId>guava</artifactId>
  	<version>31.0.1-jre</version>
</exclusion>
RateLimiter 限流体验:
// qps 2
RateLimiter rateLimiter = RateLimiter.create(2);
for (int i = 0; i < 10; i++) {
    String time = LocalDateTime.now().format(DateTimeFormatter.ISO_LOCAL_TIME);
    System.out.println(time + ":" + rateLimiter.tryAcquire());
    Thread.sleep(250);
}
代码中限制 QPS 为 2,也就是每隔 500ms 生成一个令牌,但是程序每隔 250ms 获取一次令牌,所以两次获取中只有一次会成功。
17:19:06.797557:true
17:19:07.061419:false
17:19:07.316283:true
17:19:07.566746:false
17:19:07.817035:true
17:19:08.072483:false
17:19:08.326347:true
17:19:08.577661:false
17:19:08.830252:true
17:19:09.085327:false
虽然演示了 Google Guava 工具包中的 RateLimiter 的实现,但是我们需要思考一个问题,就是令牌的添加方式,如果按照指定间隔添加令牌,那么需要开一个线程去定时添加,如果有很多个接口很多个 RateLimiter 实例,线程数会随之增加,这显然不是一个好的办法。显然 Google 也考虑到了这个问题,在 RateLimiter 中,是在每次令牌获取时才进行计算令牌是否足够的。它通过存储的下一个令牌生成的时间,和当前获取令牌的时间差,再结合阈值,去计算令牌是否足够,同时再记录下一个令牌的生成时间以便下一次调用。
下面是 Guava 中 RateLimiter 类的子类 SmoothRateLimiter 的 resync() 方法的代码分析,可以看到其中的令牌计算逻辑。
void resync(long nowMicros) { // 当前微秒时间
    // 当前时间是否大于下一个令牌生成时间
    if (nowMicros > this.nextFreeTicketMicros) {
      	// 可生成的令牌数 newPermits = (当前时间 - 下一个令牌生成时间)/ 令牌生成时间间隔。
      	// 如果 QPS 为2,这里的 coolDownIntervalMicros 就是 500000.0 微秒(500ms)
        double newPermits = (double)(nowMicros - this.nextFreeTicketMicros) / this.coolDownIntervalMicros();
				// 更新令牌库存 storedPermits。
      	this.storedPermits = Math.min(this.maxPermits, this.storedPermits + newPermits);
				// 更新下一个令牌生成时间 nextFreeTicketMicros
      	this.nextFreeTicketMicros = nowMicros;
    }
}
Redis 分布式限流
Redis 是一个开源的内存数据库,可以用来作为数据库、缓存、消息中间件等。Redis 是单线程的,又在内存中操作,所以速度极快,得益于 Redis 的各种特性,所以使用 Redis 实现一个限流工具是十分方便的。
下面的演示都基于Spring Boot 项目,并需要以下依赖。
<dependency>
    <groupId>org.springframework.boot</groupId>
    <artifactId>spring-boot-starter-data-redis</artifactId>
</dependency>
配置 Redis 信息。
spring:
  redis:
    database: 0
    password:
    port: 6379
    host: 127.0.0.1
    lettuce:
      shutdown-timeout: 100ms
      pool:
        min-idle: 5
        max-idle: 10
        max-active: 8
        max-wait: 1ms
固定窗口限流
Redis 中的固定窗口限流是使用 incr 命令实现的,incr 命令通常用来自增计数;如果我们使用时间戳信息作为 key,自然就可以统计每秒的请求量了,以此达到限流目的。
这里有两点要注意。
- 对于不存在的 key,第一次新增时,value 始终为 1。
- INCR 和 EXPIRE 命令操作应该在一个原子操作中提交,以保证每个 key 都正确设置了过期时间,不然会有 key 值无法自动删除而导致的内存溢出。
由于 Redis 中实现事务的复杂性,所以这里直接只用 lua 脚本来实现原子操作。下面是 lua 脚本内容。
local count = redis.call("incr",KEYS[1])
if count == 1 then
  redis.call('expire',KEYS[1],ARGV[2])
end
if count > tonumber(ARGV[1]) then
  return 0
end
return 1
下面是使用 Spring Boot 中 RedisTemplate 来实现的 lua 脚本调用测试代码。
/**
 * @author https://www.wdbyte.com
 */
@SpringBootTest
class RedisLuaLimiterByIncr {
    private static String KEY_PREFIX = "limiter_";
    private static String QPS = "4";
    private static String EXPIRE_TIME = "1";

    @Autowired
    private StringRedisTemplate stringRedisTemplate;

    @Test
    public void redisLuaLimiterTests() throws InterruptedException, IOException {
        for (int i = 0; i < 15; i++) {
            Thread.sleep(200);
            System.out.println(LocalTime.now() + " " + acquire("user1"));
        }
    }

    /**
     * 计数器限流
     *
     * @param key
     * @return
     */
    public boolean acquire(String key) {
        // 当前秒数作为 key
        key = KEY_PREFIX + key + System.currentTimeMillis() / 1000;
        DefaultRedisScript<Long> redisScript = new DefaultRedisScript<>();
        redisScript.setResultType(Long.class);
        //lua文件存放在resources目录下
        redisScript.setScriptSource(new ResourceScriptSource(new ClassPathResource("limiter.lua")));
        return stringRedisTemplate.execute(redisScript, Arrays.asList(key), QPS, EXPIRE_TIME) == 1;
    }
}
代码中虽然限制了 QPS 为 4,但是因为这种限流实现是把毫秒时间戳作为 key 的,所以会有临界窗口突变的问题,下面是运行结果,可以看到因为时间窗口的变化,导致了 QPS 超过了限制值 4。
17:38:23.122044 true
17:38:23.695124 true
17:38:23.903220 true
# 此处有时间窗口变化,所以下面继续 true
17:38:24.106206 true
17:38:24.313458 true
17:38:24.519431 true
17:38:24.724446 true
17:38:24.932387 false
17:38:25.137912 true
17:38:25.355595 true
17:38:25.558219 true
17:38:25.765801 true
17:38:25.969426 false
17:38:26.176220 true
17:38:26.381918 true
滑动窗口限流
通过对上面的基于 incr 命令实现的 Redis 限流方式的测试,我们已经发现了固定窗口限流所带来的问题,在这篇文章的第三部分已经介绍了滑动窗口限流的优势,它可以大幅度降低因为窗口临界突变带来的问题,那么如何使用 Redis 来实现滑动窗口限流呢?
这里主要使用 ZSET 有序集合来实现滑动窗口限流,ZSET 集合有下面几个特点:
- ZSET 集合中的 key 值可以自动排序。
- ZSET 集合中的 value 不能有重复值。
- ZSET 集合可以方便的使用 ZCARD 命令获取元素个数。
- ZSET 集合可以方便的使用 ZREMRANGEBYLEX 命令移除指定范围的 key 值。
基于上面的四点特性,可以编写出基于 ZSET 的滑动窗口限流 lua 脚本。
--KEYS[1]: 限流 key
--ARGV[1]: 时间戳 - 时间窗口
--ARGV[2]: 当前时间戳(作为score)
--ARGV[3]: 阈值
--ARGV[4]: score 对应的唯一value
-- 1. 移除时间窗口之前的数据
redis.call('zremrangeByScore', KEYS[1], 0, ARGV[1])
-- 2. 统计当前元素数量
local res = redis.call('zcard', KEYS[1])
-- 3. 是否超过阈值
if (res == nil) or (res < tonumber(ARGV[3])) then
    redis.call('zadd', KEYS[1], ARGV[2], ARGV[4])
    return 1
else
    return 0
end
下面是使用 Spring Boot 中 RedisTemplate 来实现的 lua 脚本调用测试代码。
@SpringBootTest
class RedisLuaLimiterByZset {

    private String KEY_PREFIX = "limiter_";
    private String QPS = "4";

    @Autowired
    private StringRedisTemplate stringRedisTemplate;

    @Test
    public void redisLuaLimiterTests() throws InterruptedException, IOException {
        for (int i = 0; i < 15; i++) {
            Thread.sleep(200);
            System.out.println(LocalTime.now() + " " + acquire("user1"));
        }
    }

    /**
     * 计数器限流
     *
     * @param key
     * @return
     */
    public boolean acquire(String key) {
        long now = System.currentTimeMillis();
        key = KEY_PREFIX + key;
        String oldest = String.valueOf(now - 1_000);
        String score = String.valueOf(now);
        String scoreValue = score;
        DefaultRedisScript<Long> redisScript = new DefaultRedisScript<>();
        redisScript.setResultType(Long.class);
        //lua文件存放在resources目录下
        redisScript.setScriptSource(new ResourceScriptSource(new ClassPathResource("limiter2.lua")));
        return stringRedisTemplate.execute(redisScript, Arrays.asList(key), oldest, score, QPS, scoreValue) == 1;
    }
}
代码中限制 QPS 为 4,运行结果信息与之一致。
17:36:37.150370 true
17:36:37.716341 true
17:36:37.922577 true
17:36:38.127497 true
17:36:38.335879 true
17:36:38.539225 false
17:36:38.745903 true
17:36:38.952491 true
17:36:39.159497 true
17:36:39.365239 true
17:36:39.570572 false
17:36:39.776635 true
17:36:39.982022 true
17:36:40.185614 true
17:36:40.389469 true
Redis + Lua 限流实现
下面我们通过自定义注解、aop、Redis + Lua 实现限流。
引入依赖包
pom文件中添加如下依赖包,比较关键的就是 spring-boot-starter-data-redis 和 spring-boot-starter-aop。
 <dependencies>
        <dependency>
            <groupId>org.springframework.boot</groupId>
            <artifactId>spring-boot-starter-web</artifactId>
        </dependency>
        <dependency>
            <groupId>org.springframework.boot</groupId>
            <artifactId>spring-boot-starter-data-redis</artifactId>
        </dependency>
        <dependency>
            <groupId>org.springframework.boot</groupId>
            <artifactId>spring-boot-starter-aop</artifactId>
        </dependency>
        <dependency>
            <groupId>com.google.guava</groupId>
            <artifactId>guava</artifactId>
            <version>21.0</version>
        </dependency>
        <dependency>
            <groupId>org.springframework.boot</groupId>
            <artifactId>spring-boot-starter-test</artifactId>
        </dependency>
        <dependency>
            <groupId>org.apache.commons</groupId>
            <artifactId>commons-lang3</artifactId>
        </dependency>

        <dependency>
            <groupId>org.springframework.boot</groupId>
            <artifactId>spring-boot-starter-test</artifactId>
            <scope>test</scope>
            <exclusions>
                <exclusion>
                    <groupId>org.junit.vintage</groupId>
                    <artifactId>junit-vintage-engine</artifactId>
                </exclusion>
            </exclusions>
        </dependency>
    </dependencies>
配置application.properties
在 application.properties 文件中配置提前搭建好的 redis 服务地址和端口。
spring.redis.host=127.0.0.1

spring.redis.port=6379
配置RedisTemplate实例
@Configuration
public class RedisLimiterHelper {

    @Bean
    public RedisTemplate<String, Serializable> limitRedisTemplate(LettuceConnectionFactory redisConnectionFactory) {
        RedisTemplate<String, Serializable> template = new RedisTemplate<>();
        template.setKeySerializer(new StringRedisSerializer());
        template.setValueSerializer(new GenericJackson2JsonRedisSerializer());
        template.setConnectionFactory(redisConnectionFactory);
        return template;
    }
}
限流类型枚举类
/**
 * @description 限流类型
 */
public enum LimitType {

    /**
     * 自定义key
     */
    CUSTOMER,

    /**
     * 请求者IP
     */
    IP;
}
自定义注解
我们自定义个@Limit注解,注解类型为ElementType.METHOD即作用于方法上。
period表示请求限制时间段,
count表示在period这个时间段内允许放行请求的次数。
limitType代表限流的类型,可以根据请求的IP、自定义key,如果不传limitType属性则默认用方法名作为默认key。
/**
 * @author fu
 * @description 自定义限流注解
 * @date 2020/4/8 13:15
 */
@Target({ElementType.METHOD, ElementType.TYPE})
@Retention(RetentionPolicy.RUNTIME)
@Inherited
@Documented
public @interface Limit {

    /**
     * 名字
     */
    String name() default "";

    /**
     * key
     */
    String key() default "";

    /**
     * Key的前缀
     */
    String prefix() default "";

    /**
     * 给定的时间范围 单位(秒)
     */
    int period();

    /**
     * 一定时间内最多访问次数
     */
    int count();

    /**
     * 限流的类型(用户自定义key 或者 请求ip)
     */
    LimitType limitType() default LimitType.CUSTOMER;
}
切面代码实现
/**
 * @description 限流切面实现
 * @date 2020/4/8 13:04
 */
@Aspect
@Configuration
public class LimitInterceptor {

    private static final Logger logger = LoggerFactory.getLogger(LimitInterceptor.class);

    private static final String UNKNOWN = "unknown";

    private final RedisTemplate<String, Serializable> limitRedisTemplate;

    @Autowired
    public LimitInterceptor(RedisTemplate<String, Serializable> limitRedisTemplate) {
        this.limitRedisTemplate = limitRedisTemplate;
    }

    /**
     * @description 切面
     * @date 2020/4/8 13:04
     */
    @Around("execution(public * *(..)) && @annotation(com.xiaofu.limit.api.Limit)")
    public Object interceptor(ProceedingJoinPoint pjp) {
        MethodSignature signature = (MethodSignature) pjp.getSignature();
        Method method = signature.getMethod();
        Limit limitAnnotation = method.getAnnotation(Limit.class);
        LimitType limitType = limitAnnotation.limitType();
        String name = limitAnnotation.name();
        String key;
        int limitPeriod = limitAnnotation.period();
        int limitCount = limitAnnotation.count();

        /**
         * 根据限流类型获取不同的key ,如果不传我们会以方法名作为key
         */
        switch (limitType) {
            case IP:
                key = getIpAddress();
                break;
            case CUSTOMER:
                key = limitAnnotation.key();
                break;
            default:
                key = StringUtils.upperCase(method.getName());
        }

        ImmutableList<String> keys = ImmutableList.of(StringUtils.join(limitAnnotation.prefix(), key));
        try {
            String luaScript = buildLuaScript();
            RedisScript<Number> redisScript = new DefaultRedisScript<>(luaScript, Number.class);
            Number count = limitRedisTemplate.execute(redisScript, keys, limitCount, limitPeriod);
            logger.info("Access try count is {} for name={} and key = {}", count, name, key);
            if (count != null && count.intValue() <= limitCount) {
                return pjp.proceed();
            } else {
                throw new RuntimeException("You have been dragged into the blacklist");
            }
        } catch (Throwable e) {
            if (e instanceof RuntimeException) {
                throw new RuntimeException(e.getLocalizedMessage());
            }
            throw new RuntimeException("server exception");
        }
    }

    /**
     * @description 编写 redis Lua 限流脚本
     * @date 2020/4/8 13:24
     */
    public String buildLuaScript() {
        StringBuilder lua = new StringBuilder();
        lua.append("local c");
        lua.append("\nc = redis.call('get',KEYS[1])");
        // 调用不超过最大值,则直接返回
        lua.append("\nif c and tonumber(c) > tonumber(ARGV[1]) then");
        lua.append("\nreturn c;");
        lua.append("\nend");
        // 执行计算器自加
        lua.append("\nc = redis.call('incr',KEYS[1])");
        lua.append("\nif tonumber(c) == 1 then");
        // 从第一次调用开始限流,设置对应键值的过期
        lua.append("\nredis.call('expire',KEYS[1],ARGV[2])");
        lua.append("\nend");
        lua.append("\nreturn c;");
        return lua.toString();
    }


    /**
     * @description 获取id地址
     * @date 2020/4/8 13:24
     */
    public String getIpAddress() {
        HttpServletRequest request = ((ServletRequestAttributes) RequestContextHolder.getRequestAttributes()).getRequest();
        String ip = request.getHeader("x-forwarded-for");
        if (ip == null || ip.length() == 0 || UNKNOWN.equalsIgnoreCase(ip)) {
            ip = request.getHeader("Proxy-Client-IP");
        }
        if (ip == null || ip.length() == 0 || UNKNOWN.equalsIgnoreCase(ip)) {
            ip = request.getHeader("WL-Proxy-Client-IP");
        }
        if (ip == null || ip.length() == 0 || UNKNOWN.equalsIgnoreCase(ip)) {
            ip = request.getRemoteAddr();
        }
        return ip;
    }
}
控制层实现
我们将@Limit注解作用在需要进行限流的接口方法上,下边我们给方法设置@Limit注解,在10秒内只允许放行3个请求,这里为直观一点用AtomicInteger计数。
/**
 * @Author: fu
 * @Description:
 */
@RestController
public class LimiterController {

    private static final AtomicInteger ATOMIC_INTEGER_1 = new AtomicInteger();
    private static final AtomicInteger ATOMIC_INTEGER_2 = new AtomicInteger();
    private static final AtomicInteger ATOMIC_INTEGER_3 = new AtomicInteger();

    @Limit(key = "limitTest", period = 10, count = 3)
    @GetMapping("/limitTest1")
    public int testLimiter1() {

        return ATOMIC_INTEGER_1.incrementAndGet();
    }

    @Limit(key = "customer_limit_test", period = 10, count = 3, limitType = LimitType.CUSTOMER)
    @GetMapping("/limitTest2")
    public int testLimiter2() {

        return ATOMIC_INTEGER_2.incrementAndGet();
    }
    @Limit(key = "ip_limit_test", period = 10, count = 3, limitType = LimitType.IP)
    @GetMapping("/limitTest3")
    public int testLimiter3() {

        return ATOMIC_INTEGER_3.incrementAndGet();
    }
}
总结
这篇文章介绍实现限流的几种方式,主要是窗口算法和桶算法,两者各有优势。
- 窗口算法实现简单,逻辑清晰,可以很直观的得到当前的 QPS 情况,但是会有时间窗口的临界突变问题,而且不像桶一样有队列可以缓冲。
- 桶算法虽然稍微复杂,不好统计 QPS 情况,但是桶算法也有优势所在。
- 漏桶模式消费速率恒定,可以很好的保护自身系统,可以对流量进行整形,但是面对突发流量不能快速响应。
- 令牌桶模式可以面对突发流量,但是启动时会有缓慢加速的过程,不过常见的开源工具中已经对此优化。
单机限流与分布式限流
上面演示的基于代码形式的窗口算法和桶算法限流都适用于单机限流,如果需要分布式限流可以结合注册中心、负载均衡计算每个服务的限流阈值,但这样会降低一定精度,如果对精度要求不是太高,可以使用。
而 Redis 的限流,由于 Redis 的单机性,本身就可以用于分布式限流。使用 Redis 可以实现各种可以用于限流算法,如果觉得麻烦也可以使用开源工具如 redisson,已经封装了基于 Redis 的限流。
其他限流工具
文中已经提到了 Guava 的限流工具包,不过它毕竟是单机的,开源社区中也有很多分布式限流工具,如阿里开源的 Sentinel 就是不错的工具,Sentinel 以流量为切入点,从流量控制、熔断降级、系统负载保护等多个维度保护服务的稳定性。

 浙公网安备 33010602011771号