What is a Turing machine?
https://www.cl.cam.ac.uk/projects/raspberrypi/tutorials/turing-machine/one.html
Raspberry Pi
|
Contents |
What is a Turing machine?
A Turing machine is a hypothetical machine thought of by the mathematician Alan Turing in 1936. Despite its simplicity, the machine can simulate ANY computer algorithm, no matter how complicated it is!

Above is a very simple representation of a Turing machine. It consists of an infinitely-long tape which acts like the memory in a typical computer, or any other form of data storage. The squares on the tape are usually blank at the start and can be written with symbols. In this case, the machine can only process the symbols 0 and 1 and " " (blank), and is thus said to be a 3-symbol Turing machine.
At any one time, the machine has a head which is positioned over one of the squares on the tape. With this head, the machine can perform three very basic operations:
- Read the symbol on the square under the head.
- Edit the symbol by writing a new symbol or erasing it.
- Move the tape left of right by one square so that the machine can read and edit the symbol on a neighbouring square.
A simple demonstration
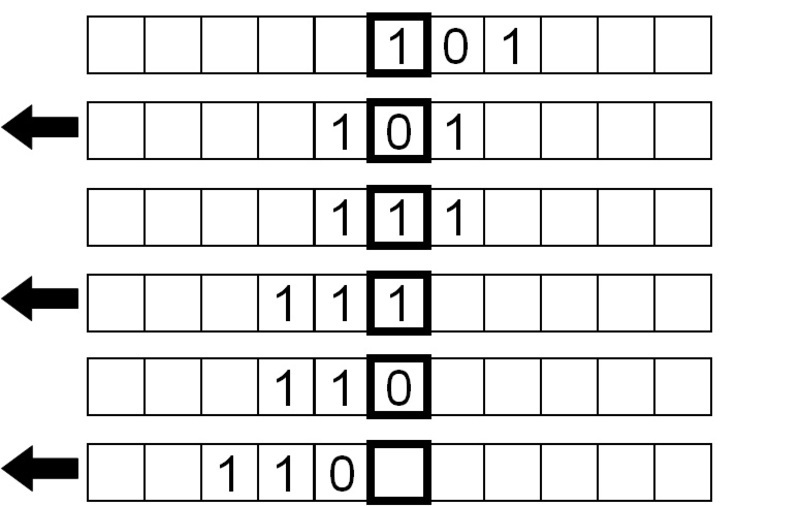
As a trivial example to demonstrate these operations, let's try printing the symbols "1 1 0" on an initially blank tape:

First, we write a 1 on the square under the head:

Next, we move the tape left by one square:

Now, write a 1 on the new square under the head:

We then move the tape left by one square again:

Finally, write a 0 and that's it!

A simple program
With the symbols "1 1 0" printed on the tape, let's attempt to convert the 1s to 0s and vice versa. This is called bit inversion, since 1s and 0s are bits in binary. This can be done by passing the following instructions to the Turing machine, utilising the machine's reading capabilities to decide its subsequent operations on its own. These instructions make up a simple program.
| Symbol read | Write instruction | Move instruction |
|---|---|---|
| Blank | None | None |
| 0 | Write 1 | Move tape to the right |
| 1 | Write 0 | Move tape to the right |
The machine will first read the symbol under the head, write a new symbol accordingly, then move the tape left or right as instructed, before repeating the read-write-move sequence again.
Let's see what this program does to our tape from the previous end point of the instructions:

The current symbol under the head is 0, so we write a 1 and move the tape right by one square.

The symbol being read is now 1, so we write a 0 and move the tape right by one square:

Similarly, the symbol read is a 1, so we repeat the same instructions.

Finally, a 'blank' symbol is read, so the machine does nothing apart from read the blank symbol continuously since we have instructed it to repeat the read-write-move sequence without stopping.
In fact, the program is incomplete. How does the machine repeat the sequence endlessly, and how does the machine stop running the program? The program tells it to with the concept of a machine state.
The machine state
To complete the program, the state changes during the execution of the program on the machine must be considered. The following changes, marked in italics, must be added to our table which can now be called a state table:
| State | Symbol read | Write instruction | Move instruction | Next state |
|---|---|---|---|---|
| State 0 | Blank | None | None | Stop state |
| 0 | Write 1 | Move the tape to the right | State 0 | |
| 1 | Write 0 | Move the tape to the right | State 0 |
We allocate the previous set of instructions to a machine state, so that the machine will perform those instructions when it is in the specified state.
After every instruction, we also specify a state for the machine to transition to. In the example, the machine is redirected back to its original state, State 0, to repeat the read-write-nove sequence, unless a blank symbol is read. When the machine reads a blank symbol, the machine is directed to a stop state and the program terminates.
Finite state machines
Even though it seems silly to do so, let's now add an additional state to our program that reverts the already inverted bits "1 1 0" back from "0 0 1" to "1 1 0". Below is the updated table, with changes listed in italics. The Turing machine now acts like a finite state machine with two states—these are called three-symbol, two-state Turing machines.
| State | Symbol read | Write instruction | Move instruction | Next state |
|---|---|---|---|---|
| State 0 | Blank | Write blank | Move the tape to the left | State 1 |
| 0 | Write 1 | Move the tape to the right | State 1 | |
| 1 | Write 0 | Move the tape to the right | State 0 | |
| State 1 | Blank | Write blank | Move the tape to the right | Stop state |
| 0 | Write 1 | Move the tape to the left | State 1 | |
| 1 | Write 0 | Move the tape to the left | State 1 |
For the write instruction, "None" has been changed to "Write blank" for uniformity's sake (so that only the machine's symbols are referred to), and it should be noted that they are equivalent.
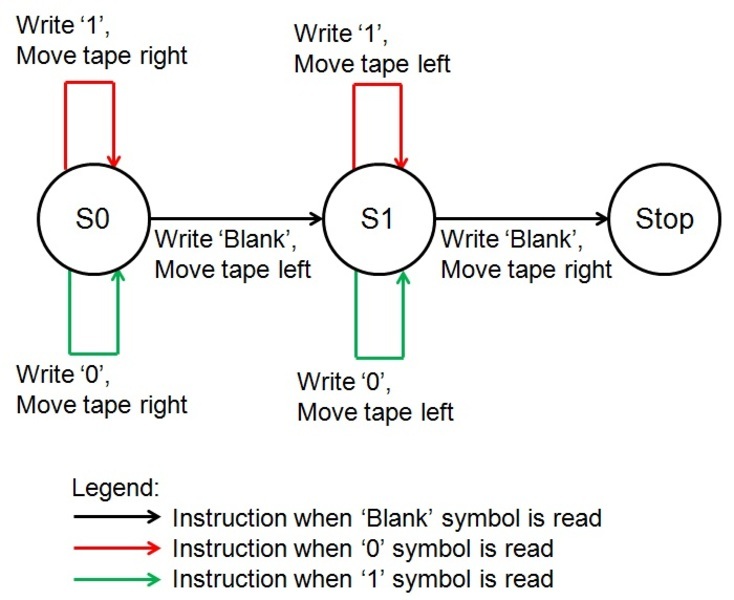
Instead of a state table, the program can also be represented with a state diagram:

From where the program was previously, instead of doing nothing and stopping after the machine encounters a blank symbol, we instruct it to move the tape left before transitioning to State 1 where it reverses the bit inversion process.

Next, we invert the bits again, this time moving the tape left instead of right.

Finally, a blank symbol is read, so we move the tape right to get back to where we started, and stop the program.

With the introduction of more states to our program, we can instruct the Turing machine to perform more complex functions and hence run any algorithm that a modern day computer can.
In section two, let's learn about LEDs, GPIO pins, resistors, and python, before embarking on building our Turing machine!


