
filebeat的层次架构图和配置部署 -- 不错的文档 - elasticsearch 性能调优 + Filebeat配置
1.fielbeat的组件架构-看出层次感
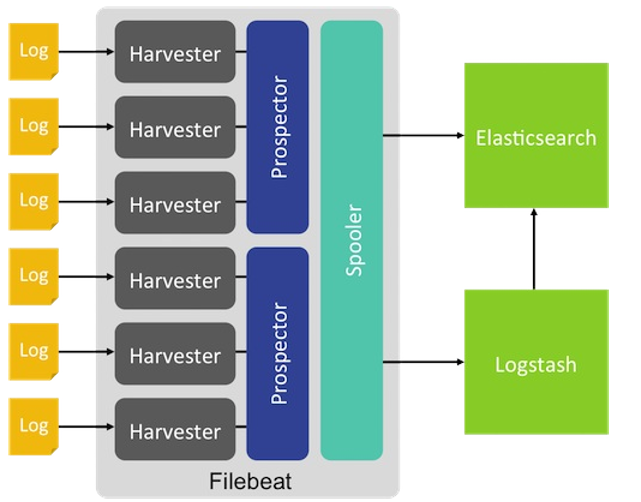
2.工作流程:每个harvester读取新的内容一个日志文件,新的日志数据发送到spooler(后台处理程序),它汇集的事件和聚合数据发送到你已经配置了Filebeat输出。
参考:https://blog.csdn.net/gamer_gyt/article/details/52688636
3.安装配置
 tar xvf filebeat-6.4.2-linux-x86_64.tar.gz
 cp /usr/local/src/filebeat-6.4.2-linux-x86_64/filebeat.yml /usr/local/src/filebeat-6.4.2-linux-x8
6_64/filebeat.yml.default
 cd /usr/local/src/filebeat-6.4.2-linux-x86_64/
 [root@VM_0_6_centos filebeat-6.4.2-linux-x86_64]# cat filebeat.yml
filebeat.inputs:
- type: log

  enabled: true

  paths:
    - /tmp/messages
  fields_under_root: true

filebeat.config.modules:

  path: ${path.config}/modules.d/*.yml
  reload.enabled: false
output.elasticsearch:
  hosts: ["10.0.0.92:9200"]
4. 报错
Filebeat配置检测报 “setup.template.name and setup.template.pattern have to be set if index name is modified” 错误
解决方案:这个错误本身提示很明显,只要我们配置了索引名格式,就必须要同时配置setup.template.name 和setup.template.pattern,但是,我配置了这两项怎么还是不行呢,还是同样的错误,重点来了:这两项的配置必须要顶格配置,不可以和index对齐写到一个缩进级别!这个是很容易写错的,大家注意!正确的写法:
--------------------- index默认就可以了,不用配置
原文:https://blog.csdn.net/yk20091201/article/details/90756738
别人的配置文件
filebeat.inputs:
- type: log

  enabled: true
  paths:
    - /usr/local/analyzer/test.log
  json.keys_under_root: true
  json.add_error_key: true
  json.overwrite_keys: true
output.elasticsearch:
  # Array of hosts to connect to.
  hosts: ["192.168.0.81:9200"]
  index: "filebeat-testindex-%{+yyyy.MM.dd}"
setup.template.name: "filebeattest"
setup.template.pattern: "filebeattest-*"


原文:https://blog.csdn.net/yk20091201/article/details/90756738
#############################################
不错的文档
https://www.cnblogs.com/cjsblog/p/9517060.html
#=========================== Filebeat inputs =============================
filebeat.inputs:
- type: log
  enabled: true
  # 要抓取的文件路径
  paths:
    - /data/logs/oh-coupon/info.log
    - /data/logs/oh-coupon/error.log
  # 添加额外的字段
  fields:
    log_source: oh-coupon
  fields_under_root: true
  # 多行处理
  # 不以"yyyy-MM-dd"这种日期开始的行与前一行合并
  multiline.pattern: ^\d{4}-\d{1,2}-\d{1,2}
  multiline.negate: true
  multiline.match: after

  # 5秒钟扫描一次以检查文件更新
  scan_frequency: 5s
  # 如果文件1小时都没有更新,则关闭文件句柄
  close_inactive: 1h
  # 忽略24小时前的文件
  #ignore_older: 24h


- type: log
  enabled: true
  paths:
    - /data/logs/oh-promotion/info.log
    - /data/logs/oh-promotion/error.log
  fields:
    log_source: oh-promotion
  fields_under_root: true
  multiline.pattern: ^\d{4}-\d{1,2}-\d{1,2}
  multiline.negate: true
  multiline.match: after
  scan_frequency: 5s
  close_inactive: 1h
  ignore_older: 24h

#================================ Outputs =====================================

#-------------------------- Elasticsearch output ------------------------------
#output.elasticsearch:
  # Array of hosts to connect to.
  # hosts: ["localhost:9200"]

  # Optional protocol and basic auth credentials.
  #protocol: "https"
  #username: "elastic"
  #password: "changeme"

#----------------------------- Logstash output --------------------------------
output.logstash:
  # The Logstash hosts
  hosts: ["localhost:5044"]

  # Optional SSL. By default is off.
  # List of root certificates for HTTPS server verifications
  #ssl.certificate_authorities: ["/etc/pki/root/ca.pem"]

  # Certificate for SSL client authentication
  #ssl.certificate: "/etc/pki/client/cert.pem"

  # Client Certificate Key
  #ssl.key: "/etc/pki/client/cert.key"
用一个例子来演示会更加清晰

 浙公网安备 33010602011771号