Service是什么?Service又不是什么?
在Android王国中,Service是一个劳动模范,总是默默的在后台运行,无怨无悔,且总是干最脏最累的活,比如下载文件,倾听音乐,网络操作等这些耗时的操作,所以我们请尊重的叫他一声:"劳模,您辛苦了".
带着这份好尊重,我又重新研读了API的文档,发现老外写东西还是很靠谱的,人家在文档中告诉你Service是什么,又告诉你Service又不是什么,我觉得这种思路不错,那就从这两个个方面开始谈起吧:
- Service是什么?
- A Service is an application component. ☆ Service 是一个应用程序组件
- that can perform long-running operations in the background. ☆ 它能在后台执行一些耗时较长的操作.
- and does not provide a user interface. ☆ 并且不提供用户界面
- Another application component can start a service and it will continue to run in the background event if the user switches to another application. ☆ 服务能被其它的应用程序组件启动,即使用户切换到其他的应用程序时还能保持在后台运行.
- Additionally,a component can bind to a service to interact with it and even perform interprocess communcation(IPC). ☆ 此外,组件还能绑定服务,并与服务交互,甚至执行进程间通信(IPC).
- For example,a service might handle network transactions,play music,perform file I/O,or interact with a content provider,all from the background. ☆ 比如,一个服务可以处理网络传输,听音乐,执行文件操作,或者与内容提供者进行交互,所有这些都在后台进行.
- A service can essentially tack two forms.☆ 服务有以下两种基本类型
- Started --> startService()
- Bound --> bindService()
- Service又不是什么?
- A service is not a separate process.☆ 服务不是一个单独的进程.
- A service is not a thread.it runs in the main thread of its hosting process. ☆ 服务不是一个线程,它运行在主线程.
- the service does not create its own thread and does not run in a separate process(unless you specify otherwise). ☆ 服务不能自己创建并且不能运行在单独的进程中(除非你明确指定).
- This means that, if your service is going to do any CPU intensive work ot blocking operations(such as MP3 playback or network). ☆ 这意味着如果你的服务要执行一些很耗CUP的工作或者阻塞的操作(比如播放mp3或网络操作),you should create a new thread within the service to do that work. ☆ 你应该在服务中创建一个新的线程来执行这些工作.
- By using a separate thread, you will reduce the risk of Application Not Responding(ANR) errors and the application's main thread can remain dedicated to user interaction with your activities. ☆ 利用一个分离的进程,将减少你的activities发生应用程序停止响应(ANR)错误的风险.
- 如何创建一个Started服务
- 继承service
- publicclassFirstServiceextendsService{
privatestaticfinalString TAG ="--FirstService-->";publicFirstService(){Log.i(TAG,"Service is running.");}@Overridepublicvoid onCreate(){Log.i(TAG,"onCreate is running.");super.onCreate();}@Overridepublicint onStartCommand(Intent intent,int flags,int startId){Log.i(TAG,"onStartCommand is running.");returnsuper.onStartCommand(intent, flags, startId);}@OverridepublicIBinder onBind(Intent intent){Log.i(TAG,"IBinder is running.");returnnull;}}
- 四大组件都需要在manifests.xml中注册,这个也不例外.
- 如何启动它
- Intent intent =newIntent(ServiceActivity.this,FirstService.class);
startService(intent);
- 生命周期onCreate(), onStartCommand(), onDestory()就这三个生命周期
- --FirstService-->:Service is running.
--FirstService-->: onCreate is running.--FirstService-->: onStartCommand is running.
-
我们在onStartCommand方法中打印下当前线程
- @Override
publicint onStartCommand(Intent intent,int flags,int startId){Log.i(TAG,"onStartCommand is running.Thread:"+Thread.currentThread());returnsuper.onStartCommand(intent, flags, startId);}
打印结果如下:- onStartCommand is running.Thread:Thread[main,5,main]
验证了两点:①由于是第二次运行,构造方法和onStart都没有打印,说明服务一旦启动是默默运行在后台的;②服务是运行在主线程的 -
如何结束服务:①调用stopService()方法 ,会回调service的onDestory()方法;
- Intent intent2 =newIntent(ServiceActivity.this,FirstService.class);
stopService(intent2);
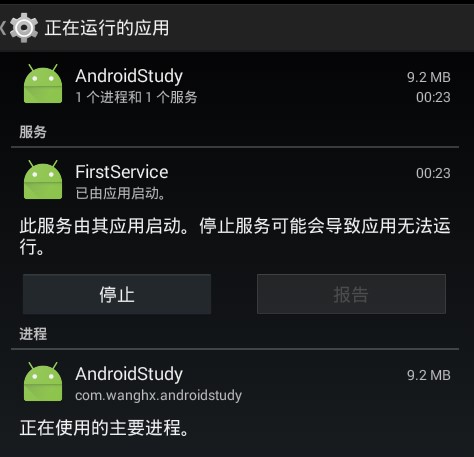
还可以在Android系统设置-->应用-->正在运行-->找到后是如下样式,会告诉我们有一个服务在运行; -
onStartCommand的返回值:
- START_STICKY:粘性的,被意外中止后自动重启,重新调用onStartCommand(),但会丢失原来激活它的Intent,会用一个null intent来调用onStartCommand(),可以用于播放器.值为1
- START_NOT_STICKY:非粘性的,被意外中止后不会重启,除非还存在未发送的Intent,这是避免服务运行的最安全选项; 值为2
- START_REDELIVER_INTENT:粘性的且重新发送Intent,被意外中止后重新启动,且该service组件将得到用于激活它的Intent对象,这中服务适用于需要立即恢复工作的活跃服务,比如下载文件; 值为3
-
onStartCommand的参数:
- @Override //第一个参数:为我们传入的intent;第二个flags:启动服务的方式,与返回值有关;第三个为我们启动service的次数.
publicint onStartCommand(Intent intent,int flags,int startId){Log.i(TAG,"onStartCommand is running.Thread:"+Thread.currentThread());Log.i(TAG,"flags:"+flags);Log.i(TAG,"startId:"+startId);returnsuper.onStartCommand(intent, flags, startId);}
因为前面服务已经启动了,这次我们连续点了三次启动服务的按钮,打印日志如下:- 11-1602:56:28.3859039-9039/com.wanghx.androidstudy I/--FirstService-->: onStartCommand is running.Thread:Thread[main,5,main]
11-1602:56:28.3859039-9039/com.wanghx.androidstudy I/--FirstService-->: flags:011-1602:56:28.3859039-9039/com.wanghx.androidstudy I/--FirstService-->: startId:211-1602:56:33.9859039-9039/com.wanghx.androidstudy I/--FirstService-->: onStartCommand is running.Thread:Thread[main,5,main]11-1602:56:33.9859039-9039/com.wanghx.androidstudy I/--FirstService-->: flags:011-1602:56:33.9859039-9039/com.wanghx.androidstudy I/--FirstService-->: startId:311-1602:56:35.5359039-9039/com.wanghx.androidstudy I/--FirstService-->: onStartCommand is running.Thread:Thread[main,5,main]11-1602:56:35.5359039-9039/com.wanghx.androidstudy I/--FirstService-->: flags:011-1602:56:35.5359039-9039/com.wanghx.androidstudy I/--FirstService-->: startId:4
我们发现flags的值没有发生改变,而startId再按顺序增加. - 如何启动一个绑定服务
- 在activity中创建一个内部类,继承ServiceConnection.
- classMyServiceConnectionimplementsServiceConnection{
@Overridepublicvoid onServiceConnected(ComponentName name,IBinder service){Log.i(TAG,"onServiceConnected");}@Overridepublicvoid onServiceDisconnected(ComponentName name){Log.i(TAG,"onServiceDisconnected");}}
- 在activity中定义一个成员connection
privateMyServiceConnection connection =newMyServiceConnection();
- 在绑定服务按钮中加入绑定代码
Intent intent3 =newIntent(ServiceActivity.this,FirstService.class);bindService(intent3, connection, BIND_AUTO_CREATE);
按钮点击后打印如下日志:I/--FirstService-->:Service is running.I/--FirstService-->: onCreate is running.I/--FirstService-->:IBinder is running.
- 在解绑服务中加入代码,这里的connection必须和上边的绑定服务的connection实例一致.
unbindService(connection);
- Service和Thread的关系
- 其实他两个没有一毛钱关系.只是因为service需要做耗时操作,需要重新建立一线程来处理工作,而不阻塞主线程;
- service是运行在主线程的;
- activity启动service后,即使activity被销毁了,如果没有主动关闭服务,服务还是会在后台默默运行的;
- 如何连接远程的service,只需要在manifests.xml中这样写即可
- <service
android:name="com.example.servicetest.MyService"android:process=":remote"></service>
如何让activity与远程的service进行通信呢?这就要使用AIDL进行跨进程通信(IPC)了. -
AIDL:Android Interface Definition Language:Android接口定义语言,它可以用于让多个service与多个应用程序组件之间进行跨进程通信;
-
这些都不是重点,我们还是弄一下在我们自己的程序中service与activity之间的通信吧;
- activity-->service 通过intent传递数据给service;
- activity调用onServiceConnected()中的IBind对象来访问service中的方法;
- IBinder通信的关键是利用activity中的IBinder对象获得service对象,然后调用方法;
- publicclassFirstServiceextendsService{
privatestaticfinalString TAG ="FirstService-->";privateMyBinder myBinder =newMyBinder();publicFirstService(){Log.i(TAG,"Service is running.");}@Overridepublicvoid onCreate(){Log.i(TAG,"onCreate is running.");super.onCreate();}@Overridepublicint onStartCommand(Intent intent,int flags,int startId){String name = intent.getStringExtra("name");Log.i(TAG,"onStartCommand is running.Thread:"+Thread.currentThread());Log.i(TAG,"flags:"+flags);Log.i(TAG,"startId:"+startId);Log.i(TAG,"name:"+name);return START_STICKY;}@Overridepublicvoid onDestroy(){Log.i(TAG,"onDestroy is running.");super.onDestroy();}@OverridepublicIBinder onBind(Intent intent){Log.i(TAG,"IBinder is running.");return myBinder;}publicclassMyBinderextendsBinder{publicFirstService getService(){returnFirstService.this;}}publicint getRandomNumber(){returnnewRandom().nextInt(10)+1;}}
- publicclassServiceActivityextendsAppCompatActivityimplementsView.OnClickListener{
privateMyServiceConnection connection =newMyServiceConnection();privatestaticfinalString TAG ="ServiceActivity-->";privateFirstService mFirstService;privateboolean isBinder;// 服务是否绑定@Overrideprotectedvoid onCreate(Bundle savedInstanceState){super.onCreate(savedInstanceState);setContentView(R.layout.activity_service);findViewById(R.id.btn_start_service).setOnClickListener(this);findViewById(R.id.btn_stop_service).setOnClickListener(this);findViewById(R.id.btn_bound_service).setOnClickListener(this);findViewById(R.id.btn_unbound_service).setOnClickListener(this);findViewById(R.id.btn_get_number).setOnClickListener(this);}@Overridepublicvoid onClick(View v){switch(v.getId()){case R.id.btn_start_service:Intent intent =newIntent(ServiceActivity.this,FirstService.class);intent.putExtra("name","Zhangsan");startService(intent);break;case R.id.btn_stop_service:Intent intent2 =newIntent(ServiceActivity.this,FirstService.class);stopService(intent2);break;case R.id.btn_bound_service:if(!isBinder){Intent intent3 =newIntent(ServiceActivity.this,FirstService.class);bindService(intent3, connection, BIND_AUTO_CREATE);isBinder =true;}break;case R.id.btn_unbound_service:if(isBinder){unbindService(connection);isBinder =false;}break;case R.id.btn_get_number:if(mFirstService ==null){Toast.makeText(getApplicationContext(),"请先绑定服务",Toast.LENGTH_SHORT).show();}else{Toast.makeText(getApplicationContext(),"得到的随机数为:"+ mFirstService.getRandomNumber(),Toast.LENGTH_SHORT).show();}break;}}classMyServiceConnectionimplementsServiceConnection{@Overridepublicvoid onServiceConnected(ComponentName name,IBinder service){Log.i(TAG,"onServiceConnected");FirstService.MyBinder myBinder =(FirstService.MyBinder) service;mFirstService = myBinder.getService();}@Overridepublicvoid onServiceDisconnected(ComponentName name){Log.i(TAG,"onServiceDisconnected");}}}
这里有一个小插曲:一起写出来大家分享下:记得以前学java基础时,老师曾说过一个java文件中只能有一个public类,类名称必须与java文件名相同,为什么这个FirstService中有两个public类,只是因为MyBinder虽然是一个public class,但是MyBinder是一个内部类,这里必须要用public修饰,否则其他包就访问不到这个内部类了;
世界上没有什么事情是跑步解决不了的,如果有,那就再跑一会!


 浙公网安备 33010602011771号