

vscode+robotframework的实践-selenium
一 说明
- 上一次使用robotframework还是刚进入工作的时候,使用的是robotframework的官方配套编辑器RIDE进行自动化脚本编写,在使用的过程中偶尔会遭遇卡顿、闪退等问题,当时排查问题大多数是因为RIDE自身与python版本以及操作系统之间的兼容性问题导致的,RIDE是一个对新手很好的编辑工具。后续有了一些前端编码经验后,使用vscode编辑器编写脚本的效率会更高,也有相对应的插件支持,也是官方推荐的IDE之一,再次使用RF时就考虑用vscode进行编写。
- 写这篇文章的目的主要是为了方便自己重新回忆robotframework的使用,结合vscode达到实战的目的,不足之处随时欢迎私信沟通鸭
- 该文章比较适合有python+RF基础,想从RIDE改成用VScode编写用例的同学,听到测试套件(test_suite)、关键字(uesr_keyword)、资源(resorce)能立刻理解的,没有基础的同学可以先看相关书籍学习,此处推荐《自动化测试实战宝典》、《RobotFramework自动化测试修炼宝典》
- 最好的RF教程其实都在RF官网,英语能力强的小伙伴建议直接看官网文档(或者借助翻译工具也行)
二 工具安装版本
- vscode-V1.90.2
- python-V3.11.9
- 谷歌浏览器-V126.0.6478.115
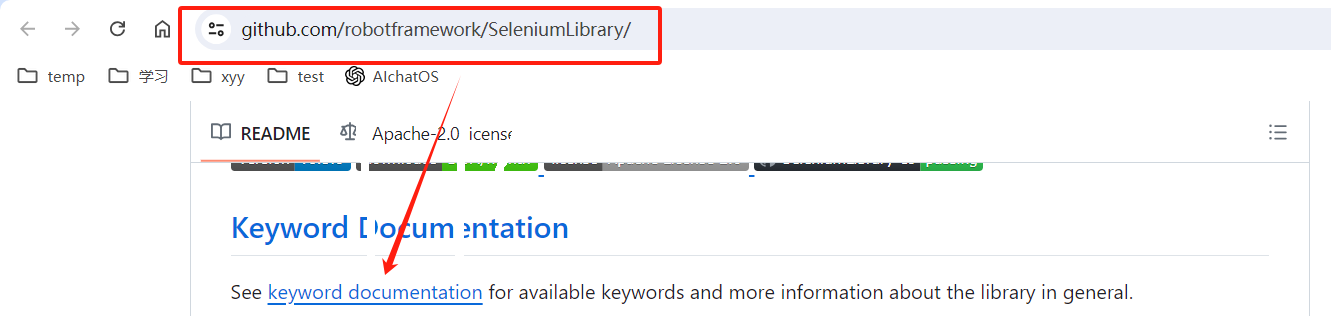
- 根据自己的谷歌浏览器安装对应的浏览器驱动,具体可查看SeleniumLibrary的git说明,其中也有讲解了怎么下载浏览器驱动
三 安装
3.1 安装RF(V7.0.1):pip install robotframework

3.2 安装Selenium Library(V6.5.0):pip install --upgrade robotframework-seleniumlibrary

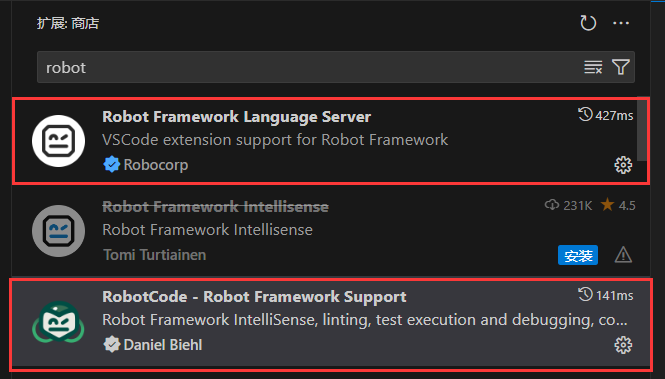
3.3 在vscode上安装RF相关插件
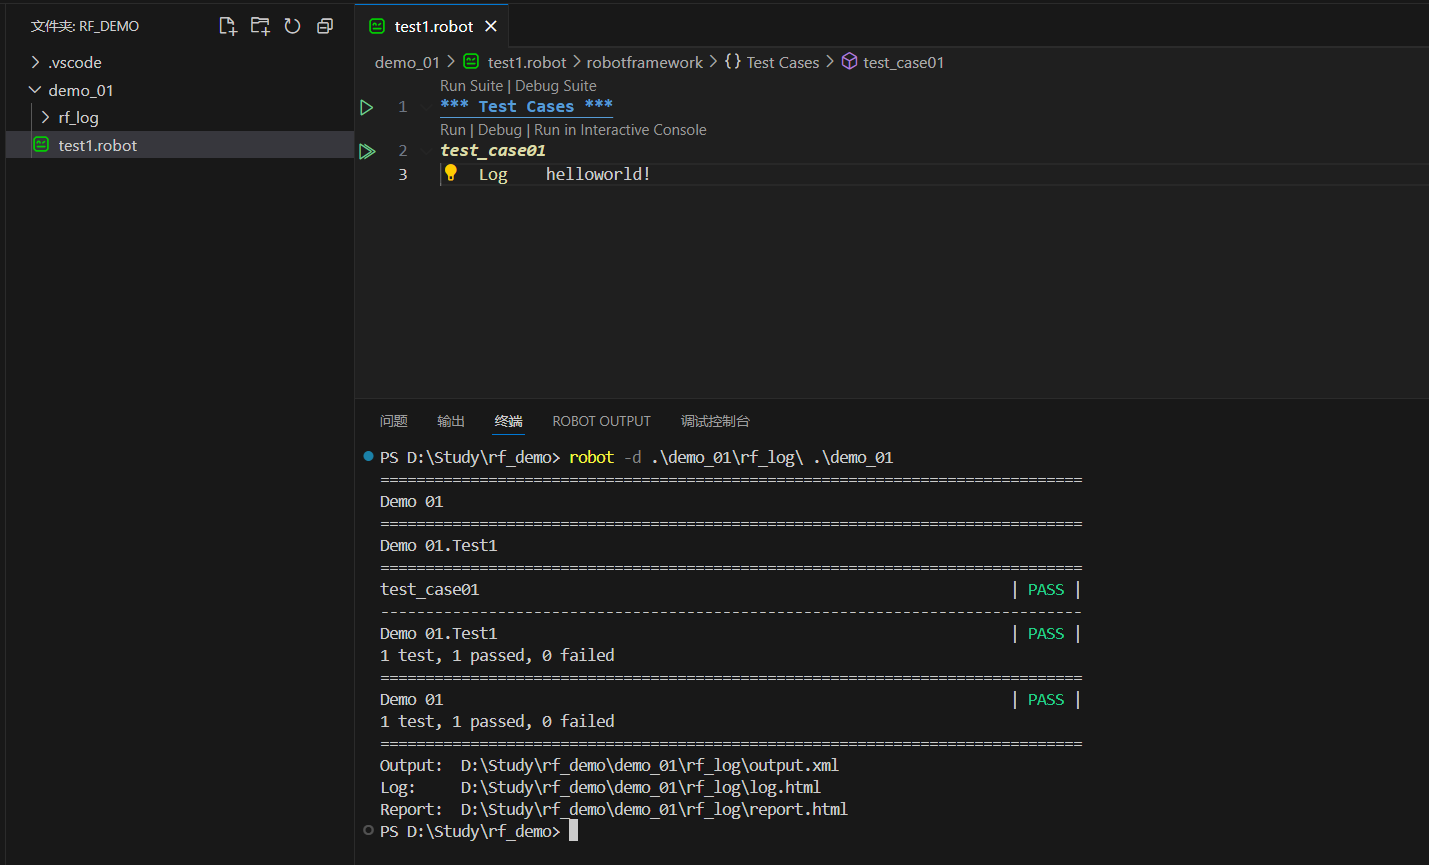
写一个熟悉的helloworld。*** Test Cases ***此类的语法可以参考官网语法
*** Test Cases ***
test_case01
    Log    helloworld!
四 实践(持续更新中)
4.1 实践1:打开谷歌浏览器,进入百度界面,搜索并进入robotframe官网。
4.1.1 对应代码
点击查看test.robot代码
*** Comments ***
#此处用来填写说明
打开谷歌浏览器,进入百度界面,搜索并进入robotframe官网。
*** Settings ***
#此处用来设置用例,常见的有引入库、设置setup teardown
Library    SeleniumLibrary
Test Teardown    Close Browser
*** Variables ***
#此处用来设置用例,常见的有引入库、设置setup teardown

*** Test Cases ***
#此处用来设置测试用例
Open Page    #用例名称
    [Teardown]    Run Keyword If Test Failed    Close Browser    #用例如果失败了就关闭浏览器
    Open Browser    url=https://www.baidu.com   browser=chrome    #打开百度搜索页面
    Maximize Browser Window    #窗口最大化
    Wait Until Page Contains Element    locator=id=kw    #等待元素出现,默认等待时间是5S
    Input Text    locator=id=kw    text=Robot Framework    #在id为kw的输入框里输入Robot Framework
    Click Button    locator=id=su    #点击id为su的搜索按钮
    Wait Until Page Contains Element    locator=//div[contains(@mu, 'robotframework.org')]    #等待想要的搜索网址出现,这里是xpath选择器
    Click Element    locator=//div[contains(@mu, 'robotframework.org')]/div/div/h3/a    #点击对应标题
    Switch Window    locator=NEW    # 切换到新标签页,进入到rf网址
*** Keywords ***
#此处用来设置变量
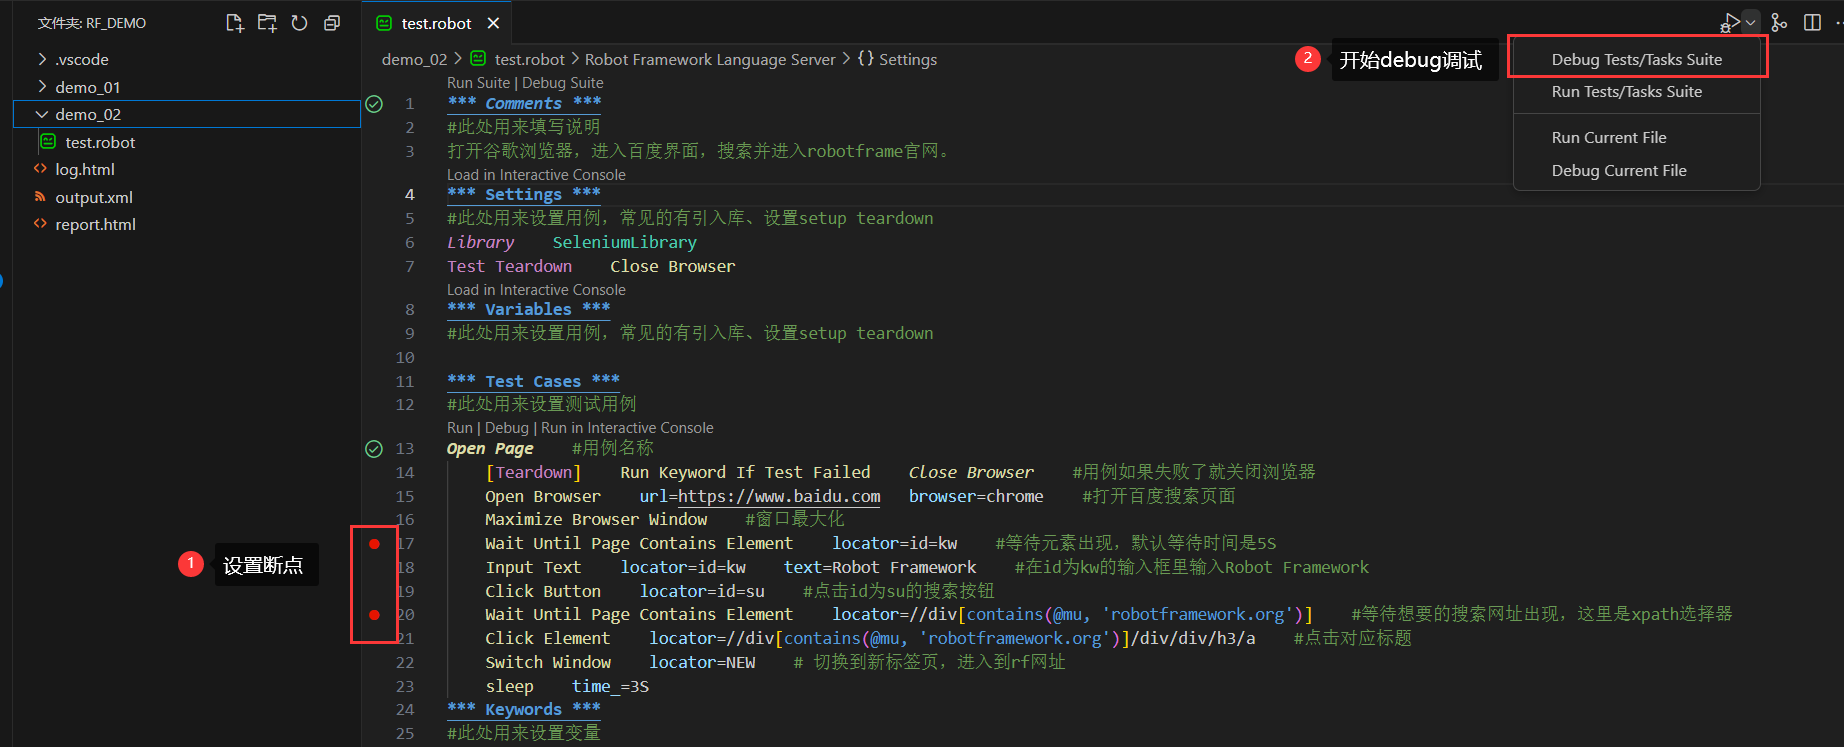
4.1.2 使用vscode调试代码。
这时候使用IDE的好处就出来了,断点调试在编写用例时非常使用,可以迅速帮我们找到BUG,以及随时停在我们需要检查的代码上,RIDE编辑器则无法做到这一步。
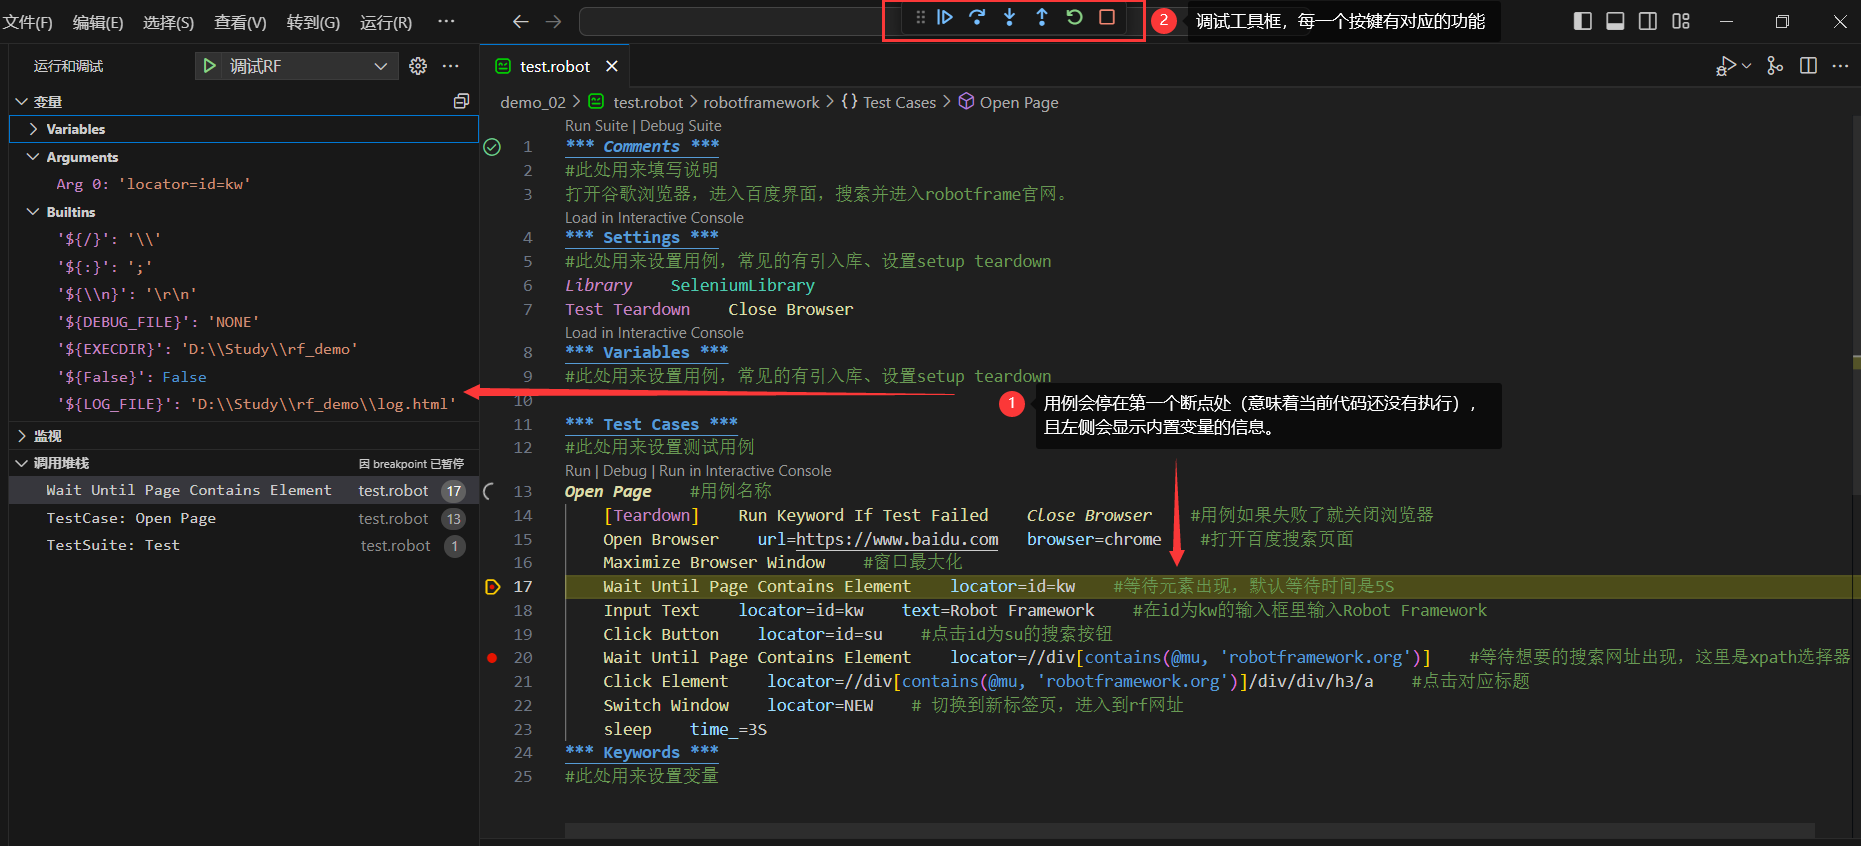
调试功能如下:
- 继续:直接跳到下一个断点处,点击后就会顺序执行代码到断点2处时停下
- 逐过程:如果代码中有循环或者子函数的话,进入带循环里和子函数,但是当前没有循环,所以点击后的效果也相当于单步调试
- 单步调试:从当前断点处,点击一次逐步执行一行代码(不打断点也可以)
- 单步跳出:进入代码中有循环或者子函数的时候,可以点击这个跳出循环和子函数进入到下一行代码
- 重启:顾名思义,重新执行代码
- 停止:顾名思义,停止当前代码
4.1.3 其他说明
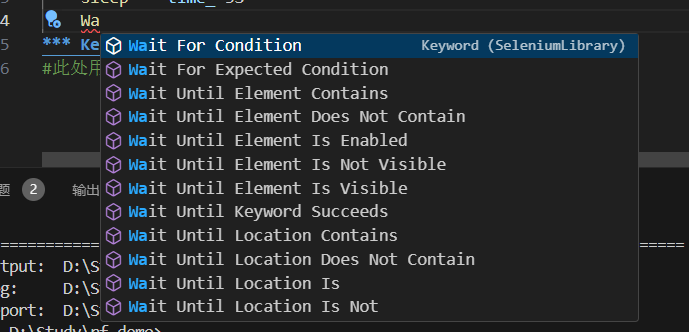
- vscode可以在使用关键字时快速匹配相关关键字列表
- 鼠标移动到关键字上,也可以快速给出关键字说明
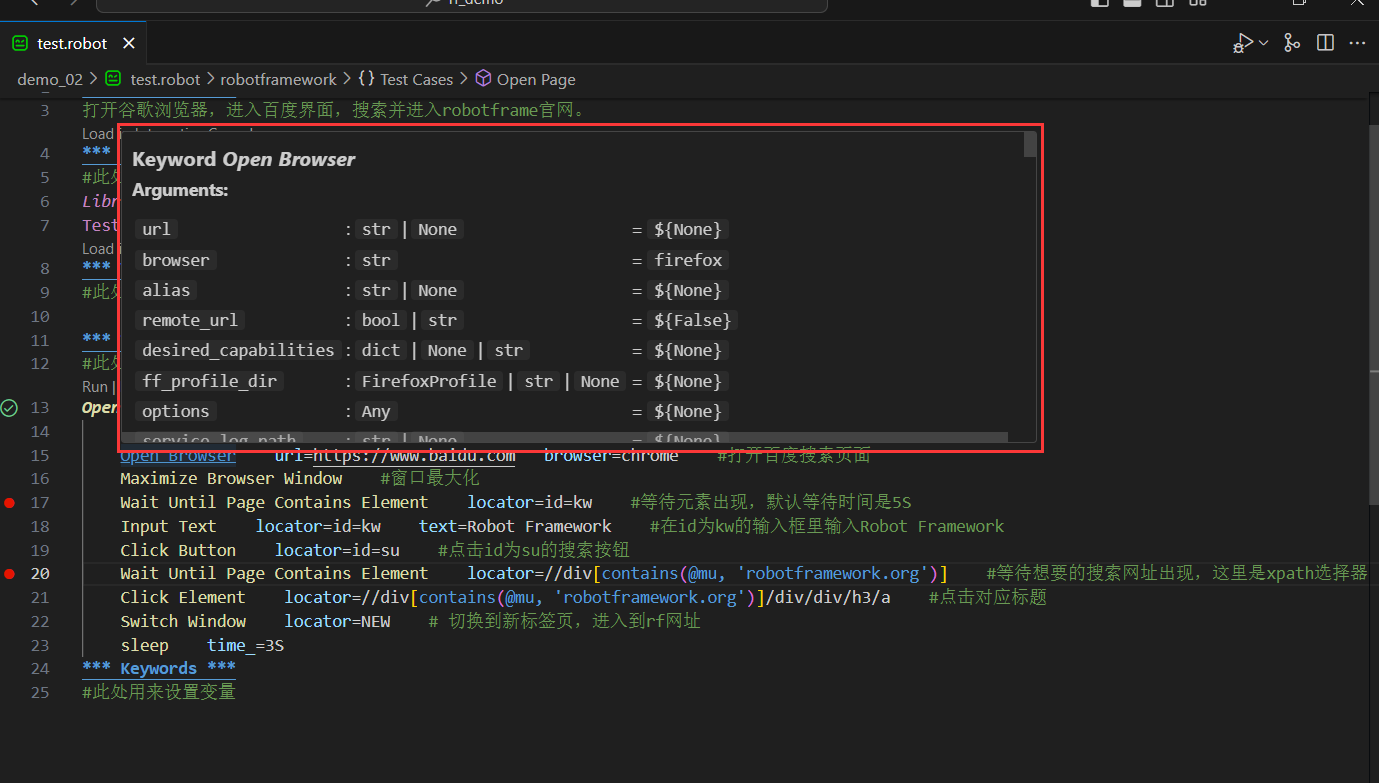
- 遗漏哪些必填项,也能给出对应错误信息

4.2 实践2:登陆界面功能测试
4.2.1 环境配置
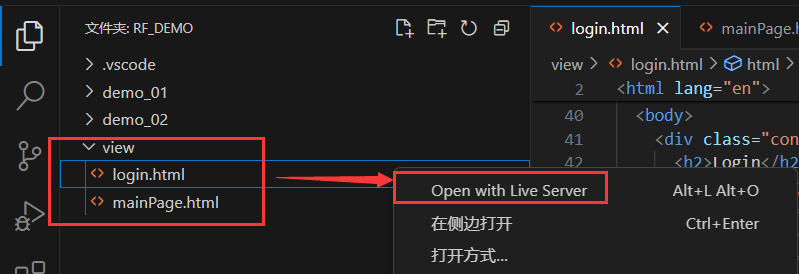
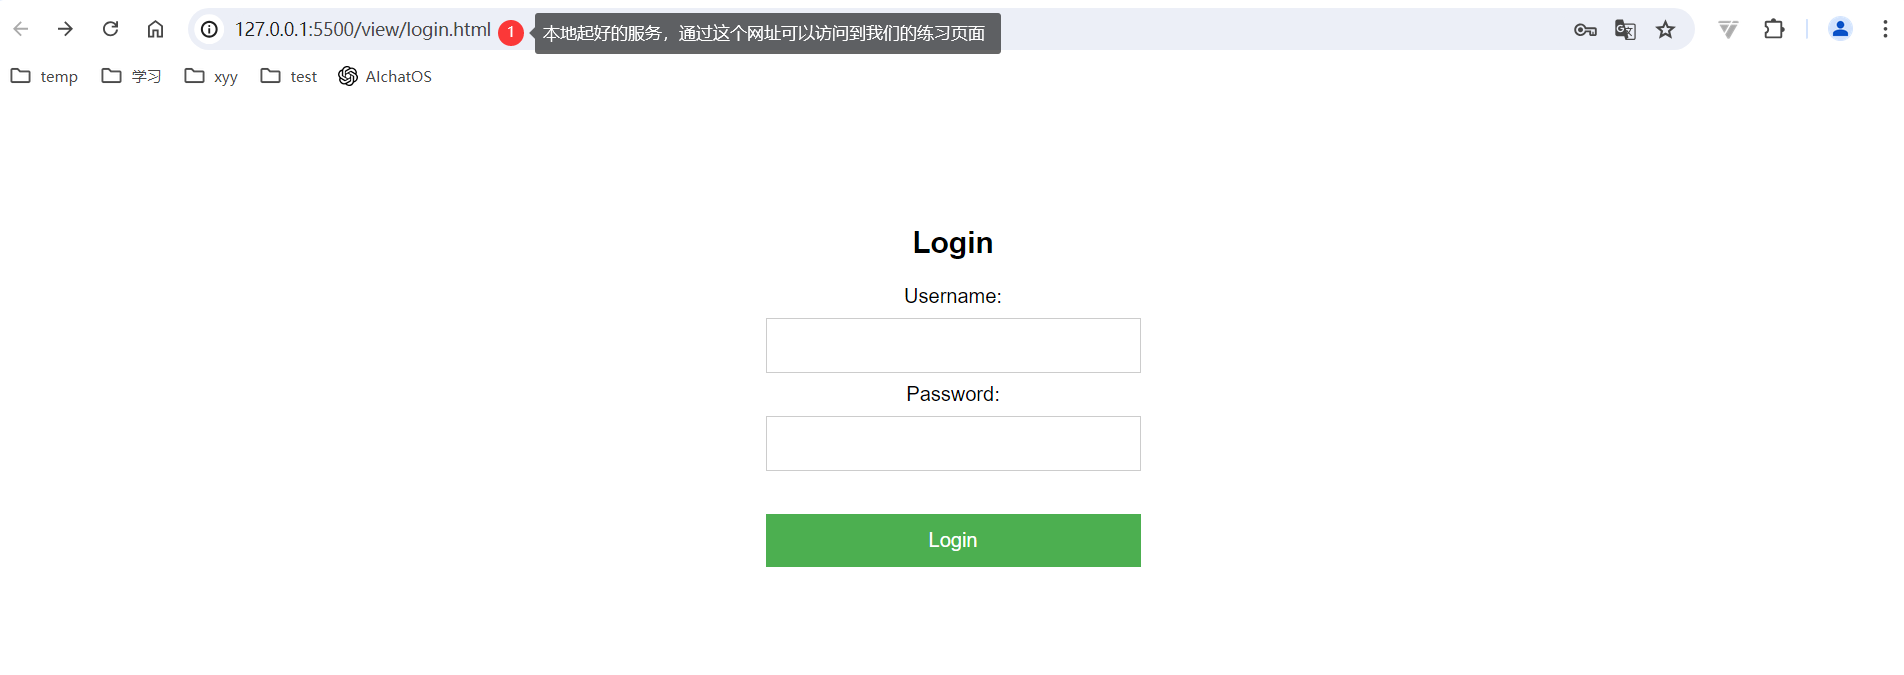
4.2.1.1 先简单写一个登陆界面,用于测试。把这两个html代码放置在一个文件目录下,对login.html右键使用open with live sever可以在浏览器中打开对应网址。open with live sever功能可以创建一个服务,方便我们调试html代码
点击查看login.html代码
<!DOCTYPE html>
<html lang="en">
  <head>
    <meta charset="UTF-8" />
    <meta name="viewport" content="width=device-width, initial-scale=1.0" />
    <title>Login Page</title>
    <style>
      body {
        font-family: Arial, sans-serif;
        text-align: center;
      }
      .container {
        margin-top: 100px;
        width: 300px;
        margin-left: auto;
        margin-right: auto;
      }
      input[type='text'],
      input[type='password'],
      input[type='submit'] {
        width: 100%;
        padding: 12px 20px;
        margin: 8px 0;
        display: inline-block;
        border: 1px solid #ccc;
        box-sizing: border-box;
        font-size: 16px;
      }
      input[type='submit'] {
        background-color: #4caf50;
        color: white;
        border: none;
        cursor: pointer;
      }
      input[type='submit']:hover {
        background-color: #45a049;
      }
    </style>
  </head>
  <body>
    <div class="container">
      <h2>Login</h2>
      <form id="loginForm" onsubmit="return checkLogin()">
        <label for="username">Username:</label><br />
        <input type="text" id="username" name="username" /><br />
        <label for="password">Password:</label><br />
        <input type="password" id="password" name="password" /><br /><br />
        <input type="submit" value="Login" />
      </form>
      <p id="loginMessage" style="display: none; color: green">
        Login successful!
      </p>
    </div>

    <script>
      function checkLogin() {
        var username = document.getElementById('username').value
        var password = document.getElementById('password').value
        if (!username || !password) {
          alert('请输入账号密码后再点击登录!')
          return false
        } else if (username === 'root' && password === 'root1234') {
          document.getElementById('loginMessage').style.display = 'block'
          window.location.href = './mainPage.html'
          return false // Prevent form submission
        } else if (username === 'root' && password != 'root1234') {
          alert('密码错误,请输入正确的密码!')
          return false
        } else {
          alert('账号密码错误,请检查账号密码!')
          return false
        }
      }
    </script>
  </body>
</html>
点击查看mainPage.html代码
<!DOCTYPE html>
<html lang="en">
  <head>
    <meta charset="UTF-8" />
    <meta name="viewport" content="width=device-width, initial-scale=1.0" />
    <title>数据搜索页面</title>
    <style>
      table {
        border-collapse: collapse;
        width: 100%;
      }
      th,
      td {
        border: 1px solid #dddddd;
        text-align: left;
        padding: 8px;
      }
      th {
        background-color: #f2f2f2;
      }
    </style>
  </head>
  <body>
    <h1>数据搜索页面</h1>
    <form id="searchForm">
      <label for="name">姓名:</label>
      <input type="text" id="name" name="name" />
      <label for="gender">性别:</label>
      <select id="gender" name="gender">
        <option value="">全部</option>
        <option value="male">男</option>
        <option value="female">女</option>
      </select>
      <button type="button" onclick="searchData()">搜索</button>
    </form>

    <br />

    <table id="dataTable">
      <thead>
        <tr>
          <th>序号</th>
          <th>姓名</th>
          <th>性别</th>
          <th>年龄</th>
        </tr>
      </thead>
      <tbody>
        <!-- 数据行将通过 JavaScript 动态生成 -->
      </tbody>
    </table>

    <script>
      var data = [
        { 序号: 1, 姓名: '张三', 性别: '男', 年龄: 25 },
        { 序号: 2, 姓名: '李四', 性别: '男', 年龄: 30 },
        { 序号: 3, 姓名: '王芳', 性别: '女', 年龄: 28 },
        { 序号: 4, 姓名: '张三三', 性别: '女', 年龄: 25 }
      ]

      var tbody = document.querySelector('#dataTable tbody')

      // 循环生成表格内容
      for (var i = 0; i < data.length; i++) {
        var row = document.createElement('tr')

        var serialNumberCell = document.createElement('td')
        serialNumberCell.textContent = data[i].序号
        row.appendChild(serialNumberCell)

        var nameCell = document.createElement('td')
        nameCell.textContent = data[i].姓名
        row.appendChild(nameCell)

        var genderCell = document.createElement('td')
        genderCell.textContent = data[i].性别
        row.appendChild(genderCell)

        var ageCell = document.createElement('td')
        ageCell.textContent = data[i].年龄
        row.appendChild(ageCell)

        tbody.appendChild(row)
      }
      function searchData() {
        var inputName = document.getElementById('name').value.toLowerCase()
        var inputGender = document.getElementById('gender').value.toLowerCase()
        var table = document.getElementById('dataTable')
        var rows = table.getElementsByTagName('tr')

        for (var i = 1; i < rows.length; i++) {
          var name = rows[i]
            .getElementsByTagName('td')[1]
            .innerText.toLowerCase()
          var gender = rows[i]
            .getElementsByTagName('td')[2]
            .innerText.toLowerCase()

          var nameMatch = name.includes(inputName)
          var genderMatch =
            inputGender === '' ||
            (inputGender === 'male' && gender === '男') ||
            (inputGender === 'female' && gender === '女')

          if (nameMatch && genderMatch) {
            rows[i].style.display = ''
          } else {
            rows[i].style.display = 'none'
          }
        }
      }
    </script>
  </body>
</html>
登陆页面功能设计如下:
- 功能1:输入正确的账号密码(root/root1234),登录成功,跳转到主页
- 功能2:输入正确的账号,错误的密码,登录失败并给出提示信息:密码错误,请输入正确的密码
- 功能3:输入错误的账号密码,登录失败并给出提示信息:账号密码错误,请检查账号密码
- 功能4:不输入账号密码点击登录,登录失败并给出提示信息:请输入账号密码后再点击登录!
4.2.1.2 根据页面功能设计用例
- 用例1:输入正确的账号密码(root/root1234)。 预期:登录成功,跳转到搜索界面
- 用例2:输入正确的账号,错误的密码。 预期:登录失败并给出提示信息:密码错误,请输入正确的密码
- 用例3:不输入账号输入密码点击登录。 预期:登录失败并给出提示信息:请输入账号密码后再点击登录!
- 用例4:输入账号不输入密码点击登录。 预期:登录失败并给出提示信息:请输入账号密码后再点击登录!
- 用例5:不输入账号密码点击登录。 预期:登录失败并给出提示信息:请输入账号密码后再点击登录!
- 用例6:输入错误的账号密码。 预期:登录失败并给出提示信息:账号密码错误,请检查账号密码
4.2.1 编写RF代码
4.2.1.1 目录结构
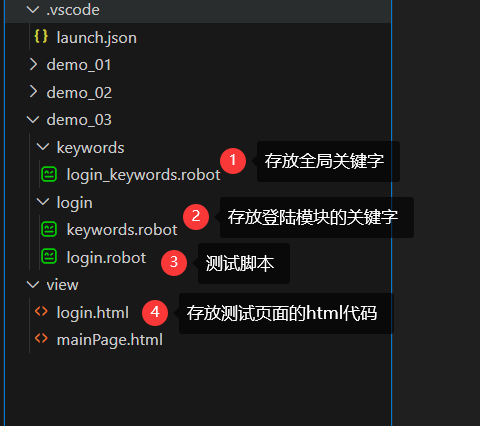
4.2.1.2 相关代码
点击查看login_keywords.robot代码
*** Comments ***
登录相关的全局关键字
*** Settings ***
Library    SeleniumLibrary
*** Variables ***
${IMPLICIT_WAIT_TIME}    5
${LOGIN_URL}    http://127.0.0.1:5500/view/login.html
*** Keywords ***
OPEN LOGIN PAGE
    Open Browser    ${LOGIN_URL}    chrome
    Set Selenium Implicit Wait    ${IMPLICIT_WAIT_TIME}
点击查看keywords.robot代码
*** Comments ***
登陆页面用到的关键字
*** Settings ***
Library    SeleniumLibrary
*** Keywords ***
INPUT USER AND PASSWORD
    [Arguments]    ${username}   ${password}
    [Documentation]    输入用户名(username)和密码(password)
    Input Text    locator=//input[@id="username"]    text=${username}
    Input Text    locator=//input[@id="password"]    text=${password}
    Click Element    locator=//input[@type="submit"]
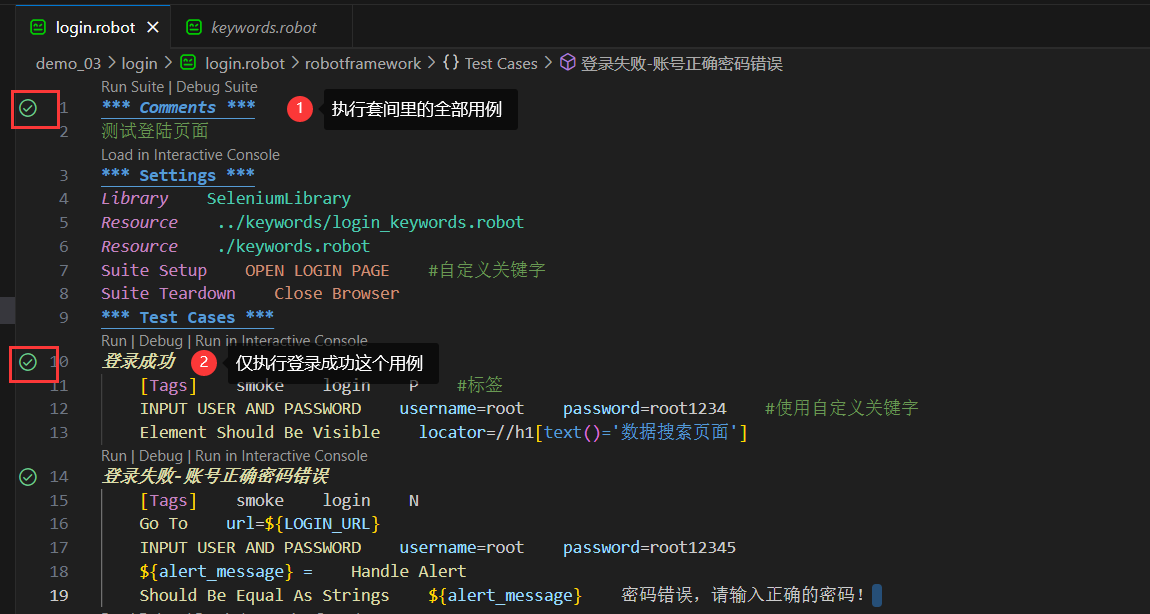
点击查看login.robot代码
*** Comments ***
测试登陆页面
*** Settings ***
Library    SeleniumLibrary
Resource    ../keywords/login_keywords.robot
Resource    ./keywords.robot
Suite Setup    OPEN LOGIN PAGE    #自定义关键字
Suite Teardown    Close Browser
*** Test Cases ***
登录成功
    [Tags]    smoke    login    P    #标签
    INPUT USER AND PASSWORD    username=root    password=root1234    #使用自定义关键字
    Element Should Be Visible    locator=//h1[text()='数据搜索页面']
登录失败-账号正确密码错误
    [Tags]    smoke    login    N
    Go To    url=${LOGIN_URL}
    INPUT USER AND PASSWORD    username=root    password=root12345
    ${alert_message} =    Handle Alert
    Should Be Equal As Strings    ${alert_message}    密码错误,请输入正确的密码!
登录失败-不输入账号
    [Tags]    smoke    login    N
    Go To    url=${LOGIN_URL}
    INPUT USER AND PASSWORD    username=    password=root1234
    ${alert_message} =    Handle Alert
    Should Be Equal As Strings    ${alert_message}    请输入账号密码后再点击登录!
登录失败-不输入密码
    [Tags]    smoke    login    N
    Go To    url=${LOGIN_URL}
    INPUT USER AND PASSWORD    username=root    password=
    ${alert_message} =    Handle Alert
    Should Be Equal As Strings    ${alert_message}    请输入账号密码后再点击登录!
登录失败-不输入账号和密码
    [Tags]    smoke    login    N
    Go To    url=${LOGIN_URL}
    INPUT USER AND PASSWORD    username=    password=
    ${alert_message} =    Handle Alert
    Should Be Equal As Strings    ${alert_message}    请输入账号密码后再点击登录!
登录失败-账号密码错误
    [Tags]    smoke    login    N
    Go To    url=${LOGIN_URL}
    INPUT USER AND PASSWORD    username=root1   password=root1234
    ${alert_message} =    Handle Alert
    Should Be Equal As Strings    ${alert_message}    账号密码错误,请检查账号密码!
*** Keywords ***
#此处用来设置变量
4.2.1.3 其他说明
- 有一些步骤是重复的,此时可以采用自定义关键字的写法,提高效率。robot文件之间是可以相互引用的,例如A.robot要引用B.robot里的关键字,只需要在A.robot的Settings处通过使用Resource关键字引用B.robot文件,即可使用B.robot文件里头的Keywords。至于文件命名以及目录命名这个就需要自己结合项目的实际情况去创建,一个好的清晰的目录结构有利于项目分工合作和后期拓展,所以还是需要想一下的。
- 在vscode也支持单个执行用例、按套件执行用例、按目录执行用例,调试同理。
4.3 实践3:搜索界面功能测试
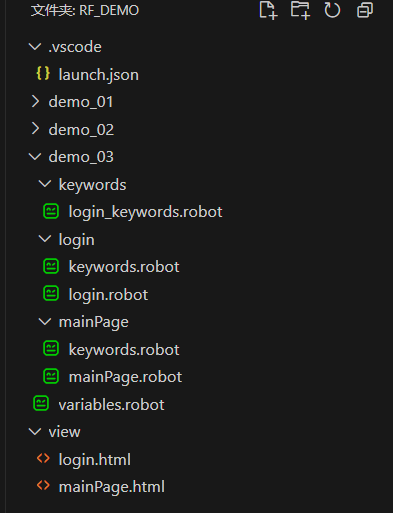
4.3.1 目录文件调整
- 考虑到很多界面测试都是基于登录成功的基础上去测试的,所以把登录成功拎出来封装成一个全局关键字放到login_keywords.robot,方便后续引用
- 新增variables.robot用于存放全局变量
4.3.2 测试用例设计
- 用例1:根据名称模糊搜索。 预期:表单正确根据搜索项显示正确数据
- 用例2:根据名称精确搜索。 预期:表单正确根据搜索项显示正确数据
- 用例3:根据性别精确搜索,遍历全部下拉选项(全部、男、女)。 预期:表单正确根据搜索项显示正确数据
- 用例4:根据名称和性别组合搜索,遍历全部下拉选项(全部、男、女)。 预期:表单正确根据搜索项显示正确数据
- 用例5:输入不存在的名称。 预期:表单搜索结果为空
4.3.3 相关代码
点击查看login_keywords.robot代码
*** Comments ***
登录相关的全局关键字
*** Settings ***
Library    SeleniumLibrary
Resource    ../login/keywords.robot
Resource    ../variables.robot
*** Variables ***
${IMPLICIT_WAIT_TIME}    5
${LOGIN_URL}    http://127.0.0.1:5500/view/login.html
*** Keywords ***
OPEN LOGIN PAGE
    Open Browser    ${LOGIN_URL}    chrome
    Set Selenium Implicit Wait    ${IMPLICIT_WAIT_TIME}
LOGIN SUCCESS
    INPUT USER AND PASSWORD    username=${User_name}    password=${Password}    #使用自定义关键字
    Element Should Be Visible    locator=//h1[text()='数据搜索页面']
点击查看variables.robot代码
*** Variables ***
${User_name}    root
${Password}    root1234
点击查看mainPage.robot代码
*** Comments ***
主页测试
*** Settings ***
Library    SeleniumLibrary
Resource    ../keywords/login_keywords.robot
Suite Setup    Run Keywords    OPEN LOGIN PAGE    AND    LOGIN SUCCESS    #自定义关键字
Suite Teardown    Close Browser
*** Variables ***
@{gender_list}    全部    男    女
*** Test Cases ***
根据名称模糊搜索
    Input Text    locator=//input[@id='name']    text=张三    #输入搜索条件张三
    Click Button    locator=//button[@onclick='searchData()']    #点击搜索
    ${table_rows_all}    Get WebElements    locator=//tbody/tr   #获取全部表格行元素
    ${length_all}    Get Length   item=${table_rows_all}    #获取全部表格行数
    ${table_rows}    Get WebElements    locator=//tbody/tr[not(@style='display: none;')]    #获取表格显示的行数
    ${length}    Get Length   item=${table_rows}    #获取未隐藏表格行数
    Should Be Equal As Numbers    first=${length}    second=2    #根据之前创建好的表格测试数据,理论上会搜出2行结果
    ${new_length} =  Evaluate    ${length_all} + 1
    FOR    ${index}    IN RANGE    1    ${new_length}   #根据显示的表格行数遍历每一行
        ${Attribute}   Get Element Attribute    locator=//tbody/tr[${index}]    attribute=style
        IF  'display: none;' != '${Attribute}'
            Element Should Contain    locator=//tbody/tr[${index}]/td[2]    expected=张三    #预期是每行第二列(姓名)的值都等于搜索值
        END
    END
根据名称精确搜索
    Input Text    locator=//input[@id='name']    text=张三三    #输入搜索条件张三
    Click Button    locator=//button[@onclick='searchData()']    #点击搜索
    ${table_rows_all}    Get WebElements    locator=//tbody/tr   #获取全部表格行元素
    ${length_all}    Get Length   item=${table_rows_all}    #获取全部表格行数
    ${table_rows}    Get WebElements    locator=//tbody/tr[not(@style='display: none;')]    #获取表格显示的行数
    ${length}    Get Length   item=${table_rows}    #获取未隐藏表格行数
    ${new_length} =  Evaluate    ${length_all} + 1
    Should Be Equal As Numbers    first=${length}    second=1    #根据之前创建好的表格测试数据,预期会搜出1行结果
    FOR    ${index}    IN RANGE    1    ${new_length}   #根据显示的表格行数遍历每一行
        ${Attribute}   Get Element Attribute    locator=//tbody/tr[${index}]    attribute=style
        IF  'display: none;' != '${Attribute}'
            Element Should Contain    locator=//tbody/tr[${index}]/td[2]    expected=张三三    #预期是每行第二列(姓名)的值都等于搜索值
        END
    END
根据性别精确搜索
    Input Text    locator=//input[@id='name']    text=${EMPTY}    #清空输入框的值
    FOR    ${gender}    IN    @{gender_list}
        Select From List By Label    //select[@id='gender']    ${gender}
        Click Button    locator=//button[@onclick='searchData()']    #点击搜索
        ${table_rows_all}    Get WebElements    locator=//tbody/tr   #获取全部表格行元素
        ${length_all}    Get Length   item=${table_rows_all}    #获取全部表格行数
        ${table_rows}    Get WebElements    locator=//tbody/tr[not(@style='display: none;')]    #获取表格显示的行数
        ${length}    Get Length   item=${table_rows}    #获取未隐藏表格行数
        ${new_length} =  Evaluate    ${length_all} + 1
        IF  '${gender}'=='全部'
            Should Be Equal As Numbers    first=${length_all}    second=4    #根据之前创建好的表格测试数据,理论上会搜出全部4行结果
        ELSE
            FOR    ${index}    IN RANGE    1    ${new_length}   #根据显示的表格行数遍历每一行
                ${Attribute}   Get Element Attribute    locator=//tbody/tr[${index}]    attribute=style
                IF  'display: none;' != '${Attribute}'
                    Element Should Contain    locator=//tbody/tr[${index}]/td[3]    expected=${gender}    #预期是每行第三列(性别)的值都等于搜索值
                END
            END
        END
    END
根据名称和性别组合搜索
    Input Text    locator=//input[@id='name']    text=张三    #输入框输入张三
    FOR    ${gender}    IN    @{gender_list}
        Select From List By Label    //select[@id='gender']    ${gender}
        Click Button    locator=//button[@onclick='searchData()']    #点击搜索
        ${table_rows_all}    Get WebElements    locator=//tbody/tr   #获取全部表格行元素
        ${length_all}    Get Length   item=${table_rows_all}    #获取全部表格行数
        ${table_rows}    Get WebElements    locator=//tbody/tr[not(@style='display: none;')]    #获取表格显示的行数
        ${length}    Get Length   item=${table_rows}    #获取未隐藏表格行数
        ${new_length} =  Evaluate    ${length_all} + 1
        IF  '${gender}'=='全部'
            Should Be Equal As Numbers    first=${length_all}    second=4    #根据之前创建好的表格测试数据,理论上会搜出全部4行结果
        ELSE
            FOR    ${index}    IN RANGE    1    ${new_length}   #根据显示的表格行数遍历每一行
                ${Attribute}   Get Element Attribute    locator=//tbody/tr[${index}]    attribute=style
                IF  'display: none;' != '${Attribute}'
                    Element Should Contain    locator=//tbody/tr[${index}]/td[3]    expected=${gender}    #预期是每行第三列(性别)的值都等于搜索值
                    Element Should Contain    locator=//tbody/tr[${index}]/td[2]    expected=张三    #预期是每行第二列(姓名)的值都等于搜索值
                END
            END
        END
    END
输入不存在的名称
    Input Text    locator=//input[@id='name']    text=哇哈哈   #输入框输入不存在的姓名
    Click Button    locator=//button[@onclick='searchData()']    #点击搜索
    ${table_rows}    Get WebElements    locator=//tbody/tr[not(@style='display: none;')]    #获取表格显示的行数
    ${length}    Get Length   item=${table_rows}    #获取未隐藏表格行数
    Should Be Equal As Numbers    first=${length}    second=0    #根据之前创建好的表格测试数据,理论上会搜出0行结果
目录如下图:
五 可能遇到的问题
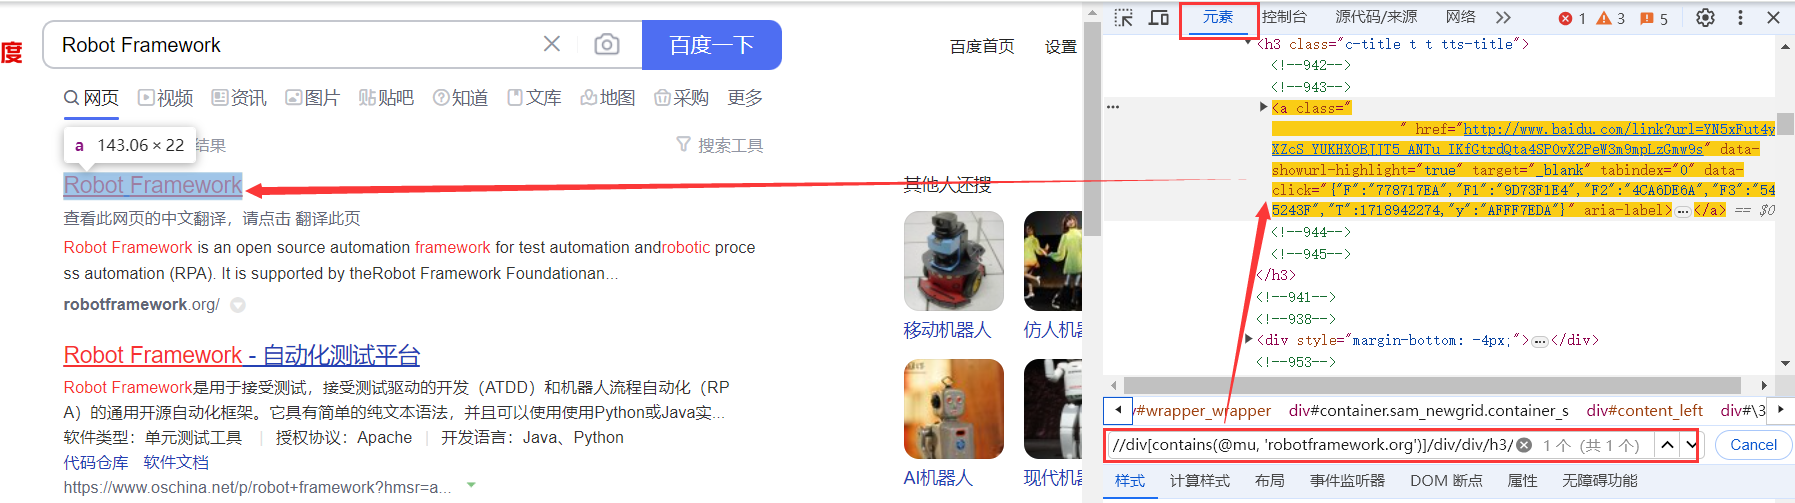
5.1 怎么判断自己写的xpath、css选择器是否正确?
可以利用谷歌开发者工具,在元素这里按f出现搜索框,再将我们的xpath贴上去,如果能搜索到就代表我们写的路径没错。需注意检查一下有几个搜索结果,使用相对路径的情况下,匹配条件不充分可能会匹配到多个结果。
5.2 怎么了解Library里面的关键字,或者说怎么快速判断应该使用哪一个关键字
对关键字的使用基本上是熟能生巧,不熟悉的情况可以借助chatGPT也可以去Library对应的官网,会有关键字文档说明
- 去官网查阅关键字文档说明
- 借助chatGPT,但chatGPT是有可能输出错误答案的,要适当的举一反三

期待和自律的小伙伴们相识相知一起进步QAQ有任何指导意见欢迎私戳


【推荐】国内首个AI IDE,深度理解中文开发场景,立即下载体验Trae
【推荐】编程新体验,更懂你的AI,立即体验豆包MarsCode编程助手
【推荐】抖音旗下AI助手豆包,你的智能百科全书,全免费不限次数
【推荐】轻量又高性能的 SSH 工具 IShell:AI 加持,快人一步
· 无需6万激活码!GitHub神秘组织3小时极速复刻Manus,手把手教你使用OpenManus搭建本
· C#/.NET/.NET Core优秀项目和框架2025年2月简报
· Manus爆火,是硬核还是营销?
· 终于写完轮子一部分:tcp代理 了,记录一下
· 【杭电多校比赛记录】2025“钉耙编程”中国大学生算法设计春季联赛(1)