Redis哨兵模式搭建
一:哨兵主要作用
监控:监控redis主库及从库运行状态;
通知:如果redis发生故障转移,可以通过邮件通知管理员;
自动故障转移:一旦发现主库宕机,则在从库中通过选举新的master进行故障转移。
二:工作原理
哨兵(sentinel) 是一个分布式系统,你可以在一个架构中运行多个哨兵(sentinel) 进程,这些进程使用流言协议(gossipprotocols)来接收关于Master是否下线的信息,并使用投票协议(agreement protocols)来决定是否执行自动故障迁移,以及选择哪个Slave作为新的Master。
每个哨兵(sentinel) 会向其它哨兵(sentinel)、master、slave定时发送消息,以确认对方是否”活”着,如果发现对方在指定时间(可配置)内未回应,则暂时认为对方宕机了,这种宕机称为”主观认为宕机” Subjective Down,简称sdown)。
若“哨兵群”中的多数sentinel,都报告某一master没响应,系统才认为该master真正宕机,即客观上认为宕机,Objective Down,简称odown),通过一定的vote算法,从剩下的slave节点中,选一台提升为master,然后自动修改相关配置。
三:部署
master: 192.168.1.247
slave1: 192.168.1.110
slave2: 192.168.1.211
1. Redis服务安装
这里Redis版本为5.0.5。
Redis的安装步骤为:下载、解压、编译、配置、启动。
以下以247服务器安装为例,其他类似。
1.1 安装所需环境和工具
centos
yum -y install wget vim tcl gcc make

ubuntu
apt-get install wget vim tcl gcc make
1.2 下载Redis
cd /home/
wget http://download.redis.io/releases/redis-5.0.5.tar.gz
1.3 解压
tar -zxvf redis-5.0.5.tar.gz
1.4 编译
cd redis-5.0.5/
make install PREFIX=/home/redis/
1.5 拷贝配置文件到Redis程序目录
cp redis.conf /home/redis/bin
cp sentinel.conf /home/redis/bin
redis.conf是Redis服务的配置文件;sentinel.conf是哨兵服务的配置文件。
1.6 修改配置文件
mkdir -p /home/redis/run
mkdir -p /home/redis/log
mkdir -p /home/redis/working
vim /home/redis/bin/redis.conf
通用配置
 # 需要不同服务器的节点连通,就不能设置为 127.0.0.1
 bind 0.0.0.0
 # 需要不同服务器的节点连通,这个就要设置为 no
 protected-mode no
 port 6379
 # 密码
 requirepass "ABC!!123"
 # 主节点认证,主从节点均需要配置
 masterauth "ABC!!123"
 tcp-backlog 511
 timeout 0
 tcp-keepalive 300
 # 设置后台运行redis
 daemonize yes
 supervised no
 dir "/home/redis/working"
 pidfile "/home/redis/run/redis_6379.pid"
 logfile "/home/redis/log/redis.log"
 loglevel notice
 databases 16
 always-show-logo yes
 save 900 1
 save 300 10
 save 60 10000
 stop-writes-on-bgsave-error yes
 rdbcompression yes
 rdbchecksum yes
 dbfilename "dump.rdb"
 replica-serve-stale-data yes
 replica-read-only yes
 repl-diskless-sync no
 repl-diskless-sync-delay 5
 repl-disable-tcp-nodelay no
 replica-priority 100
 lazyfree-lazy-eviction no
 lazyfree-lazy-expire no
 lazyfree-lazy-server-del no
 replica-lazy-flush no
 appendonly yes
 appendfilename "appendonly.aof"
 appendfsync everysec
 no-appendfsync-on-rewrite no
 auto-aof-rewrite-percentage 100
 auto-aof-rewrite-min-size 64mb
 aof-load-truncated yes
 aof-use-rdb-preamble yes
 lua-time-limit 5000
 latency-monitor-threshold 0
 notify-keyspace-events ""
 hash-max-ziplist-entries 512
 hash-max-ziplist-value 64
 list-max-ziplist-size -2
 list-compress-depth 0
 set-max-intset-entries 512
 zset-max-ziplist-entries 128
 zset-max-ziplist-value 64
 hll-sparse-max-bytes 3000
 stream-node-max-bytes 4096
 stream-node-max-entries 100
 activerehashing yes
 client-output-buffer-limit normal 0 0 0
 client-output-buffer-limit replica 256mb 64mb 60
 client-output-buffer-limit pubsub 32mb 8mb 60
 hz 10
 dynamic-hz yes
 aof-rewrite-incremental-fsync yes
 rdb-save-incremental-fsync yes
从节点配置
replicaof 192.168.1.211 6379
1.7 启动服务
cd /home/redis/bin
./redis-server redis.conf
1.8 使用 ps -ef|grep redis 查看是否都启动成功,IP和端口号都正确

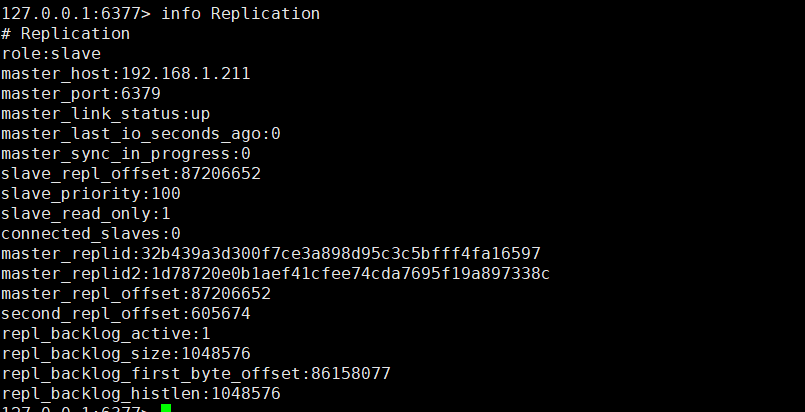
使用info Replication查看主从复制状态
cd /home/redis/bin
./redis-cli -p 6379
auth ABC!!123
info Replication
主节点

从节点(这里从节点端口用的6377)
2.哨兵配置
哨兵模式采用一主二从三哨兵模式。
2.1 修改配置
cd /home/redis/bin
vim sentine.conf
# 保护模式默认关闭
protected-mode no
# 绑定监听IP
bind 0.0.0.0
# 哨兵端口
port 26379
# 后台运行
daemonize yes
# pid
pidfile "/home/redis/run/redis-sentinel.pid"
# log
logfile "/home/redis/log/redis-sentinel.log"
# 工作目录
dir "/home/redis/working"
# 设置初始master以及法定认为下线人数:
sentinel monitor redis-master 192.168.1.211 6379 2
# 配置认证密码
sentinel auth-pass redis-master ABC!!123
# 设置初始master以及法定认为下线人数:
sentinel down-after-milliseconds redis-master 30000
# 指定在故障转移期间,多少个slave向新的master同步得数量,如果slave是提供查询服务,则应该设置小一点更好
sentinel parallel-syncs redis-master 1
# 指定故障转移超时时间,默认为3分钟
sentinel failover-timeout redis-master 180000
# 禁止修改脚本,避免脚本重置
sentinel deny-scripts-reconfig yes
2.2 启动
./redis-sentinel sentinel.conf
3.验证
3.1查看哨兵信息
随意登录一台主机执行 info Sentinel命令,下面以连接211机器为例。
cd /home/redis/bin
./redis-cli -p 26379 info Sentinel
输出信息如下:

SpringBoot配置Redis哨兵模式
application.yml 添加Redis配置
spring:
    redis:
        database: 1
        password: ABC!!123
        # 哨兵模式
        sentinel:
            master: redis-master
            nodes: 192.168.1.211:26379,192.168.1.247:26379,192.168.1.110:26379


【推荐】国内首个AI IDE,深度理解中文开发场景,立即下载体验Trae
【推荐】编程新体验,更懂你的AI,立即体验豆包MarsCode编程助手
【推荐】抖音旗下AI助手豆包,你的智能百科全书,全免费不限次数
【推荐】轻量又高性能的 SSH 工具 IShell:AI 加持,快人一步
· TypeScript + Deepseek 打造卜卦网站:技术与玄学的结合
· Manus的开源复刻OpenManus初探
· 三行代码完成国际化适配,妙~啊~
· .NET Core 中如何实现缓存的预热?
· 如何调用 DeepSeek 的自然语言处理 API 接口并集成到在线客服系统