根据颜色和大小来检测和跟踪实时网络摄像机中的对象(翻译)
(本文根据有道翻译直译,有翻译错误的地方请以英文段落为准)
原文 : https://kishordgupta.wordpress.com/
In my last post i explain how EuclideanColorFiltering work . here i use that in my webcam for track and detect i made a realtime tracker could be made where color and objects size could also be changed in real time. and can draw movement of that objects in a bitmap with that color. i use some part of their code, although i use separate color filter for more accuracy.
在上一篇文章中,我解释了euclideancolor过滤的工作原理。我在我的网络摄像头中使用它来跟踪和检测我做了一个实时跟踪器,可以在颜色和对象大小也可以实时变化的地方进行。并且可以绘制带有该颜色的位图中的对象的移动。我使用了他们的代码的一部分,虽然我使用了不同的颜色过滤器更准确 .
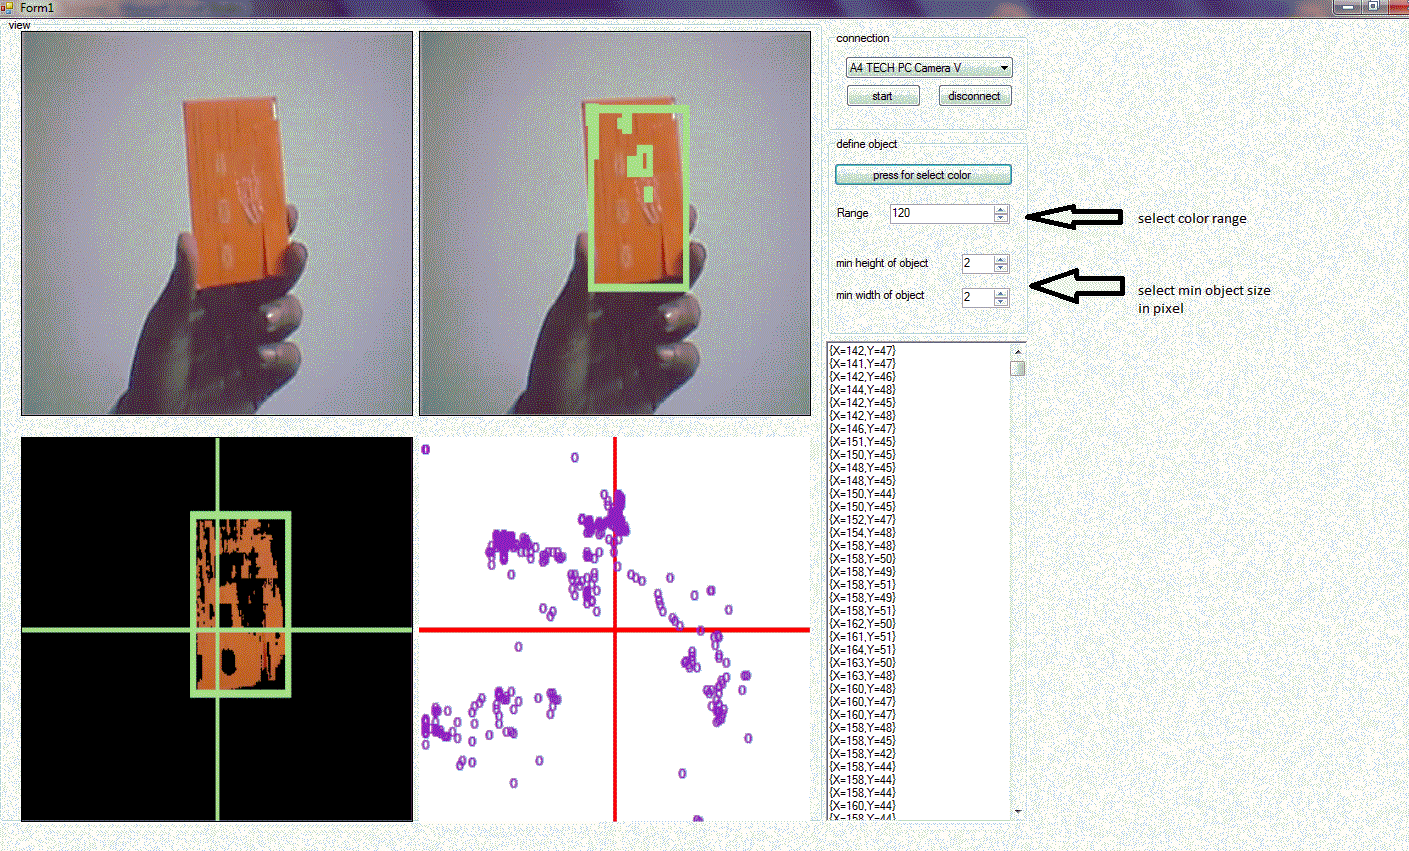
First how my software work first can start tracking by default color black and color range of 120 but u can change in real time to color change press that a color dialog will come , then select color, remember to press OK and see the solidcolor box that Ur required color is present or not.
第一我的软件是如何工作的可以开始跟踪默认颜色黑色和颜色范围的120 u可以实时改变颜色改变一个颜色对话框会新闻,然后选择颜色,记得按下OK看看solidcolor盒子,你需要颜色存在或没有

To select the range and define minimum size of the object see next image, there are 3 numeric updown list for that. objectsize calculated in pixel
要选择范围和定义对象的最小大小,请参见下一个图像,其中有3个数值上向下的列表。objectsize计算像素

now about the views, there are 4 view, 3 of them is Aforge video source control and another one is a picturebox, first one show normal video, second one show all detected object, 3rd box show only the biggest object and fourth one just draw a ‘0’ sign in biggest object location, see below image for more clearence
现在的观点,有4个,3是Aforge视频源控制,另一个是一个图片框,第一个显示正常的视频,发现第二个显示所有对象,第三框只显示最大的对象和第四个画一个“0”标志在最大对象位置,参见下面图片更多的结算

i also add a richtextbox which showing the pixel of biggestrectangle position .now about the code for connection i use normal aforge connection code,
我还添加了一个richtextbox,它显示了最大矩形位置的像素。关于连接的代码我使用普通的aforge连接代码
for that u need to download aforge dll, and also add a very good videocontrol for showing video u can add it in ur toolbox. just click freespace on toolbox chooseitems-> browse the dll -> add the control
因为你需要下载aforge的dll,并且添加一个很好的视频控制来显示视频u可以添加在你的工具箱里。只需在工具箱选择项上单击“freespace”->浏览dll - >添加控件
1 2 | using AForge;using AForge.Video.DirectShow; |
then initialize
然后初始化
 1 videoDevices = new FilterInfoCollection(FilterCategory.VideoInputDevice);
 2
 3 if (videoDevices.Count == 0)
 4     throw new ApplicationException();
 5
 6  foreach (FilterInfo device in videoDevices)
 7  {
 8     VideoCaptureDevice videoSource = new     VideoCaptureDevice(device.MonikerString);
 9     videoSource.DesiredFrameSize = new Size(320, 240);
10     videoSource.DesiredFrameRate = 15;
11     videoSourcePlayer1.VideoSource = videoSource;
12     videoSourcePlayer1.Start();
13  }
for videoplayercontrol add a event in its misc
对于videoplayercontrol,在它的misc中添加一个事件
named
命名
private void videoSourcePlayer1_NewFrame(object sender, ref Bitmap image){ //work with image} |
in that function i apply my color detection code by writing eucladian filtering and then use blobcounter to extract data to see how its work u can see my this post
在这个函数中,我通过编写eucladian过滤来应用我的颜色检测代码,然后使用blobcounter提取数据,看看它的工作是如何看到我的这篇文章的
the code is simple for second videoframe i used
我使用的第二段视频的代码很简单
 1 private void videoSourcePlayer1_NewFrame(object sender, ref Bitmap image)
 2         {
 3             Bitmap objectsImage = null;
 4             Bitmap mImage = null;
 5             mImage=(Bitmap)image.Clone();
 6            filter.CenterColor = Color.FromArgb(color.ToArgb());
 7             filter.Radius =(short)range;
 8
 9             objectsImage = image;
10             filter.ApplyInPlace(objectsImage);
11
12             BitmapData objectsData = objectsImage.LockBits(new Rectangle(0, 0, image.Width, image.Height),
13             ImageLockMode.ReadOnly, image.PixelFormat);
14             UnmanagedImage grayImage = grayscaleFilter.Apply(new UnmanagedImage(objectsData));
15             objectsImage.UnlockBits(objectsData);
16
17             blobCounter.ProcessImage(grayImage);
18             Rectangle[] rects = blobCounter.GetObjectRectangles();
19
20             if (rects.Length > 0)
21             {
22
23                 foreach (Rectangle objectRect in rects)
24                 {
25                     Graphics g = Graphics.FromImage(mImage);
26                     using (Pen pen = new Pen(Color.FromArgb(160, 255, 160), 5))
27                     {
28                         g.DrawRectangle(pen, objectRect);
29                     }
30
31                     g.Dispose();
32                 }
33             }
34
35             image = mImage;
36         }
and for second videoframe i used belowcode
在第二段视频中,我使用了belowcode
 1 private void videoSourcePlayer3_NewFrame(object sender, ref Bitmap image)
 2         {
 3             Bitmap objectsImage = null;
 4
 5                   // set center colol and radius
 6                   filter.CenterColor = Color.FromArgb(color.ToArgb());
 7                   filter.Radius = (short)range;
 8                   // apply the filter
 9                   objectsImage = image;
10                   filter.ApplyInPlace(image);
11
12             // lock image for further processing
13             BitmapData objectsData = objectsImage.LockBits(new Rectangle(0, 0, image.Width, image.Height),
14                 ImageLockMode.ReadOnly, image.PixelFormat);
15
16             // grayscaling
17             UnmanagedImage grayImage = grayscaleFilter.Apply(new UnmanagedImage(objectsData));
18
19             // unlock image
20             objectsImage.UnlockBits(objectsData);
21
22             // locate blobs
23             blobCounter.ProcessImage(grayImage);
24             Rectangle[] rects = blobCounter.GetObjectRectangles();
25
26             if (rects.Length > 0)
27             {
28                 Rectangle objectRect = rects[0];
29
30                 // draw rectangle around derected object
31                 Graphics g = Graphics.FromImage(image);
32
33                 using (Pen pen = new Pen(Color.FromArgb(160, 255, 160), 5))
34                 {
35                     g.DrawRectangle(pen, objectRect);
36                 }
37               g.Dispose();
38                 int objectX = objectRect.X + objectRect.Width / 2 - image.Width / 2;
39                 int objectY = image.Height / 2 - (objectRect.Y + objectRect.Height / 2);
40                 ParameterizedThreadStart t = new ParameterizedThreadStart(p);
41                Thread aa = new Thread(t);
42                aa.Start(rects[0]);
43             }
44             Graphics g1 = Graphics.FromImage(image);
45             Pen pen1 = new Pen(Color.FromArgb(160, 255, 160), 3);
46             g1.DrawLine(pen1,image.Width/2,0,image.Width/2,image.Width);
47             g1.DrawLine(pen1, image.Width , image.Height / 2, 0, image.Height / 2);
48             g1.Dispose();
49        }
the thread where i used to draw position and show that thread worked like
我用来绘制位置和显示线程工作的线程
 1 void p(object r)
 2    {
 3        try
 4        {
 5        Bitmap b = new Bitmap(pictureBox1.Image);
 6        Rectangle a = (Rectangle)r;
 7        Pen pen1 = new Pen(Color.FromArgb(160, 255, 160), 3);
 8        Graphics g2 = Graphics.FromImage(b);
 9        pen1 = new Pen(color, 3);
10        SolidBrush b5 = new SolidBrush(color);
11         Font f = new Font(Font, FontStyle.Bold);
12        g2.DrawString("o", f, b5, a.Location);
13        g2.Dispose();
14        pictureBox1.Image = (System.Drawing.Image)b;
15        this.Invoke((MethodInvoker)delegate
16            {
17                richTextBox1.Text = a.Location.ToString() + "\n" + richTextBox1.Text + "\n"; ;
18            });
19        }
20        catch (Exception faa)
21        {
22            Thread.CurrentThread.Abort();
23        }
24       Thread.CurrentThread.Abort();
25    }
i have to use invoke to write in textbox because of cross threading.
u can change color size any time u want, the color of drawing point will also be change
thank u for reading this long article, The full code uploaded here.
after few moderation u can use it in ur code for many type of application
我必须使用调用来在文本框中写入,因为线程的交叉。
你可以随时改变颜色大小,画点的颜色也会改变
感谢您阅读这篇文章,完整的代码在这里上传。
在您的代码中,您可以在许多类型的应用程序中使用它

thank u all.
see update- at this post
谢谢你。
请参阅更新——在本文中
翻译来源 : https://kishordgupta.wordpress.com/


【推荐】还在用 ECharts 开发大屏?试试这款永久免费的开源 BI 工具!
【推荐】国内首个AI IDE,深度理解中文开发场景,立即下载体验Trae
【推荐】编程新体验,更懂你的AI,立即体验豆包MarsCode编程助手
【推荐】轻量又高性能的 SSH 工具 IShell:AI 加持,快人一步