ZRender源码分析3:Painter(View层)-上
回顾
上一篇说到:ZRender源码分析2:Storage(Model层),这次咱看来看看Painter-View层
总体理解
Painter这个类主要负责MVC中的V(View)层,负责将Storage中的shape对象绘制到canvas中,包括了:更新、渲染、变化大小、导出、修改等操作。
Painter这个类还是很明显的构造函数,然后把方法赋值到Painter.prototype上,无新奇之处,下面为示例代码。只有在Painter.js末尾有一个内部的createDom函数,
很明显,传入id,type(tagName),painter(用来确定宽高)来创建一个新的dom元素,
并且这个dom元素的宽高与painter的相同,tagname为type,绝对定位,拥有一个自定义属性key为ata-zr-dom-id,value为id。
function Painter(root,stroage) {
	this.root = xxxx;
}

Painter.prototype.render = function () {};
Painter.prototype.refresh = function () {};
Painter.prototype.update = function () {};
Painter.prototype.clear = function () {};
.....

 /**
 * 创建dom
 *
 * @inner
 * @param {string} id dom id 待用
 * @param {string} type dom type,such as canvas, div etc.
 * @param {Painter} painter painter instance
 */
function createDom(id, type, painter) {
    var newDom = document.createElement(type);
    var width = painter._width;
    var height = painter._height;

    // 没append呢,请原谅我这样写,清晰~
    newDom.style.position = 'absolute';
    newDom.style.left = 0;
    newDom.style.top = 0;
    newDom.style.width = width + 'px';
    newDom.style.height = height + 'px';
    newDom.setAttribute('width', width * devicePixelRatio);
    newDom.setAttribute('height', height * devicePixelRatio);

    // id不作为索引用,避免可能造成的重名,定义为私有属性
    newDom.setAttribute('data-zr-dom-id', id);
    return newDom;
}
构造函数
/**
 * 绘图类 (V)
 *
 * @param {HTMLElement} root 绘图区域
 * @param {storage} storage Storage实例
 */
function Painter(root, storage) {
    this.root = root;
    this.storage = storage;

    root.innerHTML = '';
    this._width = this._getWidth(); // 宽,缓存记录
    this._height = this._getHeight(); // 高,缓存记录

    var domRoot = document.createElement('div');
    this._domRoot = domRoot;

    //domRoot.onselectstart = returnFalse; // 避免页面选中的尴尬
    domRoot.style.position = 'relative';
    domRoot.style.overflow = 'hidden';
    domRoot.style.width = this._width + 'px';
    domRoot.style.height = this._height + 'px';
    root.appendChild(domRoot);

    this._domList = {};       //canvas dom元素
    this._ctxList = {};       //canvas 2D context对象,与domList对应
    this._domListBack = {};
    this._ctxListBack = {};


    this._zLevelConfig = {}; // 每个zLevel 的配置,@config clearColor
    this._maxZlevel = storage.getMaxZlevel(); //最大zlevel,缓存记录
    // this._loadingTimer

    this._loadingEffect = new BaseLoadingEffect({});
    this.shapeToImage = this._createShapeToImageProcessor();

    // 创建各层canvas
    // 背景
    this._domList.bg = createDom('bg', 'div', this);
    domRoot.appendChild(this._domList.bg);

    var canvasElem;
    var canvasCtx;

    /**
     * 每一个level,就是一个canvas
     *
     * DOM结构
     * root
     *   ->domRoot
     *       ->canvas level1
     *       ->canvas level2
     *       ->canvas level3
     *       ->canvas hover_level
     *
     * _domList保存所有的DOM引用
     * {
     *      1:CanvasHTMLElement
     *      2:CanvasHTMLElement
     *      3:CanvasHTMLElement
     *      hover:CanvasHTMLElement
     * }
     *
     * ctxList保存所有的canvas.getContext('2d')引用
     * {
     *      1:CanvasContext
     *      2:CanvasContext
     *      3:CanvasContext
     *      hover:CanvasContext
     * }
     */

    // 实体
    for (var i = 0; i <= this._maxZlevel; i++) {
        canvasElem = createDom(i, 'canvas', this);
        domRoot.appendChild(canvasElem);
        this._domList[i] = canvasElem;
        vmlCanvasManager && vmlCanvasManager.initElement(canvasElem); // excanvas method

        this._ctxList[i] = canvasCtx = canvasElem.getContext('2d');
        if (devicePixelRatio != 1) {
            canvasCtx.scale(devicePixelRatio, devicePixelRatio);
        }
    }

    // 高亮
    canvasElem = createDom('hover', 'canvas', this);
    canvasElem.id = '_zrender_hover_';
    domRoot.appendChild(canvasElem);
    this._domList.hover = canvasElem;
    vmlCanvasManager && vmlCanvasManager.initElement(canvasElem); // excanvas method
    this._domList.hover.onselectstart = returnFalse;
    this._ctxList.hover = canvasCtx = canvasElem.getContext('2d');
    if (devicePixelRatio != 1) { //处理视网膜
        canvasCtx.scale(devicePixelRatio, devicePixelRatio);
    }
}


Painter.prototype._getWidth = function() {
    var root = this.root;
    var stl = root.currentStyle
              || document.defaultView.getComputedStyle(root);

    return ((root.clientWidth || parseInt(stl.width, 10))
            - parseInt(stl.paddingLeft, 10) // 请原谅我这比较粗暴
            - parseInt(stl.paddingRight, 10)).toFixed(0) - 0;

    /**
     * 这里用实际的width减去了左右的padding
     * 为什么不考虑将这两个方法就行重载?
     */
};

Painter.prototype._getHeight = function () {
    var root = this.root;
    var stl = root.currentStyle
              || document.defaultView.getComputedStyle(root);

    return ((root.clientHeight || parseInt(stl.height, 10))
            - parseInt(stl.paddingTop, 10) // 请原谅我这比较粗暴
            - parseInt(stl.paddingBottom, 10)).toFixed(0) - 0;
};
- 1.首先看_getWidth和_getHeight两个方法,这是获取当前root元素的实际宽度和高度值,详情请看这里 获取元素CSS值之getComputedStyle方法熟悉
- 2.看构造,运行上篇示例,打开Chrome控制台的Element Tab,可以看到如下HTML结构:

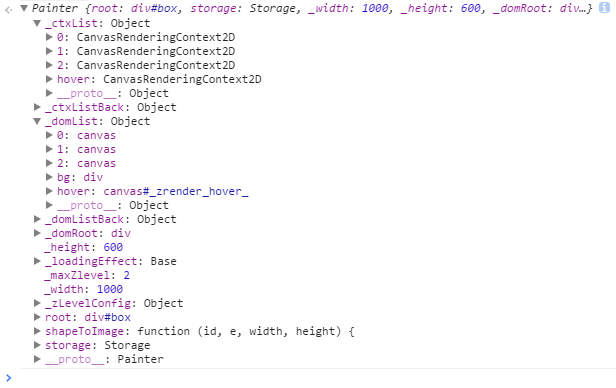
再看painter在内存中:

- 然后咱们参照上面两个图,分析流程:
- 先在指定的dom(box)元素下插入一个domRoot(跟box宽高一样,绝对定位)
- 在domRoot上插入一个背景div,保存到this._domList.bg变量中
- 遍历从storage中获得的_maxZlevel,每层对应一个canvas元素,插入到domRoot中,保存到this.domList[遍历序号]中,并调用每个canvas元素的getContext('2d')获得context,保存到this._ctxList[遍历序号]中
- 最后处理高亮层,依旧是插入到domRoot元素中,将canvas引用和context引用存入到domList和ctxList中,不过标识都变成了hover
- 关于视网膜屏幕请看: http://www.myexception.cn/mobile/1489709.html 与 http://www.zhangxinxu.com/wordpress/2012/10/new-pad-retina-devicepixelratio-css-page/
- 关于vmlCanvasManager请看 IE下使用excanvas.js的注意事项
- 3.关于加载动画loadingEffect,暂时跳过
- 4.关于shapeToImage,意思是将非imageShape对象转换为ImageShape对象
//////////////以下为zrender.js中代码//////////////////// /** * 将常规shape转成image shape */ ZRender.prototype.shapeToImage = function(e, width, height) { var id = guid(); return this.painter.shapeToImage(id, e, width, height); }; //////////////以下为Painter.js中代码//////////////////// Painter.prototype._createShapeToImageProcessor = function () { if (vmlCanvasManager) { return doNothing; } var painter = this; var canvas = document.createElement('canvas'); var ctx = canvas.getContext('2d'); var devicePixelRatio = window.devicePixelRatio || 1; return function (id, e, width, height) { return painter._shapeToImage( id, e, width, height, canvas, ctx, devicePixelRatio ); }; }; Painter.prototype._shapeToImage = function ( id, shape, width, height, canvas, ctx, devicePixelRatio ) { canvas.style.width = width + 'px'; canvas.style.height = height + 'px'; canvas.setAttribute('width', width * devicePixelRatio); canvas.setAttribute('height', height * devicePixelRatio); ctx.clearRect(0, 0, width * devicePixelRatio, height * devicePixelRatio); var shapeTransform = { position : shape.position, rotation : shape.rotation, scale : shape.scale }; shape.position = [0, 0, 0]; shape.rotation = 0; shape.scale = [1, 1]; if (shape) { shape.brush(ctx, false); } var ImageShape = require( './shape/Image' ); var imgShape = new ImageShape({ id : id, style : { x : 0, y : 0, // TODO 直接使用canvas而不是通过base64 image : canvas.toDataURL() } }); if (shapeTransform.position != null) { imgShape.position = shape.position = shapeTransform.position; } if (shapeTransform.rotation != null) { imgShape.rotation = shape.rotation = shapeTransform.rotation; } if (shapeTransform.scale != null) { imgShape.scale = shape.scale = shapeTransform.scale; } return imgShape; };- 从zrender.js中调用过来,用了两层闭包,有点绕,大家自行脑补,总之,最后zrender.shapeToImage(xxx)返回的是一个ImageShape对象
- 在painter的构造函数中有_createShapeToImageProcessor的调用,直接指向了this.shapeToImage,这说明_shapeToImage只是一个内部方法
- 在_createShapeToImageProcessor中,我们发现,如果用的是excanvas(IE678),那么不支持这个特性,return掉(这是在API没有公开这个接口的原因?)
- 如果不是excanvas,自行创建一个canvas元素,获取其context对象,然后传给_shapeToImage,饶了半天,最后Painter._shapeToImage才是苦力工啊
- 在_shapeToImage中,首先将canvas的宽高设置成指定的宽高,然后清除画布,保存变形参数,再将变形参数重置,调用 shape的brush方法进行绘制,此时,已经完成了新canvas的创建,然后再画上指定的shape
- 新建一个ImageShape,将image设置为以前新建的canvas.toDataURL() 关于canvas与Image互换,请看:http://www.jb51.net/html5/97104.html
- 最后把之前shape的变形参数设置到ImageShape上
- 既然API中不公开这个接口,其他地方也没调用,作者是个啥意图呢?
关于完美继承
/**
 * 构造类继承关系
 *
 * @param {Function} clazz 源类
 * @param {Function} baseClazz 基类
 */
function inherits(clazz, baseClazz) {
    var clazzPrototype = clazz.prototype;
    function F() {}
    F.prototype = baseClazz.prototype;
    clazz.prototype = new F();

    for (var prop in clazzPrototype) {
        clazz.prototype[prop] = clazzPrototype[prop];
    }
    clazz.constructor = clazz;
}
因为接下来的讲解之中,在loadingEffect和Shape对象中,都会有JS继承的出现,zrender/tool/util.js中有一个inherits的方法,实现了完美继承。 有兴趣的同学们可以看看下面两个,我就不详细的说了。
- http://blog.csdn.net/justoneroad/article/details/7327805
- http://my.oschina.net/antianlu/blog/228267
结束
因为Painter的内容牵扯较多,关于Shape对象不详细说道说道又无法进行,说以下篇咱们看看Shape到底是怎么组织的,等下下篇,再从来Painter类


【推荐】还在用 ECharts 开发大屏?试试这款永久免费的开源 BI 工具!
【推荐】国内首个AI IDE,深度理解中文开发场景,立即下载体验Trae
【推荐】编程新体验,更懂你的AI,立即体验豆包MarsCode编程助手
【推荐】抖音旗下AI助手豆包,你的智能百科全书,全免费不限次数
【推荐】轻量又高性能的 SSH 工具 IShell:AI 加持,快人一步