python request模块学习使用
一:requests模块简介
requests是使用Apache2 licensed 许可证的HTTP库。
用python编写。
比urllib2模块更简洁。
Request支持HTTP连接保持和连接池,支持使用cookie保持会话,支持文件上传,支持自动响应内容的编码,支持国际化的URL和POST数据自动编码。
在python内置模块的基础上进行了高度的封装,从而使得python进行网络请求时,变得人性化,使用Requests可以轻而易举的完成浏览器可有的任何操作。
现代,国际化,友好。
requests会自动实现持久连接keep-alive
中文文档 API: https://docs.python-requests.org/zh_CN/latest/index.html
二:requests基础入门
2.1 requests安装
pip install requests
2.1.1HTTP 请求类型:PUT,DELETE,HEAD 以及 OPTIONS如下
requests.get(‘https://github.com/timeline.json’)                                # GET请求
requests.post(“http://httpbin.org/post”)                                        # POST请求
requests.put(“http://httpbin.org/put”,data = {'key':'value'})                  # PUT请求
requests.delete(“http://httpbin.org/delete”)                                    # DELETE请求
requests.head(“http://httpbin.org/get”)                                         # HEAD请求
requests.options(“http://httpbin.org/get” )                                     # OPTIONS请求
2.2 GET基本请求(headers和params参数)
2.2.1 最基本的GET请求可以直接用get方法
import requests

#第一种写法
response = requests.get("http://www.baidu.com/")

#第二中写法
response = requests.request('get',"http://www.baidu.com/")
2.2.2 添加headders 和查询参数 params

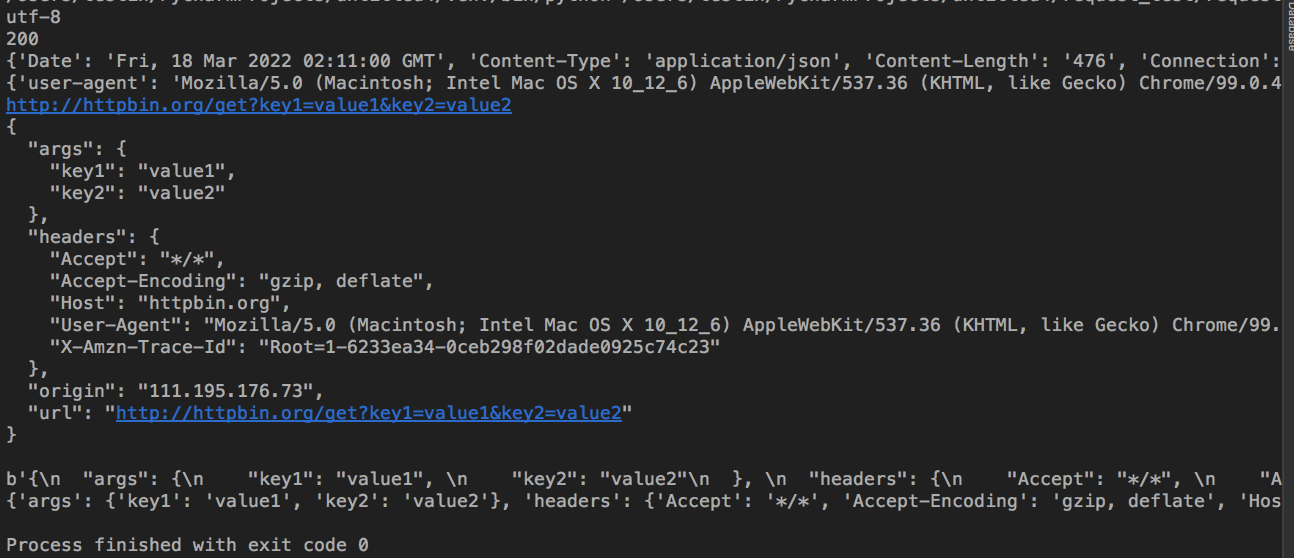
import request

header = {"user-agent":"Mozilla/5.0 (Macintosh; Intel Mac OS X 10_12_6) AppleWebKit/537.36 (KHTML, like Gecko) Chrome/99.0.4844.74 Safari/537.36"}
formdata = {'key1': 'value1', 'key2': 'value2'}

# params 接收一个字典或者字符串的查询参数,字典类型自动转换为url编码,不需要urlencode()
response = requests.get('http://httpbin.org/get',headers=header,params=formdata)

# 获取当前的编码
print(response.encoding)

# 获取当前的编码
print(response.status_code)

# 以字典对象存储服务器响应头,但是这个字典比较特殊,字典键不区分大小写,若键不存在则返回None
print(response.headers)

# 以字典对象存储请求头
print(response.request.headers)

# 查看完整url地址
print(response.url)

# 以encoding解析返回内容。字符串方式的响应体,会自动根据响应头部的字符编码进行解码。
print(response.text)

# 以字节形式(二进制)返回。字节方式的响应体,会自动为你解码 gzip 和 deflate 压缩。
print(response.content)

# Requests中内置的JSON解码器,返回的数据类型是字典(dict),以json形式返回,前提返回的内容确保是json格式的,不然解析出错会抛异常
print(response.json())
执行结果:
响应信息总结;response.encoding #获取当前的编码
response.encoding = 'utf-8'             #设置编码
response.text                           #以encoding解析返回内容。字符串方式的响应体,会自动根据响应头部的字符编码进行解码。
response.content                        #以字节形式(二进制)返回。字节方式的响应体,会自动为你解码 gzip 和 deflate 压缩。

response.headers                        #以字典对象存储服务器响应头,但是这个字典比较特殊,字典键不区分大小写,若键不存在则返回None
response.request.headers                #返回请求的头部信息
response.status_code                     #响应状态码
response.raw                             #返回原始响应体,也就是 urllib 的 response 对象,使用 r.raw.read()
response.ok                              # 查看r.ok的布尔值便可以知道是否登陆成功
 #*特殊方法*#
response.json()                         #Requests中内置的JSON解码器,以json形式返回,前提返回的内容确保是json格式的,不然解析出错会抛异常
response.raise_for_status()             #失败请求(非200响应)抛出异常 无异常时返回None

response.cookies                         #返回cookie
response.history                         #返回重定向信息,当然可以在请求是加上allow_redirects = false 阻止重定向
使用response.text 时,Requests 会基于 HTTP 响应的文本编码自动解码响应内容,大多数 Unicode 字符集都能被无缝地解码。

使用response.content 时,返回的是服务器响应数据的原始二进制字节流,可以用来保存图片等二进制文件。
例子如下:
from PIL import Image
from io import BytesIO

i = Image.open(BytesIO(r.content))
2.2.3 返回数据response.json()
import requests
def get_token():
    url = 'https://api.weixin.qq.com/cgi-bin/token'
    params = {
        "grant_type": "client_credential",
        "appid": "wx74a8627810cfa308",
        "secret": "e40a02f9d79a8097df497e6aaf93ab80"
    }
    resp = requests.get(url,params=params)
    print(resp.json())
    print(type(resp.json()))
if __name == "__main__":
  get_token()

#使用resp.json()的前提是返回的数据必须是json格式 否则会报错,使用resp.json()会自动把json格式的数据进行转换成字典(dict)类型
'''
{'access_token': '55_8NJ3YufGIpqwspICjxsNe7bolni2uFLvo2Qb1dwI7JLm-BgrEALq_nsrA0b1j_94mev_y0g7k6QSV4TpxKG3liqc4ntKxWlTqcQyFbcocY8LauzZc-YCExzVG7C-s6ZoqJxZhYY1_vTph4wySVMgAHAHKB', 'expires_in': 7200}
<class 'dict'>
'''
2.3 POST基本请求
2.3.1 最基本的post请求可以直接使用post
#第一种写法
response = requests.post('http://httpbin.org/post')

#第二种写法
response = requests.request('post', 'http://httpbin.org/post')
2.3.2 传入参数 data
1)传入的参数data为字典类型或者是元组类型
#传入字典类型的
payload = {'key1': 'value1', 'key2': 'value2'}
response = requests.post("http://httpbin.org/post", data=payload)
print(response.text)

#执行结果:
{
  ...
  "form": {
    "key2": "value2",
    "key1": "value1"
  },
  ...
}

# 传入元组类型的
payload = (('key1', 'value1'), ('key1', 'value2'))
response = requests.post("http://httpbin.org/post", data=payload)
print(response.text)

#执行结果:
{
  ...
  "form": {
    "key1": [
      "value1",
      "value2"
    ]
  }
}
2)参数data是json格式
import json

#第一种使用data参数  然后使用json.dumps()进行转换成json格式
url = 'https://api.github.com/some/endpoint'
formdata = {'some': 'data'}
response = requests.post(url, data=json.dumps(formdata))
print(response.text)

#第二种 使用 json 参数直接传递,然后它就会被自动编码
response = requests.post(url, json=formdata)
print(response.text)
3)参数data是文件格式
url = 'http://httpbin.org/post'
files = {'file': open('report.xls', 'rb')}
response = requests.post(url, files=files)
print(response.text)

#执行结果:
{
  ...
  "files": {
    "file": "<censored...binary...data>"
  },
  ...
}
4)参数data为XML格式
headers = {'Content-type': 'text/xml'}
XML = '<?xml version="1.0" encoding="utf-8"?><soap:Envelope xmlns:xsi="http://www.w3.org/2001/XMLSchema-instance" xmlns:xsd="http://www.w3.org/2001/XMLSchema" xmlns:soap="http://schemas.xmlsoap.org/soap/envelope/"><soap:Body><Request xmlns="http://tempuri.org/"><jme><JobClassFullName>WeChatJSTicket.JobWS.Job.JobRefreshTicket,WeChatJSTicket.JobWS</JobClassFullName><Action>RUN</Action><Param>1</Param><HostIP>127.0.0.1</HostIP><JobInfo>1</JobInfo><NeedParallel>false</NeedParallel></jme></Request></soap:Body></soap:Envelope>'
url = 'http://jobws.push.mobile.xxxxxxxx.com/RefreshWeiXInTokenJob/RefreshService.asmx'
response = requests.post(url, headers=headers, data=XML)
print(response.text)
5)参数data为form-data
会将表单的数据处理为一条消息,以标签为单元,用分隔符分开。既可以上传键值对,也可以上传文件。当上传的字段是文件时,会有Content-Type来说明文件类型;content-disposition,用来说明字段的一些信息
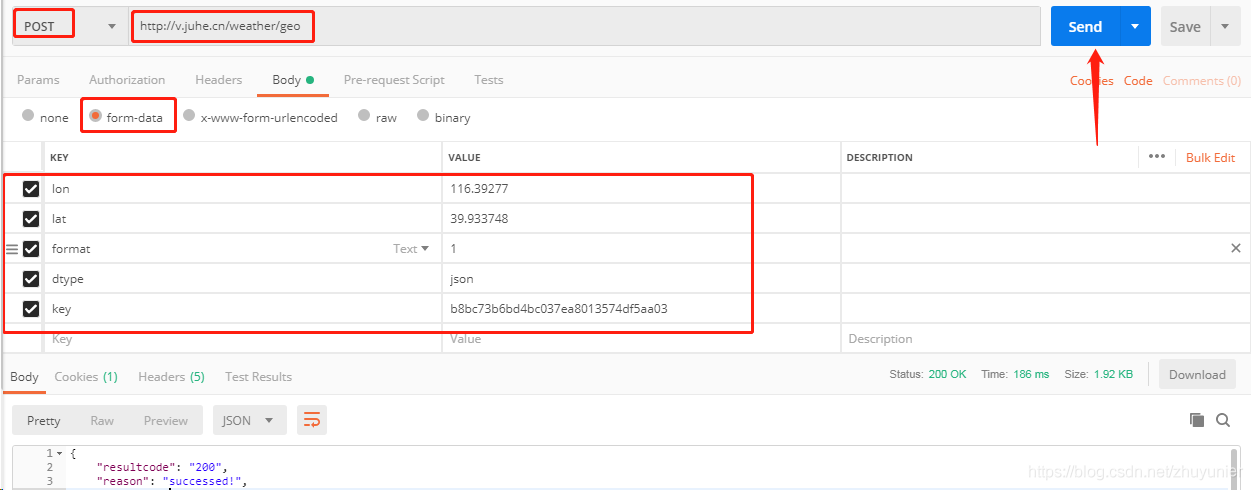
问题:
对接接口,发现对方的接口使用form-data进行数据提交,直接使用requests库的data参数对接,会报参数错误:
params = {
    'timestamp':timestamp,
    'nonce':nonce,
    'apikey':APIKEY,
    'signature': signature
}
data = {
    'name': name,
    'phone': phone,
    'idnum': idnum,
    'products': [201,]
}
resp = requests.post(URL, data=data, params=params,verify=False, timeout=10)
执行结果:

解决方案:
这一块Requests包做的不是很好,做法具体如下:
一种是手动组建form-data并加上headers;
另一种是通过files参数传递form-datal;
# 方案一:
params = {
    'timestamp':timestamp,
    'nonce':nonce,
    'apikey':APIKEY,
    'signature': signature
}
payload = """------WebKitFormBoundary7MA4YWxkTrZu0gW\r\nContent-Disposition: form-data;
    name=\"phone\"\n\n{}\r\n------WebKitFormBoundary7MA4YWxkTrZu0gW\r\nContent-Disposition: form-data;
    name=\"idnum\"\n\n{}\r\n------WebKitFormBoundary7MA4YWxkTrZu0gW\r\nContent-Disposition: form-data;
    name=\"name\"\r\n\r\n{}\r\n------WebKitFormBoundary7MA4YWxkTrZu0gW\r\nContent-Disposition: form-data;
    name=\"products\"\r\n\r\n {}\r\n------WebKitFormBoundary7MA4YWxkTrZu0gW--""".format(phone, idnum, name, [201,])
headers = {
    "content-type": "multipart/form-data; boundary=----WebKitFormBoundary7MA4YWxkTrZu0gW"
}
resp = requests.post(URL, data=payload, params=params,
                     verify=False, timeout=10, headers=headers)

# 方案二(推荐使用):
import json
params = {
    'timestamp':timestamp,
    'nonce':nonce,
    'apikey':APIKEY,
    'signature': signature
}
data = {
    'name':(None, name),
    'phone': (None, str(phone)),
    'idnum': (None, idnum),
    'products': (None, json.dumps([201,]))
}
resp = requests.post(URL, files=data, params=params,
                     verify=False, timeout=10)
print resp.status_code
print resp.request.url
print resp.request.body
print resp.text
2.4 重定向和请求历史
默认情况下,除了 HEAD, Requests 会自动处理所有重定向。可以使用响应对象的 history 方法来追踪重定向。
Response.history是一个 Response对象的列表,为了完成请求而创建了这些对象。这个对象列表按照从最老到最近的请求进行排序。
2.4.1 allow_redirects 参数
#allow_redirects =False 禁止重定向
response = requests.get('http://github.com', allow_redirects=False)

print(response.url)
http://github.com

print(response.status_code)
301

print(response.history)
[]

#allow_redirects =True 开启重定向(默认是开启的)
response = requests.get('http://github.com', allow_redirects=False)

print(response.url)
https://github.com/

print(response.status_code)
200

print(response.history)
[<Response [301]>]
2.5 代理(proxies参数)
如果需要使用代理,你可以通过为任意请求方法提供 proxies 参数来配置单个请求:
import requests

# 根据协议类型,选择不同的代理
proxies = {
  "http": "http://12.34.56.79:9527",
  "https": "http://12.34.56.79:9527",
}

response = requests.get("http://www.baidu.com", proxies = proxies)
print(response.text)


# 如果代理需要使用HTTP Basic Auth,可以使用下面这种格式:
proxy = { "http": "mr_mao_hacker:sffqry9r@61.158.163.130:16816" }

response = requests.get("http://www.baidu.com", proxies = proxy)

print(response.text)
2.6 Cookies和Session
2.6.1 Cookies
1)传入cookies参数
url = 'http://httpbin.org/cookies'

#传入cookies类型为字典类型
cookies = dict(cookies_are='working')
response= requests.get(url, cookies=cookies)
print(response.text)
#执行结果
'{"cookies": {"cookies_are": "working"}}'

#传入cookies的类型为CookieJar
jar = requests.cookies.RequestsCookieJar()
jar.set('tasty_cookie', 'yum', domain='httpbin.org', path='/cookies')
url = 'http://httpbin.org/cookies'
response = requests.get(url, cookies=jar)
print(response.text)
#执行结果:
{"cookies": {"tasty_cookie": "yum"}}'
2)获取返回的cookies
import requests
response = requests.get("http://www.baidu.com/")

# 1. 返回CookieJar对象:
cookiejar = response.cookies

# 2. 将CookieJar转为字典:
cookiedict = requests.utils.dict_from_cookiejar(cookiejar)

print(cookiejar)  #<RequestsCookieJar[<Cookie BDORZ=27315 for .baidu.com/>]>

print(cookiedict)  #{'BDORZ': '27315'}
2.6.2 Session
在 requests 里,session对象是一个非常常用的对象,这个对象代表一次用户会话:从客户端浏览器连接服务器开始,到客户端浏览器与服务器断开。
会话能让我们在跨请求时候保持某些参数,比如在同一个 Session 实例发出的所有请求之间保持 cookie 。
import requests

# 1. 创建session对象,可以保存Cookie值
ssion = requests.session()

# 2. 处理 headers
headers = {"User-Agent": "Mozilla/5.0 (Windows NT 10.0; Win64; x64) AppleWebKit/537.36 (KHTML, like Gecko) Chrome/54.0.2840.99 Safari/537.36"}

ssion.headers.update(headers)#更新头部信息

# 3. 需要登录的用户名和密码
data = {"email":"mr_mao_hacker@163.com", "password":"alarmchime"}

# 4. 发送附带用户名和密码的请求,并获取登录后的Cookie值,保存在ssion里
ssion.post("http://www.renren.com/PLogin.do", data = data)

# 5. ssion包含用户登录后的Cookie值,可以直接访问那些登录后才可以访问的页面
response = ssion.get("http://www.renren.com/410043129/profile")

# 6. 打印响应内容
print(response.text)
执行结果:

2.7 SSL证书验证
2.7.1 HTTPS 请求验证 SSL 证书
Requests 可以为 HTTPS 请求验证 SSL 证书,就像 web 浏览器一样。SSL 验证默认是开启的,如果证书验证失败,Requests 会抛出 SSLError:
verify 默认是为 True,SSL 验证默认是开启的
import requests
response = requests.get("https://www.baidu.com/", verify=True)

# 也可以省略不写
# response = requests.get("https://www.baidu.com/")
print(response.text)
执行结果:
<!DOCTYPE html>
<!--STATUS OK--><html> <head><meta http-equiv=content-type content=text/html;charset=utf-8><meta http-equiv=X-UA-Compatible content=IE=Edge>百度一下,你就知道 ....
可以为 verify 传入 CA_BUNDLE 文件的路径,或者包含可信任 CA 证书文件的文件夹路径:
#第一种写法
requests.get('https://github.com', verify='/path/to/certfile')

#第二种写法
sess = requests.Session()
sess.verify = '/path/to/certfile'

注解
如果 verify 设为文件夹路径,文件夹必须通过 OpenSSL 提供的 c_rehash 工具处理。
verify 设置为 False,Requests 也能忽略对 SSL 证书的验证
response = requests.get('https://kennethreitz.org', verify=False)
print(response.status_code)
<Response [200]>
2.7.2客户端证书
你也可以指定一个本地证书用作客户端证书,可以是单个文件(包含密钥和证书)或一个包含两个文件路径的元组
#第一种写法
response = requests.get('https://kennethreitz.org', cert=('/path/client.cert', '/path/client.key'))

print(response.status_code)#<Response [200]>

#第二种写法;
s = requests.Session()
s.cert = '/path/client.cert'

警告:
本地证书的私有 key 必须是解密状态。目前,Requests 不支持使用加密的 key。
参考;
https://blog.csdn.net/qq_37616069/article/details/80376776


【推荐】国内首个AI IDE,深度理解中文开发场景,立即下载体验Trae
【推荐】编程新体验,更懂你的AI,立即体验豆包MarsCode编程助手
【推荐】抖音旗下AI助手豆包,你的智能百科全书,全免费不限次数
【推荐】轻量又高性能的 SSH 工具 IShell:AI 加持,快人一步
· 阿里最新开源QwQ-32B,效果媲美deepseek-r1满血版,部署成本又又又降低了!
· Manus重磅发布:全球首款通用AI代理技术深度解析与实战指南
· 开源Multi-agent AI智能体框架aevatar.ai,欢迎大家贡献代码
· 被坑几百块钱后,我竟然真的恢复了删除的微信聊天记录!
· AI技术革命,工作效率10个最佳AI工具