Python测试框架之pytest的使用
第一部分:快速入门
pytest是软件测试框架,这意味着pytest是命令行工具。它会自动找到你写的测试,运行测试并报告结果。可编写插件或安装第三方来扩展插件。它可以用来测试Python发行版。它很容易与其他工具对接,如持续集成和网页自动化。
Pytest脱颖而出的原因:
- 简单
- 易读
- 用assert来测试失败,而不是self.assertEqual() 或者self.assertLessThan()
- 可运行unittest或nose测试
1.1,安装Pytest
$ pip install pytest
1.2,安装验证
pytest --version # 会展示当前已安装版本

1.3,pytest执行原则:
所有的单测文件名应该命名为test_.py或_test.py
在单测文件中,测试类以Test开头,并且不能带有 init 方法(注意:定义class时,需要以T开头,不然pytest是不会去运行该class的)
在单测类中,测试方法和函数应该被命名为test_。
此时,在执行pytest命令时,会自动从当前目录及子目录中寻找符合上述约束的测试函数来执行。

结果类型:

以下是测试功能的可能结果:

PASSED (.):测试成功。
FAILED (F):测试失败(或XPASS + strict)。
SKIPPED (s): 测试被跳过。 你可以使用@pytest.mark.skip()或 pytest.mark.skipif()修饰器告诉pytest跳过测试
xfail (x):预期测试失败。@pytest.mark.xfail()
XPASS (X):测试不应该通过。
ERROR (E):错误
1.4,pytest 执行第一个函数
Pytest 使用 Python 的assert 进行条件判断,最简单的测试函数如:
测试成功的用例:
# test_01.py
import pytest

def test_01():
    print('------------>运行test_01')
    assert (1, 2, 3) == (1, 2, 3)
使用命令 pytest 运行测试函数
  pytest 文件路径/测试文件名
  例如:pytest ./test/test_01.py
$ pytest ./test/test01.py
==================================================================== test session starts =====================================================================
platform win32 -- Python 3.7.8, pytest-5.4.3, py-1.10.0, pluggy-0.13.1
rootdir: E:\PycharmScripts\Python36\pytestScripts
plugins: allure-pytest-2.9.43, assume-2.4.3, html-2.1.1, metadata-1.11.0
collected 1 item

test\test01.py .                                                                                                                                        [100%]

===================================================================== 1 passed in 0.05s ======================================================================
注解:
pytest 使用 . 标识测试成功(PASSED)。
小技巧:
可以使用 -v 选项,显示测试的详细信息。
$ pytest ./test/test01.py -v
==================================================================== test session starts =====================================================================
platform win32 -- Python 3.7.8, pytest-5.4.3, py-1.10.0, pluggy-0.13.1 -- c:\python37\python.exe
cachedir: .pytest_cache
metadata: {'Python': '3.7.8', 'Platform': 'Windows-7-6.1.7601-SP1', 'Packages': {'pytest': '5.4.3', 'py': '1.10.0', 'pluggy': '0.13.1'}, 'Plugins': {'allure-py
test': '2.9.43', 'assume': '2.4.3', 'html': '2.1.1', 'metadata': '1.11.0'}}
rootdir: E:\PycharmScripts\Python36\pytestScripts
plugins: allure-pytest-2.9.43, assume-2.4.3, html-2.1.1, metadata-1.11.0
collected 1 item

test/test01.py::test_01 PASSED                                                                                                                          [100%]

===================================================================== 1 passed in 0.05s ======================================================================
测试失败的用例:
#test_02.py

import pytest

def test_02():
    print('------------>运行test_01')
    assert (1, 2, 3) == (3, 2, 1)
指令运行:
$pytest ./test/test02.py
==================================================================== test session starts =====================================================================
platform win32 -- Python 3.7.8, pytest-5.4.3, py-1.10.0, pluggy-0.13.1
rootdir: E:\PycharmScripts\Python36\pytestScripts
plugins: allure-pytest-2.9.43, assume-2.4.3, html-2.1.1, metadata-1.11.0
collected 1 item

test\test02.py F                                                                                                                                        [100%]

========================================================================== FAILURES ==========================================================================
__________________________________________________________________________ test_02 ___________________________________________________________________________

    def test_02():
        print('------------>运行test_02')
>       assert (1, 2, 3) == (3, 2, 1)
E       AssertionError

test\test02.py:12: AssertionError
-------------------------------------------------------------------- Captured stdout call --------------------------------------------------------------------
------------>运行test_02
================================================================== short test summary info ===================================================================
FAILED test/test02.py::test_02 - AssertionError
===================================================================== 1 failed in 0.21s ======================================================================
注解:
pytest 使用 F 标识测试失败(FAILED)。
pytest 对失败的测试给出了非常人性化的提示。
1.5,控制执行测试用例
1.5.1,指定测试模块
pytest test_mod.py
#test_01.py
import pytest

def test_01py_01():
    print('------------>运行test_01py_01')
    assert (1, 2, 3) == (1, 2, 3)

def test_01py_02():
    print('------------>运行test_01py_02')
    assert (1, 2, 3) == (1, 2, 3)

def test_01py_03():
    print('------------>运行test_01py_03')
    assert (1, 2, 3) == (1, 2, 3)

def test_01py_04():
    print('------------>运行test_01py_04')
    assert (1, 2, 3) == (1, 2, 3)
运行结果
(venv) E:\PycharmScripts\Python36\pytestScripts>pytest ./test/test_01.py
============================================================== test session starts ==============================================================
platform win32 -- Python 3.7.8, pytest-7.0.1, pluggy-1.0.0
rootdir: E:\PycharmScripts\Python36\pytestScripts
plugins: forked-1.4.0, rerunfailures-10.2, xdist-2.5.0
collected 4 items

test\test_01.py ....                                                                                                                       [100%]

=============================================================== 4 passed in 0.06s ===============================================================

(venv) E:\PycharmScripts\Python36\pytestScripts>pytest ./test/test_01.py -s
============================================================== test session starts ==============================================================
platform win32 -- Python 3.7.8, pytest-7.0.1, pluggy-1.0.0
rootdir: E:\PycharmScripts\Python36\pytestScripts
plugins: forked-1.4.0, rerunfailures-10.2, xdist-2.5.0
collected 4 items

test\test_01.py ------------>运行test_01py_01
.------------>运行test_01py_02
.------------>运行test_01py_03
.------------>运行test_01py_04
.

=============================================================== 4 passed in 0.05s ===============================================================
1.5.2,指定测试目录
pytest test/
1.5.3,通过关键字表达式过滤执行
pytest -k "MyClass and not method"
这条命令会匹配文件名、类名、方法名匹配表达式的用例,这里这条命令会运行 TestMyClass.test_something, 不会执行 TestMyClass.test_method_simple
案例:
import pytest

def test_01py_01():
    print('------------>运行test_01py_01')
    assert (1, 2, 3) == (1, 2, 3)

def test_01py_02():
    print('------------>运行test_01py_02')
    assert (1, 2, 3) == (1, 2, 3)

def test_01py_03():
    print('------------>运行test_01py_03')
    assert (1, 2, 3) == (1, 2, 3)

def test_01py_04():
    print('------------>运行test_01py_04')
    assert (1, 2, 3) == (1, 2, 3)
运行结果;
#pytest ./test/test_01.py  -k "test_01py_02 or test_01py_01"

(venv) E:\PycharmScripts\Python36\pytestScripts>pytest ./test/  -k "test_01py_02 or test_01py_01"
============================================================== test session starts ==============================================================
platform win32 -- Python 3.7.8, pytest-7.0.1, pluggy-1.0.0
rootdir: E:\PycharmScripts\Python36\pytestScripts
plugins: forked-1.4.0, rerunfailures-10.2, xdist-2.5.0
collected 10 items / 8 deselected / 2 selected

test\test_01.py ..                                                                                                                         [100%]

======================================================== 2 passed, 8 deselected in 0.08s ========================================================
1.5.4,通过 node id 指定测试用例
nodeid由模块文件名、分隔符、类名、方法名、参数构成,举例如下:
运行模块中的指定用例:
pytest test_mod.py::test_func
案例:
import pytest

def test_01py_01():
    print('------------>运行test_01py_01')
    assert (1, 2, 3) == (1, 2, 3)

def test_01py_02():
    print('------------>运行test_01py_02')
    assert (1, 2, 3) == (1, 2, 3)

def test_01py_03():
    print('------------>运行test_01py_03')
    assert (1, 2, 3) == (1, 2, 3)

def test_01py_04():
    print('------------>运行test_01py_04')
    assert (1, 2, 3) == (1, 2, 3)
执行结果:
(venv) E:\PycharmScripts\Python36\pytestScripts>pytest ./test/test_01.py::test_01py_01
============================================================== test session starts ==============================================================
platform win32 -- Python 3.7.8, pytest-7.0.1, pluggy-1.0.0
rootdir: E:\PycharmScripts\Python36\pytestScripts
plugins: forked-1.4.0, rerunfailures-10.2, xdist-2.5.0
collected 1 item

test\test_01.py .                                                                                                                          [100%]

=============================================================== 1 passed in 0.05s ===============================================================
运行模块中的指定方法:
pytest test_mod.py::TestClass::test_method
1.5.5,通过标记表达式执行
这条命令会执行被装饰器 @pytest.mark.slow 装饰的所有测试用例
pytest -m slow
案例:
import pytest

def test_01py_01():
    print('------------>运行test_01py_01')
    assert (1, 2, 3) == (1, 2, 3)

@pytest.mark.slow
def test_01py_02():
    print('------------>运行test_01py_02')
    assert (1, 2, 3) == (1, 2, 3)

def test_01py_03():
    print('------------>运行test_01py_03')
    assert (1, 2, 3) == (1, 2, 3)
运行结果:
(venv) E:\PycharmScripts\Python36\pytestScripts>pytest ./test/ -m slow  -s
============================================================== test session starts ==============================================================
platform win32 -- Python 3.7.8, pytest-7.0.1, pluggy-1.0.0
rootdir: E:\PycharmScripts\Python36\pytestScripts
plugins: forked-1.4.0, rerunfailures-10.2, xdist-2.5.0
collected 10 items / 9 deselected / 1 selected

test\test_01.py ------------>运行test_01py_02
.

================================================== 1 passed, 9 deselected, 1 warning in 0.21s ===================================================
1.5.6,多进程运行cases
当cases量很多时,运行时间也会变的很长,如果想缩短脚本运行的时长,就可以用多进程来运行
安装pytest-xdist:
pip install pytest-xdist
运行模式:
pytest test01.py -n NUM
其中NUM填写并发的进程数.
1.5.7,重试运行cases
在做接口测试时,有时会遇到503或短时的网络波动,导致case运行失败,而这并非是我们期望的结果,此时可以就可以通过重试运行cases的方式来解决。
安装pytest-rerunfailures:
pip install pytest-rerunfailures
运行模式:
pytest test01.py --reruns NUM
NUM填写重试的次数。
1.5.8, 显示print内容
在运行测试脚本时,为了调试或打印一些内容,我们会在代码中加一些print内容,但是在运行pytest时,这些内容不会显示出来。如果带上-s,就可以显示了
运行模式:
pytest test01.py -s
另外,pytest的多种运行模式是可以叠加执行的,比如说,你想同时运行4个进程,又想打印出print的内容。可以用
pytest test_se.py -s -n 4
第二部分,测试函数
2.1断言
在 pytest 中,assert 是编写测试的最基础工具。如:
import pytest

def test_02py_01():
    print('------------>运行test_02py_01')
    assert (1, 2, 3) == (3, 2, 1)

def test_02py_02():
    print('------------>运行test_02py_02')
    assert 2 == 2
具体的 assert 语法参考 https://docs.python.org/3/reference/simple_stmts.html?highlight=assert#the-yield-statement
2.2,异常捕捉
在测试过程中,经常需要测试是否如期抛出预期的异常,以确定异常处理模块生效。在 pytest 中使用 pytest.raises() 进行异常捕获:
#test_raises.py

import pytest
import socket
def test_raises():
    with pytest.raises(TypeError) as e:
        s = socket.socket()
        s.connect('localhost', '6379')
        exec_msg = e.value.args[0]
        assert exec_msg == 'port type must be int'


if __name__ == '__main__':
    pytest.main(['-s','test_raises.py'])
运行结果:
E:\PycharmScripts\Python36\pytestScripts\venv\Scripts\python.exe E:\PycharmScripts\Python36\pytestScripts\test\test_raises.py
============================= test session starts =============================
platform win32 -- Python 3.7.8, pytest-7.0.1, pluggy-1.0.0
rootdir: E:\PycharmScripts\Python36\pytestScripts\test
plugins: forked-1.4.0, rerunfailures-10.2, xdist-2.5.0
collected 1 item

test_raises.py .

============================== 1 passed in 0.13s ==============================

Process finished with exit code 0
2.3,跳过测试
上一节提到 pytest 使用标记过滤测试函数,所以对于那些尚未开发完成的测试,最好的处理方式就是略过而不执行测试。
按正向的思路,我们只要通过标记指定要测试的就可以解决这个问题;但有时候的处境是我们能进行反向的操作才是最好的解决途径,即通过标记指定要跳过的测试。
Pytest 使用特定的标记 pytest.mark.skip 完美的解决了,3种加法如下。
@pytest.mark.skip() #1、跳过方法或用例,未备注原因
@pytest.mark.skip(reason='跳过一个方法或一个测试用例') #2、跳过方法或用例,备注了原因
@pytest.mark.skipif(1==1,reason='跳过一个方法或一个测试用例') #3、当条件满足,跳过方法或用例,备注了原因
案例一:
import pytest

@pytest.mark.skip()
def test_skip_01():
    print("test_skip_01 该案例跳过不用执行,不用备注原因")

@pytest.mark.skip(reason="跳过案例备注了原因")
def test_skip_02():
    print("test_skip_02 该案例跳过不用执行 但是需要备注原因")

@pytest.mark.skipif(1==1,reason="跳过案例备注了原因")
def test_skip_03():
    print("test_skip_03 该案例跳过不用执行 但是需要备注原因")


if __name__ == '__main__':
    pytest.main(['-s','test_skip.py'])

#执行结果:
E:\PycharmScripts\Python36\pytestScripts\venv\Scripts\python.exe E:/PycharmScripts/Python36/pytestScripts/test/test_skip.py
============================= test session starts =============================
platform win32 -- Python 3.7.8, pytest-7.0.1, pluggy-1.0.0
rootdir: E:\PycharmScripts\Python36\pytestScripts\test
plugins: forked-1.4.0, rerunfailures-10.2, xdist-2.5.0
collected 3 items

test_skip.py sss

============================= 3 skipped in 0.17s ==============================

Process finished with exit code 0
案例二:
# skip跳过类
@pytest.mark.skip()
class TestSkip01(object):
    def test_one(self):
        assert 1 == 1

    def test_two(self):
        print('test_02')
        assert 1 == 2

@pytest.mark.skip(reason='跳过Test类,会跳过类中所有方法')
class TestSkip02(object):
    def test_one(self):
        assert 1 == 1

    def test_two(self):
        print('test_02')
        assert 1 == 2

@pytest.mark.skipif(1 == 1, reason='跳过Test类,会跳过类中所有方法')
class TestSkip03(object):
    def test_one(self):
        assert 1 == 1

    def test_two(self):
        print('test_02')
        assert 1 == 2

@pytest.mark.skipif(1==1,reason='多个条件时,有1个条件满足就跳过(类)')
class TestSkip04(object):
    @pytest.mark.skipif(1==2, reason='多个条件时,有1个条件满足就跳过(方法)')
    def test_one(self):
        assert 1==2
    def test_two(self):
        print('test_02')


# 赋值:myskip=pytest.mark.skipif(1==1,reason='skip赋值给变量,可多处调用')
# 调用:@myskip

myskip=pytest.mark.skipif(1==1,reason='skip赋值给变量,可多处调用')
class TestSkip05(object):

    @myskip
    def test_one(self):
        assert 1==2

    def test_two(self):
        print('test_02')

# pytest.skip()方法内跳过
# 除了通过使用标签的方式,还可以在测试用例中调用pytest.skip()方法来实现跳过,可以选择传入msg参数来说明跳过原因;如果想要通过判断是否跳过,可以写在if判断里(_)

class TestSkip06(object):
    def test_one(self):
        pytest.skip(msg='跳过')
        assert 1==2
    def test_two(self):
        print('test_02')


if __name__ == '__main__':
    pytest.main(['-rs','test_skip.py'])

E:\PycharmScripts\Python36\pytestScripts\venv\Scripts\python.exe E:/PycharmScripts/Python36/pytestScripts/test/test_skip.py
============================= test session starts =============================
platform win32 -- Python 3.7.8, pytest-7.0.1, pluggy-1.0.0
rootdir: E:\PycharmScripts\Python36\pytestScripts\test
plugins: forked-1.4.0, rerunfailures-10.2, xdist-2.5.0
collected 12 items

test_skip.py sssssssss.s.                                                [100%]


=========================== short test summary info ===========================
SKIPPED [2] test_skip.py: unconditional skip
SKIPPED [2] test_skip.py: 跳过Test类,会跳过类中所有方法
SKIPPED [1] test_skip.py:49: 跳过Test类,会跳过类中所有方法
SKIPPED [1] test_skip.py:52: 跳过Test类,会跳过类中所有方法
SKIPPED [1] test_skip.py:59: 多个条件时,有1个条件满足就跳过(类)
SKIPPED [1] test_skip.py:62: 多个条件时,有1个条件满足就跳过(类)
SKIPPED [1] test_skip.py:73: skip赋值给变量,可多处调用
SKIPPED [1] test_skip.py:83: 跳过
================== 2 passed, 10 skipped, 1 warning in 0.18s ===================
注解:
pytest 使用 s 表示测试被跳过(SKIPPED)。
2.3,遇见错误
如果我们事先知道测试函数会执行失败,但又不想直接跳过,而是希望显示的提示。
Pytest 使用 pytest.mark.xfail 实现预见错误功能
import  pytest

@pytest.mark.xfail(reason="reason='not supported until v0.2.0'")
def test_xfial_01():
    print('该案例暂时不执行')
    assert 1==1


if __name__ == "__main__":
    pytest.main(['-s', 'test_xfail.py'])

E:\PycharmScripts\Python36\pytestScripts\venv\Scripts\python.exe E:\PycharmScripts\Python36\pytestScripts\test\test_xfail.py
============================= test session starts =============================
platform win32 -- Python 3.7.8, pytest-7.0.1, pluggy-1.0.0
rootdir: E:\PycharmScripts\Python36\pytestScripts\test
plugins: forked-1.4.0, rerunfailures-10.2, xdist-2.5.0
collected 1 item

test_xfail.py 该案例暂时不执行
X

============================= 1 xpassed in 0.14s ==============================

Process finished with exit code 0
2.4,参数化
当对一个测试函数进行测试时,通常会给函数传递多组参数。比如测试账号登陆,我们需要模拟各种千奇百怪的账号密码。
在 pytest 中,我们有更好的解决方法,就是参数化测试,即每组参数都独立执行一次测试。使用的工具就是 pytest.mark.parametrize(argnames, argvalues)。
方便测试函数对测试属于的获取。
 方法:
     parametrize(argnames, argvalues, indirect=False, ids=None, scope=None)
 常用参数:
     argnames:参数名
     argvalues:参数对应值,类型必须为list
                 当参数为一个时格式:[value]
                 当参数个数大于一个时,格式为:[(param_value1,param_value2.....),(param_value1,param_value2.....)]
 使用方法:
     @pytest.mark.parametrize(argnames,argvalues)
案例一:
import pytest

@pytest.mark.parametrize("a",[1,2,3]) # a参数被赋予两个值,函数会运行三遍
def test_01(a):         # 参数必须和parametrize里面的参数一致
    print('测试数据 a=%s' % a)

if __name__ == "__main__":
    pytest.main(['-s','test_params.py'])

#执行结果:

E:\PycharmScripts\Python36\pytestScripts\venv\Scripts\python.exe E:/PycharmScripts/Python36/pytestScripts/test/test_params.py
============================= test session starts =============================
platform win32 -- Python 3.7.8, pytest-7.0.1, pluggy-1.0.0
rootdir: E:\PycharmScripts\Python36\pytestScripts\test
plugins: forked-1.4.0, rerunfailures-10.2, xdist-2.5.0
collected 3 items

test_params.py 测试数据 a=1
.测试数据 a=2
.测试数据 a=3
.

============================== 3 passed in 0.13s ==============================

Process finished with exit code 0
案例二:
import pytest
#字典类型的数组

@pytest.mark.parametrize('dict_data',[{'name':'python',"age":10,},{'name':'java',"age":15}])
def test_01(dict_data):
    print('测试数据 dict_data=%s' % dict_data)

if __name__ == "__main__":
    pytest.main(['-s','test_params.py'])

#执行结果:
E:\PycharmScripts\Python36\pytestScripts\venv\Scripts\python.exe E:/PycharmScripts/Python36/pytestScripts/test/test_params.py
============================= test session starts =============================
platform win32 -- Python 3.7.8, pytest-7.0.1, pluggy-1.0.0
rootdir: E:\PycharmScripts\Python36\pytestScripts\test
plugins: forked-1.4.0, rerunfailures-10.2, xdist-2.5.0
collected 2 items

test_params.py 测试数据 dict_data={'name': 'python', 'age': 10}
.测试数据 dict_data={'name': 'java', 'age': 15}
.

============================== 2 passed in 0.16s ==============================

Process finished with exit code 0
案例三:
@pytest.mark.parametrize("a,b",[(1,2),(0,3)]) # 参数a,b均被赋予两个值,函数会运行两遍
def test_a(a,b): # 参数必须和parametrize里面的参数一致
    print("测试数据:a=%d,b=%d" % (a, b))


if __name__ == "__main__":
    pytest.main(['-s','test_params.py'])

#执行结果:
E:\PycharmScripts\Python36\pytestScripts\venv\Scripts\python.exe E:/PycharmScripts/Python36/pytestScripts/test/test_params.py
============================= test session starts =============================
platform win32 -- Python 3.7.8, pytest-7.0.1, pluggy-1.0.0
rootdir: E:\PycharmScripts\Python36\pytestScripts\test
plugins: forked-1.4.0, rerunfailures-10.2, xdist-2.5.0
collected 2 items

test_params.py 测试数据:a=1,b=2
.测试数据:a=0,b=3
.

============================== 2 passed in 0.14s ==============================

Process finished with exit code 0
案例四:
# 函数返回值类型示例:
def return_test_data():
    return [(1,2),(0,3)]

@pytest.mark.parametrize("a,b",return_test_data()) # 使用函数返回值的形式传入参数值
def test_a(a,b): # 参数必须和parametrize里面的参数一致
    print("测试数据:a=%d,b=%d" % (a, b))

if __name__ == "__main__":
    pytest.main(['-s','test_params.py'])

#执行结果:
E:\PycharmScripts\Python36\pytestScripts\venv\Scripts\python.exe E:/PycharmScripts/Python36/pytestScripts/test/test_params.py
============================= test session starts =============================
platform win32 -- Python 3.7.8, pytest-7.0.1, pluggy-1.0.0
rootdir: E:\PycharmScripts\Python36\pytestScripts\test
plugins: forked-1.4.0, rerunfailures-10.2, xdist-2.5.0
collected 2 items

test_params.py 测试数据:a=1,b=2
.测试数据:a=0,b=3
.

============================== 2 passed in 0.56s ==============================

Process finished with exit code 0
案例五:
import pytest
#params数据类型是list
@pytest.fixture(params=[1, 2, 3])
def need_data(request):  # 传入参数request 系统封装参数
    print("获取的参数:%s" % request.param)
    return request.param  # 取列表中单个值,默认的取值方式

def test_a(need_data):
    print("------->test_a")

if __name__ == "__main__":
    pytest.main(['-s','test_params.py'])

#运行结果:
E:\PycharmScripts\Python36\pytestScripts\venv\Scripts\python.exe E:/PycharmScripts/Python36/pytestScripts/test/test_params.py
============================= test session starts =============================
platform win32 -- Python 3.7.8, pytest-7.0.1, pluggy-1.0.0
rootdir: E:\PycharmScripts\Python36\pytestScripts\test
plugins: forked-1.4.0, rerunfailures-10.2, xdist-2.5.0
collected 3 items

test_params.py 获取的参数:1
------->test_a
.获取的参数:2
------->test_a
.获取的参数:3
------->test_a
.

============================== 3 passed in 0.17s ==============================

Process finished with exit code 0
案例六:
dict1=[
    {'a':1,'b':2,'result':3},
    {'a':2,'b':2,'result':4}
]

@pytest.fixture(params=dict1)
def param(request):
    print('fixture的参数:%s' % request.param)
    return request.param

def test_a(param):
    print(param['a'],param['b']==param['result'])


if __name__ == "__main__":
    pytest.main(['-s','test_params.py'])

#执行结果;
E:\PycharmScripts\Python36\pytestScripts\venv\Scripts\python.exe E:/PycharmScripts/Python36/pytestScripts/test/test_params.py
============================= test session starts =============================
platform win32 -- Python 3.7.8, pytest-7.0.1, pluggy-1.0.0
rootdir: E:\PycharmScripts\Python36\pytestScripts\test
plugins: forked-1.4.0, rerunfailures-10.2, xdist-2.5.0
collected 2 items

test_params.py fixture的参数:{'a': 1, 'b': 2, 'result': 3}
1 False
.fixture的参数:{'a': 2, 'b': 2, 'result': 4}
2 False
.

============================== 2 passed in 0.16s ==============================

Process finished with exit code 0
第三部分:固件
3.1, pytest.fixture()
固件(Fixture)是一些函数,pytest 会在执行测试函数之前(或之后)加载运行它们。
我们可以利用固件做任何事情,其中最常见的可能就是数据库的初始连接和最后关闭操作。
Pytest 使用文件 conftest.py 集中管理固件,conftest.py文件名称时固定的,pytest会自动识别该文件。放到项目的根目录下就可以全局调用了,如果放到某个package下,那就在改package内有效。
conftest.py的特点:
有关conftest.py的详细介绍请查看:https://www.jb51.net/article/207214.htm
- 可以跨.py文件调用,有多个.py文件调用时,可让conftest.py只调用了一次fixture,或调用多次fixture
- conftest.py与运行的用例要在同一个pakage下,并且有__init__.py文件
- 不需要import导入 conftest.py,pytest用例会自动识别该文件,放到项目的根目录下就可以全局目录调用了,如果放到某个package下,那就在该package内有效,可有多个conftest.py
- conftest.py配置脚本名称是固定的,不能改名称
- conftest.py文件不能被其他文件导入
- 所有同目录测试文件运行前都会执行conftest.py文件
Pytest 使用 pytest.fixture() 定义固件,下面是最简单的固件,只返回北京邮编:
方法:fixture(scope="function", params=None, autouse=False, ids=None, name=None)
常用参数:
     scope:被标记方法的作用域
     function" (default):作用于每个测试方法,每个test都运行一次
            "class":作用于整个类,每个class的所有test只运行一次
             "module":作用于整个模块,每个module的所有test只运行一次
             "session:作用于整个session(慎用),每个session只运行一次
     params:(list类型)提供参数数据,供调用标记方法的函数使用
     autouse:是否自动运行,默认为False不运行,设置为True自动运行
   ids:每个字符串id的列表,每个字符串对应于params这样他们就是测试ID的一部分。如果没有提供ID它们将从params自动生成;是给每一项params参数设置自定义名称用,意义不大。
   name:fixture的名称。这默认为装饰函数的名称。如果fixture在定义它的统一模块中使用,夹具的功能名称将被请求夹具的功能arg遮蔽,解决这个问题的一种方法时将装饰函数命
      令"fixture_<fixturename>"然后使用"@pytest.fixture(name='<fixturename>')"。
fixture第一个例子(通过参数引用)
import pytest

class Test_ABC:
    @pytest.fixture()
    def before(self):
        print("------->before")
    def test_a(self,before): #  test_a方法传入了被fixture标识的函数,已变量的形式
        print("------->test_a")
        assert 1
if __name__ == '__main__':
    pytest.main(["-s","test_fixture.py"])

#执行结果:
E:\PycharmScripts\Python36\pytestScripts\venv\Scripts\python.exe E:/PycharmScripts/Python36/pytestScripts/test/test_fixture.py
============================= test session starts =============================
platform win32 -- Python 3.7.8, pytest-7.0.1, pluggy-1.0.0
rootdir: E:\PycharmScripts\Python36\pytestScripts\test
plugins: forked-1.4.0, rerunfailures-10.2, xdist-2.5.0
collected 1 item

test_fixture.py ------->before
------->test_a
.

============================== 1 passed in 0.17s ==============================

Process finished with exit code 0
fixture第二个例子(通过函数引用)
@pytest.fixture() # fixture标记的函数可以应用于测试类外部
def before():
    print("------->before")

@pytest.mark.usefixtures("before")#1.需要前面标记了before函数,这才可以用,所以需求before函数前面标记@pytest.fixture();2.前面标记了before函数,这不引用的话,执行后不执行before函数
#                      比如在接口测试中有需要先登录的就可以使用这个用法
class Test_ABC:
    def setup(self):
        print("------->setup")
    def test_a(self):
        print("------->test_a")
        assert 1

if __name__ == '__main__':
    pytest.main(["-s","test_fixture.py"])

#执行结果:
E:\PycharmScripts\Python36\pytestScripts\venv\Scripts\python.exe E:/PycharmScripts/Python36/pytestScripts/test/test_fixture.py
============================= test session starts =============================
platform win32 -- Python 3.7.8, pytest-7.0.1, pluggy-1.0.0
rootdir: E:\PycharmScripts\Python36\pytestScripts\test
plugins: forked-1.4.0, rerunfailures-10.2, xdist-2.5.0
collected 1 item

test_fixture.py ------->setup
------->before
------->test_a
.

============================== 1 passed in 0.14s ==============================

Process finished with exit code 0
叠加usefixtures
如果一个方法或者一个class用例想要同时调用多个fixture,可以使用@pytest.mark.usefixture()进行叠加。注意叠加顺序,先执行的放底层,后执行的放上层。
usefixtures与传fixture区别

 如果fixture有返回值,那么usefixture就无法获取到返回值,这个是装饰器usefixture与用例直接传fixture参数的区别。

 当fixture需要用到return出来的参数时,只能讲参数名称直接当参数传入,不需要用到return出来的参数时,两种方式都可以。
@pytest.fixture()
def test1():
    print('开始执行function1')
@pytest.fixture()
def test2():
    print('开始执行function2')
@pytest.mark.usefixtures('test1')
@pytest.mark.usefixtures('test2')
def test_a():
    print('---用例a执行---')

@pytest.mark.usefixtures('test2')
@pytest.mark.usefixtures('test1')
class Test_Case:
    def test_b(self):
        print('---用例b执行---')
    def test_c(self):
        print('---用例c执行---')


if __name__ == '__main__':
    pytest.main(["-s","test_fixture.py"])

#执行结果:
E:\PycharmScripts\Python36\pytestScripts\venv\Scripts\python.exe E:/PycharmScripts/Python36/pytestScripts/test/test_fixture.py
============================= test session starts =============================
platform win32 -- Python 3.7.8, pytest-7.0.1, pluggy-1.0.0
rootdir: E:\PycharmScripts\Python36\pytestScripts\test
plugins: forked-1.4.0, rerunfailures-10.2, xdist-2.5.0
collected 3 items

test_fixture.py 开始执行function2
开始执行function1
---用例a执行---
.开始执行function1
开始执行function2
---用例b执行---
.开始执行function1
开始执行function2
---用例c执行---
.

============================== 3 passed in 0.14s ==============================

Process finished with exit code 0
fixture第三个例子(默认设置为自动运行)
@pytest.fixture(autouse=True) # 设置为默认自动运行
def before():
     print("------->before")

class Test_ABC:
     def setup(self):
         print("------->setup")
     def test_a(self):
         print("------->test_a")

if __name__ == '__main__':
    pytest.main(["-s","test_fixture.py"])

#执行结果:
E:\PycharmScripts\Python36\pytestScripts\venv\Scripts\python.exe E:/PycharmScripts/Python36/pytestScripts/test/test_fixture.py
============================= test session starts =============================
platform win32 -- Python 3.7.8, pytest-7.0.1, pluggy-1.0.0
rootdir: E:\PycharmScripts\Python36\pytestScripts\test
plugins: forked-1.4.0, rerunfailures-10.2, xdist-2.5.0
collected 1 item

test_fixture.py ------->before
------->setup
------->test_a
.

============================== 1 passed in 0.18s ==============================

Process finished with exit code 0
fixture第四个例子(接收fixture返回的参数)
如果用例需要用到多个fixture的返回数据,fixture也可以返回一个元祖,list或字典,然后从里面取出对应数据。
@pytest.fixture()
def test1():
    user = 'admin'
    pwd = '123456'
    print('传出user,pwd')
    return (user, pwd)

def test_02(test1):
    u = test1[0]
    p = test1[1]
    assert u == 'admin'
    assert p == '123456'
    print('元祖形式正确')


if __name__ == '__main__':
    pytest.main(["-s","test_fixture.py"])

#执行结果:
E:\PycharmScripts\Python36\pytestScripts\venv\Scripts\python.exe E:/PycharmScripts/Python36/pytestScripts/test/test_fixture.py
============================= test session starts =============================
platform win32 -- Python 3.7.8, pytest-7.0.1, pluggy-1.0.0
rootdir: E:\PycharmScripts\Python36\pytestScripts\test
plugins: forked-1.4.0, rerunfailures-10.2, xdist-2.5.0
collected 1 item

test_fixture.py 传出user,pwd
元祖形式正确
.

============================== 1 passed in 0.15s ==============================

Process finished with exit code 0
fixture第五个例子(分开使用多个fixture)
@pytest.fixture()
def test_u():
    user = 'admin'
    print('传出 user')
    return user
@pytest.fixture()
def test_p():
    pwd = '123456'
    print('传出 pwd')
    return pwd
def test_up(test_u, test_p):
    u = test_u
    p = test_p
    print('传入多个fixture参数')
    assert u == 'admin'
    assert p == '123456'


if __name__ == '__main__':
    pytest.main(["-s","test_fixture.py"])

#执行结果:
E:\PycharmScripts\Python36\pytestScripts\venv\Scripts\python.exe E:/PycharmScripts/Python36/pytestScripts/test/test_fixture.py
============================= test session starts =============================
platform win32 -- Python 3.7.8, pytest-7.0.1, pluggy-1.0.0
rootdir: E:\PycharmScripts\Python36\pytestScripts\test
plugins: forked-1.4.0, rerunfailures-10.2, xdist-2.5.0
collected 1 item

test_fixture.py 传出 user
传出 pwd
传入多个fixture参数
.

============================== 1 passed in 0.13s ==============================

Process finished with exit code 0
fixture第六个例子(设置作用域为class)
@pytest.fixture(scope='class',autouse=True) # 作用域设置为class,自动运行
def before():
    print("------->before")
class Test_ABC:
    def setup(self):
        print("------->setup")
    def test_a(self):
        print("------->test_a")
        assert 1
    def test_b(self):
        print("------->test_b")
        assert 1


if __name__ == '__main__':
    pytest.main(["-s","test_fixture.py"])
#执行结果:
E:\PycharmScripts\Python36\pytestScripts\venv\Scripts\python.exe E:/PycharmScripts/Python36/pytestScripts/test/test_fixture.py
============================= test session starts =============================
platform win32 -- Python 3.7.8, pytest-7.0.1, pluggy-1.0.0
rootdir: E:\PycharmScripts\Python36\pytestScripts\test
plugins: forked-1.4.0, rerunfailures-10.2, xdist-2.5.0
collected 2 items

test_fixture.py ------->before
------->setup
------->test_a
.------->setup
------->test_b
.

============================== 2 passed in 0.15s ==============================

Process finished with exit code 0
fixture第七个例子(设置作用域为module)
@pytest.fixture(scope='module')
def test1():
    b = '男'
    print('传出了%s, 且在当前py文件下执行一次!!!' % b)
    return b
def test_3(test1):
    name = '男'
    print('找到name')
    assert test1 == name
class Test_Case:
    def test_4(self, test1):
        sex = '男'
        print('找到sex')
        assert test1 == sex

if __name__ == '__main__':
    pytest.main(["-s","test_fixture.py"])

#执行结果;
E:\PycharmScripts\Python36\pytestScripts\venv\Scripts\python.exe E:/PycharmScripts/Python36/pytestScripts/test/test_fixture.py
============================= test session starts =============================
platform win32 -- Python 3.7.8, pytest-7.0.1, pluggy-1.0.0
rootdir: E:\PycharmScripts\Python36\pytestScripts\test
plugins: forked-1.4.0, rerunfailures-10.2, xdist-2.5.0
collected 2 items

test_fixture.py 传出了男, 且在当前py文件下执行一次!!!
找到name
.找到sex
.

============================== 2 passed in 0.15s ==============================

Process finished with exit code 0
fixture第八个例子(设置作用域为session)
fixture为session级别是可以跨.py模块调用的,也就是当我们有多个.py文件的用例的时候,如果多个用例只需调用一次fixture,那就可以设置为scope="session",并且写到 conftest.py文件里;
注意:
conftest.py文件名称时固定的,pytest会自动识别该文件。放到项目的根目录下就可以全局调用了,如果放到某个package下,那就只在该package内有效。
一个工程下可以建多个conftest.py的文件,一般在工程根目录下设置的conftest文件起到全局作用。在不同子目录下也可以放conftest.py的文件,作用范围只能在该层级以及以下目录生效。
- conftest在不同的层级间的作用域不一样
- conftest是不能跨模块调用的(这里没有使用模块调用)
import pytest
# conftest.py

@pytest.fixture(scope='session')
def test1():
    a='admin'
    print('获取到%s' % a)
    return a


import pytest
# test_01.py

def test3(test1):
    b= '123456'
    print('找到b')
    assert test1 == user


if __name__ == '__main__':
    pytest.main(['-s', 'abc.py'])


import pytest
# test_02.py

class Test_Case:

    def test_4(self, test1):
        a = 'door'
        print('找到a')
        assert test1 == a

if __name__ == '__main__':
    pytest.main(['-s', 'abc1.py'])
如果需要同时执行两个py文件,可以在cmd的终端中在文件py文件所在目录下执行命令:pytest -s test_abc.py test_abc.py
fixture第九个例子(更改函数名称)
@pytest.fixture(name='user_pwd')
def test1():
    user = 'admin'
    pwd = '123456'
    print('传出user,pwd')
    return (user, pwd)
def test_3(user_pwd):
    name = user_pwd[0]
    print('找到name')
    assert name == 'admin'

class Test_Case:
    def test_4(self, user_pwd):
        pwd = user_pwd[1]
        print('找到sex')
        assert pwd == '123456'

if __name__ == '__main__':
    pytest.main(["-s","test_fixture.py"])

#执行结果:
E:\PycharmScripts\Python36\pytestScripts\venv\Scripts\python.exe E:/PycharmScripts/Python36/pytestScripts/test/test_fixture.py
============================= test session starts =============================
platform win32 -- Python 3.7.8, pytest-7.0.1, pluggy-1.0.0
rootdir: E:\PycharmScripts\Python36\pytestScripts\test
plugins: forked-1.4.0, rerunfailures-10.2, xdist-2.5.0
collected 2 items

test_fixture.py 传出user,pwd
找到name
.传出user,pwd
找到sex
.

============================== 2 passed in 0.18s ==============================

Process finished with exit code 0
fixture第十个例子(conftest自动执行顺序)
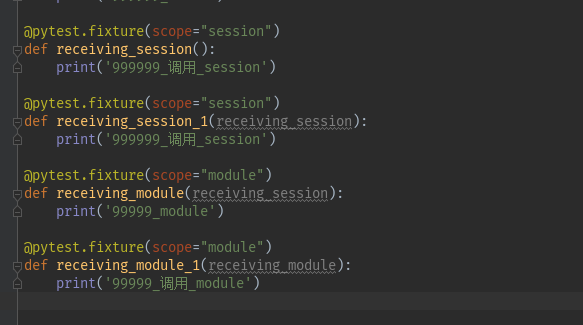
#conftest.py
@pytest.fixture(scope="session",autouse=True)
def bzs_login(zhangsan_info):
    print('11111')

@pytest.fixture(scope="session",autouse=True)
def als_login(lisi_info,member_controller_z):
    print('2222')

@pytest.fixture(scope="session")
def zhangsan_info():
    print('3333')

@pytest.fixture(scope="session")
def lisi_info():
    print('44444')

@pytest.fixture(scope="session")
def member_controller_z():
    print('55555')

@pytest.fixture(scope="session")
def receiving_z():
    print('66666')

@pytest.fixture(scope="session")
def member_controller_l():
    print('777777')

@pytest.fixture(scope="session")
def receiving_l():
    print('8888888')
#test_01.py
import pytest


def test_yoyo_01(receiving_l):

    assert 1==1

if __name__ == '__main__':

    pytest.main(['test_01.py','-s'])
执行顺序
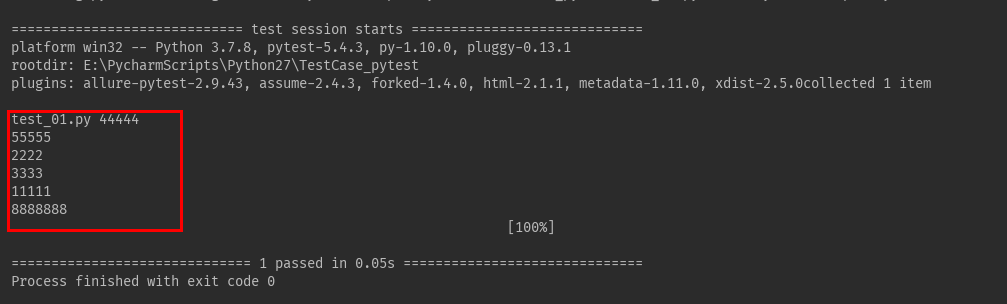
由执行结果可以看出当设置为自动执行(autouse=True)的时候,从上到下执行用例,conftest文件文件中的函数,并不是从上到下执行,而是按照首字母顺序来执行,即 a(als_login)字母在b(bls_login)字母前面,所以现在执行方法(als_login),如果是手动执行就不会有这个问题,但是自动执行需的考虑,关联请求中,初始化首字母执行顺序问题。同时还发现在传入参数的名称,与方法的名字一致时,会现在先运行于参数名称一致的方法(前提是scope必须是一致如都是session)。
同作用域的函数可以直接调用。如session的函数(scope="session") 可以直接调用作用域是session的函数(scope="session")
作用域是module的函数(scope="module") 可以直接调用作用域是session的函数(scope="session")
3.2,Pytest的setup和teardown
- pytest提供了两套互相独立的setup 与 teardown和一对相对自由的setup与teardown
- 模块级与函数级
模块级(setup_module/teardown_module) #开始于模块始末(不在类中)
函数级(setup_function/teardown_function) #只对函数用例生效(不在类中)
- 方法级与类级
方法级(setup_method/teardown_method) #开始于方法始末(在类中)
类级(setup_class/teardown_class) #只在类中前后运行一次(在类中)
- 类里面的(setup/teardown) #运行在调用方法的前后
import pytest

def setup_module():#在类中不生效
    print("setup_module:整个test_setup.py模块只执行一次")

def teardown_module():
    print("teardown_moduel:整个test_setup.py模块只执行一次")

def setup_function(): #只对函数用例生效,不在类中
    print("setup_function():每个方法开始前执行")

def teardown_function():
    print("teardown_function:每个方法结束后执行")


def test_01():
    print('-----测试用例test_01----')

def test_02():
    print('-----测试用例test_02----')

class Test_MyClass():
    def setup_class(self):#只在类中生效
        print("setup_class(self):每个类之前执行一次")

    def teardown_class(self):#只在类中生效
        print("teardown_class(self):每个类结束后执行一次")

    def setup_method(self): #只在类中生效
        print("setup_method(self):在类中的每个方法开始之前执行")

    def teardown_method(self): #只在类中生效
        print("setup_method(self):在类中的每个方法开始之前执行")

    def setup(self): #运行在调用方法的前后
        print("setup:每个用例开始前都会执行")

    def teardown(self):
        print("teardown:每个用例结束后都会执行")

    def test_a(self):
        print("正在执行测试类----test_a")

    def test_b(self):
        print("正在执行测试类----test_b")


if __name__ == "__main__":
    pytest.main(["-s", "test_setup.py"])

#执行结果:
E:\PycharmScripts\Python36\pytestScripts\venv\Scripts\python.exe E:/PycharmScripts/Python36/pytestScripts/test/test_setup.py
============================= test session starts =============================
platform win32 -- Python 3.7.8, pytest-7.0.1, pluggy-1.0.0
rootdir: E:\PycharmScripts\Python36\pytestScripts\test
plugins: forked-1.4.0, rerunfailures-10.2, xdist-2.5.0
collected 4 items

test_setup.py setup_module:整个test_setup.py模块只执行一次
setup_function():每个方法开始前执行
-----测试用例test_01----
.teardown_function:每个方法结束后执行
setup_function():每个方法开始前执行
-----测试用例test_02----
.teardown_function:每个方法结束后执行
setup_class(self):每个类之前执行一次
setup_method(self):在类中的每个方法开始之前执行
正在执行测试类----test_a
.setup_method(self):在类中的每个方法开始之前执行
setup_method(self):在类中的每个方法开始之前执行
正在执行测试类----test_b
.setup_method(self):在类中的每个方法开始之前执行
teardown_class(self):每个类结束后执行一次
teardown_moduel:整个test_setup.py模块只执行一次

============================== 4 passed in 0.20s ==============================

Process finished with exit code 0
3.3,预处理和后处理 关键字 yield
很多时候需要在测试前进行预处理(如新建数据库连接),并在测试完成进行清理(关闭数据库连接)。
当有大量重复的这类操作,最佳实践是使用固件来自动化所有预处理和后处理。
Pytest 使用 yield 关键词将固件分为两部分,yield 之前的代码属于预处理,会在测试前执行;yield 之后的代码属于后处理,将在测试完成后执行。
案例:
import pytest
@pytest.fixture()
def db():
    print('关键字yield 之前的代码属于预处理,会在测试前执行')
    user = 'admin'
    yield user

    print('关键字yield 之后的代码属于后处理,将在测试完成后执行')


def test_01(db):
    print('正在执行--------测试用例test_01 接收传递参数user=%s-----' % db)

if __name__ == '__main__':
    pytest.main(['-s','test_yield.py'])

#执行结果:
E:\PycharmScripts\Python36\pytestScripts\venv\Scripts\python.exe E:/PycharmScripts/Python36/pytestScripts/test/test_yield.py
============================= test session starts =============================
platform win32 -- Python 3.7.8, pytest-7.0.1, pluggy-1.0.0
rootdir: E:\PycharmScripts\Python36\pytestScripts\test
plugins: forked-1.4.0, rerunfailures-10.2, xdist-2.5.0
collected 1 item

test_yield.py 关键字yield 之前的代码属于预处理,会在测试前执行
正在执行--------测试用例test_01 接收传递参数user=admin-----
.关键字yield 之后的代码属于后处理,将在测试完成后执行


============================== 1 passed in 0.09s ==============================

Process finished with exit code 0
3.4 ,yield 与 return的区别
共同点:return和yield都可以用来返回值,在一次性的返回值的场景中return和yield的作用是一样的;
不同点:如果返回的数据是通过for循环等生成的迭代器类型的数据(如列表,元组),return只能在循环外部一次性返回,yield可以在循环内部逐个元素的返回
案例 return:
class TestReturn():

    def get_iterator(self):
        result_list = []
        for j in range(3):
            print("gen_iterator-%s" % j)
            result_list.append(j)
        # return在循环的外部,待变量完全生成后一次性返回
        return result_list

    def call_iterator(self):
        # 执行下边这句后result_list直接是完成的结果[0,1,2]
        result_list = self.get_iterator()
        for i in result_list:
            print('call_gen_iterator-%s' % i)


if __name__ == '__main__':
   tr = TestReturn()
   tr.call_iterator()
执行结果如下,可以看到一次性执行完下层函数,生成完整的迭代器类型返回值result_list,一次性返回给上层函数:
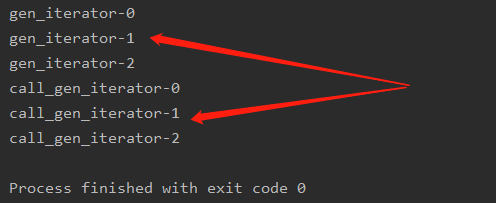
案例 yield:
class TestYeild():

    def get_iterator(self):
        for j in range(3):
            print("gen_iterator-%s" % j)

            # yield在循环的内部,逐个元素返回
            yield j

            print('关键字yield之后的代码属于后处理,将在测试完成后执行')


    def call_iterator(self):
        # yield并不是直接返回[0,1,2],执行下边这句后result_list什么值都没有
        result_list = self.get_iterator()

        # i每请求一个数据,才会触发gen_iterator生成一个数据
        for i in result_list:
            print('call_iterator-%s' % i)


if __name__ == '__main__':
   ty = TestYeild()
   ty.call_iterator()

'''
执行结果:
gen_iterator-0
call_iterator-0
关键字yield之后的代码属于后处理,将在测试完成后执行
gen_iterator-1
call_iterator-1
关键字yield之后的代码属于后处理,将在测试完成后执行
gen_iterator-2
call_iterator-2
关键字yield之后的代码属于后处理,将在测试完成后执行
'''
从执行结果上可以看到上下层函数是交替进行的,即上层函数请求迭代一个值下层函数才生成一个值并立即返回这个值
第四部分:Pytest常用插件
4.1 Allure测试报告
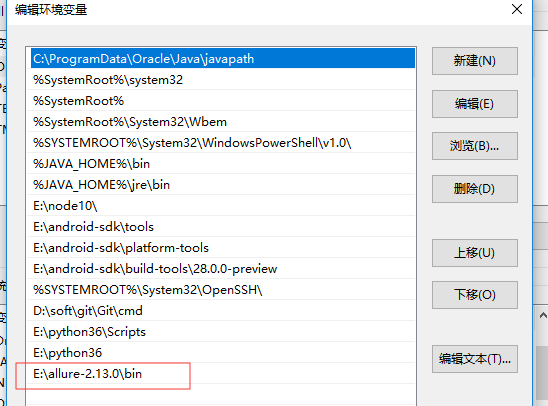
- 下载Allure 框架,并配置环境变量
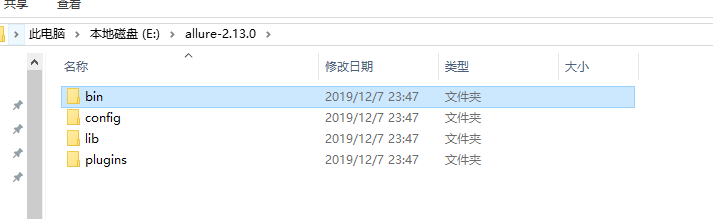
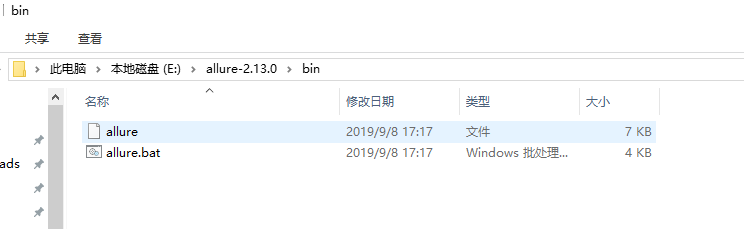
allure是一个命令行工具,需要去github上下载最新版https://github.com/allure-framework/allure2/releases
下载完成后,解压到自己指定的位置,然后并添加环境变量
- 下载allure-pytest插件
注意:pytest-allure-adaptor 这个插件与 allure-pytest 不能共存
pip install allure-pytest
利用Allure框架生成html报告
allure generate %s -o %s" % (xml_file_path,html_file_path)
#指令说明:
allure generate:规定指令
xml_file_path:测试报告的原始文件,不能打开成html的报告
-o :输出:output
html_file_path: 生成的Allure报告的路径 可以打开html的报告
if __name__ == '__main__':
    xml_file_path = os.path.abspath(os.path.join(os.path.dirname(__file__), 'Report/allure_raw',))
    html_file_path = os.path.abspath(os.path.join(xml_file_path, 'html'))
    pytest.main(['-s', '-q', '--alluredir', xml_file_path])

    #利用Allure生产html报告
    cmd = "allure generate %s -o %s" % (xml_file_path,html_file_path)
    os.system(cmd)
未执行Allure指令之前,report目录会生成一个allure_raw的原始文件,这个只是测试报告的原始文件,不能打开成html的报告

- 执行 Allure指令:"allure generate %s -o %s" % (xml_file_path,html_file_path)后
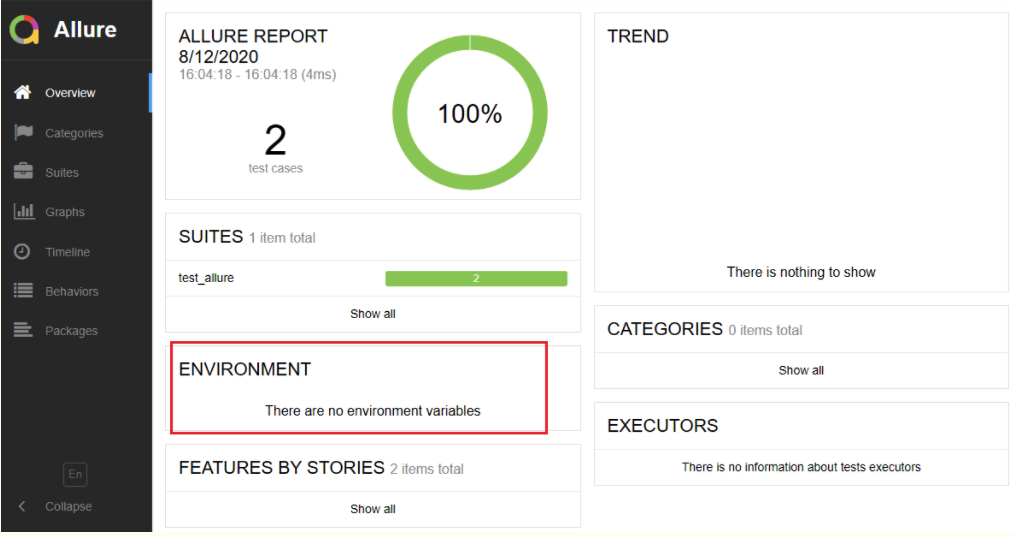
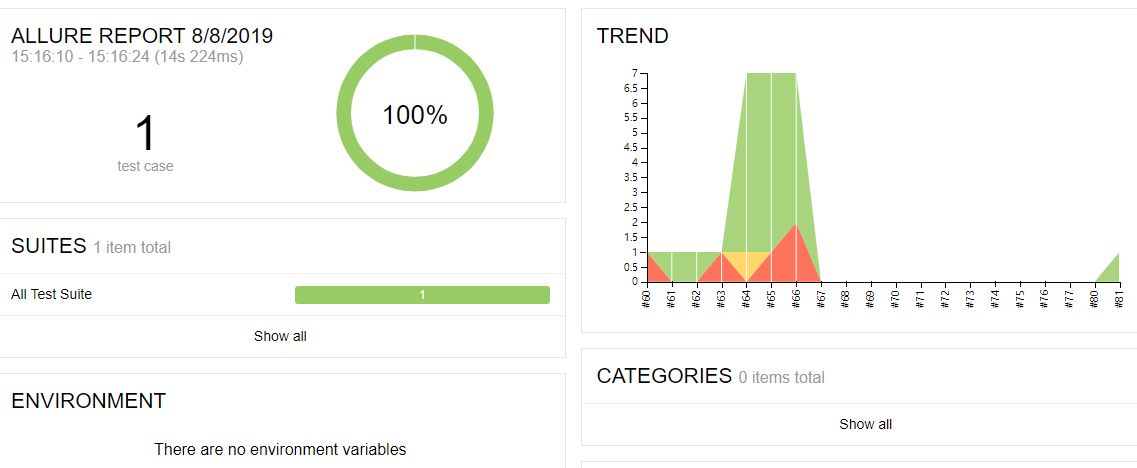
在 allure 报告首页 ENVIRONMENT 显示 'There are no environment variables' 没有环境变量的配置信息。环境变量配置可以添加报告相关的配置参数,如运行的系统环境,版本号,测试环境,测试人员等基本信息此时需要添加 ENVIRONMENT。
environment 配置文件
方法一:environment.properties 文件
在allure的report根目录下添加一个 environment.properties 文件
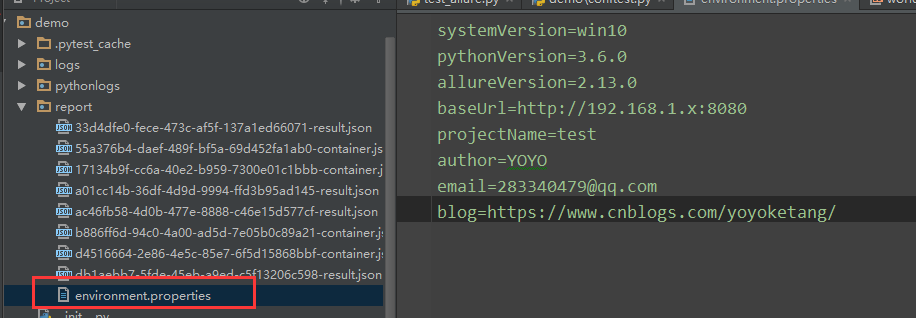
文件里面添加环境配置,格式如下
systemVersion=win10
pythonVersion=3.6.0
allureVersion=2.13.0
baseUrl=http://x x x.xxx.xxx.x:8080
projectName=test
author=XXXX
email=1234567@qq.com
blog=https://www.cnblogs.com
方法二:environment.xml
也可以用 environment.xml 文件,格式如下
<environment>
    <parameter>
        <key>Browser</key>
        <value>Chrome</value>
    </parameter>
    <parameter>
        <key>Browser.Version</key>
        <value>63.0</value>
    </parameter>
    <parameter>
        <key>Stand</key>
        <value>Production</value>
    </parameter>
</environment>
Allure无趋势图
原因:allure-result文件中没有history文件夹
解决:将allure-report中的history复制到allure-result
xcopy .\allure-report\history .\allure-results\history /e /Y /I
4.2 多重断言 pytest-assume
在测试用例中我们往往需要多个断言,然而使用assert断言时,只要有一个断言失败,后续的断言就无法再继续执行。现在,我们可以通过使用pytest-assume插件来解决这个问题,当断失 败后,仍会继续执行后续的断言。
4.2.1 安装pytest-assume
pip install purest-assume
assert多重断言案例:
import pytest

def test_assert_01():
  print('断言1')
  assert 1 + 5 == 6
  print('断言2')
  assert 1 + 6 == 8
  print('断言3')
  assert 1 + 7 == 8
  print('assert多重断言完成')
if __name__ == '__main__': pytest.main(['-vs', 'test_assert.py'])
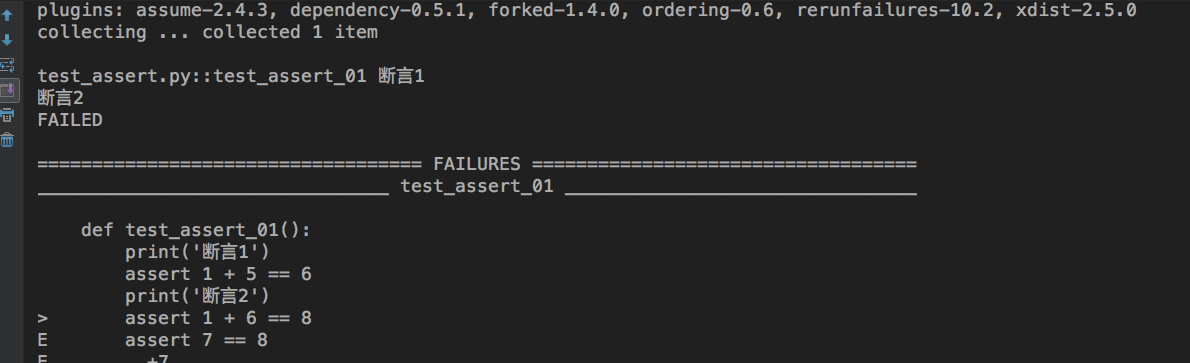
从执行结果可以看到,一旦出现断言失败,后面的断言就无法在继续执行
pytest-assume 多重断言
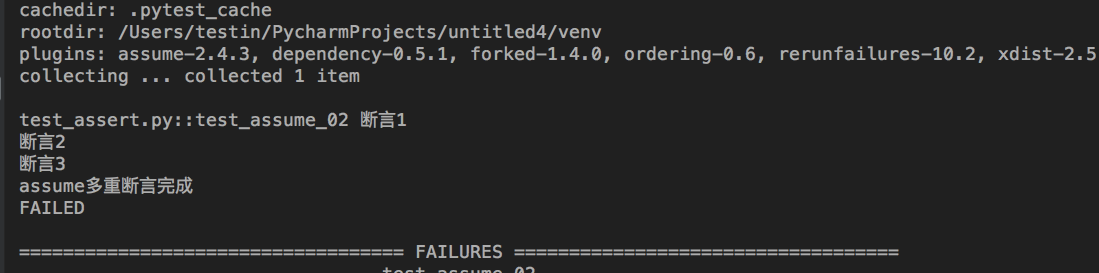
def test_assume_01():
    print('断言1')
    pytest.assume(1 + 5 == 6)
    print('断言2')
    pytest.assume(1 + 6 == 8)
    print('断言3')
    pytest.assume(1 + 7 == 8)
    print('assume多重断言完成')


if __name__ == '__main__':
    pytest.main(['-vs', 'test_assert.py'])

从执行结果中可以看出,使用assert断言时,断言失败不会再执行后续的内容;而使用pytest.assume()断言时,断言失败仍会执行至用例结束。这样更有利于我们一次性获取用例执行中全部错误信息。
通过上下文管理器with使用pytest-assume
pytest assume无法导入:解决ImportError: cannot import name ‘assume‘ from ‘pytest‘问题https://blog.csdn.net/tianshuiyimo/article/details/116519264
from pytest import assume
def test_assume_02():
    print('断言1')
    with assume: assert 1 + 5 == 6
    print('断言2')
    with assume: assert 1 + 6 == 8
    print('断言3')
    with assume: assert 1 + 7 == 8
    print('assume多重断言完成')

if __name__ == '__main__':
    pytest.main(['-vs', 'test_assert.py'])
需要注意的是每个with块只能有一个断言,如果一个with下有多个断言,当第一个断言失败的时候,后面的断言就不会起作用的.
import pytest
from pytest import assume
def test_assert_03():
    with assume:
        print('断言1')
        assert 1 + 5 == 6
        print('断言2')
        assert 1 + 6 == 8
        print('断言3')
        assert 1 + 7 == 8
        print('assume多重断言完成')


if __name__ == '__main__':
    pytest.main(['-vs', 'test_assert.py'])
4.3 用例依赖 pytest-dependency
我们在编写测试案例时,理想的状态下都是要确保案例之间的独立性,但是往往部分用例之间确实存在关联,无法做到彻底独立,那么我们就可以通过使用插件pytest-dependency设置用例之间的依赖关系。当用例A依赖于用例B时,若用例B执行失败,则用例A将会自动跳过不执行。如此,就可以避免去执行一个必定会失败的用例,相当于pytest.mark.skip。
4.3.1 安装 pytest-dependency
pip install pytest-dependency
使用说明:
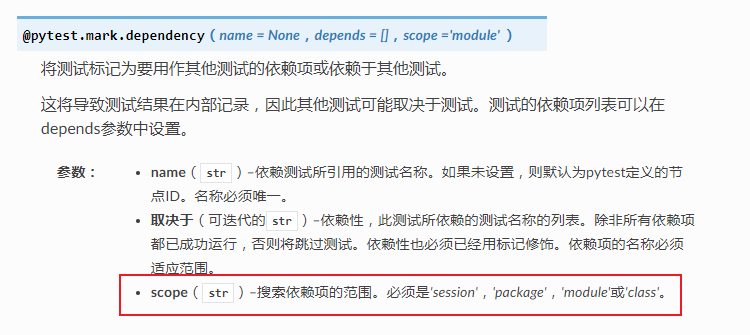
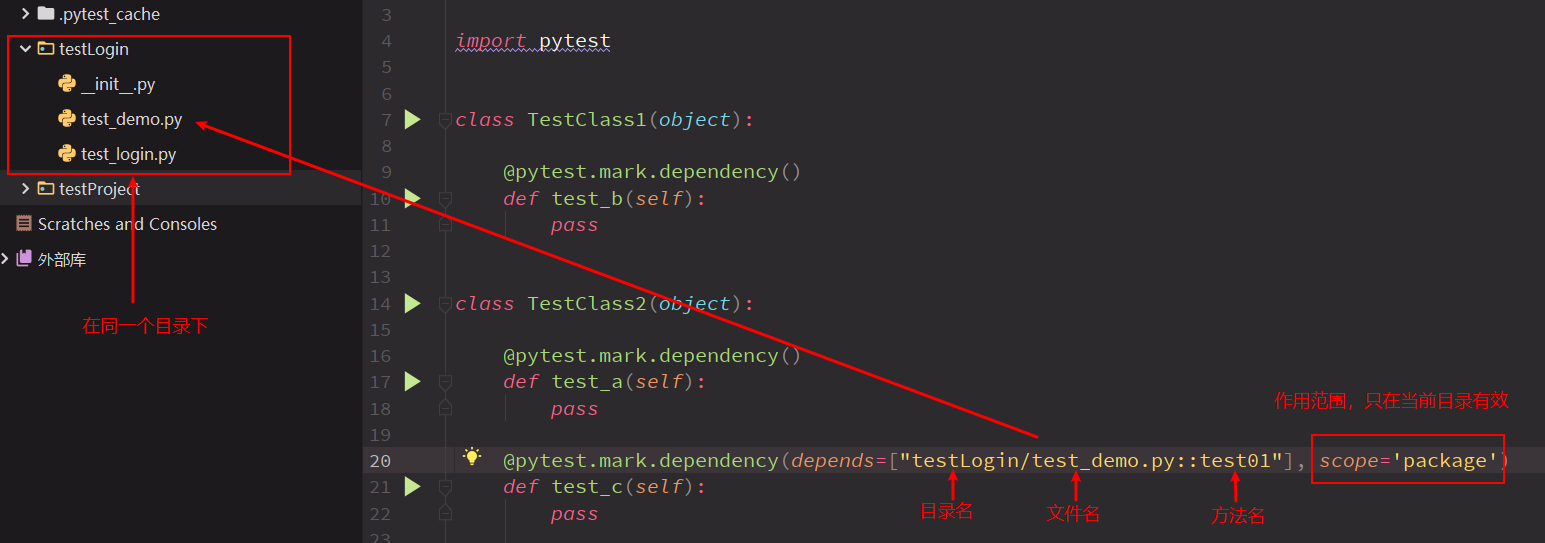
首先,在标记被依赖用例时,需要在被依赖的用例上添加装饰器pytest.mark.dependency(),且被依赖用例需要在关联用例前执行。也可以给被依赖用例设置别名,通过添加参数name实现。

在关联的依赖用例上,同样需要添加装饰器pytest.mark.dependency(depends=[‘用例名称’]),与之前不同的是,装饰器必须要填写depends参数完成用例的关联,关联的被依赖用例存在多个时可以使用“,”隔开。

此外,还可以通过scope参数指定用例依赖的范围,必须是session、package、module、class这四种类型
案例一:
import pytest
class TestMyClass():

    # 通过装饰器@pytest.mark.dependency()标记当前用例为被依赖用例,被依赖用例需要优先关联用例执行
    @pytest.mark.dependency()
    def test_01(self):
        print('测试用例test_01,执行失败')
        assert 1 == 2

    # 通过使用装饰器关联被依赖用例,通过depends参数指定用例名称关联用例,test_01是自己类下的
    @pytest.mark.dependency(depends=['test_01'])
    def test_02(self):
        print('测试用test_02,跳过')

    # 标记被依赖用例时,可以通过name参数指定别名
    @pytest.mark.dependency(name='func_03')
    def test_03(self):
        print("测试用例03,执行成功!")

    # 使用depends参数指定定义的别名关联用例
    @pytest.mark.dependency(depends=['func_03'])
    def test_04(self):
        print("测试用例04,执行成功!")

    # depends参数可以关联多个测试用例,使用“,”分隔即可
    @pytest.mark.dependency(depends=['test_01', 'func_03'])
    def test_05(self):
        print("测试用例05,跳过")


if __name__ == '__main__':
     pytest.main(['-vs', 'test_dependency.py'])
执行结果:
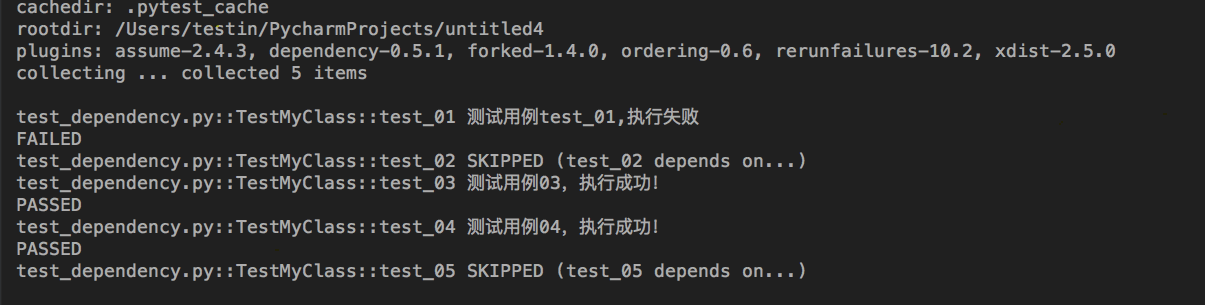
从执行结果可以看出只有依赖用例执行成功时,当前用例才会被执行,否则会被跳过。依赖多个用例时,只有全部成功,才会执行,否则一样会跳过。
4.3.2 定义依赖范围
参考http://t.zoukankan.com/se7enjean-p-13513131.html
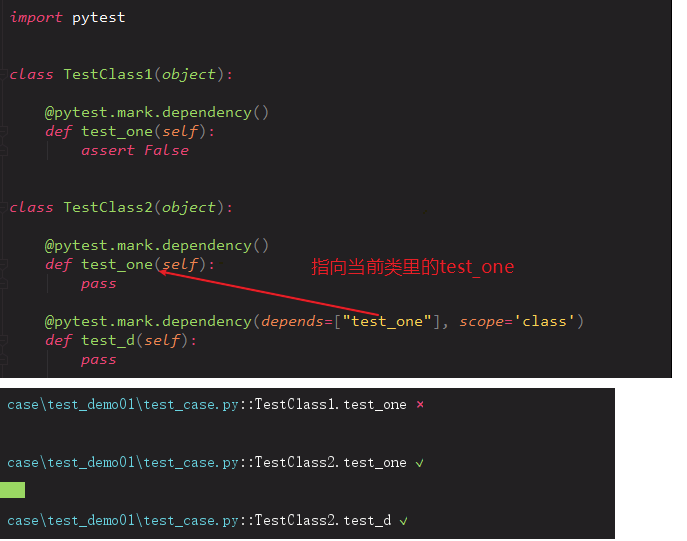
案例一:scope='class'
作用于所属的类,外部类不会被关联
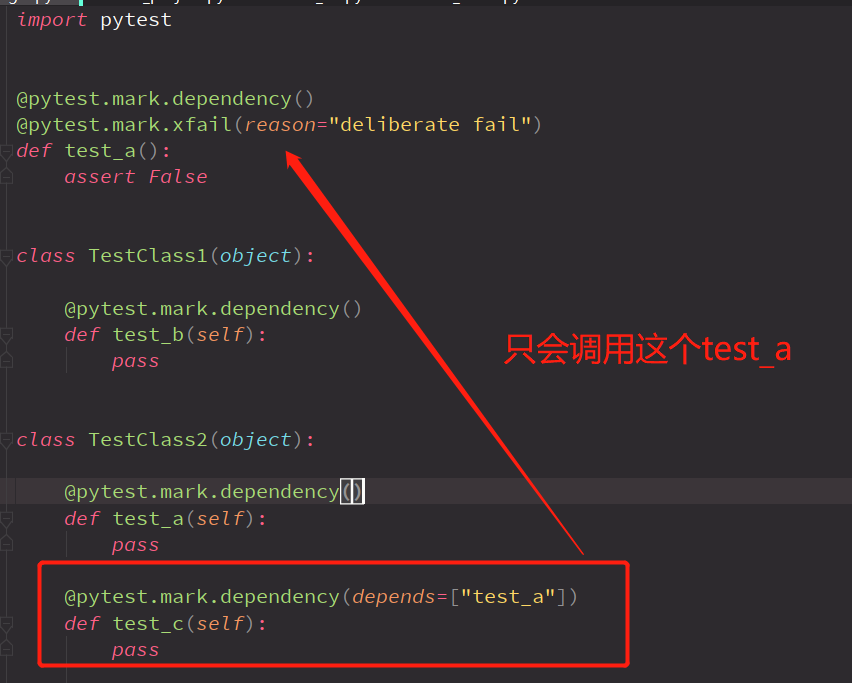
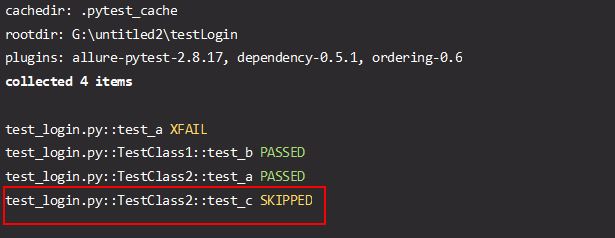
案例二:scope='module'
不传递scope,默认参数是'module',作用于当前文件
只会查找当前文件的符合条件的文件名,类里同名的方法不会被依赖
案例三:scope='package'
作用于当前目录同级的依赖函数,跨目录无法找到依赖的函数。
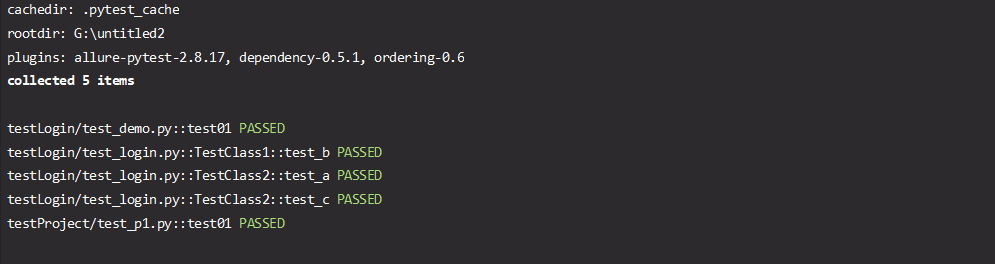
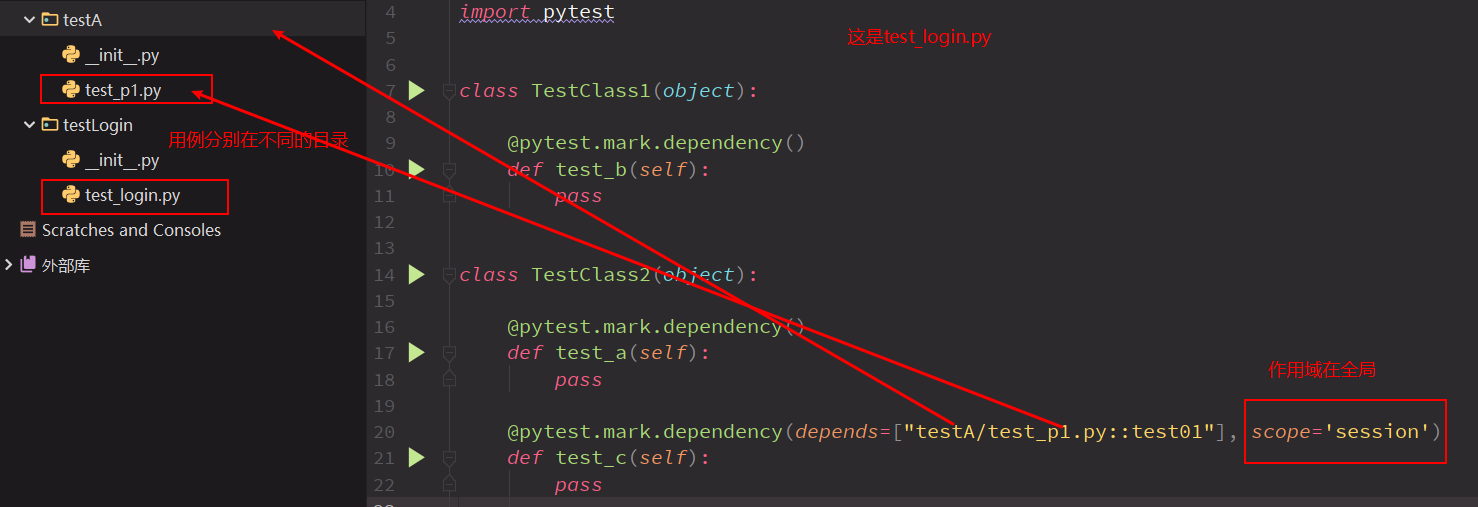
案例四:scope='session'
作用域全局,可跨目录调用。但被依赖的用例必须先执行,如例子中的test01,否则用例会执行跳过!!!!

4.4 失败重跑 pytest-rerunfailures
4.4.1安装pytest-rerunfailures
pip install pytest-rerunfailures
使用说明:
失败重跑共有两种使用方式,分别是:通过装饰器执行和命令行执行。

使用装饰器时,需要在用例上添加装饰器pytest.mark.flaky(reruns=重新执行最大次数, reruns_delay=执行间隔时间(单位:秒)),在执行过程中,添加了装饰器的用例在执行失败后会按照设置的次数和时间重新执行。

通过在命令行执行时,同样需要指定"rerun"和"rerun-delay"两个参数来实现,如:pytest --reruns 重新执行最大次数 --reruns-delay 间隔时间。

注意:
    1,reruns是重新执行的最大次数,如果在达到这一数量前用例执行成功,则不会继续重    跑,判断用例执行通过;否则执行到最大次数后,用例仍失败,则判断用例执行失败。
    2,运行失败的 fixture 或 setup_class 也将重新执行。

兼容性问题:
    不可以和fixture装饰器一起使用: @pytest.fixture()
    该插件与pytest-xdist的 --looponfail 标志不兼容
    该插件与核心--pdb标志不兼容
案例一:
import pytest
import random

# 使用装饰器设置用例失败后的重新执行最大次数和每次执行的间隔时间(单位:秒)
@pytest.mark.flaky(reruns=3, reruns_delay=1)
def test_01():
    result = random.choice([False, False, True, False, False])
    print(f"result={result}")
    assert result


if __name__ == '__main__':
    pytest.main(['-vs','test_rerunfailures.py'])
从执行的结果可以看出,当用例断言失败后,会重新执行,直到达到设置的最大次数或执行成功为止。
4.5 指定用例执行顺序 pytest-ordering
4.5.1 安装pytest-ordering
pip install pytest-ordering
使用说明;
通过给用例添加装饰器pytest.mark.run(order=执行顺序)设置用例的执行顺序。在执行的时候,使用装饰器pytest.mark.run的用例会优先没有装饰器的用例执行,设置了执行顺序的用例则按照order参数设置的大小升序执行。
案例:
import pytest

def test_01():
    print('测是用例test_01')
def test_02():
    print('测是用例test_02')

# 使用装饰器设置执行顺序为2
@pytest.mark.run(order=2)
def test_03():
    print('测是用例test_03')

# 使用装饰器设置执行顺序为1
@pytest.mark.run(order=1)
def test_04():
    print('测是用例test_04')

if __name__ == '__main__':
    pytest.main(['-vs','test_order.py'])
从执行结过可以看出,优先执行标明了执行顺序的用例,并按照order的值由小到大执行。
4.6 分布式运行 pytest-xdist
4.6.1 安装 pytest-xdist
pip install pytest-xdist
使用说明:
在命令行执行用例时,通过参数-n设置并行启动的进程数量。除了设置具体的数量外,还可以设置为auto,这种情况下,会依据当前设备的cpu数量执行。

此外,还可以通过–dist参数,设置用例分组,同一个组内的用例会在同一个进程中执行。

–dist=loadscope 同一个module或同一个class下的用例会分配为同一组,按class分组优先于module。
–dist=loadfile 同一个.py文件中的用例会分配为同一组。

分布式执行用例的设计原则(重中之重的重点)
    用例之间是独立的,用例之间没有依赖关系,用例可以完全独立运行【独立运行】
    用例执行没有顺序,随机顺序都能正常执行【随机执行】
    每个用例都能重复运行,运行结果不会影响其他用例【不影响其他用例】
案例一:
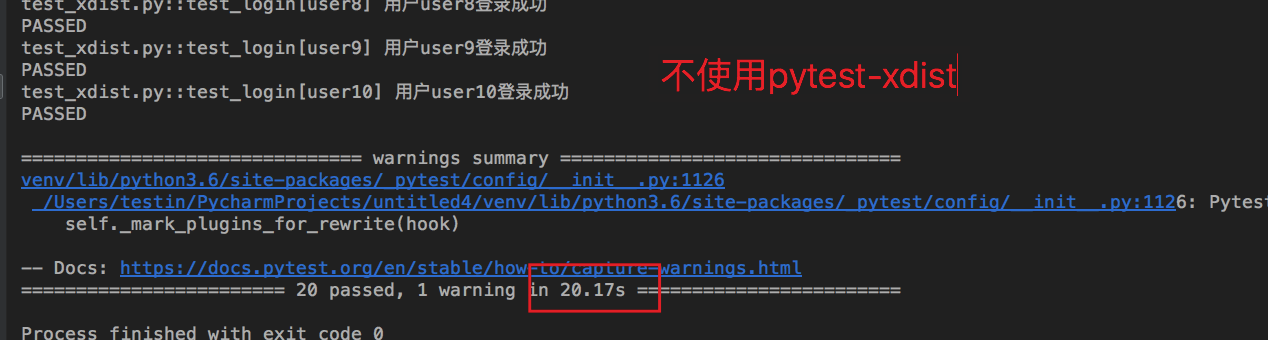
import pytest
from time import sleep


@pytest.mark.parametrize('keyword', ['a', 'b', 'c', 'd', 'e',
                                     'f', 'g', 'h', 'i', 'j'])
def test_baidu_search(keyword):
    sleep(1)
    print(f'搜索关键字{keyword}')
    assert True


@pytest.mark.parametrize('user', ['user1', 'user2', 'user3', 'user4', 'user5',
                                  'user6', 'user7', 'user8', 'user9', 'user10'])
def test_login(user):
    sleep(1)
    print(f'用户{user}登录成功')
    assert True

if __name__ == '__main__':
    pytest.main(['-vs','test_xdist.py']) # 不使用pytest-xdist运行
    # pytest.main(['-vs', '-n', '2', 'test_xdist.py']) # 使用pytest-xdist运行
不使用pytest-xdist运行执行结果:
使用pytest-xdist运行执行结果:
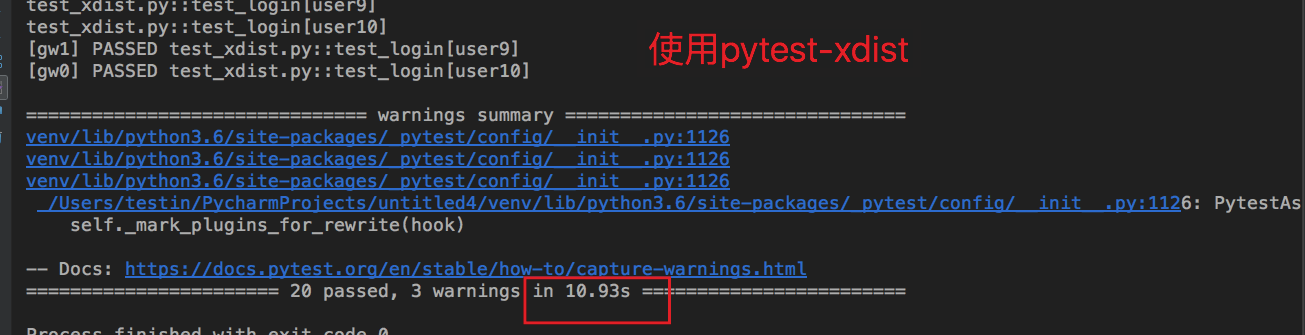
上方的两次执行结果中可以看出,使用分布式运行后,用例的运行时间明显缩短。示例中的用例彼此之间没有关联,如果实际使用时用例之间存在依赖关系,可以使用–dist参数为用例分组,确保关联的用例在同一组内。
第五部分:pytest配置文件pytest.ini详情
pytest.ini :pyteste的主配置文件,可以改变pytest的默认行为,有很多可配置的选项
5.1 配置项 addopts
更改默认命令行选项
pytest用命令行运行时,有时候需要经常使用到某些参数,又不想重复输入,这时可以使用pytest.ini文件里的addopts设置
[pytest]
addopts=-vps
-v: pyest -v 说明:可以输出用例更加相信的执行信息,比如用例所在的文件及用例名称等
-s: pytest -s 说明:输入我们用例中的调试信息,比如print打印信息等
-m: pytest -m "标记" 说明:执行待定的测试用例 如@pytest.mark.smoke 执行指令为:pytest -m smoke
-q:pytest -q 说明:简化控制台的输出,可以看出信息和结果信息
-k:pytest -k "关键字" 说明:执行用例包含“关键字”的用例


【推荐】国内首个AI IDE,深度理解中文开发场景,立即下载体验Trae
【推荐】编程新体验,更懂你的AI,立即体验豆包MarsCode编程助手
【推荐】抖音旗下AI助手豆包,你的智能百科全书,全免费不限次数
【推荐】轻量又高性能的 SSH 工具 IShell:AI 加持,快人一步
· 无需6万激活码!GitHub神秘组织3小时极速复刻Manus,手把手教你使用OpenManus搭建本
· C#/.NET/.NET Core优秀项目和框架2025年2月简报
· Manus爆火,是硬核还是营销?
· 终于写完轮子一部分:tcp代理 了,记录一下
· 【杭电多校比赛记录】2025“钉耙编程”中国大学生算法设计春季联赛(1)