Ubuntu笔记
change color of terminal output text
https://stackoverflow.com/questions/5947742/how-to-change-the-output-color-of-echo-in-linux
拦截linux命令
必须有set -T和shopt -s extdebug,参考https://stackoverflow.com/questions/55963222/intercept-and-prevent-command-from-running-in-bash
trap 'if [[ "$BASH_COMMAND" == "echo "* || "$BASH_COMMAND" == "pwd" || "$BASH_COMMAND" == "rm "* ]]; then printf "[%s]\n" ${BASH_COMMAND#echo}; false; fi' DEBUG
set -T
shopt -s extdebug
自定义yum源
1. 创建ucmrepo,要先装所有rpm包复制到ucmrepos目录下,再createrepo
mkdir /root/ucmrepo
cp ucmgateway.rpm /root/ucmrepo
createrepo /root/ucmrepo
2. 将ucmrepo复制到http://172.16.20.50:8000/ucmgateway/ucmrepo
3. 用户配置yum.repo
vim /etc/yum.repos.d/kylin_x86_64.repo

[ucmrepo]
name = ucmgateway
baseurl = http://172.16.20.50:8000/ucmgateway/ucmrepo
enabled = 1
gpgcheck = 0

yum repolist
4. 用户yum install ucmgateway
vim改colorscheme
echo 'colorscheme desert' ~/.vimrc
exit status
https://www.cyberciti.biz/faq/linux-bash-exit-status-set-exit-statusin-bash/
/var/run/xxx.pid文件作用
https://www.baeldung.com/linux/find-process-pid-file
防火墙ufw
https://www.baeldung.com/linux/uncomplicated-firewall
https://www.cyberciti.biz/faq/how-to-configure-firewall-with-ufw-on-ubuntu-20-04-lts/
学习资源
鸟哥的 Linux 私房菜 https://muicoder.github.io/linux_basic/
常用命令
#awk 将who的第一个字段值赋给a
a=$(who|awk '{print $1}')
#awk 取当用登录用户的session id
a=$(loginctl|grep $(who|awk '{print $1}')|awk '{print $1}')
## append text to file
echo aaaaaaaa >> file
cat file1 >> file
## If all those cvfs and zxvfs make your head spin, refer to this table, which explains what they all mean:
| c | create an archive |
| f filename | the name of the archive file |
| t | table of contents: tell me what's in an archive |
| v | verbose: tell me what's going on |
| x | extract from an archive |
| z | put the archive through gzip |
#查看库依赖
ldd  libxxx.so

#查看Linux版本
1、利用“lsb_release -a”命令查看所有版本信息;
2、利用“cat /etc/issue”命令查看linux发行版版本信息;
3、利用“cat /proc/version”命令查看操作系统版本信息。

#查看kylin版本
1. cat /etc/.kyinfo
#修改时间
date -s "2022-2-20 9:13:33"

#查看so库是否存在
ldconfig -p|grep xxx.so
#加组
sudo usermod -a -G root www-data # -a append在已有的基础上增加,不替换
#查看组
groups #查看当前用户的组
groups user #查看用户user的组
id user #查看用户的组
sudo cat /etc/group
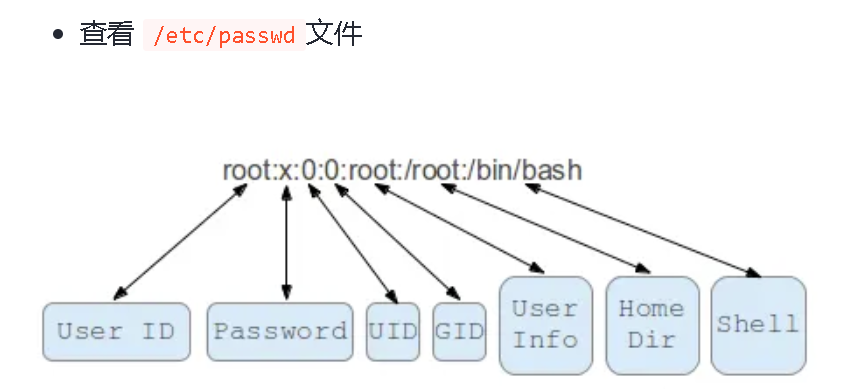
sudo cat /etc/passwd
#查找
find / -name "guacd"
#test
test x"a" = x"b" && echo yes
# /etc/sudoers
#用户名(组名要在前面加%) 主机 以什么身份执行命令 列出能执行的命令
jorge ALL=(root) /usr/bin/find,/bin/rm
#不建议直接vim /etc/sudoers,用visudo命令,这个会有语法检查
#useadd
#-g 指定主用户组 -G 指定附加用户组(多个组名用,隔开)
useradd demouser -g root -G root,chenhs -m -s /bin/bash
/etc/passwd
配置ll别名
alias ll='ls -la'
ubuntu 20.04 LTS 更换阿里云源
注意系统时间
1. sudo cp /etc/apt/source.list /etc/apt/source.list.bak
2. sudo vim /etc/apt/source.list
- 阿里云
|
1
2
3
4
5
6
7
8
9
10
11
12
13
14
|
deb https://mirrors.aliyun.com/ubuntu/ focal main restricted universe multiversedeb-src https://mirrors.aliyun.com/ubuntu/ focal main restricted universe multiversedeb https://mirrors.aliyun.com/ubuntu/ focal-security main restricted universe multiversedeb-src https://mirrors.aliyun.com/ubuntu/ focal-security main restricted universe multiversedeb https://mirrors.aliyun.com/ubuntu/ focal-updates main restricted universe multiversedeb-src https://mirrors.aliyun.com/ubuntu/ focal-updates main restricted universe multiverse# deb https://mirrors.aliyun.com/ubuntu/ focal-proposed main restricted universe multiverse# deb-src https://mirrors.aliyun.com/ubuntu/ focal-proposed main restricted universe multiversedeb https://mirrors.aliyun.com/ubuntu/ focal-backports main restricted universe multiversedeb-src https://mirrors.aliyun.com/ubuntu/ focal-backports main restricted universe multiverse |
- 原
|
1
2
3
4
5
6
7
8
9
10
11
12
13
14
|
deb http://archive.ubuntu.com/ubuntu/ focal main restricted universe multiversedeb-src http://archive.ubuntu.com/ubuntu/ focal main restricted universe multiversedeb http://archive.ubuntu.com/ubuntu/ focal-security main restricted universe multiversedeb-src http://archive.ubuntu.com/ubuntu/ focal-security main restricted universe multiversedeb http://archive.ubuntu.com/ubuntu/ focal-updates main restricted universe multiversedeb-src http://archive.ubuntu.com/ubuntu/ focal-updates main restricted universe multiversedeb http://archive.ubuntu.com/ubuntu/ focal-proposed main restricted universe multiversedeb-src https://archive.ubuntu.com/ubuntu/ focal-proposed main restricted universe multiversedeb http://archive.ubuntu.com/ubuntu/ focal-backports main restricted universe multiversedeb-src http://archive.ubuntu.com/ubuntu/ focal-backports main restricted universe multiverse |
vim相关
- 全选(高亮显示):按esc后,然后ggvG或者ggVG
- 全部复制:按esc后,然后ggyG
- 全部删除:按esc后,然后dG
- 粘贴:按esc后,按p
解析:
- gg:是让光标移到首行,在vim才有效,vi中无效
- v : 是进入Visual(可视)模式
- G :光标移到最后一行
选中内容以后就可以其他的操作了,比如:
- d 删除选中内容
- y 复制选中内容到0号寄存器
- "+y 复制选中内容到+寄存器,也就是系统的剪贴板,供其他程序用
vim加行号:
按ESC键退出编辑内容模式,输入“:” ,再输入“set number”或者“set nu”后按回车键
vim查找
在normal模式下按下/即可进入查找模式,输入要查找的字符串并按下回车。 Vim会跳转到第一个匹配。按下n查找下一个,按下N查找上一个。
samba
install
apt install samba smbclient
smbpasswd -a chenhs
smb.conf
[share]
comment = aa
path = /home/chenhs
public = yes
writable = yes
valid users = chenhs
create mask = 0777
directory mask = 0777
security = share
#force user = user
#force group= chenhs
available = yes
browseable = yes
多台linux共享smb目录
- 本地mkdir /mnt/share
-
sudo mount -t cifs //${id}/share /mnt/share -o username=${username},password=${password}
参考:https://blog.51cto.com/zhangxueliang/7054411
systemd常用
常用路径:
- /etc/systemd/system/*.wants/
- /lib/systemd/system/*.service
常用命令:
- systemctl -t service --state active 相当于systemctl list-units -t service --state active
- systemctl status 单元名称
- systemctl list-dependencies 单元名称 列出些单元的依赖
- systemctl list-unit-files -t service 列出单元文件,可通过-t来过滤单元类型systemctl cat 单元名称 查看单元文件内容
- enabled: 已经建立启动符号链接,即已启用。
- disabled: 没有 建立 符号 链接,即未启用。
- static: 该 配置文件 没有[ Install] 部分,即无法自己执行,只能作为其他配置文件的依赖。
- masked: 该 配置文件被禁止建立启动符号链接,即完全被禁用。
- generated: 该单元文件由其他的API动态创建。
- bad: 无效的单元文件。
- indirect: 该单元文件本身没有被启用,但是它的[Install] 部分配置了Also选项。
- systemctl reload 单元名称 重新加载服务的配置文件
- systemctl daemon-reload 单元名称 重新加载单元的配置文件
- systemctl enable/disable 单元名称 配置服务自动启动。其实就是在/etc/systemd/system/*.wants/里面增加或删除链接
- systemctl show 单元名称 --property 指定属性 显示服务的详细属性列表
- systemctl set-property 单元名称 loglevel=info 设置属性,会同步到单元文件里面
- systemd-analyze --user/system timehostnamectl 查看当前主机名
- time:输出系统启动时间。该命令为默认命令。
- blame:按照占用时间长短的顺序输出所有正在运行的单元。该命令通常用来优化系统,缩短启动时间。
- critical-chain:以树状形式输出单元的启动链,并以红色标注延时较长的单元。
- plot:以SVG图像的格式输出服务在什么时间启动以及用了多少时间。
- dot:输出单元依赖图。
- dump:输出详细的、可读的服务状态。
- hostnamectl set-hostname 主机名 修改主机名
- localectl 查看区域信息
- localectl set-locale 修改区域信息
- timedatectl 查看时区信息
- timedatectl set-timezone
- loginctl 查看当前登录用户
- loginctl unlock-sessions 需要验证当前用户password
- loginctl list-users
- loginctl show-user 用户名
- systemctl get-default 获取当前默认目标target
- systemctl set-default multi-user.target 设置默认目标target
- journalctl -u 单元名称 查看日志
apt search 前面字符的意思
Each search result is listed on a separate line. The first character of each line indicates the current state
of the package:
the most common states are p, meaning that no trace of the package exists on the system,
c,meaning that the package was deleted but its configuration files remain on the system,
i, meaning that the package is installed,
v, meaning that the package is virtual.
The second character indicates the stored action (if any; otherwise a blank space is displayed) to be performed on the package,
with the most common actions being i, meaning that the package will be installed,
d, meaning that the package will be deleted,
and p, meaning that the package and its configuration files will be removed.
If the third character is A, the package was automatically installed.
For a complete list of the possible state and action flags, see the section “Accessing Package Information” in
the aptitude reference guide.
简单服务单元配置示例
[Unit]
Description=test for springboot
After=graphical.target
#Wants=graphical.target
#Requires=graphical.target

[Service]
WorkingDirectory=/home/chenhs
ExecStart=java -jar /home/chenhs/test.jar
#ExecStart = /bin/sh /home/chenhs/start.sh
#SuccessExitStatus=143

# security
User=chenhs
Group=chenhs


[Install]
WantedBy=multi-user.target
查看端口
netstat -ln|grep 8080查看端口
查看进程
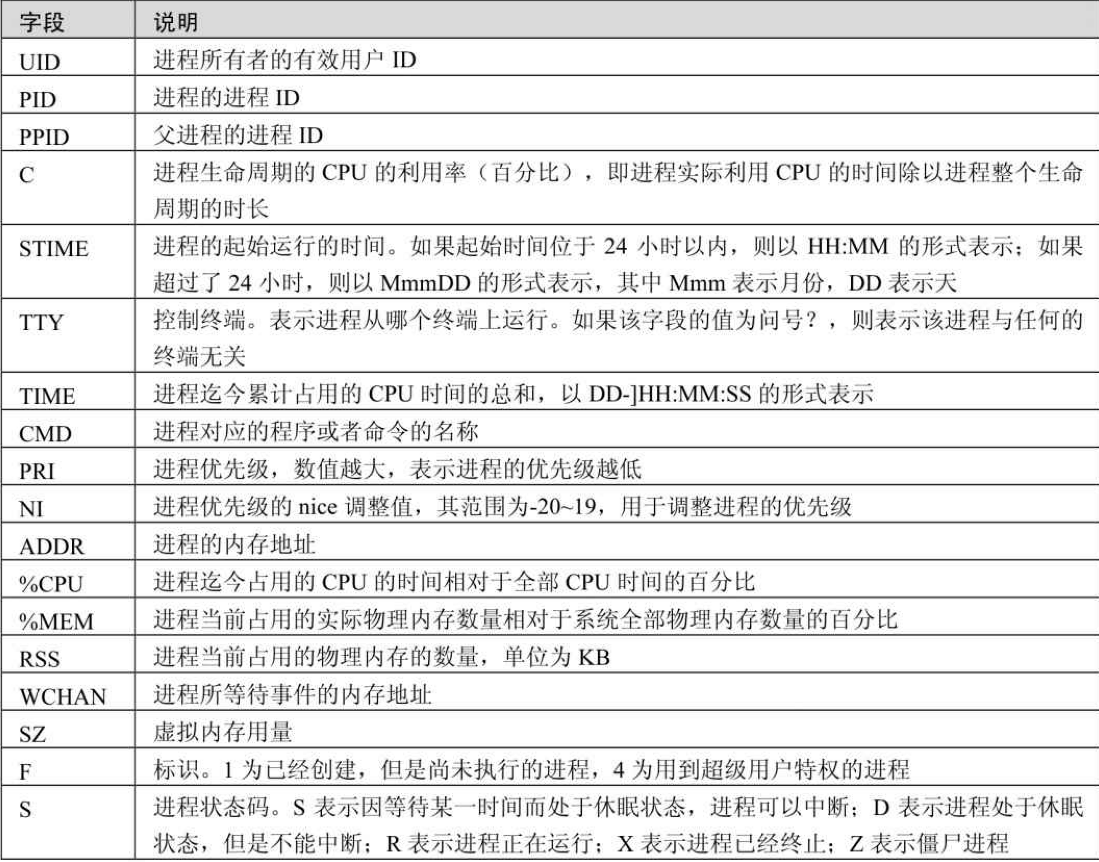
ps -aux|grep java 查看进程
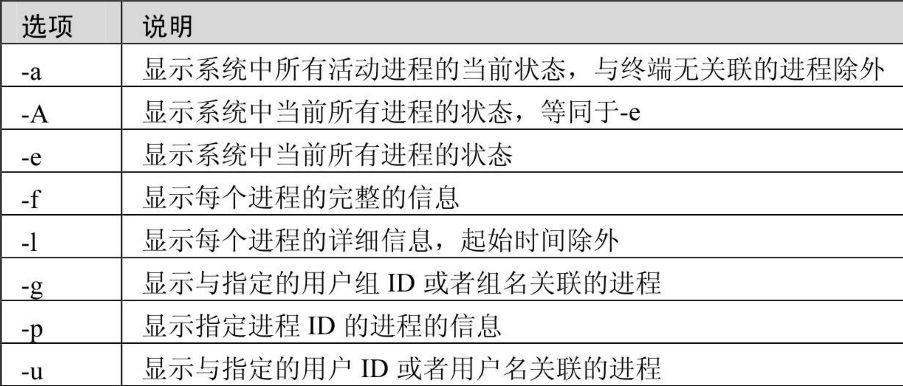
字段解释:
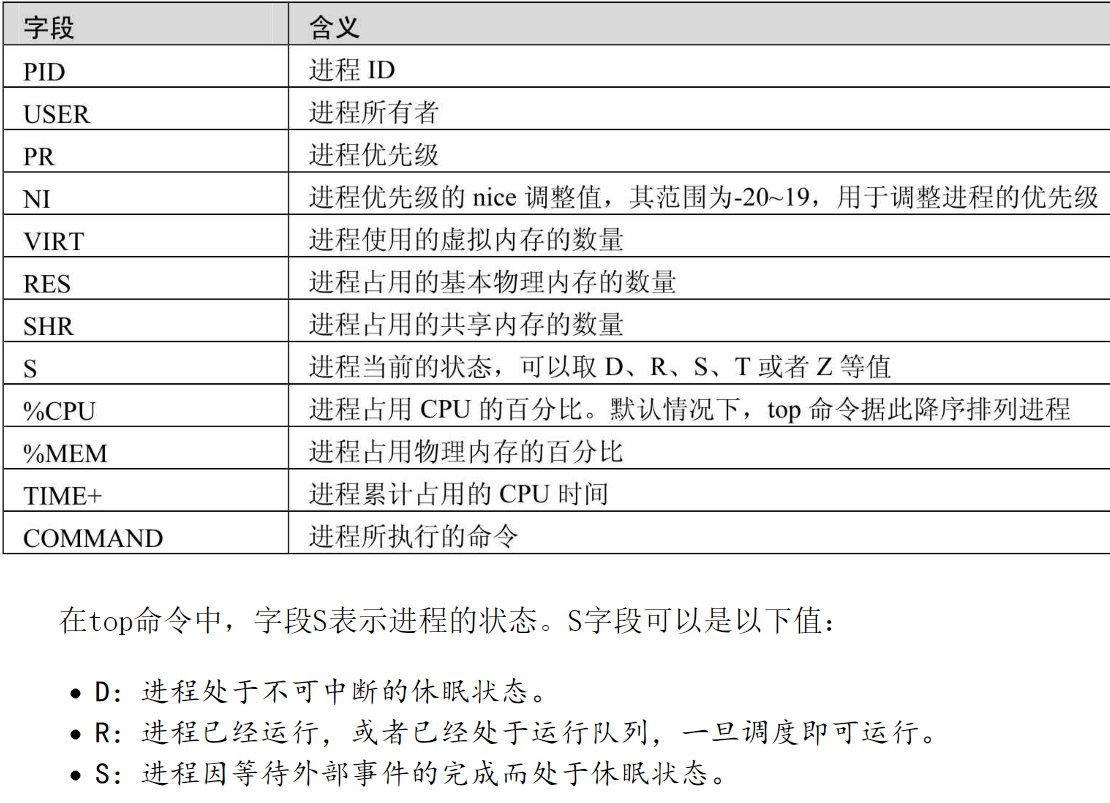
top命令
不挂起(no hang up) nohup [command] &
sudo du -h -d 1 看目录大小,参数-d 1 是目录深度 1
sudo df -h 分区挂载情况
sudo fdisk -l 列出
sudo fdisk /dev/vdb 分区
mkfs.ext4 /dev/vdb1 建文件系统 ext4
mount /dev/vdb1 /data
目录下文件数量 ls -l | grep "^-" | wc -l
开机自动mount 在/etc/fstab 文件中添加配置 /dev/vdb1 /data ext4 defaults 0 0
sudo dpkg -i 软件包名.deb
sudo apt-get remove 软件包名称
mount新硬盘后,原数据被覆盖解决:
思路:利用跳板目录复制原数据到新磁盘,然后更改新磁盘到目标目录
mkdir /new ###跳板目录
mount /dev/sdb1 /new ###首先挂载跳板目录
cp -R /home/* /new ###复制/home目录所有数据到/new先
rm -rf /home/* ####可选,主要为了腾出空间给原来的硬盘
mount /dev/sdb1 /home ###挂载/home 到新硬盘,此时你会神奇的发现之前的/home目录文件已经全部转移过来了,也许你会有点疑问,我并没有复制或移动/new文件到新挂载的/home目录啊,其实此时的/home目录相当于/new目录的硬链接,可以测试下mkdir /new/test 你会发现/home目录也存在test
umount /new ###解除挂载,可能会出现占用无法删除,可以使用 umount -fl 强行卸载,


 浙公网安备 33010602011771号