

k8s集群部署应用----gitlab-runner
环境:
# 打上节点标签

kubectl label nodes  k8s-node-ci1 system.devops=gitlab-runner
kubectl label nodes  k8s-node-ci2 system.devops=gitlab-runner
kubectl label nodes  k8s-node-ci3 system.devops=gitlab-runner

# 防止不相关的pod调度到该节点,我们还需要打上污点

kubectl taint nodes k8s-node-ci1 ci/cd=:NoSchedule
kubectl taint nodes k8s-node-ci2 ci/cd=:NoSchedule
kubectl taint nodes k8s-node-ci3 ci/cd=:NoSchedule

## 本次所有操作均以官方helm char配置提供
## 添加helm repo地址,并更新helm
helm repo add gitlab https://charts.gitlab.io
helm repo update

Hang tight while we grab the latest from your chart repositories...
...Skip local chart repository
...Successfully got an update from the "gitlab" chart repository
...Successfully got an update from the "stable" chart repository
Update Complete.

# 如果没有制定版本,将获取最新的char包
[root@k8s-master-01 gitlab] helm fetch gitlab/gitlab-runne

[root@k8s-master-01 gitlab] tar xf gitlab-runner-0.10.1.tgz

解压得到gitlab-runner目录

## 前期准备工作已经做完了,现在需要我们修改配置了,因为我们直接将chart包down了下来,所以可以直接使用gitlab-runner里面的values.yaml文件,如果你是直接想通过helm install安装 可以重新创建该文件并 -f 指定即可
# vim values.yaml
## The GitLab Server URL (with protocol) that want to register the runner against
## ref: https://docs.gitlab.com/runner/commands/README.html#gitlab-runner-register
##
# 你gitlab的地址,在runenrs能够获取,如果走的外部tls请使用https协议
gitlabUrl: https://xxxxxxx/

## The registration token for adding new Runners to the GitLab server. This must
## be retrieved from your GitLab instance.
## ref: https://docs.gitlab.com/ee/ci/runners/
## 地址: https://docs.gitlab.com/ce/ci/runners/README.html#shared-specific-and-group-runners
# 你的注册码,如果在设置获取的token则创建的runner则为共享runner,所有项目默认走该runner,如果有多个runnenr则随机调度,如果不想这样用可关闭auto devops,自行单独开启
# 也可以在创建groups时候在CI/CD处 runners也能获取到token,顾名思义,创建出来的runner将转为为这个groups使用
# 还有就是直接在project了,跟groups一样
#runnerRegistrationToken: "M_a5FsmY899u4rPsib2k"

#runnerRegistrationToken: "uNQy5pREsmmRX-XUsyE2"
## Set the certsSecretName in order to pass custom certificates for GitLab Runner to use
## Provide resource name for a Kubernetes Secret Object in the same namespace,
## this is used to populate the /etc/gitlab-runner/certs directory
## ref: https://docs.gitlab.com/runner/configuration/tls-self-signed.html#supported-options-for-self-signed-certificates
##
#certsSecretName:

## Configure the maximum number of concurrent jobs
## ref: https://docs.gitlab.com/runner/configuration/advanced-configuration.html#the-global-section
##
concurrent: 100

## Defines in seconds how often to check GitLab for a new builds
## ref: https://docs.gitlab.com/runner/configuration/advanced-configuration.html#the-global-section
##
checkInterval: 30

## For RBAC support:
# 开启权限,否则无法创建pod,
rbac:
  create: true

  ## Run the gitlab-bastion container with the ability to deploy/manage containers of jobs
  ## cluster-wide or only within namespace
  clusterWideAccess: false

  ## If RBAC is disabled in this Helm chart, use the following Kubernetes Service Account name.
  ##
  # serviceAccountName: default

## Configuration for the Pods that the runner launches for each new job
##
runners:
  ## Default container image to use for builds when none is specified
  ## 如果你的构建脚本没有指定镜像,就会用这个
  image: ubuntu:18.04

  ## Run all containers with the privileged flag enabled
  ## This will allow the docker:stable-dind image to run if you need to run Docker
  ## commands. Please read the docs before turning this on:
  ## ref: https://docs.gitlab.com/runner/executors/kubernetes.html#using-docker-dind
  ## 开启特权模式,则启动的容器具有root权限,若需要调用比如docker此类的命令或者挂在外部目录,则需要开启
  privileged: true

  ## Namespace to run Kubernetes jobs in (defaults to 'default')
  ##
  # namespace:

  ## Build Container specific configuration
  ##
  builds:
    # cpuLimit: 200m
    # memoryLimit: 256Mi
    cpuRequests: 100m
    memoryRequests: 128Mi

  ## Service Container specific configuration
  ##
  services:
    # cpuLimit: 200m
    # memoryLimit: 256Mi
    cpuRequests: 100m
    memoryRequests: 128Mi

  ## Helper Container specific configuration
  ##
  helpers:
    # cpuLimit: 200m
    # memoryLimit: 256Mi
    cpuRequests: 100m
    memoryRequests: 128Mi
  # nodeSelector:
  #   system.devops: gitlab-runner
  # 重点,开启缓存服务,在docker下面创建runner服务时,容器往往只会创建一个,每个阶段的cache都在当前容器下,但在k8s中,每个阶段都会独立创建一个pod,也就是说,当你在上一个阶段缓存下来的文件,走到下一个阶段下载下来是空的
  # 所以,我们需要开启s3缓存,如果你的机器在谷歌或者AWS,则直接申请key,按照官方的提示即可,如果没有,则自行创建s3服务,关于s3服务创建在后面会说到
  cache:
    ## General settings
    cacheType: s3
    # s3 启动时加载共享目录的根目录
    cachePath: "export"
    cacheShared: true

    ## S3 settings
    s3ServerAddress: minio.kube-ops:9000
    # 缓存到哪个目录,需指定 因接口的请求方式 是 http://xxxxxx/cachePath/s3BucketName/后面的目录随机生成
    s3BucketName: runner
    s3BucketLocation:
    s3CacheInsecure: true
    secretName: s3access
# 配置gitlab-runner node亲和
affinity:
  nodeAffinity:
    requiredDuringSchedulingIgnoredDuringExecution:
      nodeSelectorTerms:
      - matchExpressions:
        - key: "system.devops"
          operator: In
          values:
          - gitlab-runner

# 配置污点容忍
tolerations:
- key: "ci/cd"
  operator: "Exists"
## 上面的配置说完了,我们的k8s集群是部署在国内的,所以需要自行创建s3缓存服务,如果你不想创建,则需要将工作目录挂载为本地存储或者NFS,pvc等,请自行研究
# s3 deployment配置文件,同时通过NFS挂载了远程目录和s3工作目录 /cache /minio
# 这里注意 服务启动命令是 minio server - /export ,不要搞混了
#
# 参考文档 https://docs.gitlab.com/runner/install/registry_and_cache_servers.html#install-your-own-cache-server
---
apiVersion: apps/v1beta1
kind: Deployment
metadata:
  name: minio
  namespace: kube-ops
spec:
  replicas: 1
  template:
    metadata:
      labels:
        k8s-app: minio
        namespace: kube-ops
    spec:
      affinity:
        nodeAffinity:
          requiredDuringSchedulingIgnoredDuringExecution:
            nodeSelectorTerms:
            - matchExpressions:
              - key: "system.devops"
                operator: In
                values:
                - gitlab-runner
      tolerations:
      - key: "ci/cd"
        operator: "Exists"
      containers:
      - args:
        - server
        - /export
        name: minio
        image: minio/minio:latest
        imagePullPolicy: IfNotPresent
        resources:
          requests:
            memory: "2G"
            cpu: "500m"
          limits:
            memory: "2G"
            cpu: "1000m"
        ports:
        - containerPort: 9000
        volumeMounts:
        - mountPath: /root/.minio
          name: minio
        - mountPath: /export
          name: cache
      volumes:
      - name: minio
        nfs:
          path: /minio
          server: 172.16.100.122
      - name: cache
        nfs:
          path: /cache
          server: 172.16.100.122
---
kind: Service
apiVersion: v1
metadata:
  name: minio
  namespace: kube-ops
spec:
  selector:
    k8s-app: minio
    namespace: kube-ops
  ports:
    - protocol: TCP
      port: 9000
      name: http
# kubectl apply -f minio.yaml 启动服务
# 如果远程挂载或者挂载到本地请提前创建目录 mkdir -p NFS:/cache/runner[root@k8s-master-01 gitlab]# kubectl exec -n kube-ops minio-74ff8c7f64-r2bkg -- cat /export/.minio.sys/config/config.json | grep Key
并给上权限
chown -R 1000:1000 cache
以及所有权
chmod -R 777 cache
最后 kubectl apply -f minio.yaml
minio-74ff8c7f64-r2bkg 1/1 Running 0 2d23h
#启动成功以后会生成accesskey以及secretkey

# 创建secret
kubectl create secret generic s3access \
--from-literal=accesskey="616236ZD08IJJX1I9M02" \
--from-literal=secretkey="VUomlerWfJiBU8MnEx4ZE7w+zcqQRagzHbgE3fGt" -n kube-ops
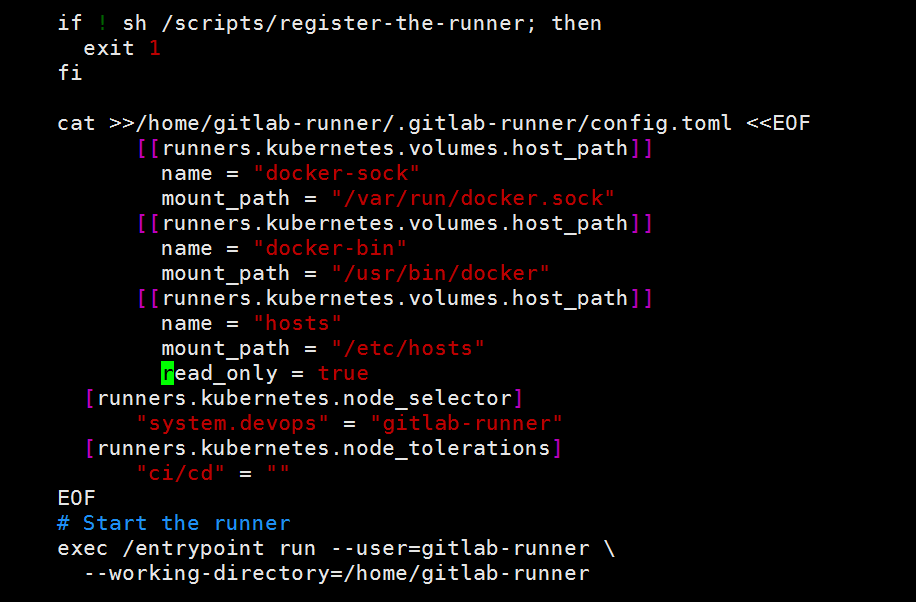
# 关于gitlab-runner绝大多数服务就已结束了,但是当我们做流水线时,创建的pod如果需要执行docker等这些操作时,就会报错, 官方提供了的vloumes字段,但一直不生效,参考了他人的文档后,可以这样,在即将启动runner时候将需要的配置插入进去,同时包括pod的污点以及标签
vim gitlab-runner/templates/configmap.yaml
    cat >>/home/gitlab-runner/.gitlab-runner/config.toml <<EOF
          [[runners.kubernetes.volumes.host_path]]
            name = "docker-sock"
            mount_path = "/var/run/docker.sock"
          [[runners.kubernetes.volumes.host_path]]
            name = "docker-bin"
            mount_path = "/usr/bin/docker"
          # 如果你的git仓库地址配置了外网+域名,那么在做CI时,每次克隆下来的代码都会通过外网拉取,通过挂载宿主机hosts文件将域名指向内网IP
          [[runners.kubernetes.volumes.host_path]]
            name = "hosts"
            mount_path = "/etc/hosts"
            read_only = true
      [runners.kubernetes.node_selector]
          "system.devops" = "gitlab-runner"
      [runners.kubernetes.node_tolerations]
          "ci/cd" = ""
    EOF
# 最后,生成yaml文件
[root@k8s-master-01 gitlab]# helm template gitlab-runner --name gitlab-runner --namespace kube-ops -f values.yaml > gitlab-runner.yaml
[root@k8s-master-01 gitlab]# kubectl apply -f gitlab-runner.yaml -n kube-ops
secret/gitlab-runner-gitlab-runner created
configmap/gitlab-runner-gitlab-runner created
serviceaccount/gitlab-runner-gitlab-runner created
deployment.apps/gitlab-runner-gitlab-runner created
role.rbac.authorization.k8s.io/gitlab-runner-gitlab-runner created
rolebinding.rbac.authorization.k8s.io/gitlab-runner-gitlab-runner created
[root@k8s-master-01 gitlab]# kubectl get pods -n kube-ops -owide
NAME READY STATUS RESTARTS AGE IP NODE NOMINATED NODE READINESS GATES
gitlab-runner-gitlab-runner-64cbbdc4-85z7q 1/1 Running 0 50m 10.244.40.14 k8s-node-ci1 <none> <none>
minio-74ff8c7f64-r2bkg 1/1 Running 0 2d23h 10.244.42.11 k8s-node-ci3 <none> <none>
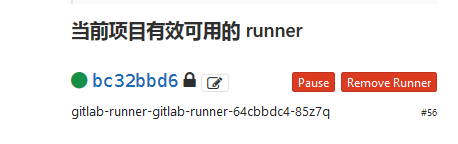
都运行成功了,现在我们需要验证是否生效
## 可以看到我的某个项目下已有该pod了,如果有共享runners,则记得先关闭
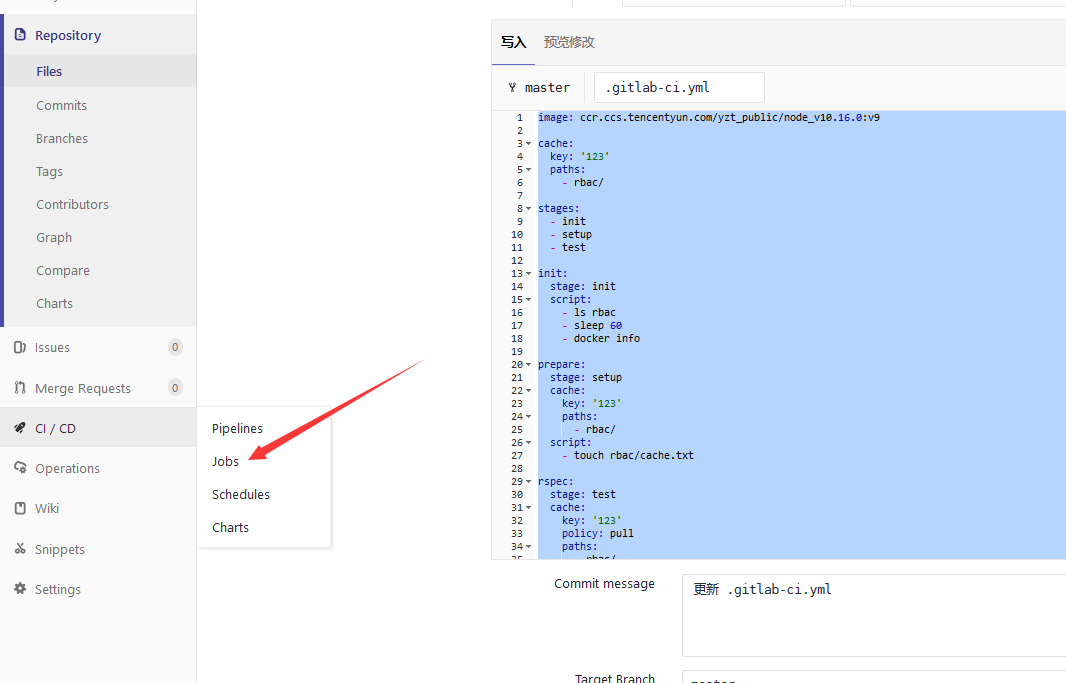
# vim .gitlab-ci.yml,验证cache是否生效,验证docker是否能够使用
image: ccr.ccs.tencentyun.com/yzt_public/node_v10.16.0:v9

cache:
  key: '123'
  paths:
    - rbac/

stages:
  - init
  - setup
  - test

init:
  stage: init
  script:
    - ls rbac
    - docker info

prepare:
  stage: setup
  cache:
    key: '123'
    paths:
      - rbac/
  script:
    - touch rbac/cache.txt

rspec:
  stage: test
  cache:
    key: '123'
    policy: pull
    paths:
      - rbac/
  script:
    - ls rbac/
## 点击提交

查看任务执行结果

## 首先查看第一个stage init ,
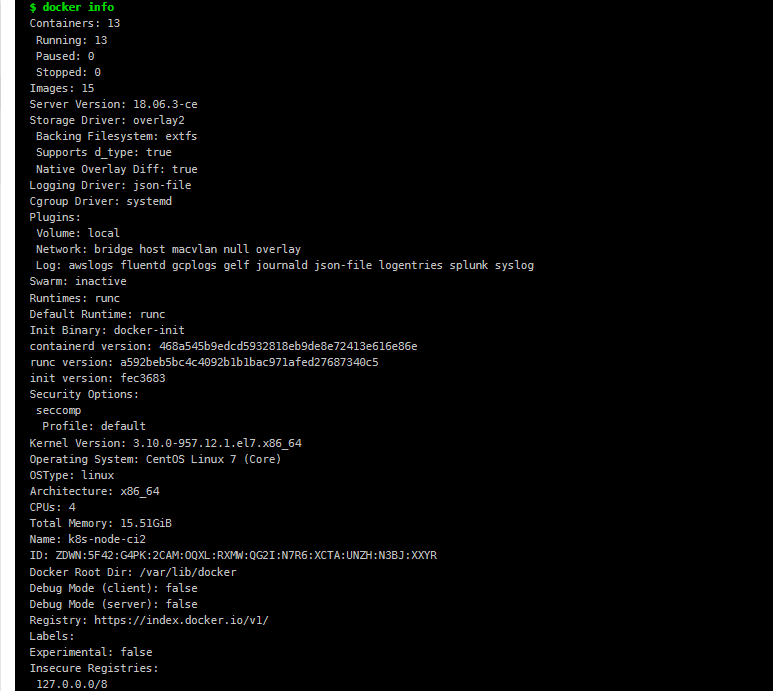
# docker 已挂载成功
在查看最后一个stage,查看cache是否生效

缓存下载成功,并且下载地址正是我们的刚才自行部署的s3共享缓存服务!!
