ubuntu更改国内源
1、个人安装环境
1.1 ubuntu 18.04.1
2、更新源分析
2.1 Ubuntu版本一览表
|
版本号
|
代号
|
发布时间
|
|---|---|---|
| 19.04 | Disco Dingo | 2019/4/19 |
| 18.10 | Cosmic Cuttlefish | 2018/10/18 |
| 18.04 LTS | Bionic Beaver | 2018/04/26 |
| 17.10 | Artful Aardvark | 2017/10/21 |
| 17.04 | Zesty Zapus | 2017/04/13 |
| 16.10 | Yakkety Yak | 2016/10/20 |
| 16.04LTS | Xenial Xerus | 2016/04/21 |
| 15.10 | Wily Werewolf | 2015/10/23 |
| 15.04 | Vivid Vervet | 2015/04/22 |
| 14.10 | Utopic Unicorn | 2014/10/23 |
| 14.04 LTS | Trusty Tahr | 2014/04/18 |
| 13.10 | Saucy Salamander | 2013/10/17 |
| 13.04 | Raring Ringtail | 2013/04/25 |
|
12.10
|
Quantal Quetzal
|
2012/10/18
|
|
12.04 LTS
|
Precise Pangolin
|
2012/04/26
|
|
11.10
|
Oneiric Ocelot
|
2011/10/13
|
|
11.04(Unity成为默认桌面环境)
|
Natty Narwhal
|
2011/04/28
|
|
10.10
|
Maverick Meerkat
|
2010/10/10
|
|
10.04 LTS
|
Lucid Lynx
|
2010/04/29
|
|
9.10
|
Karmic Koala
|
2009/10/29
|
|
9.04
|
Jaunty Jackalope
|
2009/04/23
|
|
8.10
|
Intrepid Ibex
|
2008/10/30
|
|
8.04 LTS
|
Hardy Heron
|
2008/04/24
|
|
7.10
|
Gutsy Gibbon
|
2007/10/18
|
|
7.04
|
Feisty Fawn
|
2007/04/19
|
|
6.10
|
Edgy Eft
|
2006/10/26
|
|
6.06 LTS
|
Dapper Drake
|
2006/06/01
|
|
5.10
|
Breezy Badger
|
2005/10/13
|
|
5.04
|
Hoary Hedgehog
|
2005/04/08
|
|
4.10(初始发布版本)
|
Warty Warthog
|
2004/10/20
|
2.2 更新源格式分析
2.2.1 使用如下命令查看source.list帮助文档:
man sources.list
2.2.2 相应格式信息截取如下:
The format for two one-line-style entries using the deb and deb-src types is:

           deb [ option1=value1 option2=value2 ] uri suite [component1] [component2] [...]
           deb-src [ option1=value1 option2=value2 ] uri suite [component1] [component2] [...]
说明如下:

2.2.3 suite字段的“bionic"代表什么意思?
如上已经列举Ubuntu版本一览表,相信眼尖的童鞋已经看出来了,"bionic"是18.04TLS的版本代号!所以Ubuntu18.04TLS更新源必须为如下格式:
uri bionic component1 component2 component3 component4
网上很多帖子,给出更新源url,而又不介绍自己使用Ubuntu的版本,导致很多童鞋更新源设置错误!
3、常见更新源列举
3.1 中国科技大学源
##中科大源

deb https://mirrors.ustc.edu.cn/ubuntu/ bionic main restricted universe multiverse
deb-src https://mirrors.ustc.edu.cn/ubuntu/ bionic main restricted universe multiverse
deb https://mirrors.ustc.edu.cn/ubuntu/ bionic-updates main restricted universe multiverse
deb-src https://mirrors.ustc.edu.cn/ubuntu/ bionic-updates main restricted universe multiverse
deb https://mirrors.ustc.edu.cn/ubuntu/ bionic-backports main restricted universe multiverse
deb-src https://mirrors.ustc.edu.cn/ubuntu/ bionic-backports main restricted universe multiverse
deb https://mirrors.ustc.edu.cn/ubuntu/ bionic-security main restricted universe multiverse
deb-src https://mirrors.ustc.edu.cn/ubuntu/ bionic-security main restricted universe multiverse
deb https://mirrors.ustc.edu.cn/ubuntu/ bionic-proposed main restricted universe multiverse
deb-src https://mirrors.ustc.edu.cn/ubuntu/ bionic-proposed main restricted universe multiverse
3.2 阿里源
deb http://mirrors.aliyun.com/ubuntu/ bionic main restricted universe multiverse
deb http://mirrors.aliyun.com/ubuntu/ bionic-security main restricted universe multiverse
deb http://mirrors.aliyun.com/ubuntu/ bionic-updates main restricted universe multiverse
deb http://mirrors.aliyun.com/ubuntu/ bionic-proposed main restricted universe multiverse
deb http://mirrors.aliyun.com/ubuntu/ bionic-backports main restricted universe multiverse
deb-src http://mirrors.aliyun.com/ubuntu/ bionic main restricted universe multiverse
deb-src http://mirrors.aliyun.com/ubuntu/ bionic-security main restricted universe multiverse
deb-src http://mirrors.aliyun.com/ubuntu/ bionic-updates main restricted universe multiverse
deb-src http://mirrors.aliyun.com/ubuntu/ bionic-proposed main restricted universe multiverse
deb-src http://mirrors.aliyun.com/ubuntu/ bionic-backports main restricted universe multiverse
3.3 更新源目录分析
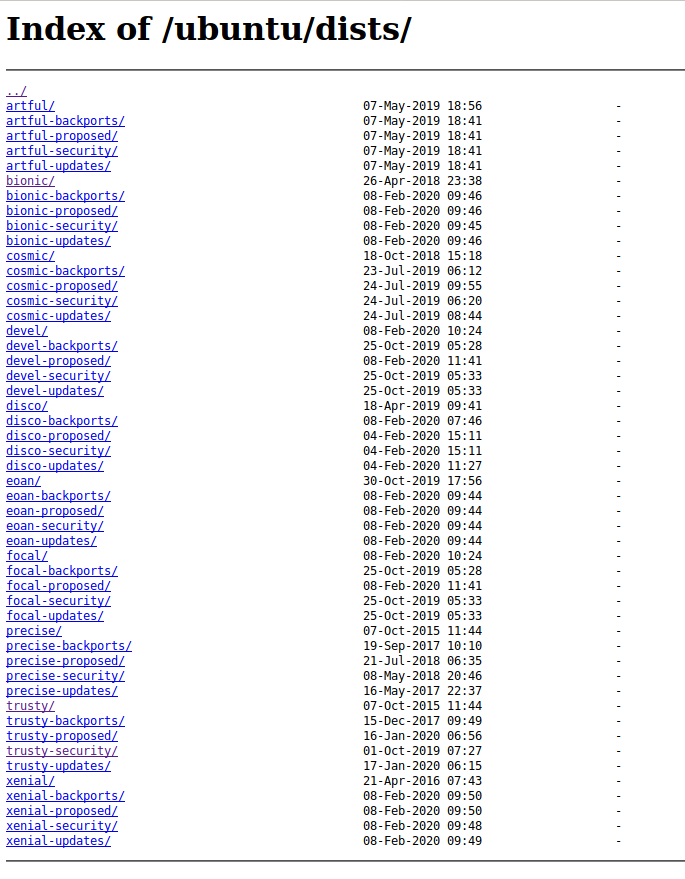
访问http://mirrors.aliyun.com/ubuntu/,目录结构如下:

单击进入dists子目录,不同的目录对应不同的Ubuntu版本代号

但个人也发现,更新源目录层级无法与阿里目录层级完全对应上,清楚的童鞋欢迎给我留言!
http://mirrors.aliyun.com/ubuntu/dists/bionic/main/,目录中已经没有restricted universe multiverse
4、选取速度较快的源
4.1 ping中科大源
ping mirrors.ustc.edu.cn
ping结果:
PING mirrors.ustc.edu.cn (202.141.176.110) 56(84) bytes of data.
64 bytes from mirrors.ustc.edu.cn (202.141.176.110): icmp_seq=1 ttl=128 time=60.9 ms
64 bytes from mirrors.ustc.edu.cn (202.141.176.110): icmp_seq=2 ttl=128 time=55.7 ms
64 bytes from mirrors.ustc.edu.cn (202.141.176.110): icmp_seq=3 ttl=128 time=58.6 ms
64 bytes from mirrors.ustc.edu.cn (202.141.176.110): icmp_seq=4 ttl=128 time=58.0 ms
大概需要60ms
4.2 ping阿里源
ping mirrors.aliyun.com
ping结果:
64 bytes from 58.215.157.229 (58.215.157.229): icmp_seq=1 ttl=128 time=2.87 ms
64 bytes from 58.215.157.229 (58.215.157.229): icmp_seq=2 ttl=128 time=3.21 ms
64 bytes from 58.215.157.229 (58.215.157.229): icmp_seq=3 ttl=128 time=3.36 ms
64 bytes from 58.215.157.229 (58.215.157.229): icmp_seq=4 ttl=128 time=3.14 ms
大概需要3ms,所以我们选择阿里源
5、系统设置
5.1 备份source.list为source.list.bk
sudo mv /etc/apt/sources.list /etc/apt/sources.list.bk
5.2 编辑source.list
sudo vim /etc/apt/sources.list
将速度较快的阿里源地址拷贝,然后替换sources.list中所有内容
5.3 执行命令
sudo apt-get update
sudo apt-get upgrade


 浙公网安备 33010602011771号